Owners Guide
Page 1
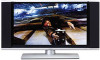
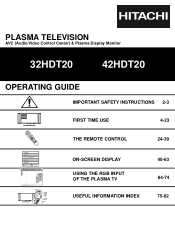
... TIME USE 4-23 THE REMOTE CONTROL 24-39 ON-SCREEN DISPLAY USING THE RGB INPUT OF THE PLASMA TV 40-63 64-74 USEFUL INFORMATION INDEX 75-82 Manager Locks Setup Move SEL Sel STB POWER TV CBL VCR SOURCE WIZARDTAPE CD 2 AMP 3 6 DVD 1 5 9 INFO 4 8 MODE 7 0 ASPECT A/V NET SLEEP...CH SELECT ANT TV/RGB MENU LAST CH GUIDE/TV SCHD VID 4 VID 5 VOL MUTE SVCS VCR PLUS+ VID 2 VID 1 PIP FREEZE VID 3 PIP CH PIP ACCESS VIDEO SWAP PIP MODE REC CLU-5723TSI Video Audio Ch. PLASMA TELEVISION AVC (Audio/Video Control Center) & Plasma Display Monitor 32HDT20 42HDT20 OPERATING GUIDE ...
... TIME USE 4-23 THE REMOTE CONTROL 24-39 ON-SCREEN DISPLAY USING THE RGB INPUT OF THE PLASMA TV 40-63 64-74 USEFUL INFORMATION INDEX 75-82 Manager Locks Setup Move SEL Sel STB POWER TV CBL VCR SOURCE WIZARDTAPE CD 2 AMP 3 6 DVD 1 5 9 INFO 4 8 MODE 7 0 ASPECT A/V NET SLEEP...CH SELECT ANT TV/RGB MENU LAST CH GUIDE/TV SCHD VID 4 VID 5 VOL MUTE SVCS VCR PLUS+ VID 2 VID 1 PIP FREEZE VID 3 PIP CH PIP ACCESS VIDEO SWAP PIP MODE REC CLU-5723TSI Video Audio Ch. PLASMA TELEVISION AVC (Audio/Video Control Center) & Plasma Display Monitor 32HDT20 42HDT20 OPERATING GUIDE ...
Owners Guide
Page 5
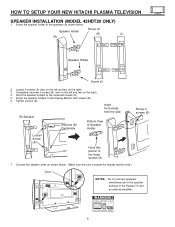
... in screws (B) Loosen Screw (A) Hook this portion to the speaker terminal of the Plasma TV and an external amplifier. 5 Loosen 4 screws (A) (two on the left and two on the right). 3. HOW TO SETUP YOUR NEW HITACHI PLASMA TELEVISION SPEAKER INSTALLATION (MODEL 42HDT20 ONLY) 1. Connect the speaker wires as shown below . (Make sure the core is...
... in screws (B) Loosen Screw (A) Hook this portion to the speaker terminal of the Plasma TV and an external amplifier. 5 Loosen 4 screws (A) (two on the left and two on the right). 3. HOW TO SETUP YOUR NEW HITACHI PLASMA TELEVISION SPEAKER INSTALLATION (MODEL 42HDT20 ONLY) 1. Connect the speaker wires as shown below . (Make sure the core is...
Owners Guide
Page 7
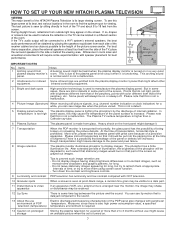
...for viewing. This is not a defect. 5 Display panel surface The plasma display panel is transported horizontally, the glass panel has the possibility of the picture screen center. The Plasma TV surface temperature is delayed compared to the sound. 13 About the use ...sound might damage it is turned on . 7 But in some cases, this large screen at the time of shipment.(There is a possibility that of the HITACHI Plasma Television is functioning. BEST VERTICAL VIEWING 20 ANGLE 3' 0' 5' 10' 15' 20' R 4" Minimum 4" Minimum S 50 BEST HORIZONTAL 5' 10' 15...
...for viewing. This is not a defect. 5 Display panel surface The plasma display panel is transported horizontally, the glass panel has the possibility of the picture screen center. The Plasma TV surface temperature is delayed compared to the sound. 13 About the use ...sound might damage it is turned on . 7 But in some cases, this large screen at the time of shipment.(There is a possibility that of the HITACHI Plasma Television is functioning. BEST VERTICAL VIEWING 20 ANGLE 3' 0' 5' 10' 15' 20' R 4" Minimum 4" Minimum S 50 BEST HORIZONTAL 5' 10' 15...
Owners Guide
Page 10
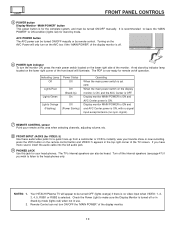
..., with no signal input except antenna (no video input when VIDEO: 1, 2, 3, 4, 5, RGB1 or RGB2 is selected. The TV's internal speakers can not turn ON/OFF the "MAIN POWER" of the monitor. Your HITACHI Plasma TV will illuminate. It is recommended to leave the "MAIN POWER" to the head-phones only. signal). ቨ REMOTE... use. Display monitor MAIN POWER is ON and AVC Center power is set OFF. press the VID5 button on the lower right corner of the TV screen. If you wish to listen to ON condition (lights red) for stand-by mode (lights red) when not in the top right corner...
..., with no signal input except antenna (no video input when VIDEO: 1, 2, 3, 4, 5, RGB1 or RGB2 is selected. The TV's internal speakers can not turn ON/OFF the "MAIN POWER" of the monitor. Your HITACHI Plasma TV will illuminate. It is recommended to leave the "MAIN POWER" to the head-phones only. signal). ቨ REMOTE... use. Display monitor MAIN POWER is ON and AVC Center power is set OFF. press the VID5 button on the lower right corner of the TV screen. If you wish to listen to ON condition (lights red) for stand-by mode (lights red) when not in the top right corner...
Owners Guide
Page 14
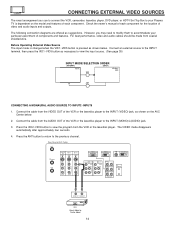
...:1 VID1 ANT CONNECTING A MONAURAL AUDIO SOURCE TO INPUT2~INPUT5 1. CONNECTING EXTERNAL VIDEO SOURCES The exact arrangement you may need to modify them to accommodate your Plasma TV is pressed as shown below . 2. Check the owner's manual of each component. The following connection diagrams are offered as shown on the model and features... TO MONITOR Y/VIDEO INPUT 2 Y AUDIO PB (MONO) L PB INPUT 1 AUDIO (MONO) L PR PR R R AUDIO R L AUDIOR L AUDIOR L AUDIO OUT IR BLASTER AUDIO OUT VIDEO OUT VCR Hitachi Model or Similar Model 14
...:1 VID1 ANT CONNECTING A MONAURAL AUDIO SOURCE TO INPUT2~INPUT5 1. CONNECTING EXTERNAL VIDEO SOURCES The exact arrangement you may need to modify them to accommodate your Plasma TV is pressed as shown below . 2. Check the owner's manual of each component. The following connection diagrams are offered as shown on the model and features... TO MONITOR Y/VIDEO INPUT 2 Y AUDIO PB (MONO) L PB INPUT 1 AUDIO (MONO) L PR PR R R AUDIO R L AUDIOR L AUDIOR L AUDIO OUT IR BLASTER AUDIO OUT VIDEO OUT VCR Hitachi Model or Similar Model 14

Owners Guide
Page 18
..., See page 23 VCR or other external components 18 CONNECTING EXTERNAL AUDIO/VIDEO SOURCES CONNECTING EXTERNAL AUDIO AMPLIFIER To monitor the audio level of the Plasma TV to INPUT2, no monitor out is available for this output. The AUDIO OUT terminal outputs all audio sources (ANT A/B, INPUT 1~5 and RGB 1/2). Rear Panel of... INPUT2~5 only. It does not output component video or RGB 1/2. The "AUDIO OUT" from the AVC center is controlled by the amplifier, not by the Plasma Television.
..., See page 23 VCR or other external components 18 CONNECTING EXTERNAL AUDIO/VIDEO SOURCES CONNECTING EXTERNAL AUDIO AMPLIFIER To monitor the audio level of the Plasma TV to INPUT2, no monitor out is available for this output. The AUDIO OUT terminal outputs all audio sources (ANT A/B, INPUT 1~5 and RGB 1/2). Rear Panel of... INPUT2~5 only. It does not output component video or RGB 1/2. The "AUDIO OUT" from the AVC center is controlled by the amplifier, not by the Plasma Television.
Owners Guide
Page 19
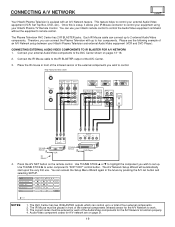
...which can access the Setup Menu Wizard again in front of the infrared sensor of an A/V Network setup between your Hitachi Plasma Television and external Audio/Video equipment (VCR and DVD Player). The A/V Network Setup Wizard will automatically start upon the very ...R L Infrared Sensor IR Mouse V L R OUTPUT VCR Infrared Sensor DVD Player 4. Use THUMB STICK ̈ to control your equipment using your Hitachi Plasma TV Remote Control. Connect the IR Mouse cable to function properly. 4. Rear Panel of the Audio/Video components for A/V network are on the remote control....
...which can access the Setup Menu Wizard again in front of the infrared sensor of an A/V Network setup between your Hitachi Plasma Television and external Audio/Video equipment (VCR and DVD Player). The A/V Network Setup Wizard will automatically start upon the very ...R L Infrared Sensor IR Mouse V L R OUTPUT VCR Infrared Sensor DVD Player 4. Use THUMB STICK ̈ to control your equipment using your Hitachi Plasma TV Remote Control. Connect the IR Mouse cable to function properly. 4. Rear Panel of the Audio/Video components for A/V network are on the remote control....
Owners Guide
Page 24
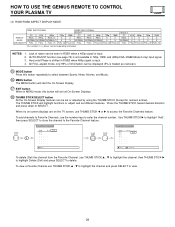
...remote to control and press the CD, TAPE or AMP button. CLU-5723TSI 24 The TV button will blink, indicating that the remote will not appear to control your VCR.) To operate your HITACHI Plasma TV, the new remote control is designed to operate different types of the AVC box/Display Monitor... and press the TV button. The STB button will blink, indicating that the remote will stay on your...
...remote to control and press the CD, TAPE or AMP button. CLU-5723TSI 24 The TV button will blink, indicating that the remote will not appear to control your VCR.) To operate your HITACHI Plasma TV, the new remote control is designed to operate different types of the AVC box/Display Monitor... and press the TV button. The STB button will blink, indicating that the remote will stay on your...
Owners Guide
Page 25
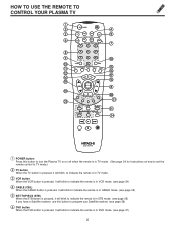
HOW TO USE THE REMOTE TO CONTROL YOUR PLASMA TV ት POWER TV DVD VCR CBL SOURCE WIZARD CD TAPE STB AMP 1 2 3 4 5 6 7 8 9 SLEEP 0 INFO ANT TV/RGB A/V NET ASPECT MODE MENU EXIT VOL SELECT CH SVCS VID 1 MUTE VCR PLUS+ LAST CH GUIDE/TV SCHD VID 5 VID 2 PIP VID 3 PIP CH VID 4 FREEZE ...-5723TSI ᕃ POWER button Press this button to turn the Plasma TV on or off when the remote is in TV mode. (See page 24 for instructions on how to set the remote control to TV mode.) ባ TV button When the TV button is pressed, it will blink, to indicate the remote ...
HOW TO USE THE REMOTE TO CONTROL YOUR PLASMA TV ት POWER TV DVD VCR CBL SOURCE WIZARD CD TAPE STB AMP 1 2 3 4 5 6 7 8 9 SLEEP 0 INFO ANT TV/RGB A/V NET ASPECT MODE MENU EXIT VOL SELECT CH SVCS VID 1 MUTE VCR PLUS+ LAST CH GUIDE/TV SCHD VID 5 VID 2 PIP VID 3 PIP CH VID 4 FREEZE ...-5723TSI ᕃ POWER button Press this button to turn the Plasma TV on or off when the remote is in TV mode. (See page 24 for instructions on how to set the remote control to TV mode.) ባ TV button When the TV button is pressed, it will blink, to indicate the remote ...
Owners Guide
Page 26
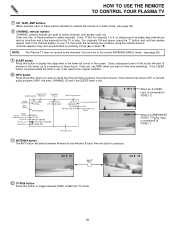
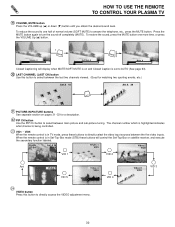
... CH PIP ACCESS VIDEO SWAP PIP MODE REC CLU-5723TSI HOW TO USE THE REMOTE TO CONTROL YOUR PLASMA TV ቨ CD, TAPE, AMP buttons When pressed, each time the button is pressed. For channels 100...next to VIDEO: 3. IN: 3 When an S-VIDEO Input is connected to the channel display on your TV, then enter the remaining two numbers using the number buttons. YPBPR:1 When a COMPONENT VIDEO: Y-PBPR ...01 Channel ID/Video ID Time PIP/Sub-Picture Source PIP/Sub-Picture S - NOTE: The Plasma TV may also be performed by pressing CH up to a maximum of these buttons will blink to ...
... CH PIP ACCESS VIDEO SWAP PIP MODE REC CLU-5723TSI HOW TO USE THE REMOTE TO CONTROL YOUR PLASMA TV ቨ CD, TAPE, AMP buttons When pressed, each time the button is pressed. For channels 100...next to VIDEO: 3. IN: 3 When an S-VIDEO Input is connected to the channel display on your TV, then enter the remaining two numbers using the number buttons. YPBPR:1 When a COMPONENT VIDEO: Y-PBPR ...01 Channel ID/Video ID Time PIP/Sub-Picture Source PIP/Sub-Picture S - NOTE: The Plasma TV may also be performed by pressing CH up to a maximum of these buttons will blink to ...
Owners Guide
Page 27
...Use THUMBSTICK to navigate and SELECT to control external components with the Plasma TV's remote control. The command on top. The button at the lower right side indicates that there are called "Soft Keys". Cable Box Amplifier DVD TV/VCR b MORE THUMB STICK SELECT MENU SELECT MORE EXIT Move Move...always stay on the button is passed through the IR mouse and onto the AUDIO/VIDEO equipment. HOW TO USE THE REMOTE TO CONTROL YOUR PLASMA TV ቯ A/V NET button Press this button to access the Audio/Video network (A/V Net) menu. When you wish to highlight the equipment you...
...Use THUMBSTICK to navigate and SELECT to control external components with the Plasma TV's remote control. The command on top. The button at the lower right side indicates that there are called "Soft Keys". Cable Box Amplifier DVD TV/VCR b MORE THUMB STICK SELECT MENU SELECT MORE EXIT Move Move...always stay on the button is passed through the IR mouse and onto the AUDIO/VIDEO equipment. HOW TO USE THE REMOTE TO CONTROL YOUR PLASMA TV ቯ A/V NET button Press this button to access the Audio/Video network (A/V Net) menu. When you wish to highlight the equipment you...
Owners Guide
Page 28
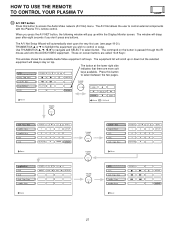
HOW TO USE THE REMOTE TO CONTROL YOUR PLASMA TV ተ ASPECT button Press this button to display conventional (4:3) images. Phosphors in on the input signal, the picture format ratio allows you select for an ...
HOW TO USE THE REMOTE TO CONTROL YOUR PLASMA TV ተ ASPECT button Press this button to display conventional (4:3) images. Phosphors in on the input signal, the picture format ratio allows you select for an ...
Owners Guide
Page 29
... note below. Press the THUMB STICK toward desired direction and press down to the Favorite Channel feature. When no on-screen displays are on the TV screen, use THUMB STICK ̆ , ̄ to highlight the channel and press SELECT to access the Favorite Channels feature. To add channels to Favorite Channels... Select To delete (Del) the channel from the Favorite Channel, use the number keys to delete. HOW TO USE THE GENIUS REMOTE TO CONTROL YOUR PLASMA TV (4) RGB1/RGB2 ASPECT DISPLAY MODE.
... note below. Press the THUMB STICK toward desired direction and press down to the Favorite Channel feature. When no on-screen displays are on the TV screen, use THUMB STICK ̆ , ̄ to highlight the channel and press SELECT to access the Favorite Channels feature. To add channels to Favorite Channels... Select To delete (Del) the channel from the Favorite Channel, use the number keys to delete. HOW TO USE THE GENIUS REMOTE TO CONTROL YOUR PLASMA TV (4) RGB1/RGB2 ASPECT DISPLAY MODE.
Owners Guide
Page 30
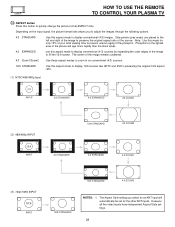
... PLUS+ VID 2 VID 1 PIP FREEZE VID 3 PIP CH PIP ACCESS VIDEO SWAP PIP MODE REC CLU-5723TSI HOW TO USE THE REMOTE TO CONTROL YOUR PLASMA TV ት VOLUME, MUTE button Press the VOLUME up (̆) or down (̄) button until you obtain the desired sound level. PIP CH button Use the... and sub-picture tuning. The channel number which is highlighted indicates what channel is being controlled. 23 VID1 ~ VID5 When the remote control is in TV mode, press these buttons will display when MUTE/SOFT MUTE is on and Closed Caption is in Set-Top-Box mode (STB) these buttons to...
... PLUS+ VID 2 VID 1 PIP FREEZE VID 3 PIP CH PIP ACCESS VIDEO SWAP PIP MODE REC CLU-5723TSI HOW TO USE THE REMOTE TO CONTROL YOUR PLASMA TV ት VOLUME, MUTE button Press the VOLUME up (̆) or down (̄) button until you obtain the desired sound level. PIP CH button Use the... and sub-picture tuning. The channel number which is highlighted indicates what channel is being controlled. 23 VID1 ~ VID5 When the remote control is in TV mode, press these buttons will display when MUTE/SOFT MUTE is on and Closed Caption is in Set-Top-Box mode (STB) these buttons to...
Owners Guide
Page 31
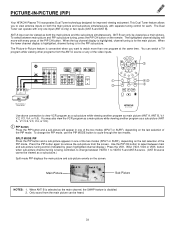
... ASPECT EXIT SELECT SVCS MUTE VID 2 VID 1 VCR PLUS+ CH PIP LAST CH PIP MODE PIP VID CH 3 GUIDE/TV VID 4 SCHD VID 5 SWAP PIP ACCESS FREEZE REC VIDEO CLU-5723TSI Your HITACHI Plasma TV incorporates Dual Tuner technology designed for the PIP sub-picture. When the top channel display is highlighted, channel tuning...
... ASPECT EXIT SELECT SVCS MUTE VID 2 VID 1 VCR PLUS+ CH PIP LAST CH PIP MODE PIP VID CH 3 GUIDE/TV VID 4 SCHD VID 5 SWAP PIP ACCESS FREEZE REC VIDEO CLU-5723TSI Your HITACHI Plasma TV incorporates Dual Tuner technology designed for the PIP sub-picture. When the top channel display is highlighted, channel tuning...

Owners Guide
Page 38
... component. (refer to Audio mode. ባ PRECODED AUDIO Buttons These buttons transmit the chosen precoded Audio component codes. ቤ EXCLUSIVE TV Buttons These buttons are removed from the remote control. Be sure to operate different types of your Audio component's code has not been...button on page 39. You must first program the remote to control another Audio component. NOTES: 1. This remote is programmed for operating the Plasma TV. If the Audio component does not turn off , try a different two digit preset code. 6. The remote will remember the codes you ...
... component. (refer to Audio mode. ባ PRECODED AUDIO Buttons These buttons transmit the chosen precoded Audio component codes. ቤ EXCLUSIVE TV Buttons These buttons are removed from the remote control. Be sure to operate different types of your Audio component's code has not been...button on page 39. You must first program the remote to control another Audio component. NOTES: 1. This remote is programmed for operating the Plasma TV. If the Audio component does not turn off , try a different two digit preset code. 6. The remote will remember the codes you ...
Owners Guide
Page 40
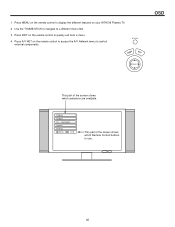
Press MENU on the remote control to display the different features on the remote control to use. 40 Press EXIT on your HITACHI Plasma TV. 2. Press A/V NET on the remote control to access the A/V Network menu to a different menu item. 3. Video Audio Ch. A/V Net MENU EXIT SELECT OSD This part of the screen shows which selections are available. Manager Locks Setup Move SEL Sel This part of the screen shows which Remote Control buttons to quickly exit from a menu. 4. 1. Use the THUMB STICK to navigate to control external components.
Press MENU on the remote control to display the different features on the remote control to use. 40 Press EXIT on your HITACHI Plasma TV. 2. Press A/V NET on the remote control to access the A/V Network menu to a different menu item. 3. Video Audio Ch. A/V Net MENU EXIT SELECT OSD This part of the screen shows which selections are available. Manager Locks Setup Move SEL Sel This part of the screen shows which Remote Control buttons to quickly exit from a menu. 4. 1. Use the THUMB STICK to navigate to control external components.
Owners Guide
Page 44
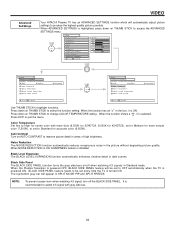
...bottom gray bar will appear in dark scenes. VIDEO Advanced Settings Your HITACHI Plasma TV has an ADVANCED SETTINGS function which will be set every time the TV is powered ON. When the function shows a " ", it is... quit the menu. BLACK SIDE PANEL feature needs to be set to OFF automatically when the TV is turned ON. Noise Reduction The NOISE REDUCTION function automatically reduces conspicuous noise in Standard mode....signal with more blue (9,300K for 32HDT20, 9,200K for 42HDT20), set to Medium for more natural color (7,500K), or set to Standard for accurate color (6,500K).
...bottom gray bar will appear in dark scenes. VIDEO Advanced Settings Your HITACHI Plasma TV has an ADVANCED SETTINGS function which will be set every time the TV is powered ON. When the function shows a " ", it is... quit the menu. BLACK SIDE PANEL feature needs to be set to OFF automatically when the TV is turned ON. Noise Reduction The NOISE REDUCTION function automatically reduces conspicuous noise in Standard mode....signal with more blue (9,300K for 32HDT20, 9,200K for 42HDT20), set to Medium for more natural color (7,500K), or set to Standard for accurate color (6,500K).
Owners Guide
Page 45
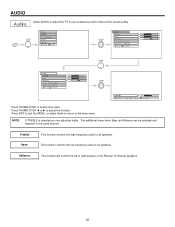
... STICK SELECT Treble Next/Prev Change Value 50% SEL Return Press THUMB STICK to improve the sound quality. AUDIO Audio Select AUDIO to adjust the TV to your preference and to select menu item. NOTE: If TREBLE is selected you are adjusting treble. Balance This function will control the left to...
... STICK SELECT Treble Next/Prev Change Value 50% SEL Return Press THUMB STICK to improve the sound quality. AUDIO Audio Select AUDIO to adjust the TV to your preference and to select menu item. NOTE: If TREBLE is selected you are adjusting treble. Balance This function will control the left to...

Owners Guide
Page 47
...STICK to select the function setting. Press down on listening conditions. Audio Source Multi-Channel Television Sound will allow you to OFF, the Plasma TV speakers and the sub-woofer output are received (monaural is noisy, this feature OFF. When set to select STEREO (a stereo broadcast),...speakers. Auto Noise Cancel This function eliminates the noise between stations. The source you prefer to improve the sound performance of the TV. AUDIO Advanced Settings Use ADVANCED SETTINGS to use only speakers from a separate stereo system, turn this function will automatically eliminate ...
...STICK to select the function setting. Press down on listening conditions. Audio Source Multi-Channel Television Sound will allow you to OFF, the Plasma TV speakers and the sub-woofer output are received (monaural is noisy, this feature OFF. When set to select STEREO (a stereo broadcast),...speakers. Auto Noise Cancel This function eliminates the noise between stations. The source you prefer to improve the sound performance of the TV. AUDIO Advanced Settings Use ADVANCED SETTINGS to use only speakers from a separate stereo system, turn this function will automatically eliminate ...


