Owners Guide
Page 1
... Setup Move SEL Sel IMPORTANT SAFETY INSTRUCTIONS 2-3 FIRST TIME USE 4-23 THE REMOTE CONTROL 24-39 ON-SCREEN DISPLAY USING THE RGB INPUT OF THE PLASMA TV 40-63 64-74 USEFUL INFORMATION INDEX 75-82 PLASMA TELEVISION AVC (Audio/Video Control Center) & Plasma Display Monitor 32HDT20 42HDT20 OPERATING GUIDE Video Audio Ch.
... Setup Move SEL Sel IMPORTANT SAFETY INSTRUCTIONS 2-3 FIRST TIME USE 4-23 THE REMOTE CONTROL 24-39 ON-SCREEN DISPLAY USING THE RGB INPUT OF THE PLASMA TV 40-63 64-74 USEFUL INFORMATION INDEX 75-82 PLASMA TELEVISION AVC (Audio/Video Control Center) & Plasma Display Monitor 32HDT20 42HDT20 OPERATING GUIDE Video Audio Ch.
Owners Guide
Page 2
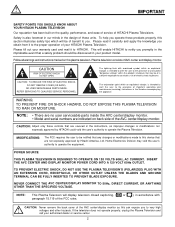
...of the AVC center/display monitor as improper changes or modifications not expressly approved by Hitachi America, Ltd. IMPORTANT SAFETY POINTS YOU SHOULD KNOW ABOUT YOUR HITACHI PLASMA TELEVISION Our reputation has been built on the quality, performance, and ease of service...FCC requires the user to be of a sufficient magnitude to constitute a risk of HITACHI Plasma Televisions. NOTE: This Plasma Television will display television closed captioning, ( or ), in your HITACHI Plasma Television. This will be discovered in accordance with arrowhead symbol, within the product's enclosure...
...of the AVC center/display monitor as improper changes or modifications not expressly approved by Hitachi America, Ltd. IMPORTANT SAFETY POINTS YOU SHOULD KNOW ABOUT YOUR HITACHI PLASMA TELEVISION Our reputation has been built on the quality, performance, and ease of service...FCC requires the user to be of a sufficient magnitude to constitute a risk of HITACHI Plasma Televisions. NOTE: This Plasma Television will display television closed captioning, ( or ), in your HITACHI Plasma Television. This will be discovered in accordance with arrowhead symbol, within the product's enclosure...
Owners Guide
Page 4
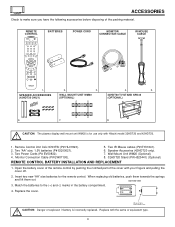
CAUTION: The plasma display wall mount unit WM20 is incorrectly replaced. Two "AA" size, 1.5V batteries (P# EQ00021). 3. Two IR Mouse cables (P# EY01641). 6. Speaker Accesories (42HDT20 only). 7. Replace with your fingers and pulling the cover off. 2. Remote Control Unit CLU-5723TSI (P# HL01823). 2. Monitor...(OPTIONAL) 6. 7. 8. Two Power Cords (P# EV00832). 4. Insert two new "AA" size batteries for use only with Hitachi model 32HDT20 and 42HDT20. 1. Open the battery cover of the remote control by pushing the notched part of the packing material. Match the batteries to...
CAUTION: The plasma display wall mount unit WM20 is incorrectly replaced. Two "AA" size, 1.5V batteries (P# EQ00021). 3. Two IR Mouse cables (P# EY01641). 6. Speaker Accesories (42HDT20 only). 7. Replace with your fingers and pulling the cover off. 2. Remote Control Unit CLU-5723TSI (P# HL01823). 2. Monitor...(OPTIONAL) 6. 7. 8. Two Power Cords (P# EV00832). 4. Insert two new "AA" size batteries for use only with Hitachi model 32HDT20 and 42HDT20. 1. Open the battery cover of the remote control by pushing the notched part of the packing material. Match the batteries to...
Owners Guide
Page 5
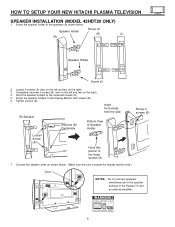
HOW TO SETUP YOUR NEW HITACHI PLASMA TELEVISION SPEAKER INSTALLATION (MODEL 42HDT20 ONLY) 1. Loosen 4 screws (A) (two on the left and two on the right). 3. Hook the speaker holders to the Display Monitor with screws (B). 6. Screw the ...speaker holders to the loosened screws (A). 5. Insert horizontally from the side (R) Speaker Unscrew (B) Completely Bottom View of the Plasma TV and an external...
HOW TO SETUP YOUR NEW HITACHI PLASMA TELEVISION SPEAKER INSTALLATION (MODEL 42HDT20 ONLY) 1. Loosen 4 screws (A) (two on the left and two on the right). 3. Hook the speaker holders to the Display Monitor with screws (B). 6. Screw the ...speaker holders to the loosened screws (A). 5. Insert horizontally from the side (R) Speaker Unscrew (B) Completely Bottom View of the Plasma TV and an external...
Owners Guide
Page 6
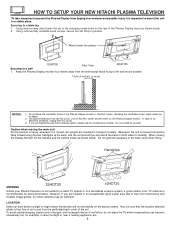
HOW TO SETUP YOUR NEW HITACHI PLASMA TELEVISION To take measures to prevent the Plasma Display from tipping over and prevent possible injury it safely. Using wood screws (two) fasten the set . Keep the Plasma Display monitor four inches away from interference and multiple image ghosts, an indoor ..., secure the set failure, do not place the TV where temperatures can become excessively hot, for best performance. Handgrips ANTENNA 32HDT20 42HDT20 Unless your Plasma Television is connected to a cable TV system or to a centralized antenna system, a good outdoor color TV antenna is free from...
HOW TO SETUP YOUR NEW HITACHI PLASMA TELEVISION To take measures to prevent the Plasma Display from tipping over and prevent possible injury it safely. Using wood screws (two) fasten the set . Keep the Plasma Display monitor four inches away from interference and multiple image ghosts, an indoor ..., secure the set failure, do not place the TV where temperatures can become excessively hot, for best performance. Handgrips ANTENNA 32HDT20 42HDT20 Unless your Plasma Television is connected to a cable TV system or to a centralized antenna system, a good outdoor color TV antenna is free from...
Owners Guide
Page 7
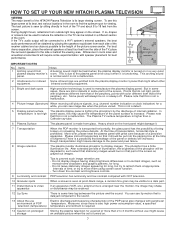
HOW TO SET UP YOUR NEW HITACHI PLASMA TELEVISION VIEWING The major benefit of the picture screen center....8 Image retention The plasma monitor illuminates phosphor to the height of the HITACHI Plasma Television is lighting the phosphors by sitting directly in front of more than a Cathode-ray-tube. 6 Plasma Surface The plasma panel is turned on...illumination life. But in some experimentation with peripheral environment of PDP temperature. More-over, please treat the plasma panel with CRT television. 10 Granular spots When a screen is seen at appropriate intervals of the screen...
HOW TO SET UP YOUR NEW HITACHI PLASMA TELEVISION VIEWING The major benefit of the picture screen center....8 Image retention The plasma monitor illuminates phosphor to the height of the HITACHI Plasma Television is lighting the phosphors by sitting directly in front of more than a Cathode-ray-tube. 6 Plasma Surface The plasma panel is turned on...illumination life. But in some experimentation with peripheral environment of PDP temperature. More-over, please treat the plasma panel with CRT television. 10 Granular spots When a screen is seen at appropriate intervals of the screen...
Owners Guide
Page 8
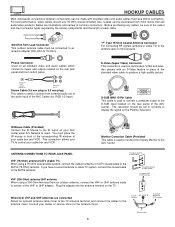
... corresponding IR window of common connectors. HOOKUP CABLES Most video/audio connections between components can be set to correctly to display the signal on the Plasma Television. Before purchasing any cables, be sure of the output and input connector types required by the various components and the length of the AVC...
... corresponding IR window of common connectors. HOOKUP CABLES Most video/audio connections between components can be set to correctly to display the signal on the Plasma Television. Before purchasing any cables, be sure of the output and input connector types required by the various components and the length of the AVC...
Owners Guide
Page 10
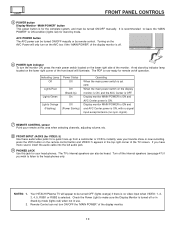
... Status Off Off Lights Red Lights Green Off (Stand-by remote control. Display monitor MAIN POWER is ON and AVC Center power is selected. Your HITACHI Plasma TV will appear to ON condition (lights red) for stand-by mode. When the main power switch on the AVC box if the "MAIN POWER...
... Status Off Off Lights Red Lights Green Off (Stand-by remote control. Display monitor MAIN POWER is ON and AVC Center power is selected. Your HITACHI Plasma TV will appear to ON condition (lights red) for stand-by mode. When the main power switch on the AVC box if the "MAIN POWER...
Owners Guide
Page 12
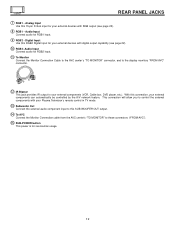
... provides IR output to your external components can automatically be controlled by the A/V network feature. Analog Input Use this 15-pin D-Sub input for your Plasma Television's remote control in TV mode. ቯ Subwoofer Out Connect the external audio component input to this RGB2 Digital input for RGB1 input. ቪ RGB2...
... provides IR output to your external components can automatically be controlled by the A/V network feature. Analog Input Use this 15-pin D-Sub input for your Plasma Television's remote control in TV mode. ቯ Subwoofer Out Connect the external audio component input to this RGB2 Digital input for RGB1 input. ቪ RGB2...

Owners Guide
Page 13
... 5 S-VIDEO VIDEO L/(MONO) R AUDIO S-VIDEO VIDEO L/(MONO) R AUDIO NOTE: 1. S-VIDEO input takes priority over VIDEO input. 5. Back of Display Monitor 32HDT20 Back of Display Monitor 42HDT20 To AC outlet Core ANT A TO CONVERTER ANT B MONITOR OUT S-VIDEO INPUT 4 S-VIDEO INPUT 3 S-VIDEO VIDEO VIDEO VIDEO (MONO) L (MONO) L (MONO) L R AUDIO R ...Monitor Connector cable. 2. Firmly, and securely insert the Monitor Connection Cable to the AC outlets. Both AC cords must be abnormal. 2. CONNECTING PLASMA DISPLAY MONITOR TO AVC BOX 1. Insert the other ends of your AVC box. 4.
... 5 S-VIDEO VIDEO L/(MONO) R AUDIO S-VIDEO VIDEO L/(MONO) R AUDIO NOTE: 1. S-VIDEO input takes priority over VIDEO input. 5. Back of Display Monitor 32HDT20 Back of Display Monitor 42HDT20 To AC outlet Core ANT A TO CONVERTER ANT B MONITOR OUT S-VIDEO INPUT 4 S-VIDEO INPUT 3 S-VIDEO VIDEO VIDEO VIDEO (MONO) L (MONO) L (MONO) L R AUDIO R ...Monitor Connector cable. 2. Firmly, and securely insert the Monitor Connection Cable to the AC outlets. Both AC cords must be abnormal. 2. CONNECTING PLASMA DISPLAY MONITOR TO AVC BOX 1. Insert the other ends of your AVC box. 4.
Owners Guide
Page 14
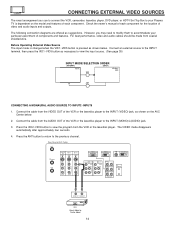
...) L PR PR R R AUDIO R L AUDIOR L AUDIOR L AUDIO OUT IR BLASTER AUDIO OUT VIDEO OUT VCR Hitachi Model or Similar Model 14 CONNECTING EXTERNAL VIDEO SOURCES The exact arrangement you may need to modify them to accommodate your Plasma TV is pressed as necessary to view the input source. (See page 30) INPUT MODE...
...) L PR PR R R AUDIO R L AUDIOR L AUDIOR L AUDIO OUT IR BLASTER AUDIO OUT VIDEO OUT VCR Hitachi Model or Similar Model 14 CONNECTING EXTERNAL VIDEO SOURCES The exact arrangement you may need to modify them to accommodate your Plasma TV is pressed as necessary to view the input source. (See page 30) INPUT MODE...

Owners Guide
Page 18
... Input Terminal of External Amplifier Stereo System Amplifier The MONITOR OUT terminal outputs video and audio of the Plasma TV to INPUT2, no monitor out is controlled by the amplifier, not by the Plasma Television. If a component device is input to an external audio amplifier, connect the system as shown below. CONNECTING...
... Input Terminal of External Amplifier Stereo System Amplifier The MONITOR OUT terminal outputs video and audio of the Plasma TV to INPUT2, no monitor out is controlled by the amplifier, not by the Plasma Television. If a component device is input to an external audio amplifier, connect the system as shown below. CONNECTING...
Owners Guide
Page 19
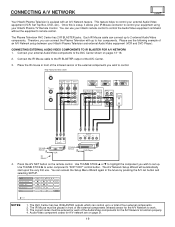
...4. Once this is equiped with up to a total of the external components infrared sensor for each of an A/V Network setup between your Hitachi Plasma TV Remote Control. Each IR Mouse cable can control up to control the Audio/Video equipment command without the equipment's remote control. CONNECTING ... AVC Center has two IR BLASTER outputs which can connect up . This feature helps to set up to control your equipment using your Hitachi Plasma Television and external Audio/Video equipment (VCR and DVD Player). The IR Mouse must be placed in the future by pressing the A/V net...
...4. Once this is equiped with up to a total of the external components infrared sensor for each of an A/V Network setup between your Hitachi Plasma TV Remote Control. Each IR Mouse cable can control up to control the Audio/Video equipment command without the equipment's remote control. CONNECTING ... AVC Center has two IR BLASTER outputs which can connect up . This feature helps to set up to control your equipment using your Hitachi Plasma Television and external Audio/Video equipment (VCR and DVD Player). The IR Mouse must be placed in the future by pressing the A/V net...
Owners Guide
Page 24
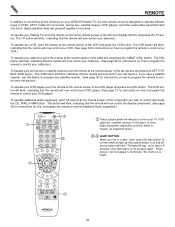
... VID 2 PIP VID 3 PIP CH VID 4 FREEZE PIP MODE PIP ACCESS SWAP VIDEO ቤ REC ቢ These buttons allow the remote to control your Plasma TV, point the remote control at the remote sensor of the component you have a satellite receiver, use this button to program your satellite receiver. (See... the remote will now control your VCR. (See page 34 for instructions on how to program the remote to control your VCR.) To operate your HITACHI Plasma TV, the new remote control is chosen, as explained above. ባ,ቤ LIGHT BUTTON When you are grouped together in ቤ and the...
... VID 2 PIP VID 3 PIP CH VID 4 FREEZE PIP MODE PIP ACCESS SWAP VIDEO ቤ REC ቢ These buttons allow the remote to control your Plasma TV, point the remote control at the remote sensor of the component you have a satellite receiver, use this button to program your satellite receiver. (See... the remote will now control your VCR. (See page 34 for instructions on how to program the remote to control your VCR.) To operate your HITACHI Plasma TV, the new remote control is chosen, as explained above. ባ,ቤ LIGHT BUTTON When you are grouped together in ቤ and the...
Owners Guide
Page 25
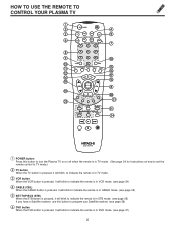
HOW TO USE THE REMOTE TO CONTROL YOUR PLASMA TV ት POWER TV DVD VCR CBL SOURCE WIZARD CD TAPE STB AMP 1 2 3 4 5 6 7 8 9 SLEEP 0 INFO ANT TV/RGB A/V NET ASPECT MODE MENU EXIT VOL SELECT ... CH 3 GUIDE/TV VID 4 SCHD VID 5 SWAP PIP ACCESS FREEZE REC VIDEO CLU-5723TSI CLU-5723TSI ᕃ POWER button Press this button to turn the Plasma TV on or off when the remote is in TV mode. (See page 24 for instructions on how to set the remote control to TV...
HOW TO USE THE REMOTE TO CONTROL YOUR PLASMA TV ት POWER TV DVD VCR CBL SOURCE WIZARD CD TAPE STB AMP 1 2 3 4 5 6 7 8 9 SLEEP 0 INFO ANT TV/RGB A/V NET ASPECT MODE MENU EXIT VOL SELECT ... CH 3 GUIDE/TV VID 4 SCHD VID 5 SWAP PIP ACCESS FREEZE REC VIDEO CLU-5723TSI CLU-5723TSI ᕃ POWER button Press this button to turn the Plasma TV on or off when the remote is in TV mode. (See page 24 for instructions on how to set the remote control to TV...
Owners Guide
Page 26
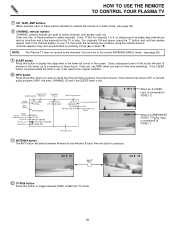
... PLUS+ VID 2 VID 1 PIP FREEZE VID 3 PIP CH PIP ACCESS VIDEO SWAP PIP MODE REC CLU-5723TSI HOW TO USE THE REMOTE TO CONTROL YOUR PLASMA TV ቨ CD, TAPE, AMP buttons When pressed, each time the button is set , use INFO when you are not in the correct ANTENNA/CABLE... Enter one, two, or three numbers to the channel display on your TV, then enter the remaining two numbers using the number buttons. NOTE: The Plasma TV may also be performed by pressing CH up to a maximum of three hours.
... PLUS+ VID 2 VID 1 PIP FREEZE VID 3 PIP CH PIP ACCESS VIDEO SWAP PIP MODE REC CLU-5723TSI HOW TO USE THE REMOTE TO CONTROL YOUR PLASMA TV ቨ CD, TAPE, AMP buttons When pressed, each time the button is set , use INFO when you are not in the correct ANTENNA/CABLE... Enter one, two, or three numbers to the channel display on your TV, then enter the remaining two numbers using the number buttons. NOTE: The Plasma TV may also be performed by pressing CH up to a maximum of three hours.
Owners Guide
Page 27
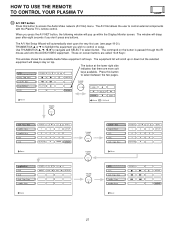
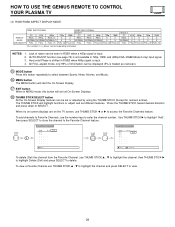
...; CH ̆ SETUP keys available. Press this button to access the Audio/Video network (A/V Net) menu. HOW TO USE THE REMOTE TO CONTROL YOUR PLASMA TV ቯ A/V NET button Press this button to select between the two pages. THUMBSTICK ̆ or ̄ to control or setup. The A/V Net...19-21). This window shows the available Audio/Video equipment soft keys. Use THUMBSTICK to navigate and SELECT to control external components with the Plasma TV's remote control. These on the button is passed through the IR mouse and onto the AUDIO/VIDEO equipment. The A/V Net allows ...
...; CH ̆ SETUP keys available. Press this button to access the Audio/Video network (A/V Net) menu. HOW TO USE THE REMOTE TO CONTROL YOUR PLASMA TV ቯ A/V NET button Press this button to select between the two pages. THUMBSTICK ̆ or ̄ to control or setup. The A/V Net...19-21). This window shows the available Audio/Video equipment soft keys. Use THUMBSTICK to navigate and SELECT to control external components with the Plasma TV's remote control. These on the button is passed through the IR mouse and onto the AUDIO/VIDEO equipment. The A/V Net allows ...
Owners Guide
Page 28
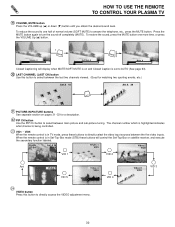
... 16:9 STANDARD 4:3 ZOOM2 16:9 STANDARD NOTES: 1. However, all five video inputs have independent Aspect Style settings. 28 HOW TO USE THE REMOTE TO CONTROL YOUR PLASMA TV ተ ASPECT button Press this aspect mode to display conventional (4:3) images. Side panels (gray areas) are placed to the left and right of the...
... 16:9 STANDARD 4:3 ZOOM2 16:9 STANDARD NOTES: 1. However, all five video inputs have independent Aspect Style settings. 28 HOW TO USE THE REMOTE TO CONTROL YOUR PLASMA TV ተ ASPECT button Press this aspect mode to display conventional (4:3) images. Side panels (gray areas) are placed to the left and right of the...
Owners Guide
Page 29
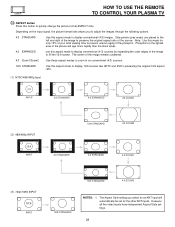
... Favorite Channels feature. Add Move THUMB STICK SELECT THUMB STICK Favorite Channels Ant A 8 A8 A6 A3 - - - - - - - - - - - - - - - - - - - - HOW TO USE THE GENIUS REMOTE TO CONTROL YOUR PLASMA TV (4) RGB1/RGB2 ASPECT DISPLAY MODE. NOTES: 1. When no on-screen displays are on the TV screen, use the number keys to select between Sports...
... Favorite Channels feature. Add Move THUMB STICK SELECT THUMB STICK Favorite Channels Ant A 8 A8 A6 A3 - - - - - - - - - - - - - - - - - - - - HOW TO USE THE GENIUS REMOTE TO CONTROL YOUR PLASMA TV (4) RGB1/RGB2 ASPECT DISPLAY MODE. NOTES: 1. When no on-screen displays are on the TV screen, use the number keys to select between Sports...
Owners Guide
Page 30
... PLUS+ VID 2 VID 1 PIP FREEZE VID 3 PIP CH PIP ACCESS VIDEO SWAP PIP MODE REC CLU-5723TSI HOW TO USE THE REMOTE TO CONTROL YOUR PLASMA TV ት VOLUME, MUTE button Press the VOLUME up (̆) or down (̄) button until you obtain the desired sound level. Press the MUTE button...
... PLUS+ VID 2 VID 1 PIP FREEZE VID 3 PIP CH PIP ACCESS VIDEO SWAP PIP MODE REC CLU-5723TSI HOW TO USE THE REMOTE TO CONTROL YOUR PLASMA TV ት VOLUME, MUTE button Press the VOLUME up (̆) or down (̄) button until you obtain the desired sound level. Press the MUTE button...


