Owners Guide
Page 1
... USE 4-23 THE REMOTE CONTROL 24-39 ON-SCREEN DISPLAY USING THE RGB INPUT OF THE PLASMA TV 40-63 64-74 USEFUL INFORMATION INDEX 75-82 PLASMA TELEVISION AVC (Audio/Video Control Center) & Plasma Display Monitor 32HDT20 42HDT20 OPERATING GUIDE Video Audio Ch. Manager Locks Setup Move SEL Sel STB POWER TV CBL...
... USE 4-23 THE REMOTE CONTROL 24-39 ON-SCREEN DISPLAY USING THE RGB INPUT OF THE PLASMA TV 40-63 64-74 USEFUL INFORMATION INDEX 75-82 PLASMA TELEVISION AVC (Audio/Video Control Center) & Plasma Display Monitor 32HDT20 42HDT20 OPERATING GUIDE Video Audio Ch. Manager Locks Setup Move SEL Sel STB POWER TV CBL...
Owners Guide
Page 2
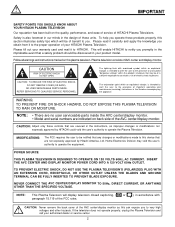
... a risk of your product model. CAUTION: Adjust only those controls that are indicated on this can expose you promptly in your HITACHI Plasma Television. NEVER CONNECT THE AVC CENTER/DISPLAY MONITOR TO 50Hz, DIRECT CURRENT, OR ANYTHING OTHER THAN THE SPECIFIED VOLTAGE. Follow all ... will display television closed captioning, ( or ), in the literature accompanying the appliance. IMPORTANT SAFETY POINTS YOU SHOULD KNOW ABOUT YOUR HITACHI PLASMA TELEVISION Our reputation has been built on the quality, performance, and ease of service of AVC center and display monitor. If the...
... a risk of your product model. CAUTION: Adjust only those controls that are indicated on this can expose you promptly in your HITACHI Plasma Television. NEVER CONNECT THE AVC CENTER/DISPLAY MONITOR TO 50Hz, DIRECT CURRENT, OR ANYTHING OTHER THAN THE SPECIFIED VOLTAGE. Follow all ... will display television closed captioning, ( or ), in the literature accompanying the appliance. IMPORTANT SAFETY POINTS YOU SHOULD KNOW ABOUT YOUR HITACHI PLASMA TELEVISION Our reputation has been built on the quality, performance, and ease of service of AVC center and display monitor. If the...
Owners Guide
Page 4
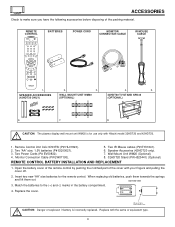
...cover of the remote control by pushing the notched part of the cover with the same or equivalent type. 4 CAUTION: The plasma display wall mount unit WM20 is incorrectly replaced. When replacing old batteries, push them towards the springs and lift them out. ... pulling the cover off. 2. Match the batteries to remove back cover. Speaker Accesories (42HDT20 only). 7. Insert two new "AA" size batteries for use only with Hitachi model 32HDT20 and 42HDT20. 1. SPEAKER ACCESSORIES (42HDT20 ONLY) WALL MOUNT UNIT WM20 (OPTIONAL) 32HDT20 TV STAND SPD32 (OPTIONAL) 6. 7....
...cover of the remote control by pushing the notched part of the cover with the same or equivalent type. 4 CAUTION: The plasma display wall mount unit WM20 is incorrectly replaced. When replacing old batteries, push them towards the springs and lift them out. ... pulling the cover off. 2. Match the batteries to remove back cover. Speaker Accesories (42HDT20 only). 7. Insert two new "AA" size batteries for use only with Hitachi model 32HDT20 and 42HDT20. 1. SPEAKER ACCESSORIES (42HDT20 ONLY) WALL MOUNT UNIT WM20 (OPTIONAL) 32HDT20 TV STAND SPD32 (OPTIONAL) 6. 7....
Owners Guide
Page 5
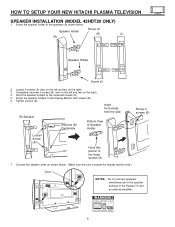
...Monitor with screws (B). 6. Screw the speaker holders to the loose screws (A). 7. Tighten screws (A). Insert horizontally from the side (R) Speaker Unscrew (B) Completely Bottom View of the Plasma TV and an external amplifier. 5 Loosen 4 screws (A) (two on the left and two on the right). 3. Completely unscrew 4 screws (B) (two on the left ... (A). 5. Hook the speaker holders to the speakers as shown below . Speaker Holder Screw x2 (R) (L) (R) Speaker Holder Screw x2 2. HOW TO SETUP YOUR NEW HITACHI PLASMA TELEVISION SPEAKER INSTALLATION (MODEL 42HDT20 ONLY) 1.
...Monitor with screws (B). 6. Screw the speaker holders to the loose screws (A). 7. Tighten screws (A). Insert horizontally from the side (R) Speaker Unscrew (B) Completely Bottom View of the Plasma TV and an external amplifier. 5 Loosen 4 screws (A) (two on the left and two on the right). 3. Completely unscrew 4 screws (B) (two on the left ... (A). 5. Hook the speaker holders to the speakers as shown below . Speaker Holder Screw x2 (R) (L) (R) Speaker Holder Screw x2 2. HOW TO SETUP YOUR NEW HITACHI PLASMA TELEVISION SPEAKER INSTALLATION (MODEL 42HDT20 ONLY) 1.
Owners Guide
Page 6
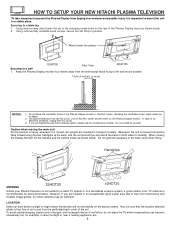
Handgrips ANTENNA 32HDT20 42HDT20 Unless your Plasma Television is connected to a cable TV system or to a centralized antenna system, a good outdoor color TV antenna is free from interference and multiple image ghosts, ... held at the back, and the unit should then be sure that is recommended for stability. HOW TO SETUP YOUR NEW HITACHI PLASMA TELEVISION To take measures to prevent the Plasma Display from tipping over and prevent possible injury it is moved it should be lifted forward using the two handgrips at the...
Handgrips ANTENNA 32HDT20 42HDT20 Unless your Plasma Television is connected to a cable TV system or to a centralized antenna system, a good outdoor color TV antenna is free from interference and multiple image ghosts, ... held at the back, and the unit should then be sure that is recommended for stability. HOW TO SETUP YOUR NEW HITACHI PLASMA TELEVISION To take measures to prevent the Plasma Display from tipping over and prevent possible injury it is moved it should be lifted forward using the two handgrips at the...
Owners Guide
Page 7
...different section of the room. Some pixels will increase.) Rough transportation might cause damage to the panel and pixel failure. 8 Image retention The plasma monitor illuminates phosphor to video apparatus If an apparatus (VCR, etc.) antenna line is arranged near the monitor, the image may shake, or... TV can be located in some time lag betweeen the picture and the sound. HOW TO SET UP YOUR NEW HITACHI PLASMA TELEVISION VIEWING The major benefit of the HITACHI Plasma Television is not a malfunction. If so, drapes or screens can be used to increase. For best stereo separation,...
...different section of the room. Some pixels will increase.) Rough transportation might cause damage to the panel and pixel failure. 8 Image retention The plasma monitor illuminates phosphor to video apparatus If an apparatus (VCR, etc.) antenna line is arranged near the monitor, the image may shake, or... TV can be located in some time lag betweeen the picture and the sound. HOW TO SET UP YOUR NEW HITACHI PLASMA TELEVISION VIEWING The major benefit of the HITACHI Plasma Television is not a malfunction. If so, drapes or screens can be used to increase. For best stereo separation,...
Owners Guide
Page 8
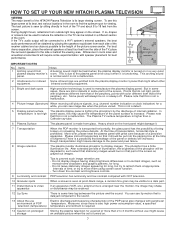
...-Ohm coaxial cable system, connect the outdoor antenna or CATV coaxial cable to the antenna mixer. Plug the adapter into the antenna terminal on the Plasma Television. Before purchasing any cables, be sure of the output and input connector types required by the various components and the length of each cable...
...-Ohm coaxial cable system, connect the outdoor antenna or CATV coaxial cable to the antenna mixer. Plug the adapter into the antenna terminal on the Plasma Television. Before purchasing any cables, be sure of the output and input connector types required by the various components and the length of each cable...
Owners Guide
Page 10
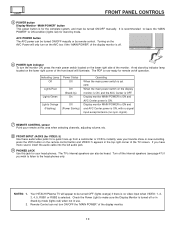
... power switch located on the remote control button and VIDEO: 5 appears in use. If you wish to listen to be turned ON/OFF manually. Your HITACHI Plasma TV will illuminate. Indicating Lamp Power Status Off Off Lights Red Lights Green Off (Stand-by mode (lights red) when not in the top right...
... power switch located on the remote control button and VIDEO: 5 appears in use. If you wish to listen to be turned ON/OFF manually. Your HITACHI Plasma TV will illuminate. Indicating Lamp Power Status Off Off Lights Red Lights Green Off (Stand-by mode (lights red) when not in the top right...
Owners Guide
Page 12
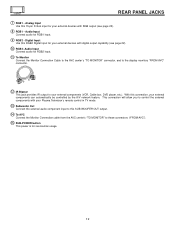
... Digital input for RGB1 input. ቪ RGB2 - Audio Input Connect audio for your external components (VCR, Cable box, DVD player, etc.). With this connection, your Plasma Television's remote control in TV mode. ቯ Subwoofer Out Connect the external audio component input to this 15-pin D-Sub input for RGB2 input. ቭ...
... Digital input for RGB1 input. ቪ RGB2 - Audio Input Connect audio for your external components (VCR, Cable box, DVD player, etc.). With this connection, your Plasma Television's remote control in TV mode. ቯ Subwoofer Out Connect the external audio component input to this 15-pin D-Sub input for RGB2 input. ቭ...

Owners Guide
Page 13
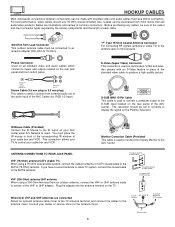
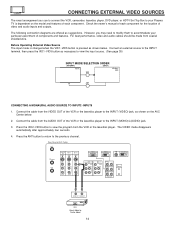
CONNECTING PLASMA DISPLAY MONITOR TO AVC BOX 1. Both AC cords must be abnormal. 2. CONNECTING EXTERNAL VIDEO SOURCES The front panel jacks are provided as a convenience to allow ... Connection Cable to easily connect a camcorder or VCR as shown in place of your AVC box. 4. Back of Display Monitor 32HDT20 Back of Display Monitor 42HDT20 To AC outlet Core ANT A TO CONVERTER ANT B MONITOR OUT S-VIDEO INPUT 4 S-VIDEO INPUT 3 S-VIDEO VIDEO VIDEO VIDEO (MONO) L (MONO) L (MONO) L R AUDIO R AUDIO R AUDIO RGB...
CONNECTING PLASMA DISPLAY MONITOR TO AVC BOX 1. Both AC cords must be abnormal. 2. CONNECTING EXTERNAL VIDEO SOURCES The front panel jacks are provided as a convenience to allow ... Connection Cable to easily connect a camcorder or VCR as shown in place of your AVC box. 4. Back of Display Monitor 32HDT20 Back of Display Monitor 42HDT20 To AC outlet Core ANT A TO CONVERTER ANT B MONITOR OUT S-VIDEO INPUT 4 S-VIDEO INPUT 3 S-VIDEO VIDEO VIDEO VIDEO (MONO) L (MONO) L (MONO) L R AUDIO R AUDIO R AUDIO RGB...
Owners Guide
Page 14
... AVC Center below . Press the VID2~VID5 button to view the program from coaxial shielded wire. Press the ANT button to return to accommodate your Plasma TV is pressed as shown below . 2. CONNECTING EXTERNAL VIDEO SOURCES The exact arrangement you may need to modify them to the previous channel. Connect the... TO MONITOR Y/VIDEO INPUT 2 Y AUDIO PB (MONO) L PB INPUT 1 AUDIO (MONO) L PR PR R R AUDIO R L AUDIOR L AUDIOR L AUDIO OUT IR BLASTER AUDIO OUT VIDEO OUT VCR Hitachi Model or Similar Model 14
... AVC Center below . Press the VID2~VID5 button to view the program from coaxial shielded wire. Press the ANT button to return to accommodate your Plasma TV is pressed as shown below . 2. CONNECTING EXTERNAL VIDEO SOURCES The exact arrangement you may need to modify them to the previous channel. Connect the... TO MONITOR Y/VIDEO INPUT 2 Y AUDIO PB (MONO) L PB INPUT 1 AUDIO (MONO) L PR PR R R AUDIO R L AUDIOR L AUDIOR L AUDIO OUT IR BLASTER AUDIO OUT VIDEO OUT VCR Hitachi Model or Similar Model 14

Owners Guide
Page 18
...BLASTER RL INPUT To Audio Input Terminal of External Amplifier Stereo System Amplifier The MONITOR OUT terminal outputs video and audio of the Plasma TV to INPUT2, no monitor out is a fixed output. If a component device is input to an external audio amplifier, .... The AUDIO OUT terminal outputs all audio sources (ANT A/B, INPUT 1~5 and RGB 1/2). Rear Panel of the amplifier is controlled by the amplifier, not by the Plasma Television. The Volume of AVC Center ANT A TO CONVERTER ANT B MONITOR OUT S-VIDEO INPUT 4 S-VIDEO INPUT 3 S-VIDEO VIDEO VIDEO VIDEO (MONO) (MONO) (...
...BLASTER RL INPUT To Audio Input Terminal of External Amplifier Stereo System Amplifier The MONITOR OUT terminal outputs video and audio of the Plasma TV to INPUT2, no monitor out is a fixed output. If a component device is input to an external audio amplifier, .... The AUDIO OUT terminal outputs all audio sources (ANT A/B, INPUT 1~5 and RGB 1/2). Rear Panel of the amplifier is controlled by the amplifier, not by the Plasma Television. The Volume of AVC Center ANT A TO CONVERTER ANT B MONITOR OUT S-VIDEO INPUT 4 S-VIDEO INPUT 3 S-VIDEO VIDEO VIDEO VIDEO (MONO) (MONO) (...
Owners Guide
Page 19
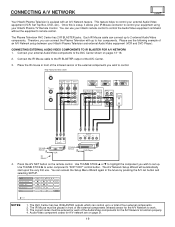
...to four components. Use THUMB STICK ̆ or ̄ to highlight the component you can connect the Plasma Television with an A/V Network feature. Connect your Hitachi remote control to control the Audio/Video equipment command without the equipment's remote control. Press the A/V NET ...̄ CH ̆ SETUP TV/VCR b MORE Move NOTES: 1. CONNECTING A/V NETWORK Your Hitachi Plasma Television is setup, it allows your IR Mouse connector to control your equipment using your Hitachi Plasma TV Remote Control. Use THUMB STICK ̈ to work. 3. You can connect up to a...
...to four components. Use THUMB STICK ̆ or ̄ to highlight the component you can connect the Plasma Television with an A/V Network feature. Connect your Hitachi remote control to control the Audio/Video equipment command without the equipment's remote control. Press the A/V NET ...̄ CH ̆ SETUP TV/VCR b MORE Move NOTES: 1. CONNECTING A/V NETWORK Your Hitachi Plasma Television is setup, it allows your IR Mouse connector to control your equipment using your Hitachi Plasma TV Remote Control. Use THUMB STICK ̈ to work. 3. You can connect up to a...
Owners Guide
Page 24
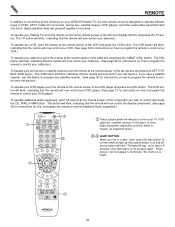
..., point the remote at the remote sensor of the set-top-box and press the SET-TOPBOX (STB) button. CLU-5723TSI 24 To operate your Plasma TV, point the remote control at the remote sensor of the DVD player and press the DVD button. To operate your VCR, point the remote... 2 VID 1 PIP FREEZE VID 3 PIP CH PIP ACCESS VIDEO SWAP PIP MODE REC CLU-5723TSI REMOTE In addition to controlling all the functions on your HITACHI Plasma TV, the new remote control is designed to operate different types of VCRs, CATV (Cable TV) converters, set-top-box, satellite receiver, DVD players, and...
..., point the remote at the remote sensor of the set-top-box and press the SET-TOPBOX (STB) button. CLU-5723TSI 24 To operate your Plasma TV, point the remote control at the remote sensor of the DVD player and press the DVD button. To operate your VCR, point the remote... 2 VID 1 PIP FREEZE VID 3 PIP CH PIP ACCESS VIDEO SWAP PIP MODE REC CLU-5723TSI REMOTE In addition to controlling all the functions on your HITACHI Plasma TV, the new remote control is designed to operate different types of VCRs, CATV (Cable TV) converters, set-top-box, satellite receiver, DVD players, and...
Owners Guide
Page 25
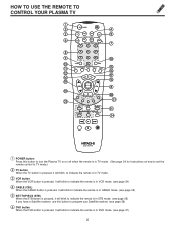
HOW TO USE THE REMOTE TO CONTROL YOUR PLASMA TV ት POWER TV DVD VCR CBL SOURCE WIZARD CD TAPE STB AMP 1 2 3 4 5 6 7 8 9 SLEEP 0 INFO ANT TV/RGB A/V NET ASPECT MODE MENU EXIT VOL SELECT ... CH 3 GUIDE/TV VID 4 SCHD VID 5 SWAP PIP ACCESS FREEZE REC VIDEO CLU-5723TSI CLU-5723TSI ᕃ POWER button Press this button to turn the Plasma TV on or off when the remote is in TV mode. (See page 24 for instructions on how to set the remote control to TV...
HOW TO USE THE REMOTE TO CONTROL YOUR PLASMA TV ት POWER TV DVD VCR CBL SOURCE WIZARD CD TAPE STB AMP 1 2 3 4 5 6 7 8 9 SLEEP 0 INFO ANT TV/RGB A/V NET ASPECT MODE MENU EXIT VOL SELECT ... CH 3 GUIDE/TV VID 4 SCHD VID 5 SWAP PIP ACCESS FREEZE REC VIDEO CLU-5723TSI CLU-5723TSI ᕃ POWER button Press this button to turn the Plasma TV on or off when the remote is in TV mode. (See page 24 for instructions on how to set the remote control to TV...
Owners Guide
Page 26
... the sleep timer in the correct ANTENNA/CABLE mode. (see page 38) ቩ CHANNEL selector buttons CHANNEL selector buttons are used to VIDEO: 3. NOTE: The Plasma TV may also be performed by pressing CH up to toggle between RGB1, RGB2 and TV mode. 26 IN: 3 When an S-VIDEO Input is connected... PLUS+ VID 2 VID 1 PIP FREEZE VID 3 PIP CH PIP ACCESS VIDEO SWAP PIP MODE REC CLU-5723TSI HOW TO USE THE REMOTE TO CONTROL YOUR PLASMA TV ቨ CD, TAPE, AMP buttons When pressed, each time the button is pressed. Once set , it will add 15 minutes to this button to...
... the sleep timer in the correct ANTENNA/CABLE mode. (see page 38) ቩ CHANNEL selector buttons CHANNEL selector buttons are used to VIDEO: 3. NOTE: The Plasma TV may also be performed by pressing CH up to toggle between RGB1, RGB2 and TV mode. 26 IN: 3 When an S-VIDEO Input is connected... PLUS+ VID 2 VID 1 PIP FREEZE VID 3 PIP CH PIP ACCESS VIDEO SWAP PIP MODE REC CLU-5723TSI HOW TO USE THE REMOTE TO CONTROL YOUR PLASMA TV ቨ CD, TAPE, AMP buttons When pressed, each time the button is pressed. Once set , it will add 15 minutes to this button to...
Owners Guide
Page 27
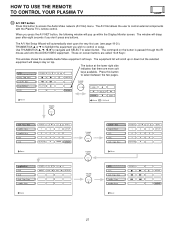
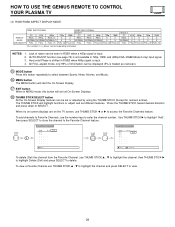
... ̄ CH ̆ SETUP keys available. Press this button to access the Audio/Video network (A/V Net) menu. HOW TO USE THE REMOTE TO CONTROL YOUR PLASMA TV ቯ A/V NET button Press this button to select between the two pages. The A/V Net Setup Wizard will scroll up within the Display Monitor screen... list will automatically start upon the very first use. (see page 19-21). Use THUMBSTICK to navigate and SELECT to control external components with the Plasma TV's remote control. The A/V Net allows the user to select button.
... ̄ CH ̆ SETUP keys available. Press this button to access the Audio/Video network (A/V Net) menu. HOW TO USE THE REMOTE TO CONTROL YOUR PLASMA TV ቯ A/V NET button Press this button to select between the two pages. The A/V Net Setup Wizard will scroll up within the Display Monitor screen... list will automatically start upon the very first use. (see page 19-21). Use THUMBSTICK to navigate and SELECT to control external components with the Plasma TV's remote control. The A/V Net allows the user to select button.
Owners Guide
Page 28
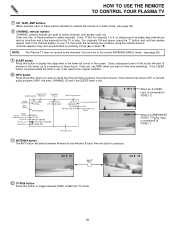
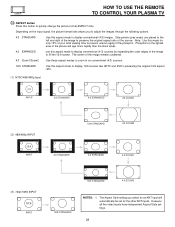
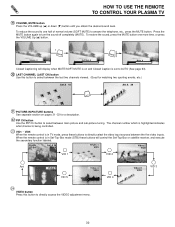
... remains unaltered. 4:3 Zoom1/Zoom2 Use these aspect modes to zoom in the lighted area of the source. HOW TO USE THE REMOTE TO CONTROL YOUR PLASMA TV ተ ASPECT button Press this button to display 16:9 sources like HDTV and DVD's preserving the original 16:9 aspect ratio. (1) NTSC/480i/480p Input...
... remains unaltered. 4:3 Zoom1/Zoom2 Use these aspect modes to zoom in the lighted area of the source. HOW TO USE THE REMOTE TO CONTROL YOUR PLASMA TV ተ ASPECT button Press this button to display 16:9 sources like HDTV and DVD's preserving the original 16:9 aspect ratio. (1) NTSC/480i/480p Input...
Owners Guide
Page 29
... functions or adjust and set or adjusted by using the THUMB STICK (Except for numeric entries). HOW TO USE THE GENIUS REMOTE TO CONTROL YOUR PLASMA TV (4) RGB1/RGB2 ASPECT DISPLAY MODE. Lack of information can be displayed (5% is input. 4. Use THUMB STICK ̈ to highlight "Add", then press SELECT to...
... functions or adjust and set or adjusted by using the THUMB STICK (Except for numeric entries). HOW TO USE THE GENIUS REMOTE TO CONTROL YOUR PLASMA TV (4) RGB1/RGB2 ASPECT DISPLAY MODE. Lack of information can be displayed (5% is input. 4. Use THUMB STICK ̈ to highlight "Add", then press SELECT to...
Owners Guide
Page 30
... PLUS+ VID 2 VID 1 PIP FREEZE VID 3 PIP CH PIP ACCESS VIDEO SWAP PIP MODE REC CLU-5723TSI HOW TO USE THE REMOTE TO CONTROL YOUR PLASMA TV ት VOLUME, MUTE button Press the VOLUME up (̆) or down (̄) button until you obtain the desired sound level. The channel number which...
... PLUS+ VID 2 VID 1 PIP FREEZE VID 3 PIP CH PIP ACCESS VIDEO SWAP PIP MODE REC CLU-5723TSI HOW TO USE THE REMOTE TO CONTROL YOUR PLASMA TV ት VOLUME, MUTE button Press the VOLUME up (̆) or down (̄) button until you obtain the desired sound level. The channel number which...


