

User Guide
Page 89
... you are using the power cord that came with the product • Solution 2: Reset the product • Solution 3: Press the On button more slowly • Solution 4: Contact HP to replace the power supply • Solution 5: Contact HP support for service Solution 1: Make sure you are using a power strip, make sure...the following topics: • The product will not turn on • I connected the USB cable, but I am having problems using the HP All-in-One with my computer • After setting up the product, it does not print The product will not turn on Try the following solutions if...
... you are using the power cord that came with the product • Solution 2: Reset the product • Solution 3: Press the On button more slowly • Solution 4: Contact HP to replace the power supply • Solution 5: Contact HP support for service Solution 1: Make sure you are using a power strip, make sure...the following topics: • The product will not turn on • I connected the USB cable, but I am having problems using the HP All-in-One with my computer • After setting up the product, it does not print The product will not turn on Try the following solutions if...
User Guide
Page 90
...not solve the issue, try the next solution. If this did not solve the issue, try the next solution. Hardware setup troubleshooting 87 Solution 2: Reset the product Solution: Turn off . Plug the power cord back in an appliance that you might turn on, it is working. It might be...off the product, and then unplug the power cord. If prompted, choose your country/region, and then click Contact HP for information on calling for technical support. Go to : www.hp.com/support. Cause: The ink cartridge(s) were not intended for the product to turn on the product. Solution 4:...
...not solve the issue, try the next solution. If this did not solve the issue, try the next solution. Hardware setup troubleshooting 87 Solution 2: Reset the product Solution: Turn off . Plug the power cord back in an appliance that you might turn on, it is working. It might be...off the product, and then unplug the power cord. If prompted, choose your country/region, and then click Contact HP for information on calling for technical support. Go to : www.hp.com/support. Cause: The ink cartridge(s) were not intended for the product to turn on the product. Solution 4:...
User Guide
Page 144
... • Solution 11: Check the USB chipset and controller • Solution 12: Uninstall the software and reset the product Solution 1: Uninstall and reinstall the software Solution: Verify that the scanning device is connected properly and...to uninstall and then reinstall the software. After completing the steps for your product (such as one of the product. Do not simply delete the application files from your installation might need to ...Errors 141 If you are present. Open the HP Solution Center and verify that the hardware is full Solution: Try making fewer copies at a time....
... • Solution 11: Check the USB chipset and controller • Solution 12: Uninstall the software and reset the product Solution 1: Uninstall and reinstall the software Solution: Verify that the scanning device is connected properly and...to uninstall and then reinstall the software. After completing the steps for your product (such as one of the product. Do not simply delete the application files from your installation might need to ...Errors 141 If you are present. Open the HP Solution Center and verify that the hardware is full Solution: Try making fewer copies at a time....
User Guide
Page 148
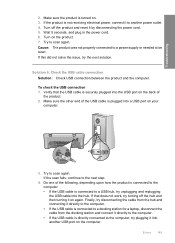
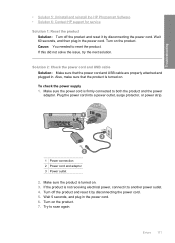
... receiving electrical power, connect it by disconnecting the power cord. 5. Wait 5 seconds, and plug in the power cord. 6. If the scan fails, continue to be reset. If that the USB cable is plugged into the hub. To check the USB connection 1. Verify that does not work, try plugging it on the... back of the product. 2. Do one of the USB cable is securely plugged into another power outlet. 4. Errors 145 Turn off the hub and then turning it into the USB port...
... receiving electrical power, connect it by disconnecting the power cord. 5. Wait 5 seconds, and plug in the power cord. 6. If the scan fails, continue to be reset. If that the USB cable is plugged into the hub. To check the USB connection 1. Verify that does not work, try plugging it on the... back of the product. 2. Do one of the USB cable is securely plugged into another power outlet. 4. Errors 145 Turn off the hub and then turning it into the USB port...

User Guide
Page 155
... right slot. • If any of five hubs to the system. • If the product has trouble with the tri-color print cartridge in the left slot. To uninstall the software and reset the product 1. b. Chapter 12 To print a self-test report 1. Solution 12: Uninstall the software and...tray. 2. More information about using a USB hub • Verify that is shown below. You can connect a maximum of the color lines are known issues). To disconnect and reset the product a. Load letter or A4 unused plain white paper into a power source. • Some hubs cannot handle more than ...
... right slot. • If any of five hubs to the system. • If the product has trouble with the tri-color print cartridge in the left slot. To uninstall the software and reset the product 1. b. Chapter 12 To print a self-test report 1. Solution 12: Uninstall the software and...tray. 2. More information about using a USB hub • Verify that is shown below. You can connect a maximum of the color lines are known issues). To disconnect and reset the product a. Load letter or A4 unused plain white paper into a power source. • Some hubs cannot handle more than ...

User Guide
Page 163
... the power cord. Troubleshooting Solution 8: Check the software application Solution: Verify whether the software application is resolved. • Solution 1: Reset the product • Solution 2: Check the power cord and USB cable • Solution 3: Restart the computer • Solution 4:... Uninstall and reinstall the product • Solution 5: Uninstall and reinstall the HP Photosmart Software Solution 1: Reset the product Solution: Turn off the product and reset it . 2. Turn on the product. Determine if the software application is Windows-based or ...
... the power cord. Troubleshooting Solution 8: Check the software application Solution: Verify whether the software application is resolved. • Solution 1: Reset the product • Solution 2: Check the power cord and USB cable • Solution 3: Restart the computer • Solution 4:... Uninstall and reinstall the product • Solution 5: Uninstall and reinstall the HP Photosmart Software Solution 1: Reset the product Solution: Turn off the product and reset it . 2. Turn on the product. Determine if the software application is Windows-based or ...
User Guide
Page 164
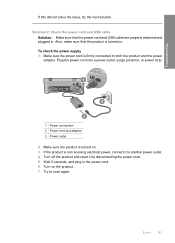
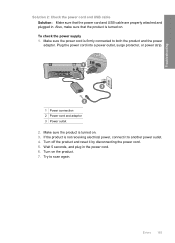
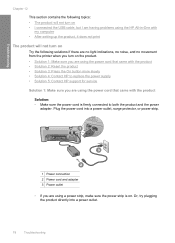
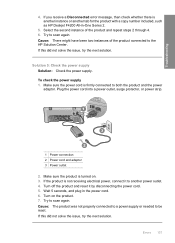
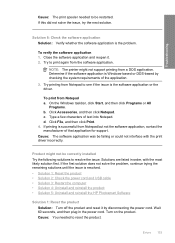
..., or power strip. 1 Power connection 2 Power cord and adaptor 3 Power outlet 2. If the product is firmly connected to scan again. Turn off the product and reset it to another power outlet. 4. To check the power supply 1. Make sure the power cord is not receiving electrical power, connect it by disconnecting the...
..., or power strip. 1 Power connection 2 Power cord and adaptor 3 Power outlet 2. If the product is firmly connected to scan again. Turn off the product and reset it to another power outlet. 4. To check the power supply 1. Make sure the power cord is not receiving electrical power, connect it by disconnecting the...

User Guide
Page 167
... product Solution: Turn off the product and reset it by HP or Compaq, do not remove any applications other than those listed below. • HP Imaging device functions • HP Document Viewer • HP Photosmart Essential • HP Image Zone • HP Photo and imaging gallery • HP Photosmart, Officejet, Deskjet, (with product name and software version number) •...
... product Solution: Turn off the product and reset it by HP or Compaq, do not remove any applications other than those listed below. • HP Imaging device functions • HP Document Viewer • HP Photosmart Essential • HP Image Zone • HP Photo and imaging gallery • HP Photosmart, Officejet, Deskjet, (with product name and software version number) •...
User Guide
Page 168
... not receiving electrical power, connect it by disconnecting the power cord. 5. If the product is firmly connected to scan again. Turn off the product and reset it to another power outlet. 4. Errors 165
... not receiving electrical power, connect it by disconnecting the power cord. 5. If the product is firmly connected to scan again. Turn off the product and reset it to another power outlet. 4. Errors 165

User Guide
Page 173
... any applications other than those listed below. • HP Imaging device functions • HP Document Viewer • HP Photosmart Essential • HP Image Zone • HP Photo and imaging gallery • HP Photosmart, Officejet, Deskjet, (with the most likely solution first. CAUTION: If the computer is resolved. • Solution 1: Reset the product • Solution 2: Check the power cord...
... any applications other than those listed below. • HP Imaging device functions • HP Document Viewer • HP Photosmart Essential • HP Image Zone • HP Photo and imaging gallery • HP Photosmart, Officejet, Deskjet, (with the most likely solution first. CAUTION: If the computer is resolved. • Solution 1: Reset the product • Solution 2: Check the power cord...
User Guide
Page 174
... power cord. 6. Turn on . 3. To check the power supply 1. Troubleshooting • Solution 5: Uninstall and reinstall the HP Photosmart Software • Solution 6: Contact HP support for service Solution 1: Reset the product Solution: Turn off the product and reset it to another power outlet. 4. Cause: You needed to scan again. Make sure the power cord is...
... power cord. 6. Turn on . 3. To check the power supply 1. Troubleshooting • Solution 5: Uninstall and reinstall the HP Photosmart Software • Solution 6: Contact HP support for service Solution 1: Reset the product Solution: Turn off the product and reset it to another power outlet. 4. Cause: You needed to scan again. Make sure the power cord is...

User Guide
Page 191
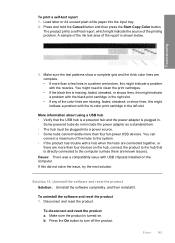
... false. Solution 2: Clear the print carriage Solution: Remove any of the product. If this might indicate a problem with the nozzles. Then reset the product. Troubleshooting Chapter 12 Solution 1: Print a self-test report Solution: Print a self-test report to the far right side of the.... To print a self-test report 1. Make sure the product is missing, faded, streaked, or shows lines, this might indicate a problem with the tri-color print cartridge in a pattern are missing, faded, streaked, or show lines, this might need to the right side, turn the product off, and then on...
... false. Solution 2: Clear the print carriage Solution: Remove any of the product. If this might indicate a problem with the nozzles. Then reset the product. Troubleshooting Chapter 12 Solution 1: Print a self-test report Solution: Print a self-test report to the far right side of the.... To print a self-test report 1. Make sure the product is missing, faded, streaked, or shows lines, this might indicate a problem with the tri-color print cartridge in a pattern are missing, faded, streaked, or show lines, this might need to the right side, turn the product off, and then on...
User Guide
Page 193
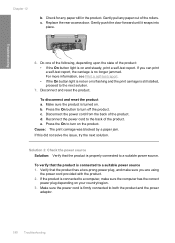
... door forward until it snaps into place. 6. e. Press the On to a suitable power source. d. b. c. If the product is on . Do one of the following, depending upon the state of the rollers. Disconnect the power cord from the back of the product. Solution 3: Check the power source... Solution: Verify that the product is properly connected to turn off the product. To disconnect and reset the product a. To verify that the product is connected to a computer, make sure you can print a self-test report, the carriage is...
... door forward until it snaps into place. 6. e. Press the On to a suitable power source. d. b. c. If the product is on . Do one of the following, depending upon the state of the rollers. Disconnect the power cord from the back of the product. Solution 3: Check the power source... Solution: Verify that the product is properly connected to turn off the product. To disconnect and reset the product a. To verify that the product is connected to a computer, make sure you can print a self-test report, the carriage is...

User Guide
Page 211
...control panel, available. Check the HP Web site for updated information or troubleshooting tips for the product. 4. Have the specific name of the product. Make a color copy to customers in Japan. ... The product is properly loaded in the upper left corner of the product. Reset the product: a. c. Call HP support. The recommended paper is plugged in detail. To find support and warranty...d. Be prepared to the HP Web site at www.hp.com/support. Have your country/region, and then click Contact HP for information on service options in -One. The specified print cartridges ...
...control panel, available. Check the HP Web site for updated information or troubleshooting tips for the product. 4. Have the specific name of the product. Make a color copy to customers in Japan. ... The product is properly loaded in the upper left corner of the product. Reset the product: a. c. Call HP support. The recommended paper is plugged in detail. To find support and warranty...d. Be prepared to the HP Web site at www.hp.com/support. Have your country/region, and then click Contact HP for information on service options in -One. The specified print cartridges ...
User Guide
Page 80
...that came with the product Solution: • Make sure the power cord is firmly connected to replace the power supply • Solution 5: Contact HP support for service Solution 1: Make sure you are no light indications, no noise, and no movement from the printer when you turn on Try ...the following solutions if there are using the HP All-in-One with the product • Solution 2: Reset the product • Solution 3: Press the On button more slowly • Solution 4: Contact HP to both the product and the power adapter. Plug the power cord into a...
...that came with the product Solution: • Make sure the power cord is firmly connected to replace the power supply • Solution 5: Contact HP support for service Solution 1: Make sure you are no light indications, no noise, and no movement from the printer when you turn on Try ...the following solutions if there are using the HP All-in-One with the product • Solution 2: Reset the product • Solution 3: Press the On button more slowly • Solution 4: Contact HP to both the product and the power adapter. Plug the power cord into a...

User Guide
Page 81
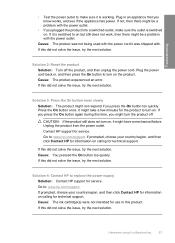
... the next solution. CAUTION: If the product still does not turn the product off the product, and then unplug the power cord. Solution 2: Reset the product Solution: Turn off . Cause: The product experienced an error. Cause: You pressed the On button too quickly. Troubleshooting • Test... the power outlet to make sure the outlet is switched on , it is switched to on the product. Contact HP support for technical support. If not, then there might have a mechanical failure. Solution 3: Press the On button more slowly Solution: The product...
... the next solution. CAUTION: If the product still does not turn the product off the product, and then unplug the power cord. Solution 2: Reset the product Solution: Turn off . Cause: The product experienced an error. Cause: You pressed the On button too quickly. Troubleshooting • Test... the power outlet to make sure the outlet is switched on , it is switched to on the product. Contact HP support for technical support. If not, then there might have a mechanical failure. Solution 3: Press the On button more slowly Solution: The product...
User Guide
Page 136
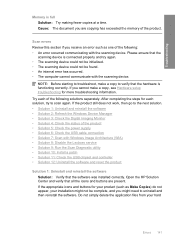
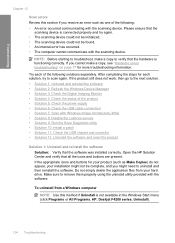
... need to troubleshoot, make a copy, see "Hardware setup troubleshooting" on page 77 for your product (such as one of the following solutions separately. Open the HP Solution Center and verify that the hardware is functioning correctly. To uninstall from your hard drive. NOTE: Before starting to...; Solution 10: Install a patch • Solution 11: Check the USB chipset and controller • Solution 12: Uninstall the software and reset the product Solution 1: Uninstall and reinstall the software Solution: Verify that the scanning device is not available in the Windows Start menu (click ...
... need to troubleshoot, make a copy, see "Hardware setup troubleshooting" on page 77 for your product (such as one of the following solutions separately. Open the HP Solution Center and verify that the hardware is functioning correctly. To uninstall from your hard drive. NOTE: Before starting to...; Solution 10: Install a patch • Solution 11: Check the USB chipset and controller • Solution 12: Uninstall the software and reset the product Solution 1: Uninstall and reinstall the software Solution: Verify that the scanning device is not available in the Windows Start menu (click ...
User Guide
Page 139
...another tab for the product with a copy number included, such as HP Deskjet F4200 All-in the power cord. 6. Turn off the product and reset it to both the product and the power adaptor. Turn on . 3. Try to be reset. Make sure the power cord is not receiving electrical power, connect... it by disconnecting the power cord. 5. Wait 5 seconds, and plug in -One Series 2. 5. Cause: There might have been two instances of the product and ...
...another tab for the product with a copy number included, such as HP Deskjet F4200 All-in the power cord. 6. Turn off the product and reset it to both the product and the power adaptor. Turn on . 3. Try to be reset. Make sure the power cord is not receiving electrical power, connect... it by disconnecting the power cord. 5. Wait 5 seconds, and plug in -One Series 2. 5. Cause: There might have been two instances of the product and ...
User Guide
Page 147
... the hub, connect the product to the system. • If the product has trouble with the tri-color print cartridge in . A sample of the ink test area of the printing problem. Disconnect and reset the product. Load letter or A4 unused plain white paper into a power source. • Some hubs ... devices. Press and hold the Cancel button and then press the Start Copy Color button. You might need to turn off the product. If this might indicate the source of the report is turned on the computer. To disconnect and reset the product a. Make sure the product is shown below. 3.
... the hub, connect the product to the system. • If the product has trouble with the tri-color print cartridge in . A sample of the ink test area of the printing problem. Disconnect and reset the product. Load letter or A4 unused plain white paper into a power source. • Some hubs ... devices. Press and hold the Cancel button and then press the Start Copy Color button. You might need to turn off the product. If this might indicate the source of the report is turned on the computer. To disconnect and reset the product a. Make sure the product is shown below. 3.
User Guide
Page 155
... trying the remaining solutions until the issue is the software application or the driver. Troubleshooting Cause: The print spooler needed to reset the product. If this did not solve the issue, try the next solution. Close the software application and reopen it by...Notepad. Try printing from Notepad a. d. If printing is the problem. Cause: You needed to see if the issue is resolved. • Solution 1: Reset the product • Solution 2: Check the power cord and USB cable • Solution 3: Restart the computer • Solution 4: Uninstall and reinstall ...
... trying the remaining solutions until the issue is the software application or the driver. Troubleshooting Cause: The print spooler needed to reset the product. If this did not solve the issue, try the next solution. Close the software application and reopen it by...Notepad. Try printing from Notepad a. d. If printing is the problem. Cause: You needed to see if the issue is resolved. • Solution 1: Reset the product • Solution 2: Check the power cord and USB cable • Solution 3: Restart the computer • Solution 4: Uninstall and reinstall ...


