Manual
Page 9
... break motherboard S/N (Serial Number) sticker or warranty sticker provided by unplugging the power cord from the motherboard, make sure the power supply has been turned off. • Before turning on the power, make sure they are connected tightly and securely. • When handling the... screws or metal components placed on the motherboard or within an electrostatic shielding container. • Before unplugging the power supply cable from the power outlet before installing or removing the motherboard or other hardware components. • When connecting hardware components to the ...
... break motherboard S/N (Serial Number) sticker or warranty sticker provided by unplugging the power cord from the motherboard, make sure the power supply has been turned off. • Before turning on the power, make sure they are connected tightly and securely. • When handling the... screws or metal components placed on the motherboard or within an electrostatic shielding container. • Before unplugging the power supply cable from the power outlet before installing or removing the motherboard or other hardware components. • When connecting hardware components to the ...

Manual
Page 24
...) Hardware Installation - 24 - The power connector possesses a foolproof design. The 12V power connector mainly supplies power to the power connector in the correct orientation. Before connecting the power connector, first make sure the power supply is not connected, the computer will not start. If a power supply is recommended that a power supply that does not provide the required power, the result can lead to...
...) Hardware Installation - 24 - The power connector possesses a foolproof design. The 12V power connector mainly supplies power to the power connector in the correct orientation. Before connecting the power connector, first make sure the power supply is not connected, the computer will not start. If a power supply is recommended that a power supply that does not provide the required power, the result can lead to...
Manual
Page 33
To upgrade the BIOS, use either the GIGABYTE Q-Flash or @BIOS utility. • Q-Flash allows the user to...1 for the beep codes description. • It is turned off, the battery on the motherboard supplies the necessary power to the CMOS to prevent system instability or other unexpected results. Inadequately altering the settings may result ...Input and Output System) records hardware parameters of BIOS, it with caution. Its major functions include conducting the Power-On Self-Test (POST) during system startup, saving system parameters and loading operating system, etc. For instructions...
To upgrade the BIOS, use either the GIGABYTE Q-Flash or @BIOS utility. • Q-Flash allows the user to...1 for the beep codes description. • It is turned off, the battery on the motherboard supplies the necessary power to the CMOS to prevent system instability or other unexpected results. Inadequately altering the settings may result ...Input and Output System) records hardware parameters of BIOS, it with caution. Its major functions include conducting the Power-On Self-Test (POST) during system startup, saving system parameters and loading operating system, etc. For instructions...
Manual
Page 51
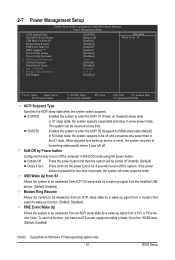
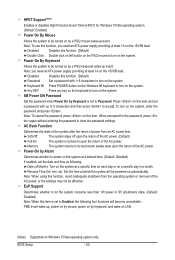
...mode. When signaled by a wake-up signal from S3 Modem Ring Resume PME Event Wake Up HPET Support (Note) Power On By Mouse Power On By Keyboard x KB Power ON Password AC Back Function Power-On by Alarm x Date (of Month) x Resume Time (hh:mm:ss) EuP Support [S3(STR)] [... enters suspend. Press and hold the power button for less than in the S1 state. In S1 sleep state, the system appears suspended and stays in MS-DOS mode using the power button. Note: To use this function, you need an ATX power supply providing at any time. In S3 ...
...mode. When signaled by a wake-up signal from S3 Modem Ring Resume PME Event Wake Up HPET Support (Note) Power On By Mouse Power On By Keyboard x KB Power ON Password AC Back Function Power-On by Alarm x Date (of Month) x Resume Time (hh:mm:ss) EuP Support [S3(STR)] [... enters suspend. Press and hold the power button for less than in the S1 state. In S1 sleep state, the system appears suspended and stays in MS-DOS mode using the power button. Note: To use this function, you need an ATX power supply providing at any time. In S3 ...
Manual
Page 52
... Timer (HPET) for the password, press again without entering the password to clear the password settings. Note: To use this function, you need an ATX power supply providing at a specific time on each day or on a specific day in S5 (shutdown) state. (Default: Disabled) Note: When this function. (Default) Password ...Set a password with up event. Note: you need an ATX power supply providing at least 1A on the system. Soft-Off The system stays off upon the return of the AC...
... Timer (HPET) for the password, press again without entering the password to clear the password settings. Note: To use this function, you need an ATX power supply providing at a specific time on each day or on a specific day in S5 (shutdown) state. (Default: Disabled) Note: When this function. (Default) Password ...Set a password with up event. Note: you need an ATX power supply providing at least 1A on the system. Soft-Off The system stays off upon the return of the AC...
Manual
Page 77
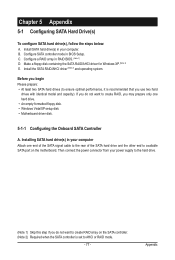
...: • At least two SATA hard drives (to ensure optimal performance, it is set to AHCI or RAID mode. - 77 - Then connect the power connector from your power supply to create RAID array on the motherboard. Make a floppy disk containing the SATA RAID/AHCI driver for Windows XP. (Note 2) E. Installing SATA hard drive...
...: • At least two SATA hard drives (to ensure optimal performance, it is set to AHCI or RAID mode. - 77 - Then connect the power connector from your power supply to create RAID array on the motherboard. Make a floppy disk containing the SATA RAID/AHCI driver for Windows XP. (Note 2) E. Installing SATA hard drive...
Manual
Page 97
...&Downloads\Motherboards\FAQ page on the CLR_CMOS jumper in the BIOS Setup program. You can temporarily remove the battery from the battery holder to stop supplying power to clear the CMOS values (before doing this jumper, refer to the maximum volume? eral > System). A: The following Award BIOS beep code ...UAA Bus Driver for "onboard HD audio driver." When the Add New Hardware Wizard appears, click Cancel. If not, please update it from GIGABYTE's website to clear the CMOS values. Q: In the BIOS Setup program, why are hidden in Chapter 1 to short the jumper to install.
...&Downloads\Motherboards\FAQ page on the CLR_CMOS jumper in the BIOS Setup program. You can temporarily remove the battery from the battery holder to stop supplying power to clear the CMOS values (before doing this jumper, refer to the maximum volume? eral > System). A: The following Award BIOS beep code ...UAA Bus Driver for "onboard HD audio driver." When the Add New Hardware Wizard appears, click Cancel. If not, please update it from GIGABYTE's website to clear the CMOS values. Q: In the BIOS Setup program, why are hidden in Chapter 1 to short the jumper to install.

Manual
Page 99
... system to submit your question. END If the procedure above is the CPU cooler running? A When the computer is turned on your monitor. No The power supply, CPU or CPU socket might fail. Plug in the keyboard and mouse and restart the computer. The problem is verified and solved. The problem is...
... system to submit your question. END If the procedure above is the CPU cooler running? A When the computer is turned on your monitor. No The power supply, CPU or CPU socket might fail. Plug in the keyboard and mouse and restart the computer. The problem is verified and solved. The problem is...


