Manual
Page 1
GA-880GM-UD2H/ GA-880GM-US2H AM3 socket motherboard for AMD Phenom™ II processor/AMD Athlon™ II processor User's Manual Rev. 1001 12ME-88GMU2H-1001R
GA-880GM-UD2H/ GA-880GM-US2H AM3 socket motherboard for AMD Phenom™ II processor/AMD Athlon™ II processor User's Manual Rev. 1001 12ME-88GMU2H-1001R

Manual
Page 7
GA-880GM-UD2H/GA-880GM-US2H Motherboard Layout KB_MS_USB ATX_12V_2X4 VGA_DVI Socket AM3 M_BIOS B_BIOS ATX FDD iTE IT8720 HDMI OPTICAL ESATA_1394_USB CPU_FAN USB_LAN F_AUDIO AUDIO PCIEX1 AMD 880G PCIEX16 RTL8111D CD_IN CODEC PCI1 GA-880GM-UD2H/GA-880GM-US2H BAT CLR_CMOS PCI2 TSB43AB23 DDR3_1 DDR3_2 DDR3_4 IDE DDR3_3 AMD SB710 SATA2_4 SPDIF_IO COM F_1394_1 SYS_FAN F_USB1 F_USB2 F_USB3 SATA2_1 SATA2_3 SATA2_0 SATA2_2 F_PANEL "*" The GA-880GM-UD2H adopts All-Solid Capacitor design. - 7 -
GA-880GM-UD2H/GA-880GM-US2H Motherboard Layout KB_MS_USB ATX_12V_2X4 VGA_DVI Socket AM3 M_BIOS B_BIOS ATX FDD iTE IT8720 HDMI OPTICAL ESATA_1394_USB CPU_FAN USB_LAN F_AUDIO AUDIO PCIEX1 AMD 880G PCIEX16 RTL8111D CD_IN CODEC PCI1 GA-880GM-UD2H/GA-880GM-US2H BAT CLR_CMOS PCI2 TSB43AB23 DDR3_1 DDR3_2 DDR3_4 IDE DDR3_3 AMD SB710 SATA2_4 SPDIF_IO COM F_1394_1 SYS_FAN F_USB1 F_USB2 F_USB3 SATA2_1 SATA2_3 SATA2_0 SATA2_2 F_PANEL "*" The GA-880GM-UD2H adopts All-Solid Capacitor design. - 7 -
Manual
Page 8
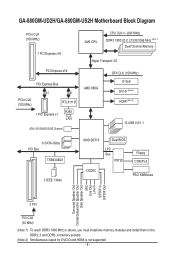
GA-880GM-UD2H/GA-880GM-US2H Motherboard Block Diagram PCIe CLK (100 MHz) 1 PCI Express x16 PCI Express x16 PCI Express Bus x1 x1 PCIe ... CPU CPU CLK+/- (200 MHz) DDR3 1800 (O.C.)/1333/1066 MHz (Note 1) Dual Channel Memory Hyper Transport 3.0 AMD 880G GFX CLK (100 MHz) D-Sub DVI-D (Note 2) HDMI (Note 2) 12 USB 2.0/1.1 6 SATA 3Gb/s PCI Bus TSB43AB23 2 IEEE 1394a... AMD SB710 Dual BIOS LPC Bus IT8720 CODEC Floppy COM Port PS/2 KB/Mouse Surround Speaker Out Center/Subwoofer Speaker Out Side ...
GA-880GM-UD2H/GA-880GM-US2H Motherboard Block Diagram PCIe CLK (100 MHz) 1 PCI Express x16 PCI Express x16 PCI Express Bus x1 x1 PCIe ... CPU CPU CLK+/- (200 MHz) DDR3 1800 (O.C.)/1333/1066 MHz (Note 1) Dual Channel Memory Hyper Transport 3.0 AMD 880G GFX CLK (100 MHz) D-Sub DVI-D (Note 2) HDMI (Note 2) 12 USB 2.0/1.1 6 SATA 3Gb/s PCI Bus TSB43AB23 2 IEEE 1394a... AMD SB710 Dual BIOS LPC Bus IT8720 CODEC Floppy COM Port PS/2 KB/Mouse Surround Speaker Out Center/Subwoofer Speaker Out Side ...
Manual
Page 19
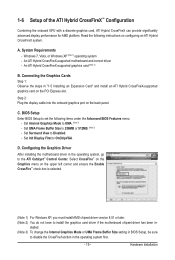
...™ Control Center. D. Step 2: Plug the display cable into the onboard graphics port on the PCI Express slot. Configuring the Graphics Driver After installing the motherboard driver in - System Requirements - Windows 7, Vista, or Windows XP (Note 1) operating system - Set Internal Graphics Mode to 256MB or 512MB. (Note 3) -...™ Configuration Combining the onboard GPU with a discrete graphics card, ATI Hybrid CrossFireX can provide significantly advanced display performance for AMD platform. An ATI Hybrid CrossFireX-supported motherboard and correct driver -
...™ Control Center. D. Step 2: Plug the display cable into the onboard graphics port on the PCI Express slot. Configuring the Graphics Driver After installing the motherboard driver in - System Requirements - Windows 7, Vista, or Windows XP (Note 1) operating system - Set Internal Graphics Mode to 256MB or 512MB. (Note 3) -...™ Configuration Combining the onboard GPU with a discrete graphics card, ATI Hybrid CrossFireX can provide significantly advanced display performance for AMD platform. An ATI Hybrid CrossFireX-supported motherboard and correct driver -

Manual
Page 88
... during the rebuilding process. Step 2: Select the RAID array to start the rebuilding process. Then launch the AMD RAIDXpert from the motherboard driver disk. Step 4: The rebuilding progress is added to replace a failed drive to launch AMD RAIDXpert. While in to rebuild a RAID 1 array. Step 3: Select one available drive and click Start Now...
... during the rebuilding process. Step 2: Select the RAID array to start the rebuilding process. Then launch the AMD RAIDXpert from the motherboard driver disk. Step 4: The rebuilding progress is added to replace a failed drive to launch AMD RAIDXpert. While in to rebuild a RAID 1 array. Step 3: Select one available drive and click Start Now...


