Manual
Page 3
... In order to the specifications and features in the use GIGABYTE's unique features, read or download the information on/from the Support&Downloads\Motherboard\Technology Guide page on your motherboard revision before updating motherboard BIOS, drivers, or when looking for technical information. For example, "REV: 1.0" means the revision of the product, read the User's Manual. For detailed product information, carefully read the Quick Installation Guide included with the...
... In order to the specifications and features in the use GIGABYTE's unique features, read or download the information on/from the Support&Downloads\Motherboard\Technology Guide page on your motherboard revision before updating motherboard BIOS, drivers, or when looking for technical information. For example, "REV: 1.0" means the revision of the product, read the User's Manual. For detailed product information, carefully read the Quick Installation Guide included with the...
Manual
Page 4
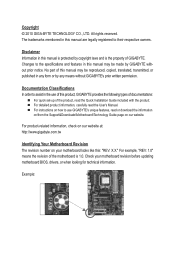
...Layout 7 GA-880GM-UD2H/GA-880GM-US2H Motherboard Block Diagram 8 Chapter 1 Hardware Installation 9 1-1 Installation Precautions 9 1-2 Product Specifications 10 1-3 Installing the CPU and CPU Cooler 13 1-3-1 Installing the CPU 13 1-3-2 Installing the CPU Cooler 15 1-4 Installing the Memory 16 1-4-1 Dual Channel Memory Configuration 16 1-4-2 Installing a Memory 17 1-5 Installing an Expansion Card 18 1-6 Setup of the ATI Hybrid CrossFireX™ Configuration 19 1-7 Back Panel Connectors 20 1-8 Internal Connectors 23 Chapter 2 BIOS Setup 33 2-1 Startup Screen 34 2-2 The Main Menu...
...Layout 7 GA-880GM-UD2H/GA-880GM-US2H Motherboard Block Diagram 8 Chapter 1 Hardware Installation 9 1-1 Installation Precautions 9 1-2 Product Specifications 10 1-3 Installing the CPU and CPU Cooler 13 1-3-1 Installing the CPU 13 1-3-2 Installing the CPU Cooler 15 1-4 Installing the Memory 16 1-4-1 Dual Channel Memory Configuration 16 1-4-2 Installing a Memory 17 1-5 Installing an Expansion Card 18 1-6 Setup of the ATI Hybrid CrossFireX™ Configuration 19 1-7 Back Panel Connectors 20 1-8 Internal Connectors 23 Chapter 2 BIOS Setup 33 2-1 Startup Screen 34 2-2 The Main Menu...
Manual
Page 5
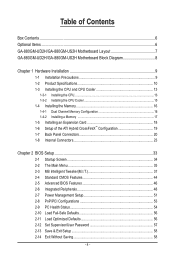
... @BIOS Utility 69 4-3 EasyTune 6...70 4-4 Easy Energy Saver 71 4-5 Q-Share...73 4-6 SMART Recovery 74 4-7 Auto Green...75 Chapter 5 Appendix...77 5-1 Configuring SATA Hard Drive(s 77 5-1-1 Configuring the Onboard SATA Controller 77 5-1-2 Making a SATA RAID/AHCI Driver Diskette 83 5-1-3 Installing the SATA RAID/AHCI Driver and Operating System 85 5-2 Configuring Audio Input and Output 89 5-2-1 Configuring 2/4/5.1/7.1-Channel Audio 89 5-2-2 Configuring S/PDIF In/Out 91 5-2-3 Enabling the Dolby Home Theater Functionj 93 5-2-4 Configuring Microphone Recording 94 5-2-5 Using the Sound...
... @BIOS Utility 69 4-3 EasyTune 6...70 4-4 Easy Energy Saver 71 4-5 Q-Share...73 4-6 SMART Recovery 74 4-7 Auto Green...75 Chapter 5 Appendix...77 5-1 Configuring SATA Hard Drive(s 77 5-1-1 Configuring the Onboard SATA Controller 77 5-1-2 Making a SATA RAID/AHCI Driver Diskette 83 5-1-3 Installing the SATA RAID/AHCI Driver and Operating System 85 5-2 Configuring Audio Input and Output 89 5-2-1 Configuring 2/4/5.1/7.1-Channel Audio 89 5-2-2 Configuring S/PDIF In/Out 91 5-2-3 Enabling the Dolby Home Theater Functionj 93 5-2-4 Configuring Microphone Recording 94 5-2-5 Using the Sound...
Manual
Page 10
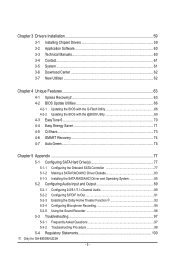
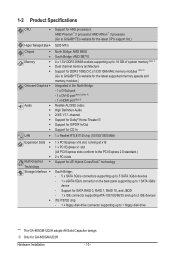
...1, RAID 10, and JBOD - 1 x IDE connector supporting ATA-133/100/66/33 and up to 2 IDE devices iTE IT8720 chip: - 1 x floppy disk drive connector supporting up to 1 floppy disk drive "*" The GA-880GM-UD2H adopts All-Solid Capacitor design. 1-2 Product Specifications CPU Support for AM3 processors: AMD Phenom™ II processor/ AMD Athlon™ II processor (Go to GIGABYTE's website for the latest CPU support list.) Hyper Transport Bus 5200 MT/s Chipset Memory Onboard Graphics Audio...
...1, RAID 10, and JBOD - 1 x IDE connector supporting ATA-133/100/66/33 and up to 2 IDE devices iTE IT8720 chip: - 1 x floppy disk drive connector supporting up to 1 floppy disk drive "*" The GA-880GM-UD2H adopts All-Solid Capacitor design. 1-2 Product Specifications CPU Support for AM3 processors: AMD Phenom™ II processor/ AMD Athlon™ II processor (Go to GIGABYTE's website for the latest CPU support list.) Hyper Transport Bus 5200 MT/s Chipset Memory Onboard Graphics Audio...
Manual
Page 18
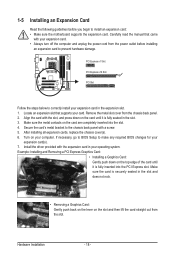
... panel. 2. Secure the card's metal bracket to prevent hardware damage. After installing all expansion cards, replace the chassis cover(s). 6. If necessary, go to BIOS Setup to correctly install your operating system. Make sure the card is fully seated in the expansion slot. 1. PCI Express x1 Slot PCI Express x16 Slot PCI Slot Follow the steps below to make any required BIOS changes for your computer. Install the driver provided with your card. Example: Installing and Removing a PCI Express Graphics Card...
... panel. 2. Secure the card's metal bracket to prevent hardware damage. After installing all expansion cards, replace the chassis cover(s). 6. If necessary, go to BIOS Setup to correctly install your operating system. Make sure the card is fully seated in the expansion slot. 1. PCI Express x1 Slot PCI Express x16 Slot PCI Slot Follow the steps below to make any required BIOS changes for your computer. Install the driver provided with your card. Example: Installing and Removing a PCI Express Graphics Card...
Manual
Page 19
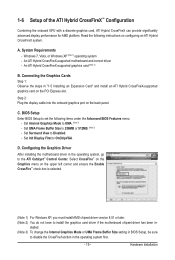
... install AMD chipset driver version 8.51 or later. (Note 2) You do not have to UMA. (Note 3) - Hardware Installation Windows 7, Vista, or Windows XP (Note 1) operating system - Step 2: Plug the display cable into the onboard graphics port on the PCI Express slot. Read the following items under the Advanced BIOS Features menu: - An ATI Hybrid CrossFireX-supported graphics card (Note 2) B. Select CrossFire™ on the Graphics menu on configuring an ATI Hybrid CrossFireX system. System Requirements - Set Internal Graphics Mode...
... install AMD chipset driver version 8.51 or later. (Note 2) You do not have to UMA. (Note 3) - Hardware Installation Windows 7, Vista, or Windows XP (Note 1) operating system - Step 2: Plug the display cable into the onboard graphics port on the PCI Express slot. Read the following items under the Advanced BIOS Features menu: - An ATI Hybrid CrossFireX-supported graphics card (Note 2) B. Select CrossFire™ on the Graphics menu on configuring an ATI Hybrid CrossFireX system. System Requirements - Set Internal Graphics Mode...
Manual
Page 31
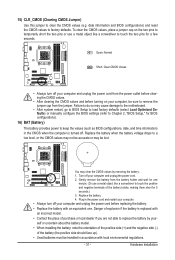
... computer is replaced with an equivalent one minute. (Or use a metal object like a screwdriver to touch the two pins for 5 seconds.) 3. Failure to do so may cause damage to the motherboard. • After system restart, go to BIOS Setup to load factory defaults (select Load Optimized Defaults) or manually configure the BIOS settings (refer to Chapter 2, "BIOS Setup," for BIOS configurations). 16) BAT (Battery) The battery provides power to clear the CMOS values (e.g. Turn off...
... computer is replaced with an equivalent one minute. (Or use a metal object like a screwdriver to touch the two pins for 5 seconds.) 3. Failure to do so may cause damage to the motherboard. • After system restart, go to BIOS Setup to load factory defaults (select Load Optimized Defaults) or manually configure the BIOS settings (refer to Chapter 2, "BIOS Setup," for BIOS configurations). 16) BAT (Battery) The battery provides power to clear the CMOS values (e.g. Turn off...
Manual
Page 34
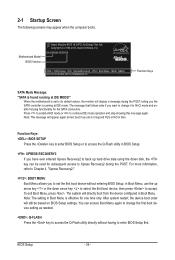
... change the first boot device setting as needed. : Q-FLASH Press the key to accept. In Boot Menu, use the up hard drive data using the driver disk, the key can access Boot Menu again to change it to enter BIOS Setup first. To exit Boot Menu, press . Function Keys: : BIOS SETUP Press the key to enter BIOS Setup or to access the Q-Flash utility in BIOS Setup. : XPRESS RECOVERY2 If you do not respond YES or NO in Boot Menu is set the first boot device without having to AHCI mode and enable hot plug...
... change the first boot device setting as needed. : Q-FLASH Press the key to accept. In Boot Menu, use the up hard drive data using the driver disk, the key can access Boot Menu again to change it to enter BIOS Setup first. To exit Boot Menu, press . Function Keys: : BIOS SETUP Press the key to enter BIOS Setup or to access the Q-Flash utility in BIOS Setup. : XPRESS RECOVERY2 If you do not respond YES or NO in Boot Menu is set the first boot device without having to AHCI mode and enable hot plug...

Manual
Page 36
... CPU, memory, etc. Standard CMOS Features Use this menu to configure the system time and date, hard drive types, floppy disk drive types, and the type of errors that stop the system boot, etc. Advanced BIOS Features Use this menu to configure the device boot order, advanced features available on the CPU, and the primary display adapter. Integrated Peripherals Use this menu to configure all peripheral devices, such as IDE, SATA, USB, integrated audio, and integrated LAN, etc. Power Management Setup Use...
... CPU, memory, etc. Standard CMOS Features Use this menu to configure the system time and date, hard drive types, floppy disk drive types, and the type of errors that stop the system boot, etc. Advanced BIOS Features Use this menu to configure the device boot order, advanced features available on the CPU, and the primary display adapter. Integrated Peripherals Use this menu to configure all peripheral devices, such as IDE, SATA, USB, integrated audio, and integrated LAN, etc. Power Management Setup Use...
Manual
Page 39
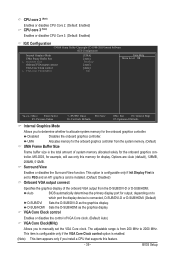
... Display First is set the VGA Core clock. D-SUB/HDMI Sets the D-SUB/HDMI as the graphics display. BIOS Setup CPU core 2 (Note) Enables or disables CPU Core 2. (Default: Enabled) CPU core 3 (Note) Enables or disables CPU Core 3. (Default: Enabled) IGX Configuration CMOS Setup Utility-Copyright (C) 1984-2010 Award Software IGX Configuration Internal Graphics Mode UMA Frame Buffer Size x Surround View Onboard VGA output connect VGA Core Clock control x VGA Core Clock(MHz) [UMA] [Auto] Disabled [Auto] [Auto] 500 Item Help Menu Level Move Enter: Select...
... Display First is set the VGA Core clock. D-SUB/HDMI Sets the D-SUB/HDMI as the graphics display. BIOS Setup CPU core 2 (Note) Enables or disables CPU Core 2. (Default: Enabled) CPU core 3 (Note) Enables or disables CPU Core 3. (Default: Enabled) IGX Configuration CMOS Setup Utility-Copyright (C) 1984-2010 Award Software IGX Configuration Internal Graphics Mode UMA Frame Buffer Size x Surround View Onboard VGA output connect VGA Core Clock control x VGA Core Clock(MHz) [UMA] [Auto] Disabled [Auto] [Auto] 500 Item Help Menu Level Move Enter: Select...
Manual
Page 40
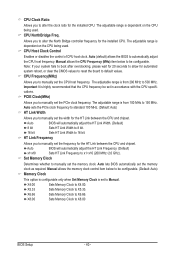
... Clock Control Enables or disables the control of CPU host clock. Auto (default) allows the BIOS to alter the clock ratio for the installed CPU. Note: If your system fails to boot after overclocking, please wait for 20 seconds to allow for automated system reboot, or clear the CMOS values to reset the board to manually set the width for the HT Link between the CPU and chipset. CPU Frequency(MHz) Allows you to manually set the frequency...
... Clock Control Enables or disables the control of CPU host clock. Auto (default) allows the BIOS to alter the clock ratio for the installed CPU. Note: If your system fails to boot after overclocking, please wait for 20 seconds to allow for automated system reboot, or clear the CMOS values to reset the board to manually set the width for the HT Link between the CPU and chipset. CPU Frequency(MHz) Allows you to manually set the frequency...
Manual
Page 46
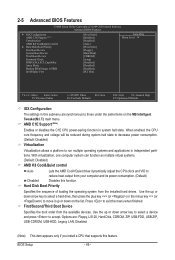
... Tweaker(M.I.T.) main menu. With virtualization, one computer system can function as multiple virtual systems. (Default: Disabled) AMD K8 Cool&Quiet control Auto Lets the AMD Cool'n'Quiet driver dynamically adjust the CPU clock and VID to accept. Options are synchronous to HDD Init Display First [Press Enter] [Disabled] [Disabled] [Auto] [Press Enter] [Floppy] [Hard Disk] [CDROM] [Setup] [Disabled] [Disabled] [Disabled] [PCI Slot] Item Help Menu Level Move Enter: Select F5: Previous Values +/-/PU/PD: Value F10: Save F6: Fail-Safe Defaults ESC...
... Tweaker(M.I.T.) main menu. With virtualization, one computer system can function as multiple virtual systems. (Default: Disabled) AMD K8 Cool&Quiet control Auto Lets the AMD Cool'n'Quiet driver dynamically adjust the CPU clock and VID to accept. Options are synchronous to HDD Init Display First [Press Enter] [Disabled] [Disabled] [Auto] [Press Enter] [Floppy] [Hard Disk] [CDROM] [Setup] [Disabled] [Disabled] [Disabled] [PCI Slot] Item Help Menu Level Move Enter: Select F5: Previous Values +/-/PU/PD: Value F10: Save F6: Fail-Safe Defaults ESC...
Manual
Page 47
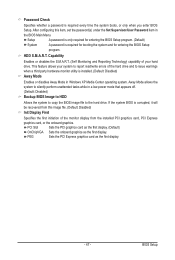
... system boots, or only when you enter BIOS Setup. HDD S.M.A.R.T. This feature allows your hard drive. If the system BIOS is installed. (Default: Disabled) Away Mode Enables or disables Away Mode in a low-power mode that appears off. (Default: Disabled) Backup BIOS Image to HDD Allows the system to copy the BIOS image file to issue warnings when a third party hardware monitor utility is corrupted, it will be recovered from the installed PCI graphics card, PCI Express graphics card, or the onboard graphics. PEG Sets the PCI Express graphics card...
... system boots, or only when you enter BIOS Setup. HDD S.M.A.R.T. This feature allows your hard drive. If the system BIOS is installed. (Default: Disabled) Away Mode Enables or disables Away Mode in a low-power mode that appears off. (Default: Disabled) Backup BIOS Image to HDD Allows the system to copy the BIOS image file to issue warnings when a third party hardware monitor utility is corrupted, it will be recovered from the installed PCI graphics card, PCI Express graphics card, or the onboard graphics. PEG Sets the PCI Express graphics card...
Manual
Page 48
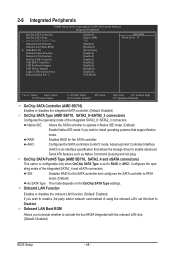
... storage driver to PATA mode. (Default) As SATA Type The mode depends on the OnChip SATA Type settings. 2-6 Integrated Peripherals CMOS Setup Utility-Copyright (C) 1984-2010 Award Software Integrated Peripherals OnChip SATA Controller OnChip SATA Type x OnChip SATA Port4/5 Type Onboard LAN Function Onboard LAN Boot ROM } SMART LAN Onboard Audio Function Onboard 1394 Function OnChip USB Controller USB EHCI Controller USB Keyboard Support USB Mouse Support Legacy USB storage detect Onboard Serial Port 1 [Enabled] [Native IDE] IDE [Enabled] [Disabled...
... storage driver to PATA mode. (Default) As SATA Type The mode depends on the OnChip SATA Type settings. 2-6 Integrated Peripherals CMOS Setup Utility-Copyright (C) 1984-2010 Award Software Integrated Peripherals OnChip SATA Controller OnChip SATA Type x OnChip SATA Port4/5 Type Onboard LAN Function Onboard LAN Boot ROM } SMART LAN Onboard Audio Function Onboard 1394 Function OnChip USB Controller USB EHCI Controller USB Keyboard Support USB Mouse Support Legacy USB storage detect Onboard Serial Port 1 [Enabled] [Native IDE] IDE [Enabled] [Disabled...
Manual
Page 51
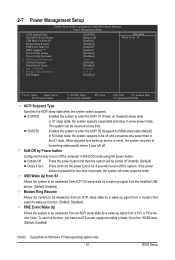
.... 2-7 Power Management Setup CMOS Setup Utility-Copyright (C) 1984-2010 Award Software Power Management Setup ACPI Suspend Type Soft-Off by Power button USB Wake Up from S3 Modem Ring Resume PME Event Wake Up HPET Support (Note) Power On By Mouse Power On By Keyboard x KB Power ON Password AC Back Function Power-On by a wake-up signal from a PCI or PCIe device. Press and hold the power button for less than in a low power mode. S1(POS) Enables the system to enter...
.... 2-7 Power Management Setup CMOS Setup Utility-Copyright (C) 1984-2010 Award Software Power Management Setup ACPI Suspend Type Soft-Off by Power button USB Wake Up from S3 Modem Ring Resume PME Event Wake Up HPET Support (Note) Power On By Mouse Power On By Keyboard x KB Power ON Password AC Back Function Power-On by a wake-up signal from a PCI or PCIe device. Press and hold the power button for less than in a low power mode. S1(POS) Enables the system to enter...
Manual
Page 77
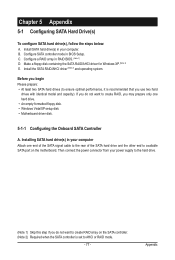
... steps below: A. Installing SATA hard drive(s) in BIOS Setup. Configure SATA controller mode in your power supply to create RAID array on the motherboard. B. C. Make a floppy disk containing the SATA RAID/AHCI driver for Windows XP. (Note 2) E. Then connect the power connector from your computer Attach one hard drive. • An empty formatted floppy disk. • Windows Vista/XP setup disk. • Motherboard driver disk. 5-1-1 Configuring the Onboard SATA Controller A. If you do not want to create RAID, you may prepare only one end of the SATA signal cable to the...
... steps below: A. Installing SATA hard drive(s) in BIOS Setup. Configure SATA controller mode in your power supply to create RAID array on the motherboard. B. C. Make a floppy disk containing the SATA RAID/AHCI driver for Windows XP. (Note 2) E. Then connect the power connector from your computer Attach one hard drive. • An empty formatted floppy disk. • Windows Vista/XP setup disk. • Motherboard driver disk. 5-1-1 Configuring the Onboard SATA Controller A. If you do not want to create RAID, you may prepare only one end of the SATA signal cable to the...
Manual
Page 83
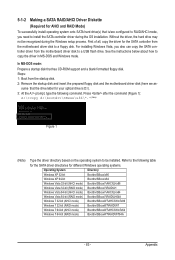
...: 1: Boot from the motherboard driver disk to install the SATA controller driver during the Windows setup process. Press after the command (Figure 1): A:\>copy d:\bootdrv\SBxxx\x86\*.* (Note) Figure 1 (Note) Type the driver directory based on the operating system to a USB flash drive. For installing Windows Vista, you need to a floppy disk. sume that has CD-ROM support and a blank formatted floppy disk. 5-1-2 Making a SATA RAID/AHCI Driver Diskette (Required for AHCI and RAID Mode) To successfully install operating system onto SATA hard drive(s) that...
...: 1: Boot from the motherboard driver disk to install the SATA controller driver during the Windows setup process. Press after the command (Figure 1): A:\>copy d:\bootdrv\SBxxx\x86\*.* (Note) Figure 1 (Note) Type the driver directory based on the operating system to a USB flash drive. For installing Windows Vista, you need to a floppy disk. sume that has CD-ROM support and a blank formatted floppy disk. 5-1-2 Making a SATA RAID/AHCI Driver Diskette (Required for AHCI and RAID Mode) To successfully install operating system onto SATA hard drive(s) that...
Manual
Page 85
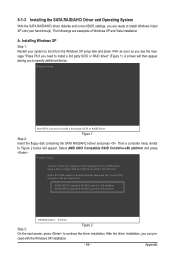
... Windows XP installation. - 85 - A. After the driver installation, you need to the previous screen. Windows Setup Press F6 if you to install a 3rd party SCSI or RAID driver" (Figure 1). 5-1-3 Installing the SATA RAID/AHCI Driver and Operating System With the SATA RAID/AHCI driver diskette and correct BIOS settings, you are examples of Windows XP and Vista installation. ceed with Windows, using a device support disk provided by an adapter manufacturer. Select AMD AHCI Compatible RAID Controller-x86 platform and press . A screen will appear. Then a controller menu...
... Windows XP installation. - 85 - A. After the driver installation, you need to the previous screen. Windows Setup Press F6 if you to install a 3rd party SCSI or RAID driver" (Figure 1). 5-1-3 Installing the SATA RAID/AHCI Driver and Operating System With the SATA RAID/AHCI driver diskette and correct BIOS settings, you are examples of Windows XP and Vista installation. ceed with Windows, using a device support disk provided by an adapter manufacturer. Select AMD AHCI Compatible RAID Controller-x86 platform and press . A screen will appear. Then a controller menu...
Manual
Page 89
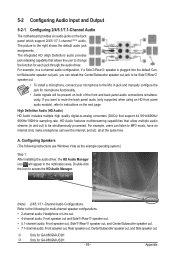
... GA-880GM-UD2H k Only for each jack through the audio driver. ter/Subwoofer speaker out jack, you want to mute the back panel audio (only supported when using an HD front panel audio module), refer to instructions on the back panel which support 2/4/5.1/7.1-channel (Note) audio. HD Audio features multistreaming capabilities that allow multiple audio streams (in a 4-channel audio configuration, if a Sidej/Reark speaker is plugged into the default Cen- High Definition Audio (HD Audio) HD Audio includes multiple high...
... GA-880GM-UD2H k Only for each jack through the audio driver. ter/Subwoofer speaker out jack, you want to mute the back panel audio (only supported when using an HD front panel audio module), refer to instructions on the back panel which support 2/4/5.1/7.1-channel (Note) audio. HD Audio features multistreaming capabilities that allow multiple audio streams (in a 4-channel audio configuration, if a Sidej/Reark speaker is plugged into the default Cen- High Definition Audio (HD Audio) HD Audio includes multiple high...
Manual
Page 97
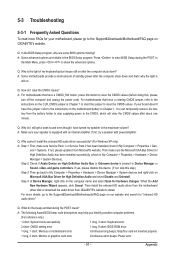
... problems. (For reference only.) 1 short: System boots successfully 1 long, 3 short: Keyboard error 2 short: CMOS setting error 1 long, 9 short: BIOS ROM error 1 long, 1 short: Memory or motherboard error Continuous long beeps: Graphics card not inserted properly 1 long, 2 short: Monitor or graphics card error Continuous short beeps: Power error - 97 - In the Main Menu, press + to install. Q: Why do I have a clearing CMOS jumper, refer to the instructions on the CLR_CMOS jumper in Chapter 1. If yes, please disable this device. (If not, skip this jumper, refer to clear...
... problems. (For reference only.) 1 short: System boots successfully 1 long, 3 short: Keyboard error 2 short: CMOS setting error 1 long, 9 short: BIOS ROM error 1 long, 1 short: Memory or motherboard error Continuous long beeps: Graphics card not inserted properly 1 long, 2 short: Monitor or graphics card error Continuous short beeps: Power error - 97 - In the Main Menu, press + to install. Q: Why do I have a clearing CMOS jumper, refer to the instructions on the CLR_CMOS jumper in Chapter 1. If yes, please disable this device. (If not, skip this jumper, refer to clear...


