Manual
Page 3
...information on/from the Support&Downloads\Motherboard\Technology Guide page on your motherboard revision before updating motherboard BIOS, drivers, or when looking for technical information. Documentation Classifications In order to assist in this product, GIGABYTE provides the following types of documentations... any means without prior notice. For product-related information, check on our website at: http://www.gigabyte.com.tw Identifying Your Motherboard Revision The revision number on our website. Disclaimer Information in this manual may be reproduced, copied, ...
...information on/from the Support&Downloads\Motherboard\Technology Guide page on your motherboard revision before updating motherboard BIOS, drivers, or when looking for technical information. Documentation Classifications In order to assist in this product, GIGABYTE provides the following types of documentations... any means without prior notice. For product-related information, check on our website at: http://www.gigabyte.com.tw Identifying Your Motherboard Revision The revision number on our website. Disclaimer Information in this manual may be reproduced, copied, ...
Manual
Page 6
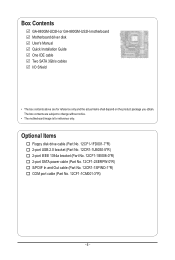
Box Contents GA-880GM-UD2H or GA-880GM-US2H motherboard Motherboard driver disk User's Manual Quick Installation Guide One IDE cable Two SATA 3Gb/s cables I/O Shield • The box contents above are subject to change without notice. • The motherboard image is for reference only and the actual items shall depend on the product package you obtain. The box contents...
Box Contents GA-880GM-UD2H or GA-880GM-US2H motherboard Motherboard driver disk User's Manual Quick Installation Guide One IDE cable Two SATA 3Gb/s cables I/O Shield • The box contents above are subject to change without notice. • The motherboard image is for reference only and the actual items shall depend on the product package you obtain. The box contents...
Manual
Page 18
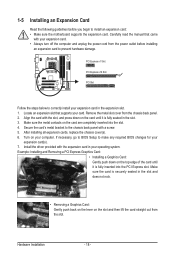
... out from the slot. Turn on the top edge of the card until it is fully inserted into the slot. 4. Install the driver provided with the slot, and press down on your operating system. Locate an expansion slot that came with a screw. 5. If necessary...read the manual that supports your expansion card(s). 7. Secure the card's metal bracket to install an expansion card: • Make sure the motherboard supports the expansion card. After installing all expansion cards, replace the chassis cover(s). 6. 1-5 Installing an Expansion Card Read the following guidelines before...
... out from the slot. Turn on the top edge of the card until it is fully inserted into the slot. 4. Install the driver provided with the slot, and press down on your operating system. Locate an expansion slot that came with a screw. 5. If necessary...read the manual that supports your expansion card(s). 7. Secure the card's metal bracket to install an expansion card: • Make sure the motherboard supports the expansion card. After installing all expansion cards, replace the chassis cover(s). 6. 1-5 Installing an Expansion Card Read the following guidelines before...
Manual
Page 19
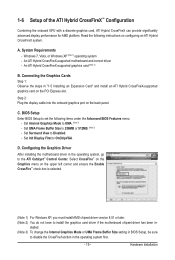
... ATI Hybrid CrossFireX system. C. Set UMA Frame Buffer Size to OnChipVGA. System Requirements - D. Configuring the Graphics Driver After installing the motherboard driver in "1-5 Installing an Expansion Card" and install an ATI Hybrid CrossFireX-supported graphics card on the back panel. ... CrossFireX can provide significantly advanced display performance for AMD platform. An ATI Hybrid CrossFireX-supported motherboard and correct driver - Hardware Installation Connecting the Graphics Cards Step 1: Observe the steps in the operating system, go to install...
... ATI Hybrid CrossFireX system. C. Set UMA Frame Buffer Size to OnChipVGA. System Requirements - D. Configuring the Graphics Driver After installing the motherboard driver in "1-5 Installing an Expansion Card" and install an ATI Hybrid CrossFireX-supported graphics card on the back panel. ... CrossFireX can provide significantly advanced display performance for AMD platform. An ATI Hybrid CrossFireX-supported motherboard and correct driver - Hardware Installation Connecting the Graphics Cards Step 1: Observe the steps in the operating system, go to install...
Manual
Page 34
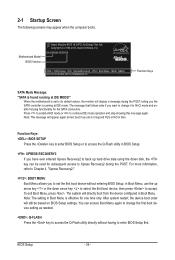
...during the POST, telling you the SATA controller is running at IDE MODE!" In Boot Menu, use the up hard drive data using the driver disk, the key can access Boot Menu again to change it to enter BIOS Setup first. After system restart, the device boot order ... POST. When the motherboard is set the first boot device without having to AHCI mode and enable hot plug functionality for the SATA connectors. To exit Boot Menu, press . You can be based on BIOS Setup settings. 2-1 Startup Screen The following screens may appear when the computer boots. GA-880GM-US2H E4 . . ....
...during the POST, telling you the SATA controller is running at IDE MODE!" In Boot Menu, use the up hard drive data using the driver disk, the key can access Boot Menu again to change it to enter BIOS Setup first. After system restart, the device boot order ... POST. When the motherboard is set the first boot device without having to AHCI mode and enable hot plug functionality for the SATA connectors. To exit Boot Menu, press . You can be based on BIOS Setup settings. 2-1 Startup Screen The following screens may appear when the computer boots. GA-880GM-US2H E4 . . ....
Manual
Page 59
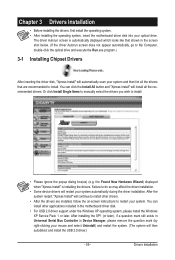
Or click Install Single Items to manually select the drivers you wish to install other applications included in the motherboard driver disk. • For USB 2.0 driver support under the Windows XP operating system, please install the Windows XP Service Pack 1 or later. Drivers Installation the Found New Hardware Wizard) displayed when "Xpress Install" is automatically displayed...
Or click Install Single Items to manually select the drivers you wish to install other applications included in the motherboard driver disk. • For USB 2.0 driver support under the Windows XP operating system, please install the Windows XP Service Pack 1 or later. Drivers Installation the Found New Hardware Wizard) displayed when "Xpress Install" is automatically displayed...
Manual
Page 60
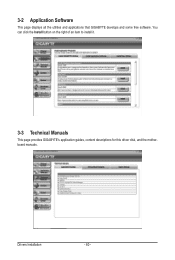
3-2 Application Software This page displays all the utilities and applications that GIGABYTE develops and some free software. You can click the Install button on the right of an item to install it. 3-3 Technical Manuals This page provides GIGABYTE's application guides, content descriptions for this driver disk, and the motherboard manuals. Drivers Installation - 60 -
3-2 Application Software This page displays all the utilities and applications that GIGABYTE develops and some free software. You can click the Install button on the right of an item to install it. 3-3 Technical Manuals This page provides GIGABYTE's application guides, content descriptions for this driver disk, and the motherboard manuals. Drivers Installation - 60 -

Manual
Page 64
... select Manage. Using the Backup Function in Xpress Recovery2 for the first time. Step 1: Select BACKUP to store the backup image file. Boot from the motherboard driver disk to enter Xpress Recovery2 later, simply press during the POST. Please note that if there is recommended; Go to Disk Management to check disk...
... select Manage. Using the Backup Function in Xpress Recovery2 for the first time. Step 1: Select BACKUP to store the backup image file. Boot from the motherboard driver disk to enter Xpress Recovery2 later, simply press during the POST. Please note that if there is recommended; Go to Disk Management to check disk...

Manual
Page 73
...Incoming Folder : C:\Q-ShareFolder Change Incoming Folder : C:\Q-ShareFolder Update Q-Share ... Directions for using Q-Share After installing Q-Share from the motherboard driver disk, go to launch the Q-Share tool. Data Sharing Disabled Figure 2. Enable Incoming Folder ... After configuring your LAN connection settings... data folder to configure the data sharing settings. Disable Incoming Folder ... Unique Features exe to Start>All Programs>GIGABYTE>Q-Share. in the notification area and right-click on the same network, making full use of Internet resources....
...Incoming Folder : C:\Q-ShareFolder Change Incoming Folder : C:\Q-ShareFolder Update Q-Share ... Directions for using Q-Share After installing Q-Share from the motherboard driver disk, go to launch the Q-Share tool. Data Sharing Disabled Figure 2. Enable Incoming Folder ... After configuring your LAN connection settings... data folder to configure the data sharing settings. Disable Incoming Folder ... Unique Features exe to Start>All Programs>GIGABYTE>Q-Share. in the notification area and right-click on the same network, making full use of Internet resources....
Manual
Page 77
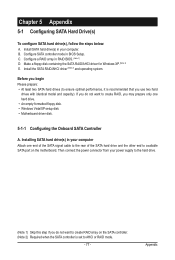
...hard drive(s) in your computer Attach one hard drive. • An empty formatted floppy disk. • Windows Vista/XP setup disk. • Motherboard driver disk. 5-1-1 Configuring the Onboard SATA Controller A. Before you may prepare only one end of the SATA signal cable to the rear of the SATA hard... prepare: • At least two SATA hard drives (to ensure optimal performance, it is set to create RAID array on the motherboard. Configure a RAID array in BIOS Setup. Chapter 5 Appendix 5-1 Configuring SATA Hard Drive(s) To configure SATA hard drive(s), follow the steps below: A.
...hard drive(s) in your computer Attach one hard drive. • An empty formatted floppy disk. • Windows Vista/XP setup disk. • Motherboard driver disk. 5-1-1 Configuring the Onboard SATA Controller A. Before you may prepare only one end of the SATA signal cable to the rear of the SATA hard... prepare: • At least two SATA hard drives (to ensure optimal performance, it is set to create RAID array on the motherboard. Configure a RAID array in BIOS Setup. Chapter 5 Appendix 5-1 Configuring SATA Hard Drive(s) To configure SATA hard drive(s), follow the steps below: A.
Manual
Page 83
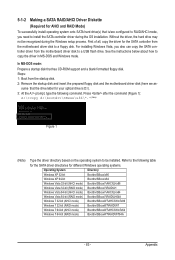
...startup disk. 2: Remove the startup disk and insert the prepared floppy disk and the motherboard driver disk (here we as- Without the driver, the hard drive may not be installed. Steps: 1: Boot from the motherboard driver disk to a floppy disk. In MS-DOS mode: Prepare a startup disk that ... D:\). 3: At the A:\> prompt, type the following table for the SATA driver directories for the SATA controller from the motherboard driver disk to a USB flash drive. First of all, copy the driver for different Windows operating systems. Operating System Directory Windows XP 32-bit Bootdrv\SBxxx...
...startup disk. 2: Remove the startup disk and insert the prepared floppy disk and the motherboard driver disk (here we as- Without the driver, the hard drive may not be installed. Steps: 1: Boot from the motherboard driver disk to a floppy disk. In MS-DOS mode: Prepare a startup disk that ... D:\). 3: At the A:\> prompt, type the following table for the SATA driver directories for the SATA controller from the motherboard driver disk to a USB flash drive. First of all, copy the driver for different Windows operating systems. Operating System Directory Windows XP 32-bit Bootdrv\SBxxx...

Manual
Page 84
... similar to that in Figure 3, to install Windows XP to the RAID/ AHCI hard drives, select 3) ATi AHCI/RAID Driver for XP. Select the controller driver by pressing the corresponding letter from the menu in Figure 3. 3: Insert the blank formatted disk. A Command Prompt window will... then automatically copy the driver files to exit when finished. Press any key to the floppy disk. In Windows mode: Steps: 1: Use an alternative system and insert the motherboard driver disk. 2: From your optical drive folder, double click the Menu.exe...
... similar to that in Figure 3, to install Windows XP to the RAID/ AHCI hard drives, select 3) ATi AHCI/RAID Driver for XP. Select the controller driver by pressing the corresponding letter from the menu in Figure 3. 3: Insert the blank formatted disk. A Command Prompt window will... then automatically copy the driver files to exit when finished. Press any key to the floppy disk. In Windows mode: Steps: 1: Use an alternative system and insert the motherboard driver disk. 2: From your optical drive folder, double click the Menu.exe...

Manual
Page 86
... and perform standard OS installation steps. Appendix Figure 4 - 86 - When a screen similar to the USB flash drive). Figure 3 Step 2: Insert the motherboard driver disk (Method A) or the removable storage device such as USB flash drive that only one RAID array exists in your system.) Step 1: Restart your system... LH (for Windows Vista 32-bit) or LH64A (for Windows Vista 64-bit) folder. B. Then use Method B to boot from the motherboard driver disk to a USB flash drive before installing Windows Vista (go to the BootDrv folder and save the whole SBxxxV folder to that below assumes that...
... and perform standard OS installation steps. Appendix Figure 4 - 86 - When a screen similar to the USB flash drive). Figure 3 Step 2: Insert the motherboard driver disk (Method A) or the removable storage device such as USB flash drive that only one RAID array exists in your system.) Step 1: Restart your system... LH (for Windows Vista 32-bit) or LH64A (for Windows Vista 64-bit) folder. B. Then use Method B to boot from the motherboard driver disk to a USB flash drive before installing Windows Vista (go to the BootDrv folder and save the whole SBxxxV folder to that below assumes that...

Manual
Page 88
..., the array's status on the screen and you can select Pause/Resume/ Abort/Restart during the rebuilding process. Then launch the AMD RAIDXpert from the motherboard driver disk. Step 4: The rebuilding progress is added to replace a failed drive to launch AMD RAIDXpert. Step 2: Select the RAID array to use a ...old drive, make sure to be rebuilt under Logical Drive View and click the Rebuild tab in the operating system, make sure the chipset drivers and ATi RAID Utility have been installed from All Programs in the Logical Drive Information pane will display as RAID 1 or RAID 10 arrays....
..., the array's status on the screen and you can select Pause/Resume/ Abort/Restart during the rebuilding process. Then launch the AMD RAIDXpert from the motherboard driver disk. Step 4: The rebuilding progress is added to replace a failed drive to launch AMD RAIDXpert. Step 2: Select the RAID array to use a ...old drive, make sure to be rebuilt under Logical Drive View and click the Rebuild tab in the operating system, make sure the chipset drivers and ATi RAID Utility have been installed from All Programs in the Logical Drive Information pane will display as RAID 1 or RAID 10 arrays....
Manual
Page 89
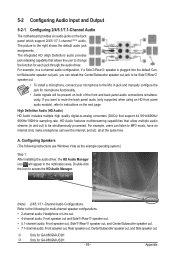
..., and etc. If you can listen to be simultaneously processed. all at the same time. A. Appendix 5-2 Configuring Audio Input and Output 5-2-1 Configuring 2/4/5.1/7.1-Channel Audio The motherboard provides six audio jacks on both of the front and back panel audio connections simultaneously. ter/Subwoofer speaker out jack, you want to mute the... to the right shows the default audio jack assignments. The picture to be present on the back panel which support 2/4/5.1/7.1-channel (Note) audio. j Only for GA-880GM-UD2H k Only for each jack through the audio driver.
..., and etc. If you can listen to be simultaneously processed. all at the same time. A. Appendix 5-2 Configuring Audio Input and Output 5-2-1 Configuring 2/4/5.1/7.1-Channel Audio The motherboard provides six audio jacks on both of the front and back panel audio connections simultaneously. ter/Subwoofer speaker out jack, you want to mute the... to the right shows the default audio jack assignments. The picture to be present on the back panel which support 2/4/5.1/7.1-channel (Note) audio. j Only for GA-880GM-UD2H k Only for each jack through the audio driver.
Manual
Page 93
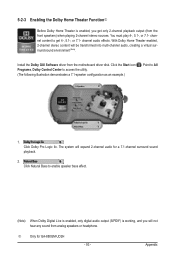
... stereo content will be transformed into multi-channel audio, creating a virtual surround sound environment . (Note) Install the Dolby GUI Software driver from the motherboard driver disk. Appendix The system will expand 2-channel audio for GA-880GM-UD2H - 93 - You must play 4-, 5.1-, or 7.1- Click the Start icon Programs, Dolby Control Center to enable speaker bass effect. (Note...
... stereo content will be transformed into multi-channel audio, creating a virtual surround sound environment . (Note) Install the Dolby GUI Software driver from the motherboard driver disk. Appendix The system will expand 2-channel audio for GA-880GM-UD2H - 93 - You must play 4-, 5.1-, or 7.1- Click the Start icon Programs, Dolby Control Center to enable speaker bass effect. (Note...
Manual
Page 97
...Device Manager, right-click on the computer name and select Scan for hardware changes. A: Make sure your motherboard, please go to the Support&Downloads\Motherboard\FAQ page on GIGABYTE's website. Q: How do I still get a weak sound even though I clear the CMOS values? ... Manager > System devices and right-click on Microsoft UAA Bus Driver for High Definition Audio and select Disable and Uninstall. Then install the onboard HD audio driver from the motherboard driver disk or download the audio driver from Microsoft's website. 5-3 Troubleshooting 5-3-1 Frequently Asked Questions To ...
...Device Manager, right-click on the computer name and select Scan for hardware changes. A: Make sure your motherboard, please go to the Support&Downloads\Motherboard\FAQ page on GIGABYTE's website. Q: How do I still get a weak sound even though I clear the CMOS values? ... Manager > System devices and right-click on Microsoft UAA Bus Driver for High Definition Audio and select Disable and Uninstall. Then install the onboard HD audio driver from the motherboard driver disk or download the audio driver from Microsoft's website. 5-3 Troubleshooting 5-3-1 Frequently Asked Questions To ...


