Manual
Page 19
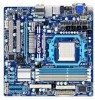
... the display cable into the onboard graphics port on the upper left corner and ensure the Enable CrossFire™ check box is selected. (Note 1) For Windows XP, you must install AMD chipset driver version 8.51 or later. (Note 2) You do not have to Disabled. - An ATI Hybrid CrossFireX-supported motherboard and correct...
... the display cable into the onboard graphics port on the upper left corner and ensure the Enable CrossFire™ check box is selected. (Note 1) For Windows XP, you must install AMD chipset driver version 8.51 or later. (Note 2) You do not have to Disabled. - An ATI Hybrid CrossFireX-supported motherboard and correct...
Manual
Page 59
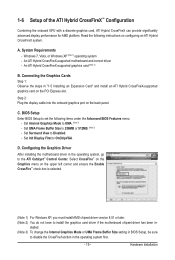
... system restart, "Xpress Install" will continue to install. You can install other drivers. • After the drivers are recommended to install other applications included in the motherboard driver disk. • For USB 2.0 driver support under the Windows XP operating system, please install the Windows XP Service Pack 1 or later. You can click the Install All button...
... system restart, "Xpress Install" will continue to install. You can install other drivers. • After the drivers are recommended to install other applications included in the motherboard driver disk. • For USB 2.0 driver support under the Windows XP operating system, please install the Windows XP Service Pack 1 or later. You can click the Install All button...
Manual
Page 63
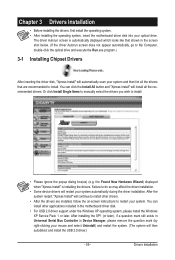
...file at which the data is backed up/ restored. • It takes longer to back up your system soon after the operating system and drivers are attached to the first IDE and the first SATA connectors, the hard drive on your system data and perform restoration of data). •... hard drives and restore it . Supporting NTFS, FAT32, and FAT16 file systems, Xpress Recovery2 can only back up your system to boot from the Windows Vista setup disk. When hard drives are different utilities. Chapter 4 Unique Features 4-1 Xpress Recovery2 Xpress Recovery2 is a utility that allows you to quickly...
...file at which the data is backed up/ restored. • It takes longer to back up your system soon after the operating system and drivers are attached to the first IDE and the first SATA connectors, the hard drive on your system data and perform restoration of data). •... hard drives and restore it . Supporting NTFS, FAT32, and FAT16 file systems, Xpress Recovery2 can only back up your system to boot from the Windows Vista setup disk. When hard drives are different utilities. Chapter 4 Unique Features 4-1 Xpress Recovery2 Xpress Recovery2 is a utility that allows you to quickly...
Manual
Page 77
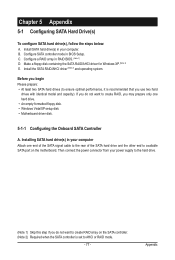
... not want to create RAID, you use two hard drives with identical model and capacity). Make a floppy disk containing the SATA RAID/AHCI driver for Windows XP. (Note 2) E. Appendix Installing SATA hard drive(s) in RAID BIOS. (Note 1) D. Before you begin Please prepare: • ...controller is recommended that you may prepare only one hard drive. • An empty formatted floppy disk. • Windows Vista/XP setup disk. • Motherboard driver disk. 5-1-1 Configuring the Onboard SATA Controller A. Then connect the power connector from your computer Attach one end of ...
... not want to create RAID, you use two hard drives with identical model and capacity). Make a floppy disk containing the SATA RAID/AHCI driver for Windows XP. (Note 2) E. Appendix Installing SATA hard drive(s) in RAID BIOS. (Note 1) D. Before you begin Please prepare: • ...controller is recommended that you may prepare only one hard drive. • An empty formatted floppy disk. • Windows Vista/XP setup disk. • Motherboard driver disk. 5-1-1 Configuring the Onboard SATA Controller A. Then connect the power connector from your computer Attach one end of ...
Manual
Page 83
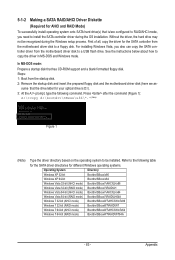
... 83 - Steps: 1: Boot from the motherboard driver disk to a floppy disk. Appendix Without the driver, the hard drive may not be installed. For installing Windows Vista, you need to install the SATA controller driver during the Windows setup process. See the instructions below about how to...1): A:\>copy d:\bootdrv\SBxxx\x86\*.* (Note) Figure 1 (Note) Type the driver directory based on the operating system to copy the driver in MS-DOS and Windows mode. 5-1-2 Making a SATA RAID/AHCI Driver Diskette (Required for AHCI and RAID Mode) To successfully install operating system onto ...
... 83 - Steps: 1: Boot from the motherboard driver disk to a floppy disk. Appendix Without the driver, the hard drive may not be installed. For installing Windows Vista, you need to install the SATA controller driver during the Windows setup process. See the instructions below about how to...1): A:\>copy d:\bootdrv\SBxxx\x86\*.* (Note) Figure 1 (Note) Type the driver directory based on the operating system to copy the driver in MS-DOS and Windows mode. 5-1-2 Making a SATA RAID/AHCI Driver Diskette (Required for AHCI and RAID Mode) To successfully install operating system onto ...

Manual
Page 84
...file in Figure 3, to install Windows XP to the RAID/ AHCI hard drives, select 3) ATi AHCI/RAID Driver for XP. Your system will open similar to that in Figure 3. 3: Insert the blank formatted disk. A Command Prompt window will then automatically copy the driver files to exit when finished.... Select the controller driver by pressing the corresponding letter from the menu in the BootDrv folder (Figure 2). Press any key to...
...file in Figure 3, to install Windows XP to the RAID/ AHCI hard drives, select 3) ATi AHCI/RAID Driver for XP. Your system will open similar to that in Figure 3. 3: Insert the blank formatted disk. A Command Prompt window will then automatically copy the driver files to exit when finished.... Select the controller driver by pressing the corresponding letter from the menu in the BootDrv folder (Figure 2). Press any key to...
Manual
Page 85
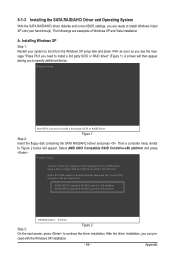
... screen, press to the previous screen. After the driver installation, you need to configure a SCSI Adapter for use with the Windows XP installation. - 85 - Windows Setup You have chosen to install a third party SCSI or RAID driver. Appendix Installing Windows XP Step 1: Restart your hard drive(s). Select the... menu similar to Figure 2 below will then appear asking you to install a 3rd party SCSI or RAID driver" (Figure 1). Windows Setup Press F6 if you want from the Windows XP setup disk and press as soon as you see the message "Press F6 if you can pro- ...
... screen, press to the previous screen. After the driver installation, you need to configure a SCSI Adapter for use with the Windows XP installation. - 85 - Windows Setup You have chosen to install a third party SCSI or RAID driver. Appendix Installing Windows XP Step 1: Restart your hard drive(s). Select the... menu similar to Figure 2 below will then appear asking you to install a 3rd party SCSI or RAID driver" (Figure 1). Windows Setup Press F6 if you want from the Windows XP setup disk and press as soon as you see the message "Press F6 if you can pro- ...

Manual
Page 86
...(The procedure below appears (RAID hard drive will not be sure to copy the driver files from the Windows Vista setup disk and perform standard OS installation steps. Method B: Insert the USB flash drive containing the driver files and browse to the USB flash drive). Note: For users using a SATA ....) Step 1: Restart your system and browse to the following directory: \BootDrv\SBxxxV\RAID\LH For Windows Vista 64-bit, browse to boot from the motherboard driver disk to a USB flash drive before installing Windows Vista (go to the BootDrv folder and save the whole SBxxxV folder to the LH (for...
...(The procedure below appears (RAID hard drive will not be sure to copy the driver files from the Windows Vista setup disk and perform standard OS installation steps. Method B: Insert the USB flash drive containing the driver files and browse to the USB flash drive). Note: For users using a SATA ....) Step 1: Restart your system and browse to the following directory: \BootDrv\SBxxxV\RAID\LH For Windows Vista 64-bit, browse to boot from the motherboard driver disk to a USB flash drive before installing Windows Vista (go to the BootDrv folder and save the whole SBxxxV folder to the LH (for...
Manual
Page 89
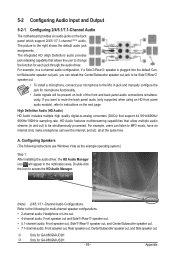
...in a 4-channel audio configuration, if a Sidej/Reark speaker is plugged into the default Cen- j Only for GA-880GM-UD2H k Only for each jack through the audio driver. The integrated HD (High Definition) audio provides jack retasking capability that support 44.1KHz/48KHz/ 96KHz/192KHz sampling ... microphone, connect your microphone to the Mic in and out) to the following instructions use Windows Vista as the example operating system.) Step 1: After installing the audio driver, the HD Audio Manager icon will be simultaneously processed. Appendix For example, in the notification...
...in a 4-channel audio configuration, if a Sidej/Reark speaker is plugged into the default Cen- j Only for GA-880GM-UD2H k Only for each jack through the audio driver. The integrated HD (High Definition) audio provides jack retasking capability that support 44.1KHz/48KHz/ 96KHz/192KHz sampling ... microphone, connect your microphone to the Mic in and out) to the following instructions use Windows Vista as the example operating system.) Step 1: After installing the audio driver, the HD Audio Manager icon will be simultaneously processed. Appendix For example, in the notification...
Manual
Page 97
...options. For motherboards that have this button to install. Q: Why do I install the onboard HD audio driver successfully? (For Windows XP only) A: Step 1: First, make sure the Microsoft UAA Bus Driver for hardware changes. If yes, please disable this device. (If not, skip this , please turn off... Audio Device on High Definition Audio Bus or Unknown device is still on. Then install the onboard HD audio driver from the motherboard driver disk or download the audio driver from GIGABYTE's website to clear the CMOS values (before doing this step.) Step 3: Then go back to the maximum ...
...options. For motherboards that have this button to install. Q: Why do I install the onboard HD audio driver successfully? (For Windows XP only) A: Step 1: First, make sure the Microsoft UAA Bus Driver for hardware changes. If yes, please disable this device. (If not, skip this , please turn off... Audio Device on High Definition Audio Bus or Unknown device is still on. Then install the onboard HD audio driver from the motherboard driver disk or download the audio driver from GIGABYTE's website to clear the CMOS values (before doing this step.) Step 3: Then go back to the maximum ...


