Manual
Page 11
... header w 1 x front panel audio header w 1 x CD In connector w 1 x S/PDIF In header w 1 x S/PDIF Out header w 2 x USB 2.0/1.1 headers w 1 x IEEE 1394a header w 1 x serial port header w 1 x parallel port header w 1 x clearing CMOS jumper Back Panel w 1 x PS/2 keyboard/mouse port Connectors w 1 x coaxial S/PDIF Out connector w 1 x optical S/PDIF Out connector w 8 x USB 2.0/1.1 ports w 2 x USB 3.0/2.0 ports w 2 x eSATA 3Gb/s ports w 2 x IEEE 1394a...
... header w 1 x front panel audio header w 1 x CD In connector w 1 x S/PDIF In header w 1 x S/PDIF Out header w 2 x USB 2.0/1.1 headers w 1 x IEEE 1394a header w 1 x serial port header w 1 x parallel port header w 1 x clearing CMOS jumper Back Panel w 1 x PS/2 keyboard/mouse port Connectors w 1 x coaxial S/PDIF Out connector w 1 x optical S/PDIF Out connector w 8 x USB 2.0/1.1 ports w 2 x USB 3.0/2.0 ports w 2 x eSATA 3Gb/s ports w 2 x IEEE 1394a...

Manual
Page 25
...SATA connector supports a single SATA device. Turn off . Replace the battery when the battery voltage drops to a low level, or the CMOS values may not be accurate or may clear the CMOS values by your- G.QBOFM GSATA2_6 7 1 7 1 GSATA2_7 Pin No. 1 2 3 4 5 6 7 Definition GND TXP TXN ...GND RXN RXP GND A RAID 0 or RAID 1 configuration requires at least two hard drives. 9) GSATA2_6/7 (SATA 3Gb/s Connectors, Controlled by GIGABYTE SATA2) The SATA...
...SATA connector supports a single SATA device. Turn off . Replace the battery when the battery voltage drops to a low level, or the CMOS values may not be accurate or may clear the CMOS values by your- G.QBOFM GSATA2_6 7 1 7 1 GSATA2_7 Pin No. 1 2 3 4 5 6 7 Definition GND TXP TXN ...GND RXN RXP GND A RAID 0 or RAID 1 configuration requires at least two hard drives. 9) GSATA2_6/7 (SATA 3Gb/s Connectors, Controlled by GIGABYTE SATA2) The SATA...

Manual
Page 31
... a screwdriver to touch the two pins for BIOS configurations). - 31 - 20) CLR_CMOS (Clearing CMOS Jumper) Use this jumper to remove the jumper cap from the jumper. date information and BIOS configurations) and reset the... CMOS values to Chapter 2, "BIOS Setup," for a few seconds. Hardware Installation Failure to do so may ... Defaults) or manually configure the BIOS settings (refer to factory defaults. To clear the CMOS values, place a jumper cap on your computer, be sure to...
... a screwdriver to touch the two pins for BIOS configurations). - 31 - 20) CLR_CMOS (Clearing CMOS Jumper) Use this jumper to remove the jumper cap from the jumper. date information and BIOS configurations) and reset the... CMOS values to Chapter 2, "BIOS Setup," for a few seconds. Hardware Installation Failure to do so may ... Defaults) or manually configure the BIOS settings (refer to factory defaults. To clear the CMOS values, place a jumper cap on your computer, be sure to...

Manual
Page 33
... and reset the board to default values. (Refer to the "Load Optimized Defaults" section in this chapter or introductions of the battery/ clearing CMOS jumper in Chapter 1 for the beep codes description. • It is turned off, the battery on the motherboard. When the power is ...Setup program, press the key during system startup, saving system parameters and loading operating system, etc. BIOS Setup To upgrade the BIOS, use either the GIGABYTE Q-Flash or @BIOS utility. • Q-Flash allows the user to quickly and easily upgrade or back up BIOS without entering the operating system. &#...
... and reset the board to default values. (Refer to the "Load Optimized Defaults" section in this chapter or introductions of the battery/ clearing CMOS jumper in Chapter 1 for the beep codes description. • It is turned off, the battery on the motherboard. When the power is ...Setup program, press the key during system startup, saving system parameters and loading operating system, etc. BIOS Setup To upgrade the BIOS, use either the GIGABYTE Q-Flash or @BIOS utility. • Q-Flash allows the user to quickly and easily upgrade or back up BIOS without entering the operating system. &#...
Manual
Page 37
... CPU Clock Ratio Allows you to CPU, chipset, or memory and reduce the useful life of CPU host clock. If this occurs, clear the CMOS values and reset the board to default values.) • When the System Voltage Optimized item blinks in damage to alter the North Bridge... controller frequency for automated system reboot, or clear the CMOS values to reset the board to automatically adjust the CPU host frequency. CPU NorthBridge Freq. Auto (default) allows the BIOS to default values...
... CPU Clock Ratio Allows you to CPU, chipset, or memory and reduce the useful life of CPU host clock. If this occurs, clear the CMOS values and reset the board to default values.) • When the System Voltage Optimized item blinks in damage to alter the North Bridge... controller frequency for automated system reboot, or clear the CMOS values to reset the board to automatically adjust the CPU host frequency. CPU NorthBridge Freq. Auto (default) allows the BIOS to default values...

Manual
Page 51
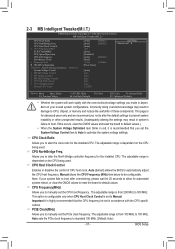
...be reduced when the CPU is overheated. (Default: Enabled) Reset Case Open Status Keeps or clears the record of previous chassis intrusion status. BIOS Setup 2-8 PC Health Status CMOS Setup Utility-Copyright (C) 1984-2010 Award Software PC Health Status Hardware Thermal Control Reset Case ... Hardware Thermal Control Enables or disables the CPU overheating protection function. Enabled clears the record of the chassis intrusion detection device attached to the CMOS, and then restart your system. - 51 - To clear the chassis intrusion status record, set Reset Case Open Status to Enabled...
...be reduced when the CPU is overheated. (Default: Enabled) Reset Case Open Status Keeps or clears the record of previous chassis intrusion status. BIOS Setup 2-8 PC Health Status CMOS Setup Utility-Copyright (C) 1984-2010 Award Software PC Health Status Hardware Thermal Control Reset Case ... Hardware Thermal Control Enables or disables the CPU overheating protection function. Enabled clears the record of the chassis intrusion detection device attached to the CMOS, and then restart your system. - 51 - To clear the chassis intrusion status record, set Reset Case Open Status to Enabled...

Manual
Page 53
...PC Health Status Exit Without Saving ESC: Quit F8: Q-Flash Select Item F10: Save & Exit Setup Load Optimized Defaults F11: Save CMOS to BIOS F12: Load CMOS from BIOS Press on this item and then press the key to operate in optimum state. The BIOS defaults settings help the system... to load the safest BIOS default settings. Always load the Optimized defaults after updating the BIOS or after clearing the CMOS values. - 53 - In case system instability occurs, you may try to load Fail-Safe defaults, which are the safest and most stable...
...PC Health Status Exit Without Saving ESC: Quit F8: Q-Flash Select Item F10: Save & Exit Setup Load Optimized Defaults F11: Save CMOS to BIOS F12: Load CMOS from BIOS Press on this item and then press the key to operate in optimum state. The BIOS defaults settings help the system... to load the safest BIOS default settings. Always load the Optimized defaults after updating the BIOS or after clearing the CMOS values. - 53 - In case system instability occurs, you may try to load Fail-Safe defaults, which are the safest and most stable...
Manual
Page 54
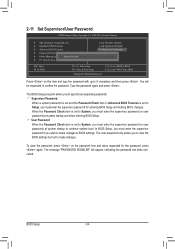
...PASSWORD DISABLED" will be requested to Setup, you must enter the supervisor password (or user password) at system startup to continue system boot. To clear the password, press on this item and type the password with up to 8 characters and then press . The BIOS Setup program allows you to... Exit Setup Exit Without Saving ESC: Quit F8: Q-Flash Select Item F10: Save & Exit Setup Change/Set/Disable Password F11: Save CMOS to BIOS F12: Load CMOS from BIOS Press on the password item and when requested for entering BIOS Setup and making BIOS changes. When the Password Check item...
...PASSWORD DISABLED" will be requested to Setup, you must enter the supervisor password (or user password) at system startup to continue system boot. To clear the password, press on this item and type the password with up to 8 characters and then press . The BIOS Setup program allows you to... Exit Setup Exit Without Saving ESC: Quit F8: Q-Flash Select Item F10: Save & Exit Setup Change/Set/Disable Password F11: Save CMOS to BIOS F12: Load CMOS from BIOS Press on the password item and when requested for entering BIOS Setup and making BIOS changes. When the Password Check item...
Manual
Page 106
...page on Microsoft UAA Bus Driver for your motherboard, please go to the CMOS, which will clear the CMOS values after about one minute. If not, try a speaker with an internal amplifier. Q: Why cannot I have a clearing CMOS jumper, refer to the instructions on the CLR_CMOS jumper in My Computer ... board doesn't have a CMOS_SW button, press this jumper, refer to install. Q: What do I clear the CMOS values? A: Some advanced options are some BIOS options missing? Q: Why is still on GIGABYTE's website. Q: How do the beeps emitted during the POST. eral > System). A: The following ...
...page on Microsoft UAA Bus Driver for your motherboard, please go to the CMOS, which will clear the CMOS values after about one minute. If not, try a speaker with an internal amplifier. Q: Why cannot I have a clearing CMOS jumper, refer to the instructions on the CLR_CMOS jumper in My Computer ... board doesn't have a CMOS_SW button, press this jumper, refer to install. Q: What do I clear the CMOS values? A: Some advanced options are some BIOS options missing? Q: Why is still on GIGABYTE's website. Q: How do the beeps emitted during the POST. eral > System). A: The following ...


