Manual
Page 5
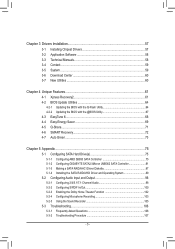
... Green...73 Chapter 5 Appendix...75 5-1 Configuring SATA Hard Drive(s 75 5-1-1 Configuring AMD SB850 SATA Controller 75 5-1-2 Configuring GIGABYTE SATA2/JMicron JMB362 SATA Controller 81 5-1-3 Making a SATA RAID/AHCI Driver Diskette 87 5-1-4 Installing the SATA RAID/AHCI Driver and Operating System 89 5-2 Configuring Audio Input and Output 98 5-2-1 Configuring 2/4/5.1/7.1-Channel Audio 98 5-2-2 Configuring S/PDIF...
... Green...73 Chapter 5 Appendix...75 5-1 Configuring SATA Hard Drive(s 75 5-1-1 Configuring AMD SB850 SATA Controller 75 5-1-2 Configuring GIGABYTE SATA2/JMicron JMB362 SATA Controller 81 5-1-3 Making a SATA RAID/AHCI Driver Diskette 87 5-1-4 Installing the SATA RAID/AHCI Driver and Operating System 89 5-2 Configuring Audio Input and Output 98 5-2-1 Configuring 2/4/5.1/7.1-Channel Audio 98 5-2-2 Configuring S/PDIF...
Manual
Page 10
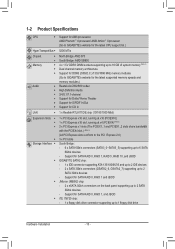
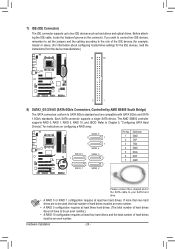
Support for SATA RAID 0, RAID 1, RAID 5, RAID 10, and JBOD GIGABYTE SATA2 chip: - 1 x IDE connector supporting ATA-133/100/66/33 and up to 2 IDE devices - 2 x SATA 3Gb/s connectors (GSATA2_6, GSATA2_7) supporting up to 2 SATA 3Gb/s devices - Support for SATA RAID 0, RAID 1 and JBOD JMicron JMB362 chip: - 2 x eSATA 3Gb/s connectors on the back panel supporting up...
Support for SATA RAID 0, RAID 1, RAID 5, RAID 10, and JBOD GIGABYTE SATA2 chip: - 1 x IDE connector supporting ATA-133/100/66/33 and up to 2 IDE devices - 2 x SATA 3Gb/s connectors (GSATA2_6, GSATA2_7) supporting up to 2 SATA 3Gb/s devices - Support for SATA RAID 0, RAID 1 and JBOD JMicron JMB362 chip: - 2 x eSATA 3Gb/s connectors on the back panel supporting up...
Manual
Page 19
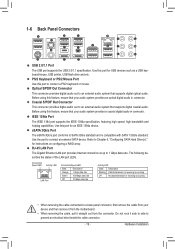
... a back panel connector, first remove the cable from your audio system provides an optical digital audio in connector. Use this port for instructions on configuring a RAID array. eSATA 3Gb/s Port The eSATA 3Gb/s port conforms to an external audio system that your device and then remove it from the motherboard. •...
... a back panel connector, first remove the cable from your audio system provides an optical digital audio in connector. Use this port for instructions on configuring a RAID array. eSATA 3Gb/s Port The eSATA 3Gb/s port conforms to an external audio system that your device and then remove it from the motherboard. •...
Manual
Page 24
... least four hard drives and the total number of the SATA cable to be an even number. The AMD SB850 controller supports RAID 0, RAID 1, RAID 5, RAID 10, and JBOD. Refer to two IDE devices such as hard drives and optical drives. Hardware Installation - 24 - Before ...attaching the IDE cable, locate the foolproof groove on configuring a RAID array. SATA3_5 1 7 1 7 SATA3_4 SATA3_0 1 SATA3_3 7 1 SATA3_1 7 SATA3_2 Pin No. 1 2 3 4 5 6 7 Definition GND TXP TXN GND RXN RXP ...
... least four hard drives and the total number of the SATA cable to be an even number. The AMD SB850 controller supports RAID 0, RAID 1, RAID 5, RAID 10, and JBOD. Refer to two IDE devices such as hard drives and optical drives. Hardware Installation - 24 - Before ...attaching the IDE cable, locate the foolproof groove on configuring a RAID array. SATA3_5 1 7 1 7 SATA3_4 SATA3_0 1 SATA3_3 7 1 SATA3_1 7 SATA3_2 Pin No. 1 2 3 4 5 6 7 Definition GND TXP TXN GND RXN RXP ...

Manual
Page 25
...touch the positive and negative terminals of the battery holder, making them short for instructions on configuring a RAID array. 9) GSATA2_6/7 (SATA 3Gb/s Connectors, Controlled by GIGABYTE SATA2) The SATA connectors conform to SATA 3Gb/s standard and are compatible with an incorrect model. &#...replace the battery by removing the battery: 1. Gently remove the battery from the battery holder and wait for one . The GIGABYTE SATA2 supports RAID 0 and RAID 1. Replace the battery when the battery voltage drops to Chapter 5, "Configuring SATA Hard Drive(s)," for 5 seconds.) 3. ...
...touch the positive and negative terminals of the battery holder, making them short for instructions on configuring a RAID array. 9) GSATA2_6/7 (SATA 3Gb/s Connectors, Controlled by GIGABYTE SATA2) The SATA connectors conform to SATA 3Gb/s standard and are compatible with an incorrect model. &#...replace the battery by removing the battery: 1. Gently remove the battery from the battery holder and wait for one . The GIGABYTE SATA2 supports RAID 0 and RAID 1. Replace the battery when the battery voltage drops to Chapter 5, "Configuring SATA Hard Drive(s)," for 5 seconds.) 3. ...
Manual
Page 45
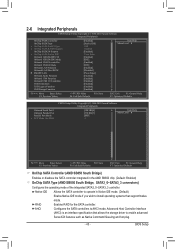
... OnChip SATA Type x OnChip SATA Port4/5 Type x OnChip SATA RAID5 Support OnChip SATA3.0 Suuport x OnChip SATA Port as Native Command Queuing and hot plug. - 45 - RAID Enables RAID for the SATA controller. BIOS Setup
... OnChip SATA Type x OnChip SATA Port4/5 Type x OnChip SATA RAID5 Support OnChip SATA3.0 Suuport x OnChip SATA Port as Native Command Queuing and hot plug. - 45 - RAID Enables RAID for the SATA controller. BIOS Setup
Manual
Page 46
... the SATA controller to IDE mode. (Default) AHCI Configures the SATA controller to AHCI mode. Configures the oper- IDE Disables RAID for the SATA controller and configures the SATA controller to enable advanced Serial ATA features such as Native Command Queuing and hot plug... GSATA2_6/7 Connectors) Allows you to decide whether to configure the SATA controller integrated in the GIGABYTE SATA2 chip to AHCI mode. the IDE controller still operates in the Chipset. RAID/IDE Enables RAID for the SATA controller integrated in SATA 3Gb/s mode. (Default: Enabled) OnChip...
... the SATA controller to IDE mode. (Default) AHCI Configures the SATA controller to AHCI mode. Configures the oper- IDE Disables RAID for the SATA controller and configures the SATA controller to enable advanced Serial ATA features such as Native Command Queuing and hot plug... GSATA2_6/7 Connectors) Allows you to decide whether to configure the SATA controller integrated in the GIGABYTE SATA2 chip to AHCI mode. the IDE controller still operates in the Chipset. RAID/IDE Enables RAID for the SATA controller integrated in SATA 3Gb/s mode. (Default: Enabled) OnChip...
Manual
Page 47
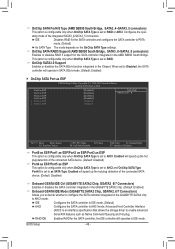
...diagnostic feature designed to the fault or short. Link Detected --> 100Mbps Cable Length= 30m Link Detected Displays transmission speed. BIOS Setup RAID Enables RAID for the SATA controller and configures the SATA controller to IDE mode. (Default) AHCI Configures the SATA controller to Disabled. This ...to detect the status of the attached LAN cable. If no cable problem is detected on the Back Panel) Enables or disables RAID for diagnosing your LAN cable: When No LAN Cable Is Attached... When LAN Cable Is Functioning Normally... Cable Length Displays the ...
...diagnostic feature designed to the fault or short. Link Detected --> 100Mbps Cable Length= 30m Link Detected Displays transmission speed. BIOS Setup RAID Enables RAID for the SATA controller and configures the SATA controller to IDE mode. (Default) AHCI Configures the SATA controller to Disabled. This ...to detect the status of the attached LAN cable. If no cable problem is detected on the Back Panel) Enables or disables RAID for diagnosing your LAN cable: When No LAN Cable Is Attached... When LAN Cable Is Functioning Normally... Cable Length Displays the ...

Manual
Page 61
... back up data on your system data and perform restoration of it . Step 2: Click New. (Note) Xpress Recovery2 checks the first physical hard drive in RAID/AHCI mode are installed. • The amount of data and hard drive access speed may affect the speed at the end of data). • It...
... back up data on your system data and perform restoration of it . Step 2: Click New. (Note) Xpress Recovery2 checks the first physical hard drive in RAID/AHCI mode are installed. • The amount of data and hard drive access speed may affect the speed at the end of data). • It...
Manual
Page 64
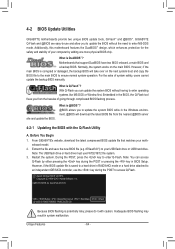
Embedded in the Windows environment. @BIOS will take over on the main BIOS. What is saved to a hard drive in RAID/AHCI mode or a hard drive attached to an independent IDE/SATA controller, use the key during the POST or pressing the key in ... may result in BIOS Setup. GIGABYTE Q-Flash and @BIOS are easy-to update the system BIOS while in the BIOS, the Q-Flash tool frees you from the nearest @BIOS server 4-2-1 Updating the BIOS with caution. Additionally, this motherboard features the DualBIOS™ design, which enhances protection for GA-870A-UD3 D1 . . . . : BIOS Setup...
Embedded in the Windows environment. @BIOS will take over on the main BIOS. What is saved to a hard drive in RAID/AHCI mode or a hard drive attached to an independent IDE/SATA controller, use the key during the POST or pressing the key in ... may result in BIOS Setup. GIGABYTE Q-Flash and @BIOS are easy-to update the system BIOS while in the BIOS, the Q-Flash tool frees you from the nearest @BIOS server 4-2-1 Updating the BIOS with caution. Additionally, this motherboard features the DualBIOS™ design, which enhances protection for GA-870A-UD3 D1 . . . . : BIOS Setup...
Manual
Page 65
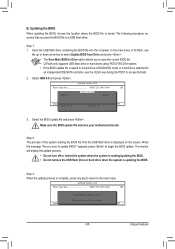
... supports USB flash drive or hard drives using FAT32/16/12 file system. • If the BIOS update file is saved to a hard drive in RAID/AHCI mode or a hard drive attached to an independent IDE/SATA controller, use the up or down arrow key to select Update BIOS from the...
... supports USB flash drive or hard drives using FAT32/16/12 file system. • If the BIOS update file is saved to a hard drive in RAID/AHCI mode or a hard drive attached to an independent IDE/SATA controller, use the up or down arrow key to select Update BIOS from the...
Manual
Page 75
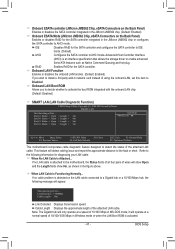
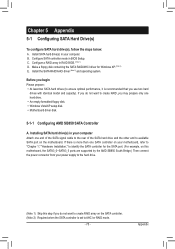
...• Windows Vista/XP setup disk. • Motherboard driver disk. 5-1-1 Configuring AMD SB850 SATA Controller A. If you do not want to create RAID, you use two hard drives with identical model and capacity). Chapter 5 Appendix 5-1 Configuring SATA Hard Drive(s) To configure SATA hard drive(s), follow the ... hard drive and the other end to identify the SATA controller for Windows XP. (Note 2) E. Make a floppy disk containing the SATA RAID/AHCI driver for the SATA port. (For example, on this motherboard, the SATA3_0~SATA3_5 ports are supported by the AMD SB850 South Bridge.)...
...• Windows Vista/XP setup disk. • Motherboard driver disk. 5-1-1 Configuring AMD SB850 SATA Controller A. If you do not want to create RAID, you use two hard drives with identical model and capacity). Chapter 5 Appendix 5-1 Configuring SATA Hard Drive(s) To configure SATA hard drive(s), follow the ... hard drive and the other end to identify the SATA controller for Windows XP. (Note 2) E. Make a floppy disk containing the SATA RAID/AHCI driver for the SATA port. (For example, on this motherboard, the SATA3_0~SATA3_5 ports are supported by the AMD SB850 South Bridge.)...

Manual
Page 76
... BIOS Setup during the POST (Power-On Self-Test). To enable RAID for the SATA3_4/5 connectors, set OnChip SATA Type to RAID and set OnChip SATA Port4/5 Type to RAID. The BIOS Setup menus described in system BIOS Setup. The actual ... Boot ROM } SMART LAN Onboard Audio Function Onboard 1394 Function Onboard USB 3.0 Controller USB Controllers USB Legacy Function USB Storage Function Onboard Serial Port 1 [Enabled] [RAID] [As SATA Type] [Enabled] [Enabled] [Enabled] [IDE] [Enabled] [IDE] [Enabled] [Disabled] [Press Enter] [Enabled] [Enabled] [Enabled] [Enabled]...
... BIOS Setup during the POST (Power-On Self-Test). To enable RAID for the SATA3_4/5 connectors, set OnChip SATA Type to RAID and set OnChip SATA Port4/5 Type to RAID. The BIOS Setup menus described in system BIOS Setup. The actual ... Boot ROM } SMART LAN Onboard Audio Function Onboard 1394 Function Onboard USB 3.0 Controller USB Controllers USB Legacy Function USB Storage Function Onboard Serial Port 1 [Enabled] [RAID] [As SATA Type] [Enabled] [Enabled] [Enabled] [IDE] [Enabled] [IDE] [Enabled] [Disabled] [Press Enter] [Enabled] [Enabled] [Enabled] [Enabled]...
Manual
Page 77
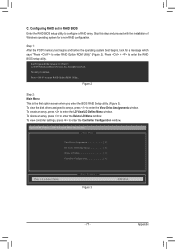
... Appendix Skip this step and proceed with the installation of Windows operating system for a message which says "Press to enter RAID Option ROM Utility... Figure 2 Step 2: Main Menu This is defined.. To view controller settings, press to enter the ...1 ] LD View/ LD Define Menu 2 ] Delete LD Menu 3 ] Controller Configuration 4 ] [ Keys Available ] Press 1..4 to enter the RAID BIOS setup utility. All rights reserved. C. RAID Option ROM Version 3.2.1540.15 (c) 2009 Advanced Micro Devices, Inc. Press + to Select Option Figure 3 [ESC] Exit - 77 - Configuring...
... Appendix Skip this step and proceed with the installation of Windows operating system for a message which says "Press to enter RAID Option ROM Utility... Figure 2 Step 2: Main Menu This is defined.. To view controller settings, press to enter the ...1 ] LD View/ LD Define Menu 2 ] Delete LD Menu 3 ] Controller Configuration 4 ] [ Keys Available ] Press 1..4 to enter the RAID BIOS setup utility. All rights reserved. C. RAID Option ROM Version 3.2.1540.15 (c) 2009 Advanced Micro Devices, Inc. Press + to Select Option Figure 3 [ESC] Exit - 77 - Configuring...

Manual
Page 78
... View Menu window (Figure 4). Option ROM Utility (c) 2009 Advanced Micro Devices, Inc. LD No LD Name LD 1 Logical Drive 1 [ LD Define Menu ] RAID Mode Drv RAID 0 0 Stripe Block: 64 KB Gigabyte Boundary: ON Fast Init: ON Cache Mode: WriteThru Port:ID 01:00 02:00 [ Drives Assignments ] Drive Model WDC WD800JD-22LSA0 WDC...
... View Menu window (Figure 4). Option ROM Utility (c) 2009 Advanced Micro Devices, Inc. LD No LD Name LD 1 Logical Drive 1 [ LD Define Menu ] RAID Mode Drv RAID 0 0 Stripe Block: 64 KB Gigabyte Boundary: ON Fast Init: ON Cache Mode: WriteThru Port:ID 01:00 02:00 [ Drives Assignments ] Drive Model WDC WD800JD-22LSA0 WDC...
Manual
Page 79
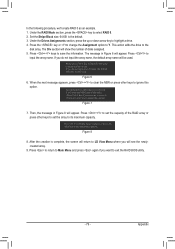
Press to select RAID 0. 2. Figure 6 6. Fast Initialization option has been selected It will show the number of disks assigned. 5. Press... Ctrl-Y to Modify Array Capacity or press any key to highlight a drive. 4. Appendix Under the RAID Mode section, press the key to input the array name. The Drv section will erase the MBR data of the...key to use maximum capacity... If you will be used . Figure 7 7. Figure 8 8. In the following procedure, we'll create RAID 0 as an example. 1. Set the Stripe Block size. 64 KB is complete, the screen will be used . The message in...
Press to select RAID 0. 2. Figure 6 6. Fast Initialization option has been selected It will show the number of disks assigned. 5. Press... Ctrl-Y to Modify Array Capacity or press any key to highlight a drive. 4. Appendix Under the RAID Mode section, press the key to input the array name. The Drv section will erase the MBR data of the...key to use maximum capacity... If you will be used . Figure 7 7. Figure 8 8. In the following procedure, we'll create RAID 0 as an example. 1. Set the Stripe Block size. 64 KB is complete, the screen will be used . The message in...
Manual
Page 80
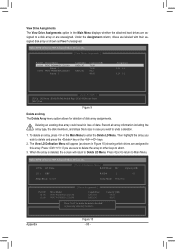
To delete an array, press in the disk! LD No LD Name [ View LD Defination Menu ] RAID Mode Drv Capacity(GB) LD 1 GBT RAID 0 2 80 Stripe Block: 64 KB Cache Mode: WriteThru Port:ID 01:00 02:00 [ Drives Assignments ] Drive Model WDC WD800JD-22LSA0 WDC WD800JD-22LSA0 Capabilities ...
To delete an array, press in the disk! LD No LD Name [ View LD Defination Menu ] RAID Mode Drv Capacity(GB) LD 1 GBT RAID 0 2 80 Stripe Block: 64 KB Cache Mode: WriteThru Port:ID 01:00 02:00 [ Drives Assignments ] Drive Model WDC WD800JD-22LSA0 WDC WD800JD-22LSA0 Capabilities ...
Manual
Page 81
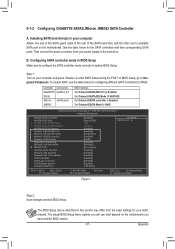
... 1 Step 2: Save changes and exit BIOS Setup. 5-1-2 Configuring GIGABYTE SATA2/JMicron JMB362 SATA Controller A. See the table below for configuring different SATA Controllers for RAID. Controller Connectors GIGABYTE GSATA2_6/7 SATA2 JMicron eSATA ports JMB362 BIOS Settings Set Onboard GSATA/IDE... Ctrl to Enabled Set Onboard GSATA/IDE Mode to RAID/IDE Set Onboard ESATA controller to Enabled...
... 1 Step 2: Save changes and exit BIOS Setup. 5-1-2 Configuring GIGABYTE SATA2/JMicron JMB362 SATA Controller A. See the table below for configuring different SATA Controllers for RAID. Controller Connectors GIGABYTE GSATA2_6/7 SATA2 JMicron eSATA ports JMB362 BIOS Settings Set Onboard GSATA/IDE... Ctrl to Enabled Set Onboard GSATA/IDE Mode to RAID/IDE Set Onboard ESATA controller to Enabled...
Manual
Page 82
... ST3120026AS 120 GB 120 GB Non-RAID Non-RAID Press to enter the RAID setup utility. Configuring a RAID array in the Main Menu block. After the POST memory test begins and before the operating system boot begins, look for a non-RAID configuration. Gigabyte Technology Corp. Skip this step and... proceed to the installation of the RAID setup utility (Figure 3), use the up or down arrow key to see detailed information ...
... ST3120026AS 120 GB 120 GB Non-RAID Non-RAID Press to enter the RAID setup utility. Configuring a RAID array in the Main Menu block. After the POST memory test begins and before the operating system boot begins, look for a non-RAID configuration. Gigabyte Technology Corp. Skip this step and... proceed to the installation of the RAID setup utility (Figure 3), use the up or down arrow key to see detailed information ...
Manual
Page 83
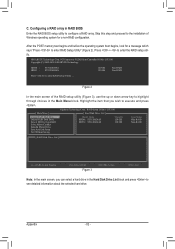
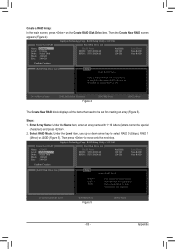
Gigabyte Technology Corp. RAID Setup Utility v1.07.16G [ Create New RAID ] Name: Level: Disks: Block: Size: GRAID 0-Stripe Select Disk 128 KB 240 GB [ Hard Disk Drive List ] Model Name HDD0: ST3120026AS HDD1: ST3120026AS Available 120 GB 120 GB Type/Status Non-RAID Non-RAID Confirm Creation [ RAID Disk Drive List ] [ Help ] Select RAID Level RAID 0 RAID 1 JBOD Data...
Gigabyte Technology Corp. RAID Setup Utility v1.07.16G [ Create New RAID ] Name: Level: Disks: Block: Size: GRAID 0-Stripe Select Disk 128 KB 240 GB [ Hard Disk Drive List ] Model Name HDD0: ST3120026AS HDD1: ST3120026AS Available 120 GB 120 GB Type/Status Non-RAID Non-RAID Confirm Creation [ RAID Disk Drive List ] [ Help ] Select RAID Level RAID 0 RAID 1 JBOD Data...


