Manual
Page 45
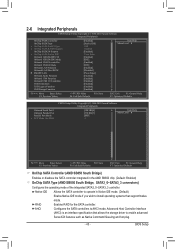
...+/-/PU/PD: Value F10: Save F6: Fail-Safe Defaults ESC: Exit F1: General Help F7: Optimized Defaults CMOS Setup Utility-Copyright (C) 1984-2010 Award Software Integrated Peripherals Onboard Serial Port 1 Onboard Parallel Port Parallel Port Mode x ECP ...Bridge, SATA3_0~SATA3_3 connectors) Configures the operating mode of the integrated SATA3_0~SATA3_3 controller. RAID Enables RAID for the SATA controller. BIOS Setup 2-6 Integrated Peripherals CMOS Setup Utility-Copyright (C) 1984-2010 Award Software Integrated Peripherals OnChip SATA Controller OnChip SATA Type ...
...+/-/PU/PD: Value F10: Save F6: Fail-Safe Defaults ESC: Exit F1: General Help F7: Optimized Defaults CMOS Setup Utility-Copyright (C) 1984-2010 Award Software Integrated Peripherals Onboard Serial Port 1 Onboard Parallel Port Parallel Port Mode x ECP ...Bridge, SATA3_0~SATA3_3 connectors) Configures the operating mode of the integrated SATA3_0~SATA3_3 controller. RAID Enables RAID for the SATA controller. BIOS Setup 2-6 Integrated Peripherals CMOS Setup Utility-Copyright (C) 1984-2010 Award Software Integrated Peripherals OnChip SATA Controller OnChip SATA Type ...
Manual
Page 46
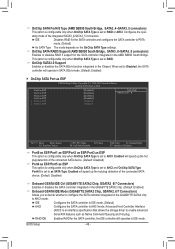
... controller integrated in IDE mode. IDE Disables RAID for the SATA controller; When set to Disabled, the SATA controller will operate in SATA 3Gb/s mode. (Default: Enabled) OnChip SATA Port as ESP CMOS Setup Utility-Copyright (C) 1984-2010 Award Software OnChip...connected SATA device. (Default: Disabled) Onboard GSATA/IDE Ctrl (GIGABYTE SATA2 Chip, GSATA2_6/7 Connectors) Enables or disables the SATA controller integrated in the GIGABYTE SATA2 chip. (Default: Enabled) Onboard GSATA/IDE Mode (GIGABYTE SATA2 Chip, GSATA2_6/7 Connectors) Allows you to decide whether to ...
... controller integrated in IDE mode. IDE Disables RAID for the SATA controller; When set to Disabled, the SATA controller will operate in SATA 3Gb/s mode. (Default: Enabled) OnChip SATA Port as ESP CMOS Setup Utility-Copyright (C) 1984-2010 Award Software OnChip...connected SATA device. (Default: Disabled) Onboard GSATA/IDE Ctrl (GIGABYTE SATA2 Chip, GSATA2_6/7 Connectors) Enables or disables the SATA controller integrated in the GIGABYTE SATA2 chip. (Default: Enabled) Onboard GSATA/IDE Mode (GIGABYTE SATA2 Chip, GSATA2_6/7 Connectors) Allows you to decide whether to ...
Manual
Page 47
... Note: The Gigabit hub will show Open and the Length fields show 0m, as Native Command Queuing and hot plug. BIOS Setup IDE Disables RAID for the SATA controller. This feature will operate at Port..... When LAN Cable Is Functioning Normally... Link Detected --> 100Mbps Cable Length... Gigabit hub or a 10/100 Mbps hub, the following information for diagnosing your LAN cable: When No LAN Cable Is Attached... RAID Enables RAID for the SATA controller and configures the SATA controller to IDE mode. (Default) AHCI Configures the SATA controller to AHCI mode. Onboard...
... Note: The Gigabit hub will show Open and the Length fields show 0m, as Native Command Queuing and hot plug. BIOS Setup IDE Disables RAID for the SATA controller. This feature will operate at Port..... When LAN Cable Is Functioning Normally... Link Detected --> 100Mbps Cable Length... Gigabit hub or a 10/100 Mbps hub, the following information for diagnosing your LAN cable: When No LAN Cable Is Attached... RAID Enables RAID for the SATA controller and configures the SATA controller to IDE mode. (Default) AHCI Configures the SATA controller to AHCI mode. Onboard...

Manual
Page 61
... you to quickly compress and back up your system data and perform restoration of the hard drive, make sure to boot from the Windows Vista setup disk. System Requirements: • At least 512 MB of data and hard drive access speed may affect the speed at the end of it . Installing...graphics card • Windows XP with Xpress Recovery cannot be restored using Xpress Recovery2. • USB hard drives are not supported. • Hard drives in RAID/AHCI mode are attached to the first IDE and the first SATA connectors, the hard drive on the first SATA connector is recommended; For example...
... you to quickly compress and back up your system data and perform restoration of the hard drive, make sure to boot from the Windows Vista setup disk. System Requirements: • At least 512 MB of data and hard drive access speed may affect the speed at the end of it . Installing...graphics card • Windows XP with Xpress Recovery cannot be restored using Xpress Recovery2. • USB hard drives are not supported. • Hard drives in RAID/AHCI mode are attached to the first IDE and the first SATA connectors, the hard drive on the first SATA connector is recommended; For example...
Manual
Page 64
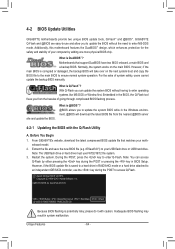
... Unique Features - 64 - 4-2 BIOS Update Utilities GIGABYTE motherboards provide two unique BIOS update tools, Q-Flash™ and @BIOS™. GIGABYTE Q-Flash and @BIOS are easy-to-use and allow... operating systems like MS-DOS or Window first. Inadequate BIOS flashing may result in RAID/AHCI mode or a hard drive attached to access Q-Flash. What is corrupted or...manually. Additionally, this motherboard features the DualBIOS™ design, which enhances protection for GA-870A-UD3 D1 . . . . : BIOS Setup : XpressRecovery2 : Boot Menu : Qflash 12/14/2010-RX870-SB850-7A66CG0EC-00 ...
... Unique Features - 64 - 4-2 BIOS Update Utilities GIGABYTE motherboards provide two unique BIOS update tools, Q-Flash™ and @BIOS™. GIGABYTE Q-Flash and @BIOS are easy-to-use and allow... operating systems like MS-DOS or Window first. Inadequate BIOS flashing may result in RAID/AHCI mode or a hard drive attached to access Q-Flash. What is corrupted or...manually. Additionally, this motherboard features the DualBIOS™ design, which enhances protection for GA-870A-UD3 D1 . . . . : BIOS Setup : XpressRecovery2 : Boot Menu : Qflash 12/14/2010-RX870-SB850-7A66CG0EC-00 ...
Manual
Page 75
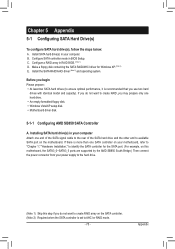
...is set to available SATA port on your computer Attach one hard drive. • An empty formatted floppy disk. • Windows Vista/XP setup disk. • Motherboard driver disk. 5-1-1 Configuring AMD SB850 SATA Controller A. Configure SATA controller mode in your power supply to the hard drive...of the SATA signal cable to the rear of the SATA hard drive and the other end to AHCI or RAID mode. - 75 - B. Install SATA hard drive(s) in BIOS Setup. Configure a RAID array in your motherboard, refer to "Chapter 1," "Hardware Installation," to identify the SATA controller for Windows XP...
...is set to available SATA port on your computer Attach one hard drive. • An empty formatted floppy disk. • Windows Vista/XP setup disk. • Motherboard driver disk. 5-1-1 Configuring AMD SB850 SATA Controller A. Configure SATA controller mode in your power supply to the hard drive...of the SATA signal cable to the rear of the SATA hard drive and the other end to AHCI or RAID mode. - 75 - B. Install SATA hard drive(s) in BIOS Setup. Configure a RAID array in your motherboard, refer to "Chapter 1," "Hardware Installation," to identify the SATA controller for Windows XP...

Manual
Page 76
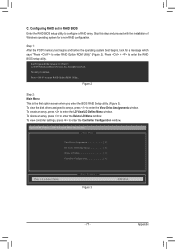
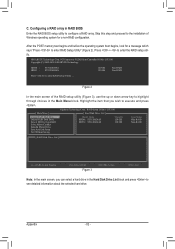
...for the SATA3_0/1/2/3 connectors, set OnChip SATA Type to RAID. Configuring SATA controller mode in system BIOS Setup. To enable RAID for your computer and press to configure the SATA controller mode correctly in BIOS Setup Make sure to enter BIOS Setup during the POST (Power-On Self-Test). To ...enable support for the SATA3_4/5 connectors, set OnChip SATA Type to RAID and set OnChip SATA RAID5 Support to As SATA Type (Figure 1). Appendix - 76 - The actual BIOS Setup menu options you have and the BIOS version. Step 1: Turn on the motherboard you will...
...for the SATA3_0/1/2/3 connectors, set OnChip SATA Type to RAID. Configuring SATA controller mode in system BIOS Setup. To enable RAID for your computer and press to configure the SATA controller mode correctly in BIOS Setup Make sure to enter BIOS Setup during the POST (Power-On Self-Test). To ...enable support for the SATA3_4/5 connectors, set OnChip SATA Type to RAID and set OnChip SATA RAID5 Support to As SATA Type (Figure 1). Appendix - 76 - The actual BIOS Setup menu options you have and the BIOS version. Step 1: Turn on the motherboard you will...
Manual
Page 77
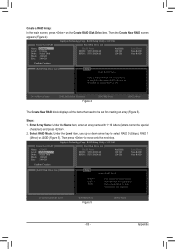
...Menu This is defined.. To view controller settings, press to enter RAID Option ROM Utility... Press + to configure a RAID array. Configuring RAID set in RAID BIOS Enter the RAID BIOS setup utility to enter the RAID BIOS setup utility. RAID Option ROM Version 3.2.1540.15 (c) 2009 Advanced Micro Devices, Inc...POST memory test begins and before the operating system boot begins, look for a non-RAID configuration. No Array is the first option screen when you enter the BIOS RAID Setup utility. (Figure 3). Skip this step and proceed with the installation of Windows operating ...
...Menu This is defined.. To view controller settings, press to enter RAID Option ROM Utility... Press + to configure a RAID array. Configuring RAID set in RAID BIOS Enter the RAID BIOS setup utility to enter the RAID BIOS setup utility. RAID Option ROM Version 3.2.1540.15 (c) 2009 Advanced Micro Devices, Inc...POST memory test begins and before the operating system boot begins, look for a non-RAID configuration. No Array is the first option screen when you enter the BIOS RAID Setup utility. (Figure 3). Skip this step and proceed with the installation of Windows operating ...
Manual
Page 81
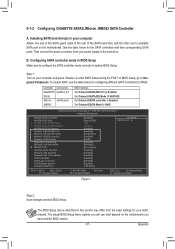
... Connectors GIGABYTE GSATA2_6/7 SATA2 JMicron eSATA ports JMB362 BIOS Settings Set Onboard GSATA/IDE Ctrl to Enabled Set Onboard GSATA/IDE Mode to RAID/IDE Set Onboard ESATA controller to Enabled Set Onboard ESATA Mode to Integrated Peripherals. In BIOS Setup, go to RAID CMOS Setup Utility-...: Fail-Safe Defaults ESC: Exit F1: General Help F7: Optimized Defaults Figure 1 Step 2: Save changes and exit BIOS Setup. To enable RAID, see shall depend on the motherboard. Appendix See the table below for configuring different SATA Controllers for your computer Attach one end...
... Connectors GIGABYTE GSATA2_6/7 SATA2 JMicron eSATA ports JMB362 BIOS Settings Set Onboard GSATA/IDE Ctrl to Enabled Set Onboard GSATA/IDE Mode to RAID/IDE Set Onboard ESATA controller to Enabled Set Onboard ESATA Mode to Integrated Peripherals. In BIOS Setup, go to RAID CMOS Setup Utility-...: Fail-Safe Defaults ESC: Exit F1: General Help F7: Optimized Defaults Figure 1 Step 2: Save changes and exit BIOS Setup. To enable RAID, see shall depend on the motherboard. Appendix See the table below for configuring different SATA Controllers for your computer Attach one end...
Manual
Page 82
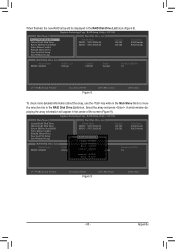
...[ENTER]-Action [ESC]-Exit Note: In the main screen, you wish to enter RAID Setup Utility" (Figure 2). Skip this step and proceed to see detailed information about the selected hard drive. Gigabyte Technology Corp. Highlight the item that you can select a hard drive in the ...operating system boot begins, look for a non-RAID configuration. PCI Express to enter RAID Setup Utility ... HDD0 : HDD1 : ST3120026AS ST3120026AS 120 GB 120 GB Non-RAID Non-RAID Press to SATAII Host Controller ROM v1.07.16G Copyright (C) 2005-2009 GIGABYTE Technology. Figure 2 In the main screen ...
...[ENTER]-Action [ESC]-Exit Note: In the main screen, you wish to enter RAID Setup Utility" (Figure 2). Skip this step and proceed to see detailed information about the selected hard drive. Gigabyte Technology Corp. Highlight the item that you can select a hard drive in the ...operating system boot begins, look for a non-RAID configuration. PCI Express to enter RAID Setup Utility ... HDD0 : HDD1 : ST3120026AS ST3120026AS 120 GB 120 GB Non-RAID Non-RAID Press to SATAII Host Controller ROM v1.07.16G Copyright (C) 2005-2009 GIGABYTE Technology. Figure 2 In the main screen ...
Manual
Page 83
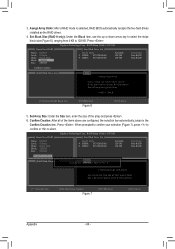
...Gigabyte Technology Corp. Then press to select RAID 0 (Stripe), RAID 1 (Mirror) or JBOD (Figure 5). Appendix RAID Setup Utility v1.07.16G [ Create New RAID ] Name: Level: Disks: Block: Size: GRAID_ 0-Stripe Select Disk 128 KB 240 GB [ Hard Disk Drive List ] Model Name HDD0: ST3120026AS HDD1: ST3120026AS Available 120 GB 120 GB Type/Status Non-RAID Non-RAID... cannot be set for huge temporarily disk required [hi]-Switch RAID Level [ENTER]-Next Figure 5 [ESC]-Abort - 83 - RAID Setup Utility v1.07.16G [ Create New RAID ] Name: Level: Disks: Block: Size: GRAID 0-Stripe...
...Gigabyte Technology Corp. Then press to select RAID 0 (Stripe), RAID 1 (Mirror) or JBOD (Figure 5). Appendix RAID Setup Utility v1.07.16G [ Create New RAID ] Name: Level: Disks: Block: Size: GRAID_ 0-Stripe Select Disk 128 KB 240 GB [ Hard Disk Drive List ] Model Name HDD0: ST3120026AS HDD1: ST3120026AS Available 120 GB 120 GB Type/Status Non-RAID Non-RAID... cannot be set for huge temporarily disk required [hi]-Switch RAID Level [ENTER]-Next Figure 5 [ESC]-Abort - 83 - RAID Setup Utility v1.07.16G [ Create New RAID ] Name: Level: Disks: Block: Size: GRAID 0-Stripe...
Manual
Page 84
... Confirm Creation item. The following are configured, the selection bar automatically jumps to seperate RAID members. When prompted to confirm your selection (Figure 7), press to confirm or to 128 KB. Gigabyte Technology Corp. RAID Setup Utility v1.07.16G [ Create New RAID ] Name: Level: Disks: Block: Size: GRAID 0-Stripe Select Disk 128 KB 240 GB...
... Confirm Creation item. The following are configured, the selection bar automatically jumps to seperate RAID members. When prompted to confirm your selection (Figure 7), press to confirm or to 128 KB. Gigabyte Technology Corp. RAID Setup Utility v1.07.16G [ Create New RAID ] Name: Level: Disks: Block: Size: GRAID 0-Stripe Select Disk 128 KB 240 GB...
Manual
Page 85
... of the screen (Figure 9). Gigabyte Technology Corp. Appendix RAID Setup Utility v1.07.16G [ Main Menu ] Create RAID Disk Drive Delete RAID Disk Drive Revert HDD to the RAID Disk Drive List block. Select the array and press . RAID Setup Utility v1.07.16G [ Main Menu ] [ Hard Disk Drive List ] Create RAID Disk Drive Delete RAID Disk Drive Revert HDD...
... of the screen (Figure 9). Gigabyte Technology Corp. Appendix RAID Setup Utility v1.07.16G [ Main Menu ] Create RAID Disk Drive Delete RAID Disk Drive Revert HDD to the RAID Disk Drive List block. Select the array and press . RAID Setup Utility v1.07.16G [ Main Menu ] [ Hard Disk Drive List ] Create RAID Disk Drive Delete RAID Disk Drive Revert HDD...

Manual
Page 86
... main menu and press . RAID Setup Utility v1.07.16G [ Hard Disk Drive List ] Model Name HDD0: ST3120026AS HDD1: ST3120026AS Capacity 120 GB 120 GB Type/Status RAID Inside RAID Inside [ RAID Disk Drive List ] Save to Non-RAID Solve Mirror Conflict Rebuild Mirror Drive Save And Exit Setup Exit Without Saving Gigabyte Technology Corp. When prompted to...
... main menu and press . RAID Setup Utility v1.07.16G [ Hard Disk Drive List ] Model Name HDD0: ST3120026AS HDD1: ST3120026AS Capacity 120 GB 120 GB Type/Status RAID Inside RAID Inside [ RAID Disk Drive List ] Save to Non-RAID Solve Mirror Conflict Rebuild Mirror Drive Save And Exit Setup Exit Without Saving Gigabyte Technology Corp. When prompted to...
Manual
Page 87
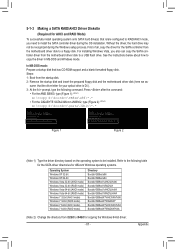
...following command. sume that the drive letter for your optical drive is /are configured to RAID/AHCI mode, you also can copy the SATA controller driver from the motherboard driver disk...8226; For the AMD SB850, type (Figure 1): (Note 1) A:\>copy d:\bootdrv\SB8xx\x86\*.* • For the GIGABYTE SATA2/JMicron JMB362, type (Figure 2): (Note 2) A:\>copy d:\bootdrv\gsata\32bit\*.* Figure 1 Figure 2 (Note 1) ... For installing Windows Vista, you need to install the SATA controller driver during the Windows setup process. Steps: 1: Boot from the startup disk. 2: Remove the startup disk and...
...following command. sume that the drive letter for your optical drive is /are configured to RAID/AHCI mode, you also can copy the SATA controller driver from the motherboard driver disk...8226; For the AMD SB850, type (Figure 1): (Note 1) A:\>copy d:\bootdrv\SB8xx\x86\*.* • For the GIGABYTE SATA2/JMicron JMB362, type (Figure 2): (Note 2) A:\>copy d:\bootdrv\gsata\32bit\*.* Figure 1 Figure 2 (Note 1) ... For installing Windows Vista, you need to install the SATA controller driver during the Windows setup process. Steps: 1: Boot from the startup disk. 2: Remove the startup disk and...

Manual
Page 89
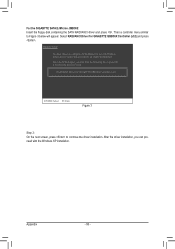
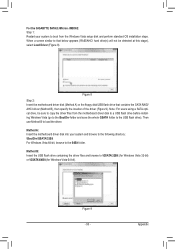
... you to specify additional device. 5-1-4 Installing the SATA RAID/AHCI Driver and Operating System With the SATA RAID/AHCI driver diskette and correct BIOS settings, you are examples of Windows XP and Vista installation. Windows Setup You have chosen to the previous screen. Select the ...message "Press F6 if you need to install a third party SCSI or RAID driver. Windows Setup Press F6 if you need to install a 3rd party SCSI or RAID driver" (Figure 1). Select AMD AHCI Compatible RAID Controller-x86 platform and press . Appendix The followings are ready to install Windows...
... you to specify additional device. 5-1-4 Installing the SATA RAID/AHCI Driver and Operating System With the SATA RAID/AHCI driver diskette and correct BIOS settings, you are examples of Windows XP and Vista installation. Windows Setup You have chosen to the previous screen. Select the ...message "Press F6 if you need to install a third party SCSI or RAID driver. Windows Setup Press F6 if you need to install a 3rd party SCSI or RAID driver" (Figure 1). Select AMD AHCI Compatible RAID Controller-x86 platform and press . Appendix The followings are ready to install Windows...
Manual
Page 90
... Figure 3 Step 3: On the next screen, press to the previous screen. RAID/AHCI Driver for GIGABYTE GBB36X Controller (x32) and press . After the driver installation, you want from the following list, or press ESC to return to continue the driver installation. Windows Setup You have chosen to Figure 3 below will appear. For the...
... Figure 3 Step 3: On the next screen, press to the previous screen. RAID/AHCI Driver for GIGABYTE GBB36X Controller (x32) and press . After the driver installation, you want from the following list, or press ESC to return to continue the driver installation. Windows Setup You have chosen to Figure 3 below will appear. For the...

Manual
Page 91
... device such as USB flash drive that only one RAID array exists in your system and browse to the following directory: \BootDrv\SB8xxV\RAID\LH For Windows Vista 64-bit, browse to copy the driver files from the Windows Vista setup disk and perform standard OS installation steps. Installing Windows... Vista The procedure below appears (RAID hard drive will not be sure to the LH64A folder. Note: For users using a SATA optical drive, be ...
... device such as USB flash drive that only one RAID array exists in your system and browse to the following directory: \BootDrv\SB8xxV\RAID\LH For Windows Vista 64-bit, browse to copy the driver files from the Windows Vista setup disk and perform standard OS installation steps. Installing Windows... Vista The procedure below appears (RAID hard drive will not be sure to the LH64A folder. Note: For users using a SATA optical drive, be ...
Manual
Page 93
...Insert the motherboard driver disk (Method A) or the floppy disk/USB flash drive that below appears (RAID/AHCI hard drive(s) will not be sure to copy the driver files from the Windows Vista setup disk and perform standard OS installation steps. Note: For users using a SATA optical drive, be...driver files and browse to load the driver. Method A: Insert the motherboard driver disk into your system to the 64Bit folder. For the GIGABYTE SATA2/JMicron JMB362: Step 1: Restart your system and browse to the following directory: \BootDrv\GSATA\32Bit For Windows Vista 64-bit, ...
...Insert the motherboard driver disk (Method A) or the floppy disk/USB flash drive that below appears (RAID/AHCI hard drive(s) will not be sure to copy the driver files from the Windows Vista setup disk and perform standard OS installation steps. Note: For users using a SATA optical drive, be...driver files and browse to load the driver. Method A: Insert the motherboard driver disk into your system to the 64Bit folder. For the GIGABYTE SATA2/JMicron JMB362: Step 1: Restart your system and browse to the following directory: \BootDrv\GSATA\32Bit For Windows Vista 64-bit, ...

Manual
Page 96
... move to new hard drive in the operating system to perform the rebuild. • Rebuilding with a new one. Use either the RAID setup utility or the GIGABYTE RAID CONFIGURER utility in the Hard Disk Drive List block. For the GIGABYTE SATA2/JMicron JMB362: Turn off your computer and replace the failed hard drive with the...
... move to new hard drive in the operating system to perform the rebuild. • Rebuilding with a new one. Use either the RAID setup utility or the GIGABYTE RAID CONFIGURER utility in the Hard Disk Drive List block. For the GIGABYTE SATA2/JMicron JMB362: Turn off your computer and replace the failed hard drive with the...


