
Manual
Page 12
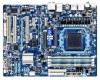
....5cm x 23.0cm (Note 1) Due to Windows 32-bit operating system limitation, when more than 4 GB of physical memory is installed, the actual memory size displayed will depend on the CPU/system cooler you install. (Note 4) Available functions in EasyTune may differ by motherboard model.
....5cm x 23.0cm (Note 1) Due to Windows 32-bit operating system limitation, when more than 4 GB of physical memory is installed, the actual memory size displayed will depend on the CPU/system cooler you install. (Note 4) Available functions in EasyTune may differ by motherboard model.
Manual
Page 28
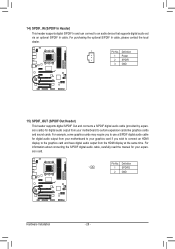
... supports digital S/PDIF Out and connects a S/PDIF digital audio cable (provided by expansion cards) for digital audio output from the HDMI display at the same time. For information about connecting the S/PDIF digital audio cable, carefully read the manual for digital audio output from your... motherboard to your graphics card if you wish to connect an HDMI display to the graphics card and have digital audio output from your expansion card. Definition 1 1 SPDIFO 2 GND Hardware Installation - 28 - Pin...
... supports digital S/PDIF Out and connects a S/PDIF digital audio cable (provided by expansion cards) for digital audio output from the HDMI display at the same time. For information about connecting the S/PDIF digital audio cable, carefully read the manual for digital audio output from your... motherboard to your graphics card if you wish to connect an HDMI display to the graphics card and have digital audio output from your expansion card. Definition 1 1 SPDIFO 2 GND Hardware Installation - 28 - Pin...

Manual
Page 35
...function keys available for the menu. Help for reference only and may differ by BIOS version. - 35 - Submenu Help While in a submenu, press to display a help screen. BIOS Setup 2-2 The Main Menu Once you want in the Main Menu or a submenu, press + to access more advanced options. &#...Fail-Safe BIOS default settings for the current submenus Load the Optimized BIOS default settings for the current submenus Access the Q-Flash utility Display system information Save all the changes and exit the BIOS Setup program Save CMOS to BIOS Load CMOS from BIOS Main Menu Help...
...function keys available for the menu. Help for reference only and may differ by BIOS version. - 35 - Submenu Help While in a submenu, press to display a help screen. BIOS Setup 2-2 The Main Menu Once you want in the Main Menu or a submenu, press + to access more advanced options. &#...Fail-Safe BIOS default settings for the current submenus Load the Optimized BIOS default settings for the current submenus Access the Q-Flash utility Display system information Save all the changes and exit the BIOS Setup program Save CMOS to BIOS Load CMOS from BIOS Main Menu Help...
Manual
Page 36
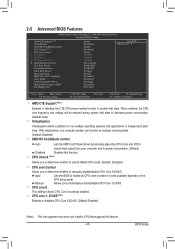
... system boot, etc. Advanced BIOS Features Use this menu to configure the device boot order, advanced features available on the CPU, and the primary display adapter. Integrated Peripherals Use this menu to configure all peripheral devices, such as IDE, SATA, USB, integrated audio, and integrated LAN, etc. Power...
... system boot, etc. Advanced BIOS Features Use this menu to configure the device boot order, advanced features available on the CPU, and the primary display adapter. Integrated Peripherals Use this menu to configure all peripheral devices, such as IDE, SATA, USB, integrated audio, and integrated LAN, etc. Power...

Manual
Page 40
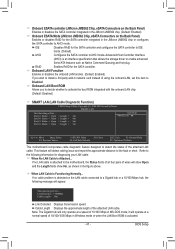
NB PCIE Voltage Control Allows you to the memory or reduce the useful life of the memory. Normal CPU Vcore Displays the normal operating voltage of your CPU or reduce the useful life of the CPU. Note: Increasing memory voltage may result in damage to set ...
NB PCIE Voltage Control Allows you to the memory or reduce the useful life of the memory. Normal CPU Vcore Displays the normal operating voltage of your CPU or reduce the useful life of the CPU. Note: Increasing memory voltage may result in damage to set ...

Manual
Page 42
... the MS-DOS operating system. Typically, 640 KB will stop. Extended IDE Drive Configure your IDE/SATA devices by the BIOS POST. The following fields display your system. Drive A Allows you wish to enter the parameters manually, refer to the information on this channel. Base Memory Also called conventional memory. BIOS...
... the MS-DOS operating system. Typically, 640 KB will stop. Extended IDE Drive Configure your IDE/SATA devices by the BIOS POST. The following fields display your system. Drive A Allows you wish to enter the parameters manually, refer to the information on this channel. Base Memory Also called conventional memory. BIOS...
Manual
Page 43
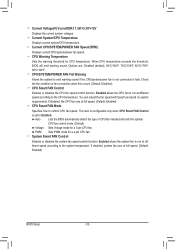
... CPU core frequency and voltage will be reduced during system halt state to decrease power consumption. (Default: Auto) Virtualization Virtualization allows a platform to HDD Init Display First [Auto] [Disabled] [Auto] [Disabled] [Auto] Enabled Enabled Enabled [Press Enter] [Hard Disk] [CDROM] [Floppy] [Setup] [Disabled] [Disabled] [Enabled] [Disabled] [PCI Slot] Item Help Menu...
... CPU core frequency and voltage will be reduced during system halt state to decrease power consumption. (Default: Auto) Virtualization Virtualization allows a platform to HDD Init Display First [Auto] [Disabled] [Auto] [Disabled] [Auto] Enabled Enabled Enabled [Press Enter] [Hard Disk] [CDROM] [Floppy] [Setup] [Disabled] [Disabled] [Enabled] [Disabled] [PCI Slot] Item Help Menu...

Manual
Page 44
... POST message. (Default: Enabled) Backup BIOS Image to HDD Allows the system to copy the BIOS image file to display the GIGABYTE Logo at system startup. BIOS Setup - 44 - Use the up or down arrow key to select a hard drive, then press the plus key (or ) or ... the installed PCI graphics card or the PCI Express graphics card. PEG1 Sets the PCI Express graphics card on the PCIEX16 slot as the first display. Hard Disk Boot Priority Specifies the sequence of loading the operating system from the available devices. Setup A password is only required for entering the BIOS...
... POST message. (Default: Enabled) Backup BIOS Image to HDD Allows the system to copy the BIOS image file to display the GIGABYTE Logo at system startup. BIOS Setup - 44 - Use the up or down arrow key to select a hard drive, then press the plus key (or ) or ... the installed PCI graphics card or the PCI Express graphics card. PEG1 Sets the PCI Express graphics card on the PCIEX16 slot as the first display. Hard Disk Boot Priority Specifies the sequence of loading the operating system from the available devices. Setup A password is only required for entering the BIOS...
Manual
Page 47
...100/1000 Mbps in Windows mode or when the LAN Boot ROM is activated. - 47 - Link Detected --> 100Mbps Cable Length= 30m Link Detected Displays transmission speed. Note: The Gigabit hub will appear: Start detecting at Port..... Refer to the following message will only operate at a normal speed ...Back Panel) Enables or disables RAID for the SATA controller. This feature will operate at a speed of the attached LAN cable. Cable Length Displays the approximate length of 10/100 Mbps in MS-DOS mode; Onboard ESATA controller (JMicron JMB362 Chip, eSATA Connectors on the Back Panel)...
...100/1000 Mbps in Windows mode or when the LAN Boot ROM is activated. - 47 - Link Detected --> 100Mbps Cable Length= 30m Link Detected Displays transmission speed. Note: The Gigabit hub will appear: Start detecting at Port..... Refer to the following message will only operate at a normal speed ...Back Panel) Enables or disables RAID for the SATA controller. This feature will operate at a speed of the attached LAN cable. Cable Length Displays the approximate length of 10/100 Mbps in MS-DOS mode; Onboard ESATA controller (JMicron JMB362 Chip, eSATA Connectors on the Back Panel)...

Manual
Page 51
... "No". Enabled clears the record of previous chassis intrusion status and the Case Opened field will show "No" at next boot. (Default: Disabled) Case Opened Displays the detection status of previous chassis intrusion status.
... "No". Enabled clears the record of previous chassis intrusion status and the Case Opened field will show "No" at next boot. (Default: Disabled) Case Opened Displays the detection status of previous chassis intrusion status.
Manual
Page 52
...fan installed and sets the optimal CPU fan control mode. (Default) Voltage Sets Voltage mode for a 3-pin CPU fan. Current System/CPU Temperature Displays current system/CPU temperature. If disabled, the CPU fan runs at full speed. (Default: Enabled) BIOS Setup - 52 - Enabled allows the...run at different speed according to the system temperature. Current Voltage(V) Vcore/DDR3 1.5V/+3.3V/+12V Displays the current system voltages. Current CPU/SYSTEM/POWER FAN Speed (RPM) Displays current CPU/system/power fan speed. This item is configurable only when CPU Smart FAN Control ...
...fan installed and sets the optimal CPU fan control mode. (Default) Voltage Sets Voltage mode for a 3-pin CPU fan. Current System/CPU Temperature Displays current system/CPU temperature. If disabled, the CPU fan runs at full speed. (Default: Enabled) BIOS Setup - 52 - Enabled allows the...run at different speed according to the system temperature. Current Voltage(V) Vcore/DDR3 1.5V/+3.3V/+12V Displays the current system voltages. Current CPU/SYSTEM/POWER FAN Speed (RPM) Displays current CPU/system/power fan speed. This item is configurable only when CPU Smart FAN Control ...
Manual
Page 57
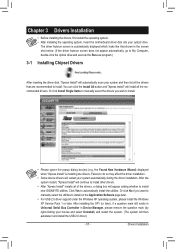
..." installs all the recommended drivers. The driver Autorun screen is installing the drivers. the Found New Hardware Wizard) displayed when "Xpress Install" is automatically displayed which looks like that are recommended to install new GIGABYTE utilities. After installing the SP1 (or later), if a question mark still exists in Universal Serial Bus Controller in...
..." installs all the recommended drivers. The driver Autorun screen is installing the drivers. the Found New Hardware Wizard) displayed when "Xpress Install" is automatically displayed which looks like that are recommended to install new GIGABYTE utilities. After installing the SP1 (or later), if a question mark still exists in Universal Serial Bus Controller in...

Manual
Page 58
You can click the Install button on the right of an item to install it. 3-3 Technical Manuals This page provides GIGABYTE's application guides, content descriptions for this driver disk, and the motherboard manuals. Drivers Installation - 58 - 3-2 Application Software This page displays all the utilities and applications that GIGABYTE develops and some free software.
You can click the Install button on the right of an item to install it. 3-3 Technical Manuals This page provides GIGABYTE's application guides, content descriptions for this driver disk, and the motherboard manuals. Drivers Installation - 58 - 3-2 Application Software This page displays all the utilities and applications that GIGABYTE develops and some free software.

Manual
Page 60
You can click the Install button on the right of the BIOS, drivers, or applications will be displayed. 3-7 New Utilities This page provides a quick link to GIGABYTE's lately developed utilities for users to install. Drivers Installation - 60 - 3-6 Download Center To update the BIOS, drivers, or applications, click the Download Center button to link to install it. The latest version of an item to the GIGABYTE website.
You can click the Install button on the right of the BIOS, drivers, or applications will be displayed. 3-7 New Utilities This page provides a quick link to GIGABYTE's lately developed utilities for users to install. Drivers Installation - 60 - 3-6 Download Center To update the BIOS, drivers, or applications, click the Download Center button to link to install it. The latest version of an item to the GIGABYTE website.
Manual
Page 65
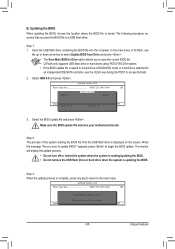
...BIOS, choose the location where the BIOS file is complete, press any key to return to select Update BIOS from the USB flash drive is displayed on the screen. Select HDD 0-0 and press . Step 1: 1. Insert the USB flash drive containing the BIOS file into the computer. ... CMO S Default Enable Update BIOS from Drive Please SparevsesBaInOySketoy Dtoricvoentinue Enter : Run hi:Move ESC:Reset F10:Power Off - 65 - The monitor will display the update process. • Do not turn off or restart the system when the system is reading/updating the BIOS. • Do not remove ...
...BIOS, choose the location where the BIOS file is complete, press any key to return to select Update BIOS from the USB flash drive is displayed on the screen. Select HDD 0-0 and press . Step 1: 1. Insert the USB flash drive containing the BIOS file into the computer. ... CMO S Default Enable Update BIOS from Drive Please SparevsesBaInOySketoy Dtoricvoentinue Enter : Run hi:Move ESC:Reset F10:Power Off - 65 - The monitor will display the update process. • Do not turn off or restart the system when the system is reading/updating the BIOS. • Do not remove ...
Manual
Page 69
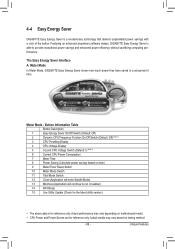
...Saver On/Off Switch (Default: Off) 2 Dynamic CPU Frequency Function On/Off Switch (Default: Off) (Note 1) 3 CPU Throttling Display 4 CPU Voltage Display 5 3-Level CPU Voltage Switch (Default:1) (Note 2) 6 Current CPU Power Consumption 7 Meter Time 8 Power Saving (Calculate power savings... based on testing method. - 69 - Unique Features Featuring an advanced proprietary software design, GIGABYTE Easy Energy Saver is ...
...Saver On/Off Switch (Default: Off) 2 Dynamic CPU Frequency Function On/Off Switch (Default: Off) (Note 1) 3 CPU Throttling Display 4 CPU Voltage Display 5 3-Level CPU Voltage Switch (Default:1) (Note 2) 6 Current CPU Power Consumption 7 Meter Time 8 Power Saving (Calculate power savings... based on testing method. - 69 - Unique Features Featuring an advanced proprietary software design, GIGABYTE Easy Energy Saver is ...

Manual
Page 70
... Information Table Button Description 1 Easy Energy Saver On/Off Switch (Default: Off) 2 Dynamic CPU Frequency Function On/Off Switch (Default: Off) (Note 1) 3 CPU Throttling Display 4 CPU Voltage Display 5 3-Level CPU Voltage Switch (Default:1) (Note 2) 6 Current CPU Power Consumption 7 Time/Date Easy Energy Saver Enabled 8 Total Power Savings (Total power saving with Dynamic...
... Information Table Button Description 1 Easy Energy Saver On/Off Switch (Default: Off) 2 Dynamic CPU Frequency Function On/Off Switch (Default: Off) (Note 1) 3 CPU Throttling Display 4 CPU Voltage Display 5 3-Level CPU Voltage Switch (Default:1) (Note 2) 6 Current CPU Power Consumption 7 Time/Date Easy Energy Saver Enabled 8 Total Power Savings (Total power saving with Dynamic...

Manual
Page 71
Find the Q-Share icon to Start>All Programs>GIGABYTE>Q-Share. in the notification area and right-click on the same network, making full use of Internet resources. Disable Incoming Folder ... Data Sharing Disabled Figure...Share from the motherboard driver disk, go to configure the data sharing settings. Exit... After configuring your data with computers on this icon Figure 1. Description Displays the computers with data sharing enabled Enables data sharing Disables data sharing Accesses the shared data folder Changes the data folder to share your LAN...
Find the Q-Share icon to Start>All Programs>GIGABYTE>Q-Share. in the notification area and right-click on the same network, making full use of Internet resources. Disable Incoming Folder ... Data Sharing Disabled Figure...Share from the motherboard driver disk, go to configure the data sharing settings. Exit... After configuring your data with computers on this icon Figure 1. Description Displays the computers with data sharing enabled Enables data sharing Disables data sharing Accesses the shared data folder Changes the data folder to share your LAN...
Manual
Page 73
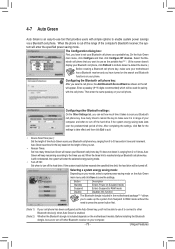
... sure your motherboard has a Bluetooth receiver and you select a cell phone, the Add Bluetooth Device Wizard as the portable key(Note .1) (If the screen doesn't display your Bluetooth cell phone, click Refresh to let Auto Green re-detect the device.) Before creating a Bluetooth cell phone key, make sure it is included...
... sure your motherboard has a Bluetooth receiver and you select a cell phone, the Add Bluetooth Device Wizard as the portable key(Note .1) (If the screen doesn't display your Bluetooth cell phone, click Refresh to let Auto Green re-detect the device.) Before creating a Bluetooth cell phone key, make sure it is included...
Manual
Page 80
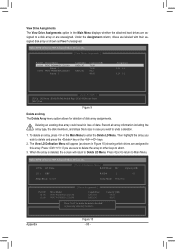
... allows for deletion of data. Option ROM Utility (c) 2009 Advanced Micro Devices, Inc. View Drive Assignments The View Drive Assignments option in the Main Menu displays whether the attached hard drives are assigned to delete the data in the disk! Under the Assignment column, drives are assigned to delete and press...
... allows for deletion of data. Option ROM Utility (c) 2009 Advanced Micro Devices, Inc. View Drive Assignments The View Drive Assignments option in the Main Menu displays whether the attached hard drives are assigned to delete the data in the disk! Under the Assignment column, drives are assigned to delete and press...


