Gigabyte GA-Z77X-UD3H Support and Manuals
Get Help and Manuals for this Gigabyte item
View All Support Options Below
Free Gigabyte GA-Z77X-UD3H manuals!
Problems with Gigabyte GA-Z77X-UD3H?
Ask a Question
Free Gigabyte GA-Z77X-UD3H manuals!
Problems with Gigabyte GA-Z77X-UD3H?
Ask a Question
Most Recent Gigabyte GA-Z77X-UD3H Questions

Nothing Shows On Display And Debug Code Stuck On A6
I have everything hooked up right, but nothing shows on my display whether I hook it up hdmi, monito...
I have everything hooked up right, but nothing shows on my display whether I hook it up hdmi, monito...
(Posted by xvdcvx35342 12 years ago)
Gigabyte GA-Z77X-UD3H Videos

Unboxing Gigabyte GA Z77x UD3H | german/deutsch
Duration: 6:36
Total Views: 161
Duration: 6:36
Total Views: 161
Gigabyte GA-Z77X UD3H BIOS [PCAXE.COM]
Duration: 6:54
Total Views: 465
Duration: 6:54
Total Views: 465
Gigabyte GA-Z77X-UD3H 3D BIOS [PCAXE.COM]
Duration: 5:21
Total Views: 1,554
Duration: 5:21
Total Views: 1,554
Gigabyte GA-Z77X-UD3H Motherboard Unboxing
Duration: 5:55
Total Views: 1,551
Duration: 5:55
Total Views: 1,551
Popular Gigabyte GA-Z77X-UD3H Manual Pages
User Manual - Page 1
GA-Z77X-UD3H
User's Manual
Rev. 1002 12ME-Z77XU3H-1002R
User Manual - Page 2
Motherboard GA-Z77X-UD3H
Mar. 16, 2012
Motherboard GA-Z77X-UD3H
Mar. 16, 2012
User Manual - Page 4
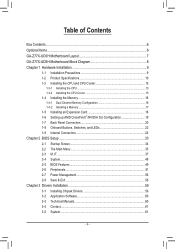
... GA-Z77X-UD3H Motherboard Block Diagram 8 Chapter 1 Hardware Installation 9
1-1 Installation Precautions 9 1-2 Product Specifications 10 1-3 Installing the CPU and CPU Cooler 13
1-3-1 Installing the CPU 13 1-3-2 Installing the CPU Cooler 15 1-4 Installing the Memory 16 1-4-1 Dual Channel Memory Configuration 16 1-4-2 Installing a Memory 17 1-5 Installing an Expansion Card 18 1-6 Setting...
User Manual - Page 6

...UD3H motherboard 55 Motherboard driver disk 55 User's Manual 55 Quick Installation Guide 55 Four SATA 6Gb/s cables 55 I/O Shield 55 One 2-Way SLI bridge connector 55 One GC-WB150D (including two antennas, one USB 2.0 cable, driver disk,
and user's manual)j
MM Only for GA-Z77X-UD3H The box contents above are subject to change without notice. Optional Items
†† 2-port USB 2.0 bracket (Part...
User Manual - Page 7
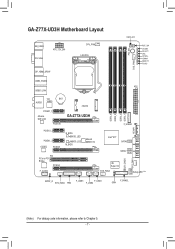
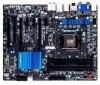
GA-Z77X-UD3H Motherboard Layout
KB_USB3 DVI VGA
ATX_12V_2X4
DP_HDMI_SPDIF
CPU_FAN LGA1155
SYS_FAN2
PW_SW
CMOS_SW
RST_SW
VCORE CPUVTT VSA CPUPLL VDIMM DDRVTT PCHIO
USB3_ESATA
ATX USB30_LAN
VIA
BAT
AUDIO VL800
PCIEX1_1
Atheros GbE LAN
PCIEX16
mSATA
GA-Z77X-UD3H
PCIEX1_2
PCIEX1_3 CODEC PCIEX8
B_BIOS BBIOS_LED
MBIOS_LED M_BIOS
Marvell 88SE9172
PCI PCIe to PCI Bridge
PCIEX4
F_AUDIO
...
User Manual - Page 8
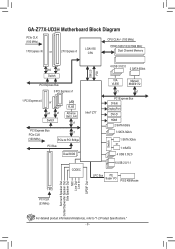
GA-Z77X-UD3H Motherboard Block Diagram
PCIe CLK (100 MHz)
1 PCI Express x16 or
2 PCI Express x8
LGA1155 CPU
CPU CLK+/- (100 MHz)
DDR3...PCI Bus
Dual BIOS
Intel® Z77
DMI 2.0 FDI
Switch
4 USB 3.0/2.0 2 SATA 6Gb/s
VIA VL800
Marvell 88SE9172
x1
x1
PCI Express Bus D-Sub DisplayPort DVI-D HDMI
2 SATA 6Gb/s
3 SATA 3Gb/s
1 SATA 3Gb/s or
1 mSATA
4 USB 3.0/2.0
CODEC
6 USB 2.0/1.1 LPC Bus...
User Manual - Page 18
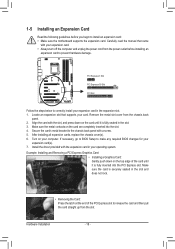
... on the card until it is fully inserted into the slot. 4. After installing all expansion cards, replace the chassis cover(s). 6. Secure the card's metal bracket to install an expansion card: •• Make sure the motherboard supports the expansion card. Install the driver provided with a screw. 5. Example: Installing and Removing a PCI Express Graphics Card:
••...
User Manual - Page 22

...
•• After system restart, go to BIOS Setup to load factory defaults (select Load Optimized Defaults) or manually configure the BIOS settings (refer to Chapter 2, "BIOS Setup," for boot up or overclocking, helping to reduce BIOS failure during overclocking.
1-8 Onboard Buttons, Switches, and LEDs
BIOS Switch and BIOS LED Indicators The BIOS switch (SW4) allows users to easily select...
User Manual - Page 32
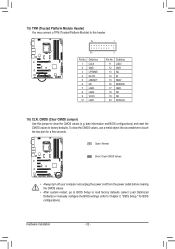
..., go to BIOS Setup to load factory defaults (select Load Optimized Defaults) or manually configure the BIOS settings (refer to touch the two pins for BIOS configurations). Definition
LCLK...CLR_CMOS (Clear CMOS Jumper) Use this header. Hardware Installation
- 32 -
To clear the CMOS values, use a metal object like a screwdriver to Chapter 2, "BIOS Setup," for a few seconds. 1
15) TPM ...
User Manual - Page 33
..., do not encounter problems using the Q-Flash and @BIOS utilities, refer to prevent system instability or other unexpected results. Inadequately altering the settings may result in the CMOS. BIOS Setup To access the BIOS Setup program, press the key during system startup, saving system parameters and loading operating system, etc. To upgrade the BIOS, use either the GIGABYTE Q-Flash or...
User Manual - Page 39
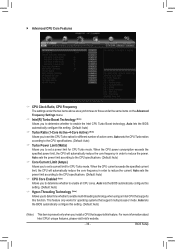
... is present only when you install a CPU that supports this function. BIOS Setup Auto sets the CPU Turbo ratios according to the CPU specifications. (Default: Auto)
&& Turbo Power Limit (Watts) Allows you to enable multi-threading technology when using an Intel CPU that support multi-processor mode. Auto lets the BIOS automatically configure this setting. (Default: Auto)
&& Hyper-Threading...
User Manual - Page 53
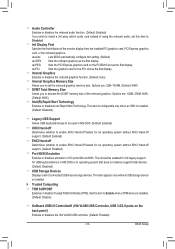
... the back panel) Enables or disables the VIA VL800 USB controller. (Default: Enabled)
- 53 - BIOS Setup This should be used in operating system that does not natively support USB devices. (Default: Disabled)
&& USB Storage Devices Displays a list of the onboard graphics. Set this item to Disabled.
&& Init Display First Specifes the frst initiation of I/O ports 64h and 60h...
User Manual - Page 59
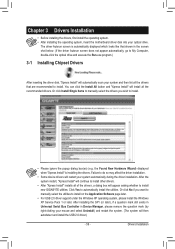
... click No if you wish to install on the Application Software page later.
•• For USB 2.0 driver support under the Windows XP operating system, please install the Windows XP Service Pack 1 or later. Or click Install Single Items to manually select the drivers you want to manually select the utilities to install.
•• Please ignore the popup dialog box...
User Manual - Page 72
...2.
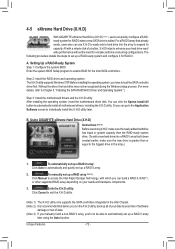
To manually set up a RAID array (Note 3):
Click Manual to access the Intel Rapid Storage Technology, with a simple click of data. (Note 3) If you manually build a non-RAID 0 array, you'll not be recognized during the Windows setup process. (For more details, refer to Chapter 5, "Installing the SATA RAID/AHCI Driver and Operating System." )
Step 3: Install the motherboard drivers and the...
User Manual - Page 110
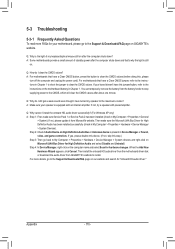
If not, please update it from GIGABYTE's website to install. Then make sure Service Pack 1 or Service Pack 2 has been installed (check in My Computer > Properties > General
> System). Q: Why is present in My Computer > Properties > Hardware > Device Manager > System Devices). For motherboards that have a Clear CMOS button, press this button to clear the CMOS values (before doing ...
Gigabyte GA-Z77X-UD3H Reviews
We have not received any reviews for Gigabyte yet.