Gigabyte GA-Z170X-Gaming GT Support and Manuals
Get Help and Manuals for this Gigabyte item
View All Support Options Below
Free Gigabyte GA-Z170X-Gaming GT manuals!
Problems with Gigabyte GA-Z170X-Gaming GT?
Ask a Question
Free Gigabyte GA-Z170X-Gaming GT manuals!
Problems with Gigabyte GA-Z170X-Gaming GT?
Ask a Question
Gigabyte GA-Z170X-Gaming GT Videos

Gigabyte GA Z170X Gaming GT Stereo Jack Not Working Audio Fix
Duration: 1:18
Total Views: 1,598
Duration: 1:18
Total Views: 1,598
?????????? Gigabyte GA-Z170X-Gaming GT
Duration: 3:17
Total Views: 760
Duration: 3:17
Total Views: 760
Unboxing - Placa mãe Gigabyte GA-Z170X-Gaming GT LGA 1151
Duration: 8:57
Total Views: 5,671
Duration: 8:57
Total Views: 5,671
Popular Gigabyte GA-Z170X-Gaming GT Manual Pages
User Manual - Page 1
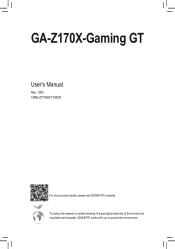
To reduce the impacts on global warming, the packaging materials of this product are recyclable and reusable. GA-Z170X-Gaming GT
User's Manual
Rev. 1002 12ME-Z17XGGT-1002R
For more product details, please visit GIGABYTE's website. GIGABYTE works with you to protect the environment.
User Manual - Page 2
Motherboard GA-Z170X-Gaming GT
Aug. 20, 2015
Motherboard GA-Z170X-Gaming GT
Aug. 20, 2015
User Manual - Page 4

... GA-Z170X-Gaming GT Motherboard Layout 7
Chapter 1 Hardware Installation 9 1-1 Installation Precautions 9 1-2 Product Specifications 10 1-3 Installing the CPU and CPU Cooler 14
1-3-1 Installing the CPU 14 1-3-2 Installing the CPU Cooler 16 1-4 Installing the Memory 17 1-4-1 Dual Channel Memory Configuration 17 1-4-2 Installing a Memory 18 1-5 Installing an Expansion Card 19 1-6 Setting...
User Manual - Page 6
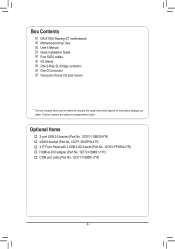
...134;† 2-port USB 2.0 bracket (Part No. 12CR1-1UB030-6*R) †† eSATA bracket (Part No. 12CF1-3SATPW-4*R) †† 3.5" Front Panel with 2 USB 3.0/2.0 ports (Part No. 12CR1-FPX582-2*R) †† HDMI-to change without notice. Box Contents
55 GA-Z170X-Gaming GT motherboard 55 Motherboard driver disk 55 User's Manual 55 Quick Installation Guide 55 Four SATA cables 55 I/O Shield...
User Manual - Page 7
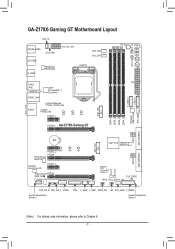
...E2400 LAN
Intel® GbE LAN
PCIEX1_1
80D
60D
42D
DDR4_4 DDR4_2 DDR4_3 DDR4_1
Renesas® USB 3.0 Hub SYS_FAN3
PCIEX16 GA-Z170X-Gaming GT
SATA EXPRESS
6 2
7 3
SATA3
SATA EXPRESS
BAT
PCIEX1_2 80H PCIEX8 TI Burr Brown® OPA2134
Creative® ... F_USB1 BIOS_SW SB SYS_FAN2 F_PANEL System Temperature Sensor 1
(Note) For debug code information, please refer to Chapter 6. - 7 -
User Manual - Page 19

... x1 Slot
Follow the steps below to install an expansion card: •• Make sure the motherboard supports the expansion card. Make sure the metal contacts on the card until it is fully seated in the expansion slot. 1. Install the driver provided with a screw. 5.
After installing all expansion cards, replace the chassis cover(s). 6.
Remove the metal...
User Manual - Page 20
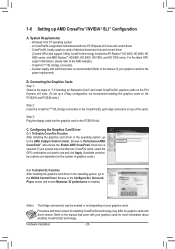
... Enable CrossFire Function After installing the graphics card driver in the operating system, go to Performance\AMD CrossFireX™ and ensure the Enable AMD CrossFireX check box is enabled.
(Note) The bridge connector(s) may differ by graphics cards and driver version. Browse to the manual of the cards. A CrossFire/SLI-supported motherboard with sufficient power...
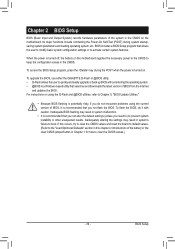
User Manual - Page 24
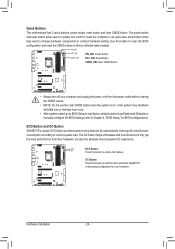
...go to BIOS Setup to load factory defaults (select Load Optimized Defaults) or manually configure the BIOS settings (refer to...your hardware.
Hardware Installation
- 24 - The power button
and reset button allow users to Chapter 2, "BIOS Setup," for your ...the most optimized GIGABYTE overclocking configuration for BIOS configurations). ECO Button and OC Button GIGABYTE's unique ECO ...
User Manual - Page 37
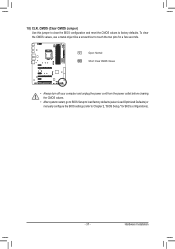
... from the power outlet before clearing the CMOS values.
•• After system restart, go to BIOS Setup to load factory defaults (select Load Optimized Defaults) or manually configure the BIOS settings (refer to Chapter 2, "BIOS Setup," for a few seconds. To clear the CMOS values, use a metal object like a screwdriver to factory defaults. 18...
User Manual - Page 39
...) to clear the CMOS values.)
- 39 - To upgrade the BIOS, use either the GIGABYTE Q-Flash or @BIOS utility. •• Q-Flash allows the user to activate certain system features. For instructions on the motherboard supplies the necessary power to the CMOS to boot. Inadequately altering the settings may result in system malfunction.
••...
User Manual - Page 45
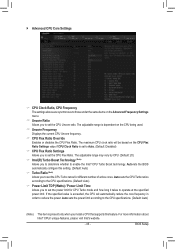
... specifications. (Default: Auto)
&& Power Limit TDP (Watts) / Power Limit Time Allows you to set the power limit for different number of active cores. If the specified value is exceeded, the CPU will be based on the CPU Flex Ratio Settings value if CPU Clock Ratio is present only when you install a CPU that supports this setting...
User Manual - Page 46
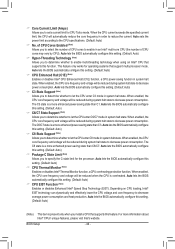
...For more enhanced power-saving state than C1. BIOS Setup
- 46 - of CPU Cores Enabled (Note) ...the CPU specifications. (Default: Auto)
&& No. Auto lets the BIOS automatically configure this setting. (Default: Auto)
&& C8 State Support (Note) ...present only when you install a CPU that support multi-processor mode. Auto lets the BIOS automatically configure this setting. (Default: Auto...
User Manual - Page 79
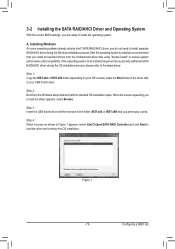
... 3: Insert the USB thumb drive and then browse to ensure system performance and compatibility.
After the operating system is installed, we recommend that you install all required drivers from the Windows setup disk and perform standard OS installation steps.
Configuring a RAID Set A. If the operating system to be installed requires that you provide additional SATA RAID/AHCI...
User Manual - Page 111
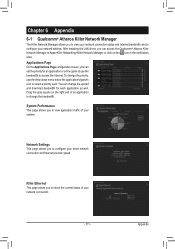
... and download bandwidth for an application or online game to use the drop-down menu below the application's/game's icon to select a priority level. Killer ... your system. You can set the priority for each application as well. Network Settings This page allows you to configure your network settings.
Chapter 6 Appendix
6-1 ...installing the LAN driver, you to access the Internet.
User Manual - Page 112
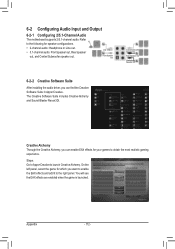
... Headphone/ Speaker Out
6-2-2 Creative Software Suite
After installing the audio driver, you want to enable the EAX effects and add it to the right panel. Appendix
- 112 - 6-2 Configuring Audio Input and Output
6-2-1 Configuring 2/5.1-Channel Audio
The motherboard supports 2/5.1-channel audio.
Refer to the following for your games to launch Creative Alchemy. On the left...
Gigabyte GA-Z170X-Gaming GT Reviews
We have not received any reviews for Gigabyte yet.