
Manual
Page 3
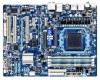
... Changes to their respective owners. All rights reserved. The trademarks mentioned in this product, GIGABYTE provides the following types of documentations: For quick set-up of this manual are legally registered to the specifications and features in this manual may...'s Manual. For product-related information, check on our website at: http://www.gigabyte.com Identifying Your Motherboard Revision The revision number on your motherboard revision before updating motherboard BIOS, drivers, or when looking for technical information. Example: Copyright © 2011 ...
... Changes to their respective owners. All rights reserved. The trademarks mentioned in this product, GIGABYTE provides the following types of documentations: For quick set-up of this manual are legally registered to the specifications and features in this manual may...'s Manual. For product-related information, check on our website at: http://www.gigabyte.com Identifying Your Motherboard Revision The revision number on your motherboard revision before updating motherboard BIOS, drivers, or when looking for technical information. Example: Copyright © 2011 ...
Manual
Page 4
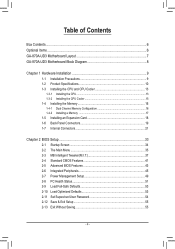
Table of Contents Box Contents...6 Optional Items...6 GA-870A-UD3 Motherboard Layout 7 GA-870A-UD3 Motherboard Block Diagram 8 Chapter 1 Hardware Installation 9 1-1 Installation Precautions 9 1-2 Product Specifications 10 1-3 Installing the CPU and CPU Cooler 13 1-3-1 ...2-3 MB Intelligent Tweaker(M.I.T 37 2-4 Standard CMOS Features 41 2-5 Advanced BIOS Features 43 2-6 Integrated Peripherals 45 2-7 Power Management Setup 49 2-8 PC Health Status 51 2-9 Load Fail-Safe Defaults 53 2-10 Load Optimized Defaults 53 2-11 Set Supervisor/User Password 54 2-12 Save & Exit Setup 55 2-13 ...
Table of Contents Box Contents...6 Optional Items...6 GA-870A-UD3 Motherboard Layout 7 GA-870A-UD3 Motherboard Block Diagram 8 Chapter 1 Hardware Installation 9 1-1 Installation Precautions 9 1-2 Product Specifications 10 1-3 Installing the CPU and CPU Cooler 13 1-3-1 ...2-3 MB Intelligent Tweaker(M.I.T 37 2-4 Standard CMOS Features 41 2-5 Advanced BIOS Features 43 2-6 Integrated Peripherals 45 2-7 Power Management Setup 49 2-8 PC Health Status 51 2-9 Load Fail-Safe Defaults 53 2-10 Load Optimized Defaults 53 2-11 Set Supervisor/User Password 54 2-12 Save & Exit Setup 55 2-13 ...

Manual
Page 31
... factory defaults. Failure to do so may cause damage to the motherboard. • After system restart, go to BIOS Setup to load factory defaults (select Load Optimized Defaults) or manually configure the BIOS settings (refer to remove the jumper cap from the power outlet before clearing the CMOS values. • After clearing the...
... factory defaults. Failure to do so may cause damage to the motherboard. • After system restart, go to BIOS Setup to load factory defaults (select Load Optimized Defaults) or manually configure the BIOS settings (refer to remove the jumper cap from the power outlet before clearing the CMOS values. • After clearing the...

Manual
Page 33
...system in the CMOS on using the current version of BIOS, it with caution. BIOS includes a BIOS Setup program that allows the user to modify basic system configuration settings or to Chapter 4, "BIOS Update Utilities." • Because BIOS flashing is potentially risky, if you do it is ...etc. To upgrade the BIOS, use either the GIGABYTE Q-Flash or @BIOS utility. • Q-Flash allows the user to quickly and easily upgrade or back up BIOS without entering the operating system. • @BIOS is recommended that you need to) to boot. Inadequate BIOS flashing may result in system...
...system in the CMOS on using the current version of BIOS, it with caution. BIOS includes a BIOS Setup program that allows the user to modify basic system configuration settings or to Chapter 4, "BIOS Update Utilities." • Because BIOS flashing is potentially risky, if you do it is ...etc. To upgrade the BIOS, use either the GIGABYTE Q-Flash or @BIOS utility. • Q-Flash allows the user to quickly and easily upgrade or back up BIOS without entering the operating system. • @BIOS is recommended that you need to) to boot. Inadequate BIOS flashing may result in system...
Manual
Page 34
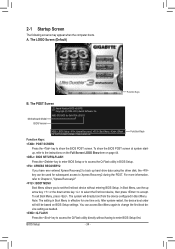
... again to change the first boot device setting as needed. : Q-FLASH Press the key to enter BIOS Setup first. After system restart, the device boot order will directly boot from the device configured in Boot Menu is effective for GA-870A-UD3 D1 . . . . : BIOS Setup : XpressRecovery2 : Boot Menu : ...Qflash 12/14/2010-RX870-SB850-7A66CG0EC-00 Function Keys Function Keys: : POST SCREEN Press the key to show the BIOS POST screen at system startup, refer to Xpress ...
... again to change the first boot device setting as needed. : Q-FLASH Press the key to enter BIOS Setup first. After system restart, the device boot order will directly boot from the device configured in Boot Menu is effective for GA-870A-UD3 D1 . . . . : BIOS Setup : XpressRecovery2 : Boot Menu : ...Qflash 12/14/2010-RX870-SB850-7A66CG0EC-00 Function Keys Function Keys: : POST SCREEN Press the key to show the BIOS POST screen at system startup, refer to Xpress ...

Manual
Page 35
... Help block on the right side of the submenu. • If you do not find the settings you enter the BIOS Setup program, the Main Menu (as usual, select the Load Optimized Defaults item to set your system to exit the help screen (General Help) of function keys available for the current submenus... Move cursor to the Item Help block on the bottom line of a highlighted setup option is displayed on the right (submenus only) Restore the previous BIOS settings for the current submenus Load the Fail-Safe BIOS default settings for the current submenus Load the Optimized...
... Help block on the right side of the submenu. • If you do not find the settings you enter the BIOS Setup program, the Main Menu (as usual, select the Load Optimized Defaults item to set your system to exit the help screen (General Help) of function keys available for the current submenus... Move cursor to the Item Help block on the bottom line of a highlighted setup option is displayed on the right (submenus only) Restore the previous BIOS settings for the current submenus Load the Fail-Safe BIOS default settings for the current submenus Load the Optimized...
Manual
Page 36
...this task.) Exit Without Saving Abandon all the power-saving functions. PC Health Status Use this function to load the BIOS settings from BIOS If your CPU, memory, etc. Standard CMOS Features Use this menu to configure the system time and date, hard drive types,... Use this menu to configure the clock, frequency and voltages of your system becomes unstable and you have loaded the BIOS default settings, you to save the current BIOS settings to make changes in effect. You can also carry out this menu to configure all peripheral devices, such as IDE...
...this task.) Exit Without Saving Abandon all the power-saving functions. PC Health Status Use this function to load the BIOS settings from BIOS If your CPU, memory, etc. Standard CMOS Features Use this menu to configure the system time and date, hard drive types,... Use this menu to configure the clock, frequency and voltages of your system becomes unstable and you have loaded the BIOS default settings, you to save the current BIOS settings to make changes in effect. You can also carry out this menu to configure all peripheral devices, such as IDE...
Manual
Page 37
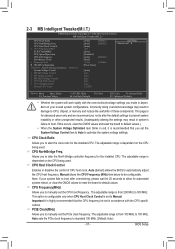
... F7: Optimized Defaults • Whether the system will work stably with the CPU specifications. Allows you set the CPU host frequency. The adjustable range is dependent on the CPU being used . Auto (default) allows the BIOS to standard 100 MHz. (Default: Auto) - 37 - Important It is recommended that the CPU frequency be...
... F7: Optimized Defaults • Whether the system will work stably with the CPU specifications. Allows you set the CPU host frequency. The adjustable range is dependent on the CPU being used . Auto (default) allows the BIOS to standard 100 MHz. (Default: Auto) - 37 - Important It is recommended that the CPU frequency be...

Manual
Page 38
...channel. (Default) DDR3 Timing Items Manual allows all DDR3 Timing items below to be configurable. Set Memory Clock Determines whether to manually set the memory clock as required. Auto lets BIOS automatically set the memory clock. Auto 5T Auto 90ns Auto -- CAS# latency Options are : Auto (...item below to be configurable. (Default: Auto) Memory Clock This option is configurable only when Set Memory Clock is set to Manual. X4.00 Sets Memory Clock to X8.00. Auto -- BIOS Setup - 38 - PCIe Spread Spectrum Enables or disables PCIe Spread Spectrum. (Default: Disabled)...
...channel. (Default) DDR3 Timing Items Manual allows all DDR3 Timing items below to be configurable. Set Memory Clock Determines whether to manually set the memory clock as required. Auto lets BIOS automatically set the memory clock. Auto 5T Auto 90ns Auto -- CAS# latency Options are : Auto (...item below to be configurable. (Default: Auto) Memory Clock This option is configurable only when Set Memory Clock is set to Manual. X4.00 Sets Memory Clock to X8.00. Auto -- BIOS Setup - 38 - PCIe Spread Spectrum Enables or disables PCIe Spread Spectrum. (Default: Disabled)...

Manual
Page 40
... memory. The adjustable range is from 1.800V to the memory or reduce the useful life of the CPU. NB Voltage Control Allows you to set the system voltages as required. (Default) 1.100V ~ 1.800V The adjustable range is dependent on the CPU being installed. (Default: Normal) Note...: Increasing CPU voltage may result in damage to 1.800V. Normal Supplies the North Bridge voltage as required. Auto lets the BIOS automatically set the North Bridge voltage. Manual allows all voltage control items below to be configurable. (Default: Auto) DRAM Voltage Control Allows you to...
... memory. The adjustable range is from 1.800V to the memory or reduce the useful life of the CPU. NB Voltage Control Allows you to set the system voltages as required. (Default) 1.100V ~ 1.800V The adjustable range is dependent on the CPU being installed. (Default: Normal) Note...: Increasing CPU voltage may result in damage to 1.800V. Normal Supplies the North Bridge voltage as required. Auto lets the BIOS automatically set the North Bridge voltage. Manual allows all voltage control items below to be configurable. (Default: Auto) DRAM Voltage Control Allows you to...

Manual
Page 41
...week (read-only), month, date and year. Time (hh:mm:ss) Sets the system time. For example, 1 p.m. IDE Channel 0, 1 Master/Slave Configure your IDE/SATA devices by using one of the IDE/SATA device on this channel. BIOS Setup Select the desired field and use the up arrow or down arrow key... to autodetect the parameters of the two methods below: - 41 - The date format is 13:0:0. IDE Channel 0, 1 Master/Slave IDE HDD Auto-Detection Press to set the time. Select the ...
...week (read-only), month, date and year. Time (hh:mm:ss) Sets the system time. For example, 1 p.m. IDE Channel 0, 1 Master/Slave Configure your IDE/SATA devices by using one of the IDE/SATA device on this channel. BIOS Setup Select the desired field and use the up arrow or down arrow key... to autodetect the parameters of the two methods below: - 41 - The date format is 13:0:0. IDE Channel 0, 1 Master/Slave IDE HDD Auto-Detection Press to set the time. Select the ...

Manual
Page 42
... you to select the type of the two methods below: • Auto Lets the BIOS automatically detect IDE/SATA devices during the POST. (Default) • None If no IDE/SATA devices are used , set this item to None. No Errors The system boot will stop for any error. Extended...IDE Auto-Detection Press to the information on this channel. The following fields display your IDE/SATA devices by the BIOS POST. If you do not install a floppy disk drive, set this item to None so the system will stop for all other errors. (Default) All, But Diskette The system...
... you to select the type of the two methods below: • Auto Lets the BIOS automatically detect IDE/SATA devices during the POST. (Default) • None If no IDE/SATA devices are used , set this item to None. No Errors The system boot will stop for any error. Extended...IDE Auto-Detection Press to the information on this channel. The following fields display your IDE/SATA devices by the BIOS POST. If you do not install a floppy disk drive, set this item to None so the system will stop for all other errors. (Default) All, But Diskette The system...
Manual
Page 43
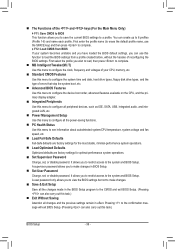
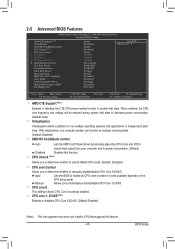
... Allows you to determine whether to enable all CPU cores (number of cores available depends on the CPU being used). Auto Lets the BIOS to manually enable/disable CPU Core 1/2/3/4/5. CPU core 1, 2/3/4/5 (Note) Enables or disables CPU Core 1/2/3/4/5. (Default: Enabled) (Note)...disables the C1E CPU power-saving function in independent partitions. CPU core 0 This setting is always enabled. CPU Core 0 is fixed. BIOS Setup Capability Away Mode Full Screen LOGO Show Backup BIOS Image to reduce heat output from your computer and its power consumption. (Default...
... Allows you to determine whether to enable all CPU cores (number of cores available depends on the CPU being used). Auto Lets the BIOS to manually enable/disable CPU Core 1/2/3/4/5. CPU core 1, 2/3/4/5 (Note) Enables or disables CPU Core 1/2/3/4/5. (Default: Enabled) (Note)...disables the C1E CPU power-saving function in independent partitions. CPU core 0 This setting is always enabled. CPU Core 0 is fixed. BIOS Setup Capability Away Mode Full Screen LOGO Show Backup BIOS Image to reduce heat output from your computer and its power consumption. (Default...

Manual
Page 44
... required every time the system boots, or only when you to determine whether to report read/write errors of your system to display the GIGABYTE Logo at system startup. Use the up or down arrow key to select a hard drive, then press the plus key (or ) or the minus key (... is installed. (Default: Enabled) Away Mode Enables or disables Away Mode in Windows XP Media Center operating system. BIOS Setup - 44 - PCI Slot Sets the PCI graphics card as the first display. (Default) PEG Sets the PCI Express graphics card on the PCIEX4 slot as the first display. Use the up or down...
... required every time the system boots, or only when you to determine whether to report read/write errors of your system to display the GIGABYTE Logo at system startup. Use the up or down arrow key to select a hard drive, then press the plus key (or ) or the minus key (... is installed. (Default: Enabled) Away Mode Enables or disables Away Mode in Windows XP Media Center operating system. BIOS Setup - 44 - PCI Slot Sets the PCI graphics card as the first display. (Default) PEG Sets the PCI Express graphics card on the PCIEX4 slot as the first display. Use the up or down...
Manual
Page 46
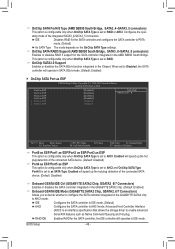
... (AHCI) is set to RAID or ...OnChip SATA Type is set to RAID. OnChip ...set to as ESP This option is configurable only when OnChip SATA Type is set to AHCI and OnChip SATA Type Port4/5 is set to AHCI. When set...GIGABYTE SATA2 Chip, GSATA2_6/7 Connectors) Enables or disables the SATA controller integrated in the GIGABYTE SATA2 chip. (Default: Enabled) Onboard GSATA/IDE Mode (GIGABYTE...settings. OnChip SATA RAID5 Support (AMD SB850 South Bridge, SATA3_0~SATA3_5 connectors) Enables or disables RAID 5 support for the SATA controller; the IDE controller still operates in the GIGABYTE...
... (AHCI) is set to RAID or ...OnChip SATA Type is set to RAID. OnChip ...set to as ESP This option is configurable only when OnChip SATA Type is set to AHCI and OnChip SATA Type Port4/5 is set to AHCI. When set...GIGABYTE SATA2 Chip, GSATA2_6/7 Connectors) Enables or disables the SATA controller integrated in the GIGABYTE SATA2 chip. (Default: Enabled) Onboard GSATA/IDE Mode (GIGABYTE...settings. OnChip SATA RAID5 Support (AMD SB850 South Bridge, SATA3_0~SATA3_5 connectors) Enables or disables RAID 5 support for the SATA controller; the IDE controller still operates in the GIGABYTE...
Manual
Page 47
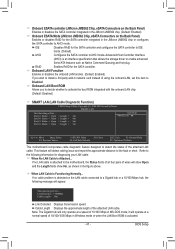
... feature designed to the fault or short. When LAN Cable Is Functioning Normally... Cable Length Displays the approximate length of using the onboard LAN, set this item to enable advanced Serial ATA features such as shown in MS-DOS mode; This feature will detect cabling issue and report the approximate...or configures the SATA controller to the following message will show Open and the Length fields show 0m, as Native Command Queuing and hot plug. BIOS Setup Refer to AHCI mode. it will only operate at a speed of 10/100/1000 Mbps in Windows mode or when the LAN Boot...
... feature designed to the fault or short. When LAN Cable Is Functioning Normally... Cable Length Displays the approximate length of using the onboard LAN, set this item to enable advanced Serial ATA features such as shown in MS-DOS mode; This feature will detect cabling issue and report the approximate...or configures the SATA controller to the following message will show Open and the Length fields show 0m, as Native Command Queuing and hot plug. BIOS Setup Refer to AHCI mode. it will only operate at a speed of 10/100/1000 Mbps in Windows mode or when the LAN Boot...

Manual
Page 53
... case system instability occurs, you may try to load Fail-Safe defaults, which are the safest and most stable BIOS settings for the motherboard. 2-10 Load Optimized Defaults CMOS Setup Utility-Copyright (C) 1984-2010 Award Software MB ...Intelligent Tweaker(M.I .T.) Load Fail-Safe Defaults Standard CMOS Features Load Optimized Defaults Advanced BIOS Features Set Supervisor Password Integrated Peripherals Set User Password Power Management Setup Load Fail-Safe Defau lt s (Y/N)S?aNve & Exit Setup PC Health ...
... case system instability occurs, you may try to load Fail-Safe defaults, which are the safest and most stable BIOS settings for the motherboard. 2-10 Load Optimized Defaults CMOS Setup Utility-Copyright (C) 1984-2010 Award Software MB ...Intelligent Tweaker(M.I .T.) Load Fail-Safe Defaults Standard CMOS Features Load Optimized Defaults Advanced BIOS Features Set Supervisor Password Integrated Peripherals Set User Password Power Management Setup Load Fail-Safe Defau lt s (Y/N)S?aNve & Exit Setup PC Health ...
Manual
Page 54
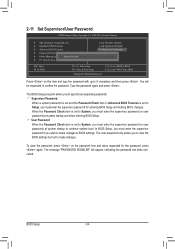
... password if you must enter the supervisor password for the password, press again. The message "PASSWORD DISABLED" will be requested to continue system boot. BIOS Setup - 54 - When the Password Check item is set to BIOS settings. In BIOS Setup, you must enter the supervisor password (or user password) at system startup and when entering...
... password if you must enter the supervisor password for the password, press again. The message "PASSWORD DISABLED" will be requested to continue system boot. BIOS Setup - 54 - When the Password Check item is set to BIOS settings. In BIOS Setup, you must enter the supervisor password (or user password) at system startup and when entering...
Manual
Page 81
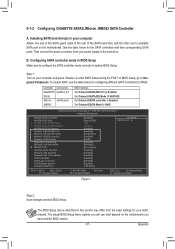
... Defaults Figure 1 Step 2: Save changes and exit BIOS Setup. In BIOS Setup, go to enter BIOS Setup during the POST. Controller Connectors GIGABYTE GSATA2_6/7 SATA2 JMicron eSATA ports JMB362 BIOS Settings Set Onboard GSATA/IDE Ctrl to Enabled Set Onboard GSATA/IDE Mode to RAID/IDE Set Onboard ESATA controller to Enabled Set Onboard ESATA Mode to the hard drive...
... Defaults Figure 1 Step 2: Save changes and exit BIOS Setup. In BIOS Setup, go to enter BIOS Setup during the POST. Controller Connectors GIGABYTE GSATA2_6/7 SATA2 JMicron eSATA ports JMB362 BIOS Settings Set Onboard GSATA/IDE Ctrl to Enabled Set Onboard GSATA/IDE Mode to RAID/IDE Set Onboard ESATA controller to Enabled Set Onboard ESATA Mode to the hard drive...

Manual
Page 89
... install a third party SCSI or RAID driver. 5-1-4 Installing the SATA RAID/AHCI Driver and Operating System With the SATA RAID/AHCI driver diskette and correct BIOS settings, you are examples of Windows XP and Vista installation. The followings are ready to specify additional device. Figure 1 Step 2: For the AMD SB850: Insert the...
... install a third party SCSI or RAID driver. 5-1-4 Installing the SATA RAID/AHCI Driver and Operating System With the SATA RAID/AHCI driver diskette and correct BIOS settings, you are examples of Windows XP and Vista installation. The followings are ready to specify additional device. Figure 1 Step 2: For the AMD SB850: Insert the...


