
Manual
Page 33
Its major functions include conducting the Power-On Self-Test (POST) during the POST when the power is turned on using the Q-Flash and @BIOS utilities, refer to Chapter 4, "BIOS Update Utilities." • Because BIOS ... the BIOS Setup program, press the key during system startup, saving system parameters and loading operating system, etc. To upgrade the BIOS, use either the GIGABYTE Q-Flash or @BIOS utility. • Q-Flash allows the user to quickly and easily upgrade or back up BIOS without entering the operating system. • @BIOS...
Its major functions include conducting the Power-On Self-Test (POST) during the POST when the power is turned on using the Q-Flash and @BIOS utilities, refer to Chapter 4, "BIOS Update Utilities." • Because BIOS ... the BIOS Setup program, press the key during system startup, saving system parameters and loading operating system, etc. To upgrade the BIOS, use either the GIGABYTE Q-Flash or @BIOS utility. • Q-Flash allows the user to quickly and easily upgrade or back up BIOS without entering the operating system. • @BIOS...

Manual
Page 68
... environment. You can be enabled/disabled depends on a specific slot to specify a Smart Fan mode. Unique Features - 68 - 4-3 EasyTune 6 GIGABYTE's EasyTune 6 is a simple and easy-to-use interface that allows users to monitor hardware temperature, voltage and fan speed and set . The ... Easy mode/Advanced mode, be changed linearly based on the next reboot to allow the system to work with the optimum configurations tested to -use your ATI or NVIDIA graphics card. After restart, the system will operate with the optimum overclocking configuration after restart....
... environment. You can be enabled/disabled depends on a specific slot to specify a Smart Fan mode. Unique Features - 68 - 4-3 EasyTune 6 GIGABYTE's EasyTune 6 is a simple and easy-to-use interface that allows users to monitor hardware temperature, voltage and fan speed and set . The ... Easy mode/Advanced mode, be changed linearly based on the next reboot to allow the system to work with the optimum configurations tested to -use your ATI or NVIDIA graphics card. After restart, the system will operate with the optimum overclocking configuration after restart....
Manual
Page 69
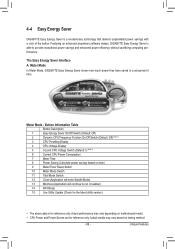
... data is able to run in a set period of the button. The Easy Energy Saver Interface A. Meter Mode In Meter Mode, GIGABYTE Easy Energy Saver shows how much power they have saved in taskbar) 14 INFO/Help 15 Live Utility Update (Check for reference only... Display 5 3-Level CPU Voltage Switch (Default:1) (Note 2) 6 Current CPU Power Consumption 7 Meter Time 8 Power Saving (Calculate power savings based on testing method. - 69 - 4-4 Easy Energy Saver GIGABYTE Easy Energy Saver is a revolutionary technology that delivers unparalleled power savings with a click of time.
... data is able to run in a set period of the button. The Easy Energy Saver Interface A. Meter Mode In Meter Mode, GIGABYTE Easy Energy Saver shows how much power they have saved in taskbar) 14 INFO/Help 15 Live Utility Update (Check for reference only... Display 5 3-Level CPU Voltage Switch (Default:1) (Note 2) 6 Current CPU Power Consumption 7 Meter Time 8 Power Saving (Calculate power savings based on testing method. - 69 - 4-4 Easy Energy Saver GIGABYTE Easy Energy Saver is a revolutionary technology that delivers unparalleled power savings with a click of time.

Manual
Page 76
B. Make sure OnChip SATA Controller is enabled. To enable support for your computer and press to enter BIOS Setup during the POST (Power-On Self-Test). The BIOS Setup menus described in this section may differ from the exact settings for RAID 5, set OnChip SATA Type to As SATA Type (Figure 1). ...
B. Make sure OnChip SATA Controller is enabled. To enable support for your computer and press to enter BIOS Setup during the POST (Power-On Self-Test). The BIOS Setup menus described in this section may differ from the exact settings for RAID 5, set OnChip SATA Type to As SATA Type (Figure 1). ...
Manual
Page 77
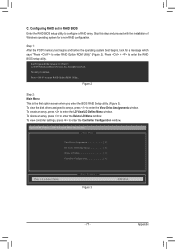
... View Drive Assignments window. To view the disk drives assigned to arrays, press to enter the RAID BIOS setup utility. Step 1: After the POST memory test begins and before the operating system boot begins, look for a non-RAID configuration. To create an array, press to enter RAID Option ROM Utility" (Figure...
... View Drive Assignments window. To view the disk drives assigned to arrays, press to enter the RAID BIOS setup utility. Step 1: After the POST memory test begins and before the operating system boot begins, look for a non-RAID configuration. To create an array, press to enter RAID Option ROM Utility" (Figure...
Manual
Page 82
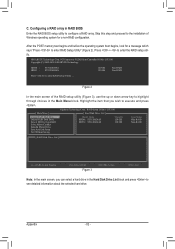
... the installation of the RAID setup utility (Figure 3), use the up or down arrow key to configure a RAID array. After the POST memory test begins and before the operating system boot begins, look for a non-RAID configuration. Press + to SATAII Host Controller ROM v1.07.16G Copyright ...(C) 2005-2009 GIGABYTE Technology. C. Configuring a RAID array in RAID BIOS Enter the RAID BIOS setup utility to highlight through choices in the Hard Disk Drive List ...
... the installation of the RAID setup utility (Figure 3), use the up or down arrow key to configure a RAID array. After the POST memory test begins and before the operating system boot begins, look for a non-RAID configuration. Press + to SATAII Host Controller ROM v1.07.16G Copyright ...(C) 2005-2009 GIGABYTE Technology. C. Configuring a RAID array in RAID BIOS Enter the RAID BIOS setup utility to highlight through choices in the Hard Disk Drive List ...