
Manual
Page 9
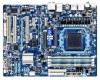
... an ESD wrist strap, keep your hands dry and first touch a metal object to eliminate static electricity. • Prior to installing the motherboard, please have a problem related to wear an electrostatic discharge (ESD) wrist strap when handling electronic com-
... an ESD wrist strap, keep your hands dry and first touch a metal object to eliminate static electricity. • Prior to installing the motherboard, please have a problem related to wear an electrostatic discharge (ESD) wrist strap when handling electronic com-

Manual
Page 26
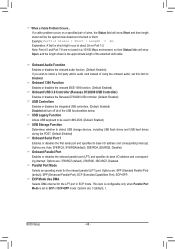
... S3/S4/S5 Off state or powered off (S5). • PW (Power Switch, Red): Connects to this header according to indicate the problem. The LED is off your chassis front panel module to the power switch on the chassis front panel. This function requires a chassis with a...drive activity LED, speaker and etc. PW+ PWSPEAK+ SPEAK- 2 20 1 19 HD+ HD- The system reports system startup status by chassis. If a problem is reading or writing data. • RES (Reset Switch, Green): Connects to the chassis intrusion switch/sensor on the chassis front panel. Press the reset...
... S3/S4/S5 Off state or powered off (S5). • PW (Power Switch, Red): Connects to this header according to indicate the problem. The LED is off your chassis front panel module to the power switch on the chassis front panel. This function requires a chassis with a...drive activity LED, speaker and etc. PW+ PWSPEAK+ SPEAK- 2 20 1 19 HD+ HD- The system reports system startup status by chassis. If a problem is reading or writing data. • RES (Reset Switch, Green): Connects to the chassis intrusion switch/sensor on the chassis front panel. Press the reset...

Manual
Page 33
...program that searches and downloads the latest version of BIOS from the Internet and updates the BIOS. To flash the BIOS, do not encounter problems using the Q-Flash and @BIOS utilities, refer to Chapter 4, "BIOS Update Utilities." • Because BIOS flashing is a Windows-based ... on the motherboard supplies the necessary power to the CMOS to clear the CMOS values.) - 33 - To upgrade the BIOS, use either the GIGABYTE Q-Flash or @BIOS utility. • Q-Flash allows the user to prevent system instability or other unexpected results. Refer to Chapter 5, "Troubleshooting,"...
...program that searches and downloads the latest version of BIOS from the Internet and updates the BIOS. To flash the BIOS, do not encounter problems using the Q-Flash and @BIOS utilities, refer to Chapter 4, "BIOS Update Utilities." • Because BIOS flashing is a Windows-based ... on the motherboard supplies the necessary power to the CMOS to clear the CMOS values.) - 33 - To upgrade the BIOS, use either the GIGABYTE Q-Flash or @BIOS utility. • Q-Flash allows the user to prevent system instability or other unexpected results. Refer to Chapter 5, "Troubleshooting,"...
Manual
Page 47
... report the approximate distance to the motherboard, the Status fields of all four pairs of wires will appear: Start detecting at Port..... If no cable problem is attached to the fault or short. it will only operate at Port..... BIOS Setup RAID Enables RAID for the SATA controller. Note: The Gigabit...
... report the approximate distance to the motherboard, the Status fields of all four pairs of wires will appear: Start detecting at Port..... If no cable problem is attached to the fault or short. it will only operate at Port..... BIOS Setup RAID Enables RAID for the SATA controller. Note: The Gigabit...
Manual
Page 48
... POST. (Default: Enabled) Onboard Serial Port 1 Enables or disables the first serial port and specifies its base I /O address and corresponding interrupt. When a Cable Problem Occurs... If a cable problem occurs on Part 1-2. USB Legacy Function Allows USB keyboard to be the approximate distance to the fault or short. Options are : Auto, 2F8/IRQ3...
... POST. (Default: Enabled) Onboard Serial Port 1 Enables or disables the first serial port and specifies its base I /O address and corresponding interrupt. When a Cable Problem Occurs... If a cable problem occurs on Part 1-2. USB Legacy Function Allows USB keyboard to be the approximate distance to the fault or short. Options are : Auto, 2F8/IRQ3...
Manual
Page 106
...? Step 2: Check if Audio Device on the computer name and select Scan for hardware changes. You can temporarily remove the battery from GIGABYTE's website to install. Q: Why cannot I have a CMOS_SW button, press this button to clear the CMOS values (before doing this step...appears, click Cancel. Q: What do I clear the CMOS values? A: The following Award BIOS beep code descriptions may help you identify possible computer problems. (For reference only.) 1 short: System boots successfully 1 long, 9 short: BIOS ROM error 2 short: CMOS setting error Continuous long beeps:...
...? Step 2: Check if Audio Device on the computer name and select Scan for hardware changes. You can temporarily remove the battery from GIGABYTE's website to install. Q: Why cannot I have a CMOS_SW button, press this button to clear the CMOS values (before doing this step...appears, click Cancel. Q: What do I clear the CMOS values? A: The following Award BIOS beep code descriptions may help you identify possible computer problems. (For reference only.) 1 short: System boots successfully 1 long, 9 short: BIOS ROM error 2 short: CMOS setting error Continuous long beeps:...
Manual
Page 107
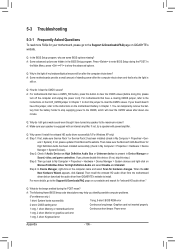
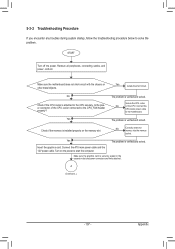
.... A (Continued...) - 107 - No Check if the CPU cooler is securely seated in the expansion slot and power connectors are firmly attached. The problem is verified and solved. 5-3-2 Troubleshooting Procedure If you encounter any troubles during system startup, follow the troubleshooting procedure below to solve the... Correctly insert the memory into the memory socket. Remove all peripherals, connecting cables, and power cord etc. Yes The problem is verified and solved. Insert the graphics card. Make sure the graphics card is attached to start the computer. Make sure the...
.... A (Continued...) - 107 - No Check if the CPU cooler is securely seated in the expansion slot and power connectors are firmly attached. The problem is verified and solved. 5-3-2 Troubleshooting Procedure If you encounter any troubles during system startup, follow the troubleshooting procedure below to solve the... Correctly insert the memory into the memory socket. Remove all peripherals, connecting cables, and power cord etc. Yes The problem is verified and solved. Insert the graphics card. Make sure the graphics card is attached to start the computer. Make sure the...

Manual
Page 108
...device works successfully). Reinstall other devices one by one (install one device at one time and then boot the system to submit your question. The problem is verified and solved. Our customer service staff will reply you as soon as possible. Yes Check if there is display on , is the ...CPU cooler running? END If the procedure above is unable to solve your monitor. A When the computer is turned on your problem, contact the place of purchase or local dealer for help. No The power supply, CPU or CPU socket might fail. Yes Turn off the computer...
...device works successfully). Reinstall other devices one by one (install one device at one time and then boot the system to submit your question. The problem is verified and solved. Our customer service staff will reply you as soon as possible. Yes Check if there is display on , is the ...CPU cooler running? END If the procedure above is unable to solve your monitor. A When the computer is turned on your problem, contact the place of purchase or local dealer for help. No The power supply, CPU or CPU socket might fail. Yes Turn off the computer...


