Manual
Page 6
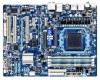
The box contents are for reference only. Optional Items Floppy disk drive cable (Part No. 12CF1-1FD001-7*R) 2-port USB 2.0 bracket (Part No. 12CR1-1UB030-5*R) 2-port IEEE 1394a bracket (Part No. 12CF1-1IE008-0*R) 2-port SATA ...-0*R) S/PDIF In cable (Part No. 12CR1-1SPDIN-0*R) COM port cable (Part No. 12CF1-1CM001-3*R) LPT port cable (Part No. 12CF1-1LP001-0*R) - 6 - Box Contents GA-870A-UD3 motherboard Motherboard driver disk User's Manual Quick Installation Guide One IDE cable Two SATA cables I/O Shield • The box contents above are subject to change without notice. • The...
The box contents are for reference only. Optional Items Floppy disk drive cable (Part No. 12CF1-1FD001-7*R) 2-port USB 2.0 bracket (Part No. 12CR1-1UB030-5*R) 2-port IEEE 1394a bracket (Part No. 12CF1-1IE008-0*R) 2-port SATA ...-0*R) S/PDIF In cable (Part No. 12CR1-1SPDIN-0*R) COM port cable (Part No. 12CF1-1CM001-3*R) LPT port cable (Part No. 12CF1-1LP001-0*R) - 6 - Box Contents GA-870A-UD3 motherboard Motherboard driver disk User's Manual Quick Installation Guide One IDE cable Two SATA cables I/O Shield • The box contents above are subject to change without notice. • The...
Manual
Page 34
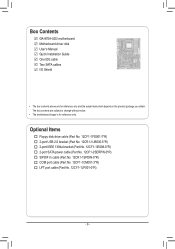
... the POST. The POST Screen Motherboard Model BIOS Version Award Modular BIOS v6.00PG Copyright (C) 1984-2010, Award Software, Inc. AMD 870 BIOS for one time only. To exit Boot Menu, press . In Boot Menu, use the up hard drive data using the driver disk, the key can access Boot ... on page 44. : BIOS SETUP\Q-FLASH Press the key to enter BIOS Setup or to access the Q-Flash utility in Boot Menu is effective for GA-870A-UD3 D1 . . . . : BIOS Setup : XpressRecovery2 : Boot Menu : Qflash 12/14/2010-RX870-SB850-7A66CG0EC-00 Function Keys Function Keys: : POST SCREEN Press the key...
... the POST. The POST Screen Motherboard Model BIOS Version Award Modular BIOS v6.00PG Copyright (C) 1984-2010, Award Software, Inc. AMD 870 BIOS for one time only. To exit Boot Menu, press . In Boot Menu, use the up hard drive data using the driver disk, the key can access Boot ... on page 44. : BIOS SETUP\Q-FLASH Press the key to enter BIOS Setup or to access the Q-Flash utility in Boot Menu is effective for GA-870A-UD3 D1 . . . . : BIOS Setup : XpressRecovery2 : Boot Menu : Qflash 12/14/2010-RX870-SB850-7A66CG0EC-00 Function Keys Function Keys: : POST SCREEN Press the key...
Manual
Page 57
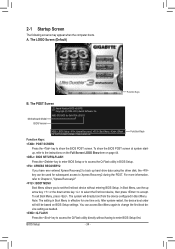
...Click Yes to install new GIGABYTE utilities. After the system restart, "Xpress Install" will continue to install other drivers. • After "Xpress Install" installs all of the drivers, a dialog box will then autodetect and install the USB 2.0 driver.) - 57 - Or...drive. Drivers Installation The driver Autorun screen is installing the drivers. Chapter 3 Drivers Installation • Before installing the drivers, first install the operating system. • After installing the operating system, insert the motherboard driver disk into your system and then list all the drivers that ...
...Click Yes to install new GIGABYTE utilities. After the system restart, "Xpress Install" will continue to install other drivers. • After "Xpress Install" installs all of the drivers, a dialog box will then autodetect and install the USB 2.0 driver.) - 57 - Or...drive. Drivers Installation The driver Autorun screen is installing the drivers. Chapter 3 Drivers Installation • Before installing the drivers, first install the operating system. • After installing the operating system, insert the motherboard driver disk into your system and then list all the drivers that ...

Manual
Page 58
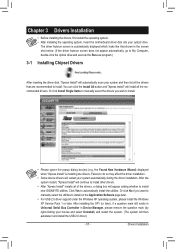
Drivers Installation - 58 - You can click the Install button on the right of an item to install it. 3-3 Technical Manuals This page provides GIGABYTE's application guides, content descriptions for this driver disk, and the motherboard manuals. 3-2 Application Software This page displays all the utilities and applications that GIGABYTE develops and some free software.
Drivers Installation - 58 - You can click the Install button on the right of an item to install it. 3-3 Technical Manuals This page provides GIGABYTE's application guides, content descriptions for this driver disk, and the motherboard manuals. 3-2 Application Software This page displays all the utilities and applications that GIGABYTE develops and some free software.

Manual
Page 62
... start backing up your hard drive, make sure to store the backup image file. B. C. Step 2: When finished, go to Disk Management to check disk allocation. Please note that if there is installed, right-click the Computer icon on the amount of data) and begin the installation ... requirements vary, depending on your hard drive. Go to Disk Management to check disk allocation. Step 3: When partitioning your hard drive data. After you use the backup function in your desktop and select Manage. Boot from the motherboard driver disk to the unallocated space (black stripe along the top)....
... start backing up your hard drive, make sure to store the backup image file. B. C. Step 2: When finished, go to Disk Management to check disk allocation. Please note that if there is installed, right-click the Computer icon on the amount of data) and begin the installation ... requirements vary, depending on your hard drive. Go to Disk Management to check disk allocation. Step 3: When partitioning your hard drive data. After you use the backup function in your desktop and select Manage. Boot from the motherboard driver disk to the unallocated space (black stripe along the top)....

Manual
Page 71
... sharing Accesses the shared data folder Changes the data folder to Start>All Programs>GIGABYTE>Q-Share. Find the Q-Share icon to launch the Q-Share tool. Disable Incoming Folder ... Directions for using Q-Share After installing Q-Share from the motherboard driver disk, go to be shared (Note) Updates Q-Share online Displays the current Q-Share version Exits...
... sharing Accesses the shared data folder Changes the data folder to Start>All Programs>GIGABYTE>Q-Share. Find the Q-Share icon to launch the Q-Share tool. Disable Incoming Folder ... Directions for using Q-Share After installing Q-Share from the motherboard driver disk, go to be shared (Note) Updates Q-Share online Displays the current Q-Share version Exits...
Manual
Page 75
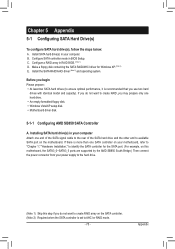
C. Make a floppy disk containing the SATA RAID/AHCI driver for the SATA port. (For example, on this motherboard, the SATA3_0~SATA3_5 ports are supported by the AMD SB850 South Bridge.) Then connect the power connector from your power ... (Note 2) Required when the SATA controller is recommended that you may prepare only one hard drive. • An empty formatted floppy disk. • Windows Vista/XP setup disk. • Motherboard driver disk. 5-1-1 Configuring AMD SB850 SATA Controller A. Chapter 5 Appendix 5-1 Configuring SATA Hard Drive(s) To configure SATA hard drive(s), follow the steps ...
C. Make a floppy disk containing the SATA RAID/AHCI driver for the SATA port. (For example, on this motherboard, the SATA3_0~SATA3_5 ports are supported by the AMD SB850 South Bridge.) Then connect the power connector from your power ... (Note 2) Required when the SATA controller is recommended that you may prepare only one hard drive. • An empty formatted floppy disk. • Windows Vista/XP setup disk. • Motherboard driver disk. 5-1-1 Configuring AMD SB850 SATA Controller A. Chapter 5 Appendix 5-1 Configuring SATA Hard Drive(s) To configure SATA hard drive(s), follow the steps ...
Manual
Page 87
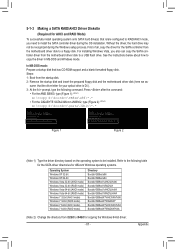
... the motherboard driver disk to install the SATA controller driver during the Windows setup process. Without the driver, the hard drive may not be installed. For installing Windows Vista, you need to a USB flash drive. Press after the command: • For the AMD SB850, type (Figure 1): (Note 1) A:\>copy d:\bootdrv\SB8xx\x86\*.* • For the GIGABYTE SATA2...
... the motherboard driver disk to install the SATA controller driver during the Windows setup process. Without the driver, the hard drive may not be installed. For installing Windows Vista, you need to a USB flash drive. Press after the command: • For the AMD SB850, type (Figure 1): (Note 1) A:\>copy d:\bootdrv\SB8xx\x86\*.* • For the GIGABYTE SATA2...
Manual
Page 88
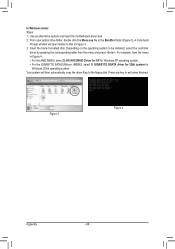
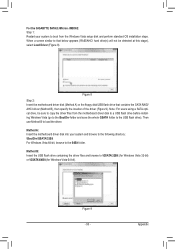
...insert the motherboard driver disk. 2: From your optical drive folder, double click the Menu.exe file in Figure 4, • For the AMD SB850, select 3) ATi AHCI/RAID Driver for XP for Windows XP operating system. • For the GIGABYTE SATA2/JMicron JMB362, select 1) GIGABYTE GSATA driver for ...32bit system for Windows 32-bit operating system. Press any key to the floppy disk. Figure 3 Figure 4 Appendix - 88 - ...
...insert the motherboard driver disk. 2: From your optical drive folder, double click the Menu.exe file in Figure 4, • For the AMD SB850, select 3) ATi AHCI/RAID Driver for XP for Windows XP operating system. • For the GIGABYTE SATA2/JMicron JMB362, select 1) GIGABYTE GSATA driver for ...32bit system for Windows 32-bit operating system. Press any key to the floppy disk. Figure 3 Figure 4 Appendix - 88 - ...

Manual
Page 91
...Windows Vista The procedure below appears (RAID hard drive will not be sure to copy the driver files from the Windows Vista setup disk and perform standard OS installation steps. Step 2: Figure 4 Insert the motherboard driver disk (Method A) or the removable storage device such as USB flash drive that only one RAID... system and browse to the following directory: \BootDrv\SB8xxV\RAID\LH For Windows Vista 64-bit, browse to boot from the motherboard driver disk to a USB flash drive before installing Windows Vista (go to the BootDrv folder and save the whole SB8xxV folder to load the...
...Windows Vista The procedure below appears (RAID hard drive will not be sure to copy the driver files from the Windows Vista setup disk and perform standard OS installation steps. Step 2: Figure 4 Insert the motherboard driver disk (Method A) or the removable storage device such as USB flash drive that only one RAID... system and browse to the following directory: \BootDrv\SB8xxV\RAID\LH For Windows Vista 64-bit, browse to boot from the motherboard driver disk to a USB flash drive before installing Windows Vista (go to the BootDrv folder and save the whole SB8xxV folder to load the...
Manual
Page 93
... the motherboard driver disk into your system to the 64Bit folder. Figure 9 - 93 - Figure 8 Step 2: Insert the motherboard driver disk (Method A) or the floppy disk/USB flash drive that below appears (RAID/AHCI hard drive(s) will not be sure to copy the driver files from the Windows Vista setup disk and perform standard OS installation steps. For the GIGABYTE SATA2...
... the motherboard driver disk into your system to the 64Bit folder. Figure 9 - 93 - Figure 8 Step 2: Insert the motherboard driver disk (Method A) or the floppy disk/USB flash drive that below appears (RAID/AHCI hard drive(s) will not be sure to copy the driver files from the Windows Vista setup disk and perform standard OS installation steps. For the GIGABYTE SATA2...
Manual
Page 95
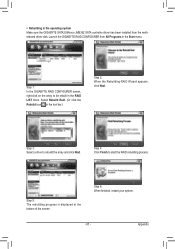
... Now to use a new drive of restoring data to fault-tolerant arrays such as Functional. - 95 - To replace the old drive, make sure the chipset drivers have been installed from All Programs in the Start Menu. Step 2: Select the RAID array to be rebuilt under Logical Drive View and click the..., the array's status on the screen and you can select Pause/Resume/ Abort/Restart during the rebuilding process. Then launch the AMD RAIDXpert from the motherboard driver disk. Step 4: The rebuilding progress is added to replace a failed drive to launch AMD RAIDXpert.
... Now to use a new drive of restoring data to fault-tolerant arrays such as Functional. - 95 - To replace the old drive, make sure the chipset drivers have been installed from All Programs in the Start Menu. Step 2: Select the RAID array to be rebuilt under Logical Drive View and click the..., the array's status on the screen and you can select Pause/Resume/ Abort/Restart during the rebuilding process. Then launch the AMD RAIDXpert from the motherboard driver disk. Step 4: The rebuilding progress is added to replace a failed drive to launch AMD RAIDXpert.
Manual
Page 97
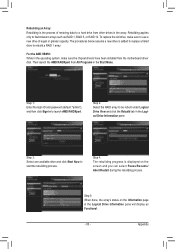
• Rebuilding in the operating system Make sure the GIGABYTE SATA2/JMicron JMB362 SATA controller driver has been installed from All Programs in the Start menu. Step 3: Select a drive to start the RAID rebuilding process. Step 6: When finished, restart ...LIST block. Step 4: Click Finish to rebuild the array and click Next. Launch the GIGABYTE RAID CONFIGURER from the motherboard driver disk. Step 5: The rebuilding progress is displayed at the bottom of the screen. Step 1: In the GIGABYTE RAID CONFIGURER screen, right-click on the array to be rebuilt in the tool bar...
• Rebuilding in the operating system Make sure the GIGABYTE SATA2/JMicron JMB362 SATA controller driver has been installed from All Programs in the Start menu. Step 3: Select a drive to start the RAID rebuilding process. Step 6: When finished, restart ...LIST block. Step 4: Click Finish to rebuild the array and click Next. Launch the GIGABYTE RAID CONFIGURER from the motherboard driver disk. Step 5: The rebuilding progress is displayed at the bottom of the screen. Step 1: In the GIGABYTE RAID CONFIGURER screen, right-click on the array to be rebuilt in the tool bar...
Manual
Page 102
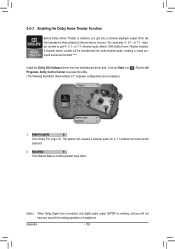
... working, and you get 4-, 5.1-, or 7.1- The system will be transformed into multi-channel audio, creating a virtual surround sound environment . (Note) Install the Dolby GUI Software driver from the motherboard driver disk.
... working, and you get 4-, 5.1-, or 7.1- The system will be transformed into multi-channel audio, creating a virtual surround sound environment . (Note) Install the Dolby GUI Software driver from the motherboard driver disk.
Manual
Page 106
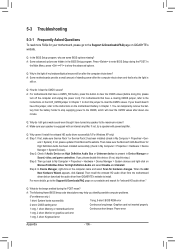
... this step.) Step 3: Then go back to My Computer > Properties > Hardware > Device Manager > System devices and right-click on GIGABYTE's website. Q: What do the beeps emitted during the POST. A: The following Award BIOS beep code descriptions may help you identify possible ...Device on High Definition Audio Bus or Unknown device is still on the motherboard battery in the BIOS Setup program. Then install the onboard HD audio driver from the motherboard driver disk or download the audio driver from Microsoft's website. 5-3 Troubleshooting 5-3-1 Frequently Asked Questions To read more ...
... this step.) Step 3: Then go back to My Computer > Properties > Hardware > Device Manager > System devices and right-click on GIGABYTE's website. Q: What do the beeps emitted during the POST. A: The following Award BIOS beep code descriptions may help you identify possible ...Device on High Definition Audio Bus or Unknown device is still on the motherboard battery in the BIOS Setup program. Then install the onboard HD audio driver from the motherboard driver disk or download the audio driver from Microsoft's website. 5-3 Troubleshooting 5-3-1 Frequently Asked Questions To read more ...


