Owner's Manual
Page 2
... to make changes in any storage medium, for current updates and supplemental information concerning the use and operation of Garmin Ltd. Garmin®, GPSMAP®, AutoLocate® , UltraScroll®, TracBack®, BlueChart®, and MapSource® are registered trademarks of this manual or any revision hereto is subject to print one copy of this...
... to make changes in any storage medium, for current updates and supplemental information concerning the use and operation of Garmin Ltd. Garmin®, GPSMAP®, AutoLocate® , UltraScroll®, TracBack®, BlueChart®, and MapSource® are registered trademarks of this manual or any revision hereto is subject to print one copy of this...

Owner's Manual
Page 3
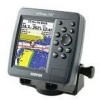
... accessory installation instructions for choosing the Garmin® GPSMAP® 292/298. INTRODUCTION > ABOUT THIS MANUAL The Basic Operation section provides you with the packing list on using waypoints. The Main Pages section provides detailed explanations about the Sonar and Flasher Pages and how to create an unsurpassed portable GPS receiver. The Appendix contains installation instructions...
... accessory installation instructions for choosing the Garmin® GPSMAP® 292/298. INTRODUCTION > ABOUT THIS MANUAL The Basic Operation section provides you with the packing list on using waypoints. The Main Pages section provides detailed explanations about the Sonar and Flasher Pages and how to create an unsurpassed portable GPS receiver. The Appendix contains installation instructions...
Owner's Manual
Page 4
INTRODUCTION > TABLE OF CONTENTS Table of Contents Introduction i About This Manual i Warning iv Important Information iv Basic Operation 1 Turning on the GPSMAP 292/298 1 Using Simulator Mode 3 Adjusting the Backlight 4 Using the GPSMAP 292/298 Keypad 5 Entering Data and Selecting Options 6 Using the Map Pointer 7 Creating and Using Waypoints 8 Man OverBoard (... 21 AIS 25 Main Pages 26 Map Page 27 Compass Page 32 3D Highway Page 33 Active Route Page 36 Main Menu 37 GPS Tab 37 Tide Tab 40 Trip Tab 44 Celes (Celestial) Tab 45 Points Tab 46 Route Tab 51 Track Tab 57 DSC...
INTRODUCTION > TABLE OF CONTENTS Table of Contents Introduction i About This Manual i Warning iv Important Information iv Basic Operation 1 Turning on the GPSMAP 292/298 1 Using Simulator Mode 3 Adjusting the Backlight 4 Using the GPSMAP 292/298 Keypad 5 Entering Data and Selecting Options 6 Using the Map Pointer 7 Creating and Using Waypoints 8 Man OverBoard (... 21 AIS 25 Main Pages 26 Map Page 27 Compass Page 32 3D Highway Page 33 Active Route Page 36 Main Menu 37 GPS Tab 37 Tide Tab 40 Trip Tab 44 Celes (Celestial) Tab 45 Points Tab 46 Route Tab 51 Track Tab 57 DSC...
Owner's Manual
Page 5
... Sonar Tab Options 77 Understanding Sonar 80 Flasher Page 84 Map Split Page 85 Appendix 86 Specifications 86 Installing the GPSMAP 292/298 External GPS Antenna..... 87 Mounting the GPSMAP 292/298 88 Installing the Transducer 90 Connecting the Power/Data Cable 92 Interfacing 93 Caring for the Screen 93 Installing and Removing... 105 Software License Agreement 106 Product Registration 106 Limited Warranty 107 FCC Compliance 108 Industry Canada Compliance 108 Declaration of Conformity (DoC 108 Index 109 GPSMAP 292/298 Owner's Manual iii
... Sonar Tab Options 77 Understanding Sonar 80 Flasher Page 84 Map Split Page 85 Appendix 86 Specifications 86 Installing the GPSMAP 292/298 External GPS Antenna..... 87 Mounting the GPSMAP 292/298 88 Installing the Transducer 90 Connecting the Power/Data Cable 92 Interfacing 93 Caring for the Screen 93 Installing and Removing... 105 Software License Agreement 106 Product Registration 106 Limited Warranty 107 FCC Compliance 108 Industry Canada Compliance 108 Declaration of Conformity (DoC 108 Index 109 GPSMAP 292/298 Owner's Manual iii
Owner's Manual
Page 6
.... See www.garmin.com/prop65 for more information. WARNING: This product, its packaging, and its components contain chemicals known to the State of authorized government charts. We use of California to the consumer. iv GPSMAP 292/298 Owner's Manual For safety, ...always resolve any discrepancies or questions before continuing navigation. When navigating, carefully compare information displayed on the GPSMAP 292/298 to all information needed to mariners contain all available navigation sources, including...
.... See www.garmin.com/prop65 for more information. WARNING: This product, its packaging, and its components contain chemicals known to the State of authorized government charts. We use of California to the consumer. iv GPSMAP 292/298 Owner's Manual For safety, ...always resolve any discrepancies or questions before continuing navigation. When navigating, carefully compare information displayed on the GPSMAP 292/298 to all information needed to mariners contain all available navigation sources, including...

Owner's Manual
Page 7
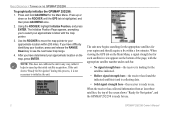
...POWER key. 2. BASIC OPERATION > TURNING ON THE GPSMAP 292/298 3. The GPS Information Page appears as the receiver begins acquiring satellites. BASIC OPERATION Turning on the GPSMAP 292/298 The first time you turn on the GPSMAP 292/298, the receiver must be given an opportunity to agree and acknowledge ... the POWER key until the power tone sounds, and then release the POWER key. GPSMAP 292/298 Owner's Manual 1 Install the antenna in the "Appendix." To ensure proper initialization, the GPSMAP 292/298 is blank, release the POWER key. Press ENTER to answer NO to the...
...POWER key. 2. BASIC OPERATION > TURNING ON THE GPSMAP 292/298 3. The GPS Information Page appears as the receiver begins acquiring satellites. BASIC OPERATION Turning on the GPSMAP 292/298 The first time you turn on the GPSMAP 292/298, the receiver must be given an opportunity to agree and acknowledge ... the POWER key until the power tone sounds, and then release the POWER key. GPSMAP 292/298 Owner's Manual 1 Install the antenna in the "Appendix." To ensure proper initialization, the GPSMAP 292/298 is blank, release the POWER key. Press ENTER to answer NO to the...
Owner's Manual
Page 8
... signal strength bars-the receiver is not necessary to speed up or down on the Main Menu, a signal strength bar for your location, press and release the RANGE Down key to use . 2 GPSMAP 292/298 Owner's Manual When viewing the GPS tab on the ROCKER until the GPS tab is ready for... Navigation" during this process, it helps to initialize the unit. Press and hold ADJ/MENU for Navigation", and the GPSMAP 292/298 is highlighted, and then press ADJ/MENU once. 2. When the receiver has...
... signal strength bars-the receiver is not necessary to speed up or down on the Main Menu, a signal strength bar for your location, press and release the RANGE Down key to use . 2 GPSMAP 292/298 Owner's Manual When viewing the GPS tab on the ROCKER until the GPS tab is ready for... Navigation" during this process, it helps to initialize the unit. Press and hold ADJ/MENU for Navigation", and the GPSMAP 292/298 is highlighted, and then press ADJ/MENU once. 2. When the receiver has...
Owner's Manual
Page 9
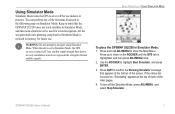
...and press ENTER. 3. When the unit is set to Simulator Mode, the GPS receiver is turned on the ROCKER until the GPS tab is retained in memory for future use indoors or practice. BASIC OPERATION > USING SIMULATOR MODE To place the GPSMAP 292/298 in Simulator Mode. Use the ROCKER to navigate using Simulator Mode... pages in Simulator Mode: 1. All the waypoint and route planning completed in Simulator Mode, and this mode should never be used for actual navigation. GPSMAP 292/298 Owner's Manual 3 Using Simulator Mode Simulator Mode turns the GPS receiver off for use .
...and press ENTER. 3. When the unit is set to Simulator Mode, the GPS receiver is turned on the ROCKER until the GPS tab is retained in memory for future use indoors or practice. BASIC OPERATION > USING SIMULATOR MODE To place the GPSMAP 292/298 in Simulator Mode. Use the ROCKER to navigate using Simulator Mode... pages in Simulator Mode: 1. All the waypoint and route planning completed in Simulator Mode, and this mode should never be used for actual navigation. GPSMAP 292/298 Owner's Manual 3 Using Simulator Mode Simulator Mode turns the GPS receiver off for use .
Owner's Manual
Page 10
... or 3D Highway Pages: 1. Press ENTER, and select User Track. 5. Press left or right on the ROCKER increase the speed in the same increments. 2. GPSMAP 292/298 Owner's Manual Use the ROCKER to set the track. 6. Use the ROCKER to highlight Track Control. Press the POWER key again and the user-defi...
... or 3D Highway Pages: 1. Press ENTER, and select User Track. 5. Press left or right on the ROCKER increase the speed in the same increments. 2. GPSMAP 292/298 Owner's Manual Use the ROCKER to set the track. 6. Use the ROCKER to highlight Track Control. Press the POWER key again and the user-defi...

Owner's Manual
Page 11
...From the Sonar Page, press to open the Main Page Configuration window. BASIC OPERATION > USING THE GPSMAP 292/298 KEYPAD RANGE Down/RANGE Up Zoom Keys • From the Map Page, press to zoom in progress...function windows and data fields on any time to search for points such as a waypoint. Using the GPSMAP 292/298 Keypad POWER Key • Press and hold to turn the unit on or off. • Press ...Key • Press and release to view options for MOB waypoint. GPSMAP 292/298 Owner's Manual 5 ROCKER Key • Press up or down , right, or left to view the Main Menu.
...From the Sonar Page, press to open the Main Page Configuration window. BASIC OPERATION > USING THE GPSMAP 292/298 KEYPAD RANGE Down/RANGE Up Zoom Keys • From the Map Page, press to zoom in progress...function windows and data fields on any time to search for points such as a waypoint. Using the GPSMAP 292/298 Keypad POWER Key • Press and hold to turn the unit on or off. • Press ...Key • Press and release to view options for MOB waypoint. GPSMAP 292/298 Owner's Manual 5 ROCKER Key • Press up or down , right, or left to view the Main Menu.
Owner's Manual
Page 12
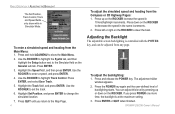
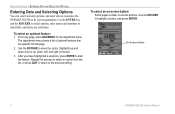
... menus. 3. BASIC OPERATION > ENTERING DATA AND SELECTING OPTIONS Entering Data and Selecting Options You can select and start options, and enter data to customize the GPSMAP 292/298 to highlight a button, and press ENTER. On-Screen buttons 6 GPSMAP 292/298 Owner's Manual
... menus. 3. BASIC OPERATION > ENTERING DATA AND SELECTING OPTIONS Entering Data and Selecting Options You can select and start options, and enter data to customize the GPSMAP 292/298 to highlight a button, and press ENTER. On-Screen buttons 6 GPSMAP 292/298 Owner's Manual
Owner's Manual
Page 13
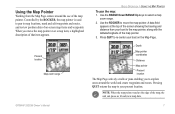
... the map pointer reaches the edge of on the Map Page. Press QUIT to re-center your present location. Present location Map zoom range GPSMAP 292/298 Owner's Manual BASIC OPERATION > USING THE MAP POINTER To pan the map: 1. A data field appears at the top of the screen showing the bearing and...
... the map pointer reaches the edge of on the Map Page. Press QUIT to re-center your present location. Present location Map zoom range GPSMAP 292/298 Owner's Manual BASIC OPERATION > USING THE MAP POINTER To pan the map: 1. A data field appears at the top of the screen showing the bearing and...
Owner's Manual
Page 14
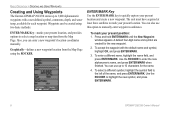
... You can enter a new waypoint's location coordinates manually. Also, you can use this option to manually enter waypoint coordinates. Use the ROCKER to highlight the new symbol, and press ENTER/MARK. 8 GPSMAP 292/298 Owner's Manual Waypoints can also use up to 3,000 alphanumeric ...waypoints with the default name and symbol, highlight OK, and press ENTER/MARK. 3. You can be created using the ROCKER. BASIC OPERATION > CREATING AND USING WAYPOINTS Creating and Using Waypoints The Garmin GPSMAP 292...
... You can enter a new waypoint's location coordinates manually. Also, you can use this option to manually enter waypoint coordinates. Use the ROCKER to highlight the new symbol, and press ENTER/MARK. 8 GPSMAP 292/298 Owner's Manual Waypoints can also use up to 3,000 alphanumeric ...waypoints with the default name and symbol, highlight OK, and press ENTER/MARK. 3. You can be created using the ROCKER. BASIC OPERATION > CREATING AND USING WAYPOINTS Creating and Using Waypoints The Garmin GPSMAP 292...
Owner's Manual
Page 15
... location, and the latitude/longitude of the map pointer is shown along the top of the map. Highlight Create Wpt, and press ENTER/MARK. 4. GPSMAP 292/298 Owner's Manual 9 To enter optional comments or a depth, highlight Comments, Depth, or Water Temp, and press ENTER/MARK, use the ROCKER to create the new ... 7. BASIC OPERATION > CREATING AND USING WAYPOINTS To create a new waypoint from the Map Page. Make your changes, and press ENTER/MARK when finished. 6. To manually enter a set of the point, its distance and bearing from your present location, not the map location.
... location, and the latitude/longitude of the map pointer is shown along the top of the map. Highlight Create Wpt, and press ENTER/MARK. 4. GPSMAP 292/298 Owner's Manual 9 To enter optional comments or a depth, highlight Comments, Depth, or Water Temp, and press ENTER/MARK, use the ROCKER to create the new ... 7. BASIC OPERATION > CREATING AND USING WAYPOINTS To create a new waypoint from the Map Page. Make your changes, and press ENTER/MARK when finished. 6. To manually enter a set of the point, its distance and bearing from your present location, not the map location.
Owner's Manual
Page 16
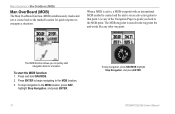
Press ENTER to begin navigating to a location. To start navigation back to the MOB location. 3. GPSMAP 292/298 Owner's Manual Press and hold NAV/MOB. 2. The MOB function allows you back to emergency situations. When a MOB is active, a MOB waypoint with an international MOB symbol ...
Press ENTER to begin navigating to a location. To start navigation back to the MOB location. 3. GPSMAP 292/298 Owner's Manual Press and hold NAV/MOB. 2. The MOB function allows you back to emergency situations. When a MOB is active, a MOB waypoint with an international MOB symbol ...
Owner's Manual
Page 17
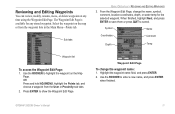
... ADJ/MENU, highlight the Points tab, and choose a waypoint from the waypoint lists in the Main Menu-Points tab. Use the ROCKER to cancel. GPSMAP 292/298 Owner's Manual 11 Reviewing and Editing Waypoints You can review, modify, rename, move, or delete waypoints at any stored waypoint. Highlight the waypoint name field...
... ADJ/MENU, highlight the Points tab, and choose a waypoint from the waypoint lists in the Main Menu-Points tab. Use the ROCKER to cancel. GPSMAP 292/298 Owner's Manual 11 Reviewing and Editing Waypoints You can review, modify, rename, move, or delete waypoints at any stored waypoint. Highlight the waypoint name field...
Owner's Manual
Page 18
... of points or graphically from your present location. If you are actively navigating, the Map Page shows a straight line from the Map Page. 12 GPSMAP 292/298 Owner's Manual The Go To function is the easiest method for selecting a destination. To stop the move the waypoint on the ROCKER. 3. You can also use...
... of points or graphically from your present location. If you are actively navigating, the Map Page shows a straight line from the Map Page. 12 GPSMAP 292/298 Owner's Manual The Go To function is the easiest method for selecting a destination. To stop the move the waypoint on the ROCKER. 3. You can also use...
Owner's Manual
Page 19
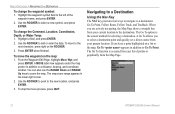
... To Point, and press ENTER. 2. If you are selecting a map item as the Go To destination, the GPSMAP 292/298 automatically creates a waypoint at the map pointer location. GPSMAP 292/298 Owner's Manual 13 To select a waypoint from the Map Page: 1. To Go To an existing waypoint or map item from ... page 8 for creating waypoints using map items. If you are selecting a new map point (non-map item) as the Go To destination, the GPSMAP 292/298 automatically uses the name of three items from a point list: 1. Press NAV. From the Find menu, highlight Waypoints or another menu option, and...
... To Point, and press ENTER. 2. If you are selecting a map item as the Go To destination, the GPSMAP 292/298 automatically creates a waypoint at the map pointer location. GPSMAP 292/298 Owner's Manual 13 To select a waypoint from the Map Page: 1. To Go To an existing waypoint or map item from ... page 8 for creating waypoints using map items. If you are selecting a new map point (non-map item) as the Go To destination, the GPSMAP 292/298 automatically uses the name of three items from a point list: 1. Press NAV. From the Find menu, highlight Waypoints or another menu option, and...
Owner's Manual
Page 20
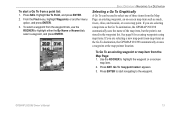
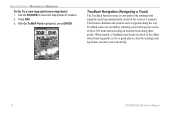
... of up to the starting point using the track log automatically stored in the receiver's memory. Use the ROCKER to move the map pointer to store waypoints along those points. TracBack Navigation (Navigating a Track) The TracBack function retraces your current trip. 14 GPSMAP 292/298 Owner's Manual This feature eliminates the need to location. 2.
... of up to the starting point using the track log automatically stored in the receiver's memory. Use the ROCKER to move the map pointer to store waypoints along those points. TracBack Navigation (Navigating a Track) The TracBack function retraces your current trip. 14 GPSMAP 292/298 Owner's Manual This feature eliminates the need to location. 2.
Owner's Manual
Page 21
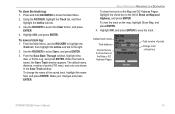
... select Save, and press ENTER. 3. BASIC OPERATION > NAVIGATING TO A DESTINATION To show the Main Menu. 2. Use the ROCKER to the left of track line GPSMAP 292/298 Owner's Manual 15 To change the name of points (700 max), and color are shown in the Save Track window. Using the ROCKER, highlight the Track...
... select Save, and press ENTER. 3. BASIC OPERATION > NAVIGATING TO A DESTINATION To show the Main Menu. 2. Use the ROCKER to the left of track line GPSMAP 292/298 Owner's Manual 15 To change the name of points (700 max), and color are shown in the Save Track window. Using the ROCKER, highlight the Track...

