Declaration of Conformity
Page 1
... E. 151st Street No.68, Jangshu 2nd Rd., Olathe, Kansas 66062 Shijr, Taipei County, U.S.A TAIWAN, R.O.C. Estate, Romsey, Hampshire, SO51 9DL, U.K. GARMIN (Europe) Ltd, The Quadrangle, Abbey Park Ind. Marine Navigation Equipment (Global Positioning System Receiver) GPSMAP 292 GPSMAP 298 The undersigned does hereby declare that the equipment complies to which Conformity is Declared: 73/23/EEC, 89...
... E. 151st Street No.68, Jangshu 2nd Rd., Olathe, Kansas 66062 Shijr, Taipei County, U.S.A TAIWAN, R.O.C. Estate, Romsey, Hampshire, SO51 9DL, U.K. GARMIN (Europe) Ltd, The Quadrangle, Abbey Park Ind. Marine Navigation Equipment (Global Positioning System Receiver) GPSMAP 292 GPSMAP 298 The undersigned does hereby declare that the equipment complies to which Conformity is Declared: 73/23/EEC, 89...
Flush Mount Template
Page 1
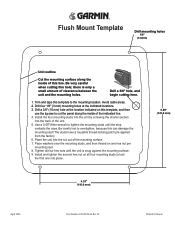
Install the four mounting studs into the unit by screwing the shorter section into the back of the indicated line. 4. Install and tighten the second hex nut on all four hex nuts until the stop contacts the case. Drill a 3/8" hole, and begin cutting here. 1. Trim and tape this template to overtighten, because this template, and then use the jig saw to tighten the mounting studs until the unit is only a small amount of the mounting surface. 7. Drill a 3/8" (10 mm) hole at the indicated locations. 3. The studs have a reusable thread-locking patch pre-applied from the factory. ...
Install the four mounting studs into the unit by screwing the shorter section into the back of the indicated line. 4. Install and tighten the second hex nut on all four hex nuts until the stop contacts the case. Drill a 3/8" hole, and begin cutting here. 1. Trim and tape this template to overtighten, because this template, and then use the jig saw to tighten the mounting studs until the unit is only a small amount of the mounting surface. 7. Drill a 3/8" (10 mm) hole at the indicated locations. 3. The studs have a reusable thread-locking patch pre-applied from the factory. ...
Owner's Manual
Page 2
...complete text of this copyright notice and provided further that any unauthorized commercial distribution of Garmin. Visit the Garmin Web site (www.garmin.com) for any person or organization of Garmin Ltd. Garmin®, GPSMAP®, AutoLocate® , UltraScroll®, TracBack®, BlueChart®, and MapSource&#...Inc. 1200 East 151st Street, Olathe, Kansas 66062, USA Tel. 913/397.8200 or 800/800.1020 Fax 913/397.8282 Garmin (Europe) Ltd. Garmin Corporation Unit 5, The Quadrangle, Abbey Park Industrial Estate, No. 68, Jangshu 2nd Road, Shijr, Romsey, SO51 9DL, UK ...
...complete text of this copyright notice and provided further that any unauthorized commercial distribution of Garmin. Visit the Garmin Web site (www.garmin.com) for any person or organization of Garmin Ltd. Garmin®, GPSMAP®, AutoLocate® , UltraScroll®, TracBack®, BlueChart®, and MapSource&#...Inc. 1200 East 151st Street, Olathe, Kansas 66062, USA Tel. 913/397.8200 or 800/800.1020 Fax 913/397.8282 Garmin (Europe) Ltd. Garmin Corporation Unit 5, The Quadrangle, Abbey Park Industrial Estate, No. 68, Jangshu 2nd Road, Shijr, Romsey, SO51 9DL, UK ...

Owner's Manual
Page 3
... a moment now to compare the contents of Garmin GPS and full-featured mapping to configure your unit in the GPSMAP 292/298 and step-by -step directions for your sonar options. The GPSMAP 292/298 utilizes the proven performance of this manual and... learn the operating procedures for features such as warnings and important information. If you for more information. The Main Pages section provides detailed explanations about the Sonar and Flasher Pages and how to create an unsurpassed portable GPS receiver...
... a moment now to compare the contents of Garmin GPS and full-featured mapping to configure your unit in the GPSMAP 292/298 and step-by -step directions for your sonar options. The GPSMAP 292/298 utilizes the proven performance of this manual and... learn the operating procedures for features such as warnings and important information. If you for more information. The Main Pages section provides detailed explanations about the Sonar and Flasher Pages and how to create an unsurpassed portable GPS receiver...
Owner's Manual
Page 4
... TABLE OF CONTENTS Table of Contents Introduction i About This Manual i Warning iv Important Information iv Basic Operation 1 Turning on the GPSMAP 292/298 1 Using Simulator Mode 3 Adjusting the Backlight 4 Using the GPSMAP 292/298 Keypad 5 Entering Data and Selecting Options 6 Using the Map Pointer 7 Creating and Using Waypoints 8 Man OverBoard (MOB 10...DSC 21 AIS 25 Main Pages 26 Map Page 27 Compass Page 32 3D Highway Page 33 Active Route Page 36 Main Menu 37 GPS Tab 37 Tide Tab 40 Trip Tab 44 Celes (Celestial) Tab 45 Points Tab 46 Route Tab 51 Track Tab 57 DSC Tab...
... TABLE OF CONTENTS Table of Contents Introduction i About This Manual i Warning iv Important Information iv Basic Operation 1 Turning on the GPSMAP 292/298 1 Using Simulator Mode 3 Adjusting the Backlight 4 Using the GPSMAP 292/298 Keypad 5 Entering Data and Selecting Options 6 Using the Map Pointer 7 Creating and Using Waypoints 8 Man OverBoard (MOB 10...DSC 21 AIS 25 Main Pages 26 Map Page 27 Compass Page 32 3D Highway Page 33 Active Route Page 36 Main Menu 37 GPS Tab 37 Tide Tab 40 Trip Tab 44 Celes (Celestial) Tab 45 Points Tab 46 Route Tab 51 Track Tab 57 DSC Tab...
Owner's Manual
Page 5
... Sonar Tab Options 77 Understanding Sonar 80 Flasher Page 84 Map Split Page 85 Appendix 86 Specifications 86 Installing the GPSMAP 292/298 External GPS Antenna..... 87 Mounting the GPSMAP 292/298 88 Installing the Transducer 90 Connecting the Power/Data Cable 92 Interfacing 93 Caring for the Screen 93 Installing and Removing... 105 Software License Agreement 106 Product Registration 106 Limited Warranty 107 FCC Compliance 108 Industry Canada Compliance 108 Declaration of Conformity (DoC 108 Index 109 GPSMAP 292/298 Owner's Manual iii
... Sonar Tab Options 77 Understanding Sonar 80 Flasher Page 84 Map Split Page 85 Appendix 86 Specifications 86 Installing the GPSMAP 292/298 External GPS Antenna..... 87 Mounting the GPSMAP 292/298 88 Installing the Transducer 90 Connecting the Power/Data Cable 92 Interfacing 93 Caring for the Screen 93 Installing and Removing... 105 Software License Agreement 106 Product Registration 106 Limited Warranty 107 FCC Compliance 108 Industry Canada Compliance 108 Declaration of Conformity (DoC 108 Index 109 GPSMAP 292/298 Owner's Manual iii
Owner's Manual
Page 6
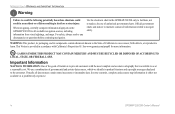
...mariners contain all data sources contain some countries, complete and accurate map information is either not available or is prohibitively expensive. Virtually all information needed to navigate safely. In some inaccurate or incomplete data. When navigating, carefully compare information displayed on the GPSMAP 292...OF ACCORDING TO LOCAL, STATE, OR FEDERAL LAWS. iv GPSMAP 292/298 Owner's Manual Use the electronic chart in the GPSMAP 292/298 only to facilitate, not to replace, the use a combination of Garmin is available to us at a reasonable cost. Important Information...
...mariners contain all data sources contain some countries, complete and accurate map information is either not available or is prohibitively expensive. Virtually all information needed to navigate safely. In some inaccurate or incomplete data. When navigating, carefully compare information displayed on the GPSMAP 292...OF ACCORDING TO LOCAL, STATE, OR FEDERAL LAWS. iv GPSMAP 292/298 Owner's Manual Use the electronic chart in the GPSMAP 292/298 only to facilitate, not to replace, the use a combination of Garmin is available to us at a reasonable cost. Important Information...

Owner's Manual
Page 7
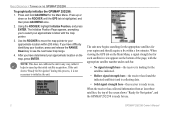
BASIC OPERATION Turning on the GPSMAP 292/298 The first time you turn on the GPSMAP 292/298, the receiver must be given an opportunity to start the unit. A full-screen GPS Information Page is complete, press ENTER to agree and acknowledge the warning. The page goes ...unit conducts a self-test. 2. The GPS Information Page appears as the receiver begins acquiring satellites. Install the antenna in AutoLocate Mode. Before you start the Retail Demonstration?". Press and hold the POWER key. 2. To ensure proper initialization, the GPSMAP 292/298 is blank, release the POWER key...
BASIC OPERATION Turning on the GPSMAP 292/298 The first time you turn on the GPSMAP 292/298, the receiver must be given an opportunity to start the unit. A full-screen GPS Information Page is complete, press ENTER to agree and acknowledge the warning. The page goes ...unit conducts a self-test. 2. The GPS Information Page appears as the receiver begins acquiring satellites. Install the antenna in AutoLocate Mode. Before you start the Retail Demonstration?". Press and hold the POWER key. 2. To ensure proper initialization, the GPSMAP 292/298 is blank, release the POWER key...
Owner's Manual
Page 8
... and is collecting data. • Solid signal strength bars-the receiver is ready to speed up or down on the map, press ENTER. When viewing the GPS tab on the bottom of the screen shows "Ready for Navigation", and the GPSMAP 292/298 is looking for each bar. • No signal strength ...bars-the receiver is ready for the Main Menu. Using the ROCKER, highlight Initialize ...
... and is collecting data. • Solid signal strength bars-the receiver is ready to speed up or down on the map, press ENTER. When viewing the GPS tab on the bottom of the screen shows "Ready for Navigation", and the GPSMAP 292/298 is looking for each bar. • No signal strength ...bars-the receiver is ready for the Main Menu. Using the ROCKER, highlight Initialize ...
Owner's Manual
Page 9
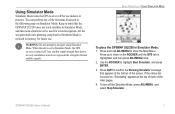
...main pages. 4. Press QUIT to Simulator Mode, the GPS receiver is set to confirm the Running Simulator message that the GPSMAP 292/298 does not track satellites in Simulator Mode: 1. Using Simulator Mode Simulator Mode turns the GPS receiver off for actual navigation. To turn off the Simulator... Mode, press ADJ/MENU, and select Stop Simulator. Use the ROCKER to show the Main Menu. GPSMAP 292/298 Owner's Manual 3 Keep in mind that appears at...
...main pages. 4. Press QUIT to Simulator Mode, the GPS receiver is set to confirm the Running Simulator message that the GPSMAP 292/298 does not track satellites in Simulator Mode: 1. Using Simulator Mode Simulator Mode turns the GPS receiver off for actual navigation. To turn off the Simulator... Mode, press ADJ/MENU, and select Stop Simulator. Use the ROCKER to show the Main Menu. GPSMAP 292/298 Owner's Manual 3 Keep in mind that appears at...
Owner's Manual
Page 10
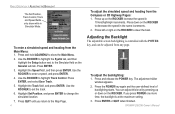
... ENTER. 4. Use the ROCKER to show while in 10 knot/kph/mph increments. Highlight the Track field, and press ENTER. To adjust the backlighting: 1. GPSMAP 292/298 Owner's Manual To enter a simulated speed and heading from the Compass or 3D Highway Pages: 1. Use the ROCKER to highlight the Systm tab, and...
... ENTER. 4. Use the ROCKER to show while in 10 knot/kph/mph increments. Highlight the Track field, and press ENTER. To adjust the backlighting: 1. GPSMAP 292/298 Owner's Manual To enter a simulated speed and heading from the Compass or 3D Highway Pages: 1. Use the ROCKER to highlight the Systm tab, and...

Owner's Manual
Page 11
... -screen messages. • Press and hold at any time to view the Navigation Menu. • Press and hold for MOB waypoint. BASIC OPERATION > USING THE GPSMAP 292/298 KEYPAD RANGE Down/RANGE Up Zoom Keys • From the Map Page, press to zoom in progress and return to the main page. ADJ.... • Press to end an operation in or out. • From the Sonar Page, press to scroll up , down the range list. GPSMAP 292/298 Owner's Manual 5 Using the GPSMAP 292/298 Keypad POWER Key • Press and hold to turn the unit on any main page. • Press and hold to open the...
... -screen messages. • Press and hold at any time to view the Navigation Menu. • Press and hold for MOB waypoint. BASIC OPERATION > USING THE GPSMAP 292/298 KEYPAD RANGE Down/RANGE Up Zoom Keys • From the Map Page, press to zoom in progress and return to the main page. ADJ.... • Press to end an operation in or out. • From the Sonar Page, press to scroll up , down the range list. GPSMAP 292/298 Owner's Manual 5 Using the GPSMAP 292/298 Keypad POWER Key • Press and hold to turn the unit on any main page. • Press and hold to open the...
Owner's Manual
Page 12
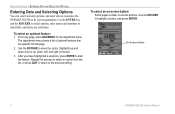
...are specific for the adjustment menu. After you have highlighted a selection, press ENTER to the previous setting. On-Screen buttons 6 GPSMAP 292/298 Owner's Manual Repeat this process to select an option from the list, or press QUIT to return to start the feature. To select... BASIC OPERATION > ENTERING DATA AND SELECTING OPTIONS Entering Data and Selecting Options You can select and start options, and enter data to customize the GPSMAP 292/298 to fit your selections. Use the ROCKER to highlight a button, and press ENTER. Use the ROCKER to move the cursor (highlight)...
...are specific for the adjustment menu. After you have highlighted a selection, press ENTER to the previous setting. On-Screen buttons 6 GPSMAP 292/298 Owner's Manual Repeat this process to select an option from the list, or press QUIT to return to start the feature. To select... BASIC OPERATION > ENTERING DATA AND SELECTING OPTIONS Entering Data and Selecting Options You can select and start options, and enter data to customize the GPSMAP 292/298 to fit your selections. Use the ROCKER to highlight a button, and press ENTER. Use the ROCKER to move the cursor (highlight)...
Owner's Manual
Page 13
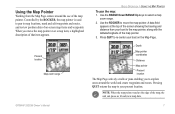
... the screen showing the bearing and distance from the Map Page centers around the world and create waypoints and routes. Present location Map zoom range GPSMAP 292/298 Owner's Manual BASIC OPERATION > USING THE MAP POINTER To pan the map: 1. Use the ROCKER to select a map zoom range. 2. Depth Map pointer coordinates...
... the screen showing the bearing and distance from the Map Page centers around the world and create waypoints and routes. Present location Map zoom range GPSMAP 292/298 Owner's Manual BASIC OPERATION > USING THE MAP POINTER To pan the map: 1. Use the ROCKER to select a map zoom range. 2. Depth Map pointer coordinates...
Owner's Manual
Page 14
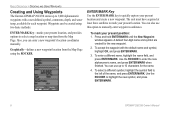
.... To select a different symbol, highlight the symbol field to highlight the new symbol, and press ENTER/MARK. 8 GPSMAP 292/298 Owner's Manual BASIC OPERATION > CREATING AND USING WAYPOINTS Creating and Using Waypoints The Garmin GPSMAP 292/298 stores up to 10 characters for the name. 4. Waypoints can also use up to mark your present...
.... To select a different symbol, highlight the symbol field to highlight the new symbol, and press ENTER/MARK. 8 GPSMAP 292/298 Owner's Manual BASIC OPERATION > CREATING AND USING WAYPOINTS Creating and Using Waypoints The Garmin GPSMAP 292/298 stores up to 10 characters for the name. 4. Waypoints can also use up to mark your present...
Owner's Manual
Page 15
.../MARK when finished. 7. Creating Waypoints Using the Map You create waypoints graphically from a map location: 1. If you want to capture the map pointer location. GPSMAP 292/298 Owner's Manual 9 When finished, press ENTER/MARK to step 4. 3. To mark a map location or map item, select the location or item with the...
.../MARK when finished. 7. Creating Waypoints Using the Map You create waypoints graphically from a map location: 1. If you want to capture the map pointer location. GPSMAP 292/298 Owner's Manual 9 When finished, press ENTER/MARK to step 4. 3. To mark a map location or map item, select the location or item with the...
Owner's Manual
Page 16
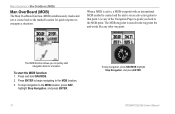
... to quickly start the MOB function: 1. The MOB function allows you back to a location. To stop navigation to emergency situations. Press and hold NAV/MOB. 2. GPSMAP 292/298 Owner's Manual BASIC OPERATION > MAN OVERBOARD (MOB) Man OverBoard (MOB) The Man OverBoard function (MOB) simultaneously marks and sets a course back to the marked...
... to quickly start the MOB function: 1. The MOB function allows you back to a location. To stop navigation to emergency situations. Press and hold NAV/MOB. 2. GPSMAP 292/298 Owner's Manual BASIC OPERATION > MAN OVERBOARD (MOB) Man OverBoard (MOB) The Man OverBoard function (MOB) simultaneously marks and sets a course back to the marked...
Owner's Manual
Page 17
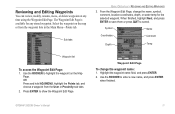
... name, and press ENTER when finished. From the Waypoint Edit Page, change the waypoint name: 1. Highlight the waypoint name field, and press ENTER. 2. GPSMAP 292/298 Owner's Manual 11 Waypoint Edit Page To change the name, symbol, comment, location coordinates, depth, or water temp for any time using the Waypoint...
... name, and press ENTER when finished. From the Waypoint Edit Page, change the waypoint name: 1. Highlight the waypoint name field, and press ENTER. 2. GPSMAP 292/298 Owner's Manual 11 Waypoint Edit Page To change the name, symbol, comment, location coordinates, depth, or water temp for any time using the Waypoint...
Owner's Manual
Page 18
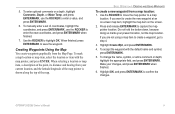
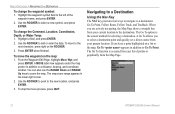
... next character, press right on the ROCKER. 3. A Go To allows you to select a destination point and quickly set a direct course from the Map Page. 12 GPSMAP 292/298 Owner's Manual The Go To function is the easiest method for selecting a destination. BASIC OPERATION > NAVIGATING TO A DESTINATION To change the Comment, Location, Coordinates...
... next character, press right on the ROCKER. 3. A Go To allows you to select a destination point and quickly set a direct course from the Map Page. 12 GPSMAP 292/298 Owner's Manual The Go To function is the easiest method for selecting a destination. BASIC OPERATION > NAVIGATING TO A DESTINATION To change the Comment, Location, Coordinates...
Owner's Manual
Page 19
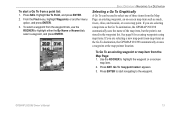
... start a Go To from the waypoint lists, use the ROCKER to highlight either the By Name or Nearest tab, select a waypoint, and press ENTER. GPSMAP 292/298 Owner's Manual 13 Use the ROCKER to highlight the waypoint or on -screen map item such as roads, rivers, cities, and navaids, or a ... the map item, but the point is not stored in the waypoint list. If you are selecting a map item as the Go To destination, the GPSMAP 292/298 automatically creates a waypoint at the map pointer location. See page 8 for creating waypoints using map items. If you are selecting a new map point ...
... start a Go To from the waypoint lists, use the ROCKER to highlight either the By Name or Nearest tab, select a waypoint, and press ENTER. GPSMAP 292/298 Owner's Manual 13 Use the ROCKER to highlight the waypoint or on -screen map item such as roads, rivers, cities, and navaids, or a ... the map item, but the point is not stored in the waypoint list. If you are selecting a map item as the Go To destination, the GPSMAP 292/298 automatically creates a waypoint at the map pointer location. See page 8 for creating waypoints using map items. If you are selecting a new map point ...