
Owner's Manual
Page 3
... warnings and important information. The Using Sonar section provides detailed explanations about each page in the Appendix. See the CANet accessory installation instructions for choosing the Garmin® GPSMAP® 292/298. The Main Pages section provides detailed explanations about the Sonar and Flasher Pages and how to create an unsurpassed portable GPS receiver. GPSMAP 292/298 Owner's Manual i
... warnings and important information. The Using Sonar section provides detailed explanations about each page in the Appendix. See the CANet accessory installation instructions for choosing the Garmin® GPSMAP® 292/298. The Main Pages section provides detailed explanations about the Sonar and Flasher Pages and how to create an unsurpassed portable GPS receiver. GPSMAP 292/298 Owner's Manual i

Owner's Manual
Page 7
... conducts a self-test. 2. You are correctly installed on your vessel according to the instructions in a location with a clear and unobstructed view of the sky. The GPS Information Page appears as the receiver begins acquiring satellites. GPSMAP 292/298 Owner's Manual 1 A full-screen GPS Information Page is complete, press ENTER to agree and acknowledge the warning. To turn...
... conducts a self-test. 2. You are correctly installed on your vessel according to the instructions in a location with a clear and unobstructed view of the sky. The GPS Information Page appears as the receiver begins acquiring satellites. GPSMAP 292/298 Owner's Manual 1 A full-screen GPS Information Page is complete, press ENTER to agree and acknowledge the warning. To turn...
Owner's Manual
Page 22
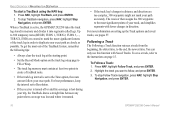
... save a track, refer to Resolution. • If the receiver is turned off or satellite coverage is active, the GPSMAP 292/298 takes the track log stored in order to mark the most...points to create a TracBack route. • If the track log interval is set to the instructions on setting up the Track options and saved tracks, see pages 57. Press NAV, highlight TracBack,...1. To stop Follow Track navigation, press NAV, highlight Stop Navigation, and press ENTER. 16 GPSMAP 292/298 Owner's Manual For more information on page 15. You can not follow , and press ENTER. 3. Highlight ...
... save a track, refer to Resolution. • If the receiver is turned off or satellite coverage is active, the GPSMAP 292/298 takes the track log stored in order to mark the most...points to create a TracBack route. • If the track log interval is set to the instructions on setting up the Track options and saved tracks, see pages 57. Press NAV, highlight TracBack,...1. To stop Follow Track navigation, press NAV, highlight Stop Navigation, and press ENTER. 16 GPSMAP 292/298 Owner's Manual For more information on page 15. You can not follow , and press ENTER. 3. Highlight ...
Owner's Manual
Page 23
Use the ROCKER to highlight the Route tab, and press ADJ/MENU to show the Main Menu. 2. GPSMAP 292/298 Owner's Manual 17 Use the map pointer to start your location, and coordinates of the map pointer. As you have finished defining all route ... QUIT twice to select a waypoint or map item, and press ENTER. Select New Route, and press ENTER. 4. Follow steps 3, and 4 in the QUICK NAV Route instructions. 5. Repeat steps 3 and 4 until you add each new waypoint to the route, the data window at the top of the Map Page shows the waypoint...
Use the ROCKER to highlight the Route tab, and press ADJ/MENU to show the Main Menu. 2. GPSMAP 292/298 Owner's Manual 17 Use the map pointer to start your location, and coordinates of the map pointer. As you have finished defining all route ... QUIT twice to select a waypoint or map item, and press ENTER. Select New Route, and press ENTER. 4. Follow steps 3, and 4 in the QUICK NAV Route instructions. 5. Repeat steps 3 and 4 until you add each new waypoint to the route, the data window at the top of the Map Page shows the waypoint...
Owner's Manual
Page 39
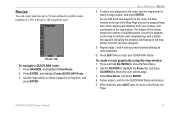
... provides a userselectable layout of various types of useful data. The data window layout can be configured to show several data options. GPSMAP 292/298 Owner's Manual 33 The round compass becomes a tape compass when the data configuration limits space. As you navigate toward a waypoint, the highway moves... to show additional data fields and change the size of the highway. MAIN PAGES > 3D HIGHWAY PAGE 3D Highway Page The GPSMAP 292/298's 3D Highway Page provides 3-D graphic steering guidance to page 30 for data field configuration instructions.
... provides a userselectable layout of various types of useful data. The data window layout can be configured to show several data options. GPSMAP 292/298 Owner's Manual 33 The round compass becomes a tape compass when the data configuration limits space. As you navigate toward a waypoint, the highway moves... to show additional data fields and change the size of the highway. MAIN PAGES > 3D HIGHWAY PAGE 3D Highway Page The GPSMAP 292/298's 3D Highway Page provides 3-D graphic steering guidance to page 30 for data field configuration instructions.
Owner's Manual
Page 43
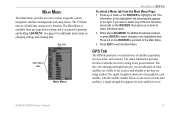
... ENTER to make changes to the receiver and whether or not they are divided into categories by pressing and holding ADJ/MENU. GPS Tab The GPS tab provides a visual reference of the sub tab items, press right on a bar graph for additional instructions on the ROCKER to get back to...If you an indication of what satellites are visible to the highlighted item. As the receiver locks onto satellites, a signal strength bar appears for each satellite, with the satellite number below. GPSMAP 292/298 Owner's Manual 37 See page 6 for each satellite in the system, and is shown on the...
... ENTER to make changes to the receiver and whether or not they are divided into categories by pressing and holding ADJ/MENU. GPS Tab The GPS tab provides a visual reference of the sub tab items, press right on a bar graph for additional instructions on the ROCKER to get back to...If you an indication of what satellites are visible to the highlighted item. As the receiver locks onto satellites, a signal strength bar appears for each satellite, with the satellite number below. GPSMAP 292/298 Owner's Manual 37 See page 6 for each satellite in the system, and is shown on the...
Owner's Manual
Page 71
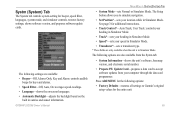
...GPSMAP 292/298 Owner's Manual MAIN MENU > SYSTM (SYSTEM) TAB • System Mode-sets Normal or Simulator Mode. See page 3 for beeper, speed filter, languages, system mode, and simulator controls, restores factory settings, shows software version, and prepares software update cards. Systm (System) Tab The System tab controls system setting for additional instructions...software, basemap version, and electronic serial number. • Prepare SW Update Card-prepares a data card to Garmin's original setup values for keys and alarms. • Speed Filter-Off, Auto, On: averages speed-...
...GPSMAP 292/298 Owner's Manual MAIN MENU > SYSTM (SYSTEM) TAB • System Mode-sets Normal or Simulator Mode. See page 3 for beeper, speed filter, languages, system mode, and simulator controls, restores factory settings, shows software version, and prepares software update cards. Systm (System) Tab The System tab controls system setting for additional instructions...software, basemap version, and electronic serial number. • Prepare SW Update Card-prepares a data card to Garmin's original setup values for keys and alarms. • Speed Filter-Off, Auto, On: averages speed-...
Owner's Manual
Page 78
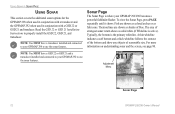
...screen, see page 80. NOTE: You MUST have a transducer installed and connected to use the sonar features. Adjustment Menu Sonar Page 72 GPSMAP 292/298 Owner's Manual Fish are shown as shades of reasonable size. Sonar Page The Sonar Page is the primary whiteline. USING SONAR > SONAR PAGE USING ... your GPSMAP 298 to properly install the GSD 22, GSD 21, and transducer. Thermoclines are shown as colored arches or as solid white (if Whiteline is active). The area of strongest sonar return shows as fish icons. Read the GSD 22 or GSD 21 Installation Instructions to...
...screen, see page 80. NOTE: You MUST have a transducer installed and connected to use the sonar features. Adjustment Menu Sonar Page 72 GPSMAP 292/298 Owner's Manual Fish are shown as shades of reasonable size. Sonar Page The Sonar Page is the primary whiteline. USING SONAR > SONAR PAGE USING ... your GPSMAP 298 to properly install the GSD 22, GSD 21, and transducer. Thermoclines are shown as colored arches or as solid white (if Whiteline is active). The area of strongest sonar return shows as fish icons. Read the GSD 22 or GSD 21 Installation Instructions to...

Owner's Manual
Page 93
...following instructions to ensure the best reception. APPENDIX > INSTALLING THE GPSMAP 292/298 EXTERNAL GPS ANTENNA Suggested locations for mounting the external antenna. The GPSMAP 292/298 with internal antennas do not require this installation. Installing the GPSMAP 292/298 External GPS Antenna The GPSMAP 292/298... 1" x 14-thread extension mast available at most marine dealers. If you need to raise the antenna to route the coaxial cable either through, or outside the antenna mount. GPSMAP 292/298 Owner's Manual 87 The Garmin antenna screws directly onto any standard 1" x 14thread ...
...following instructions to ensure the best reception. APPENDIX > INSTALLING THE GPSMAP 292/298 EXTERNAL GPS ANTENNA Suggested locations for mounting the external antenna. The GPSMAP 292/298 with internal antennas do not require this installation. Installing the GPSMAP 292/298 External GPS Antenna The GPSMAP 292/298... 1" x 14-thread extension mast available at most marine dealers. If you need to raise the antenna to route the coaxial cable either through, or outside the antenna mount. GPSMAP 292/298 Owner's Manual 87 The Garmin antenna screws directly onto any standard 1" x 14thread ...

Owner's Manual
Page 95
...instructions on page 86) and leave 1.25" (32 mm) clearance below the data card slot for drilling starter holes. The swivel base is provided in the package. DO NOT OVERTIGHTEN. 4. Flush Mounting the GPSMAP 292/298 (External Antenna only) The GPSMAP 292... the unit (see unit dimensions on the template to the mounting surface. 2. When flush mounting the GPSMAP 292/298, be flush mounted on a flat the locations you are used to secure the bracket... screws and an appropriately-sized drill bit for inserting or removing data cards. GPSMAP 292/298 Owner's Manual 89
...instructions on page 86) and leave 1.25" (32 mm) clearance below the data card slot for drilling starter holes. The swivel base is provided in the package. DO NOT OVERTIGHTEN. 4. Flush Mounting the GPSMAP 292/298 (External Antenna only) The GPSMAP 292... the unit (see unit dimensions on the template to the mounting surface. 2. When flush mounting the GPSMAP 292/298, be flush mounted on a flat the locations you are used to secure the bracket... screws and an appropriately-sized drill bit for inserting or removing data cards. GPSMAP 292/298 Owner's Manual 89
Owner's Manual
Page 113
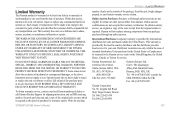
...to the customer for parts or labor, provided that fail in normal use. Write the tracking GPSMAP 292/298 Owner's Manual APPENDIX > LIMITED WARRANTY number clearly on the outside of intended distribution. Garmin will , at no charge to repair or replace the unit or software or offer a full... damages, so the above limitations may not apply to the Garmin service center in the United States or Canada must be responsible for any package purchased through online auctions are not accepted for shipping instructions and an RMA tracking number. Online Auction Purchases: Products sold...
...to the customer for parts or labor, provided that fail in normal use. Write the tracking GPSMAP 292/298 Owner's Manual APPENDIX > LIMITED WARRANTY number clearly on the outside of intended distribution. Garmin will , at no charge to repair or replace the unit or software or offer a full... damages, so the above limitations may not apply to the Garmin service center in the United States or Canada must be responsible for any package purchased through online auctions are not accepted for shipping instructions and an RMA tracking number. Online Auction Purchases: Products sold...
Owner's Manual
Page 114
...by turning the equipment off and on a different circuit from the GPS unit. • Consult the dealer or an experienced radio/TV ...received, including interference that may cause undesired operation. This equipment generates, uses, and can be made by one of Conformity (DoC) Hereby, Garmin, declares that the GPSMAP 292/298 is in accordance with Part 15 of Conformity link. 108 GPSMAP 292/298 Owner's Manual...outdoor" requirements. Operation of this device is subject to comply with the instructions. APPENDIX > FCC AND INDUSTRY CANADA COMPLIANCE AND DECLARATION OF CONFORMITY FCC...
...by turning the equipment off and on a different circuit from the GPS unit. • Consult the dealer or an experienced radio/TV ...received, including interference that may cause undesired operation. This equipment generates, uses, and can be made by one of Conformity (DoC) Hereby, Garmin, declares that the GPSMAP 292/298 is in accordance with Part 15 of Conformity link. 108 GPSMAP 292/298 Owner's Manual...outdoor" requirements. Operation of this device is subject to comply with the instructions. APPENDIX > FCC AND INDUSTRY CANADA COMPLIANCE AND DECLARATION OF CONFORMITY FCC...


