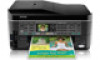
Quick Guide
Page 24
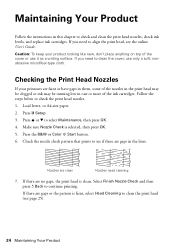
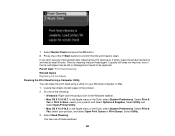
... anything on top of the cover or use only a soft, nonabrasive microfiber-type cloth. or A4-size paper. 2. Nozzles are clean Nozzles need to clean the print head (see if there are no gaps, the print head is clean. Select Finish Nozzle Check and then press y Back to select Maintenance, then press OK. 4. Press u or d to continue...
... anything on top of the cover or use only a soft, nonabrasive microfiber-type cloth. or A4-size paper. 2. Nozzles are clean Nozzles need to clean the print head (see if there are no gaps, the print head is clean. Select Finish Nozzle Check and then press y Back to select Maintenance, then press OK. 4. Press u or d to continue...
Quick Guide
Page 25
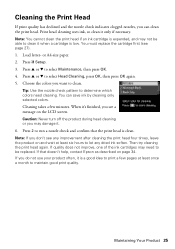
... a message on page 34. Press u or d to select Head Cleaning, press OK, then press OK again. 5. When it only if necessary. If you want to run a nozzle check and confirm that doesn't help, contact Epson as described on the LCD screen. Press 2 to clean. Print head cleaning uses ink, so clean it 's finished, you don't see page 27). 1.
... a message on page 34. Press u or d to select Head Cleaning, press OK, then press OK again. 5. When it only if necessary. If you want to run a nozzle check and confirm that doesn't help, contact Epson as described on the LCD screen. Press 2 to clean. Print head cleaning uses ink, so clean it 's finished, you don't see page 27). 1.
Quick Guide
Page 34
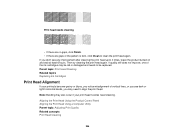
...Epson with your printouts or they are too faint, run a nozzle check (see page 24) to see page 27). ■ Clean the scanner glass with a soft, dry, lint-free cloth (paper towels are subject to align the print head...may need to change without notice. Check your cartridge levels (see page 26) and replace cartridges, if necessary (see if the print head needs cleaning. ■ If you notice jagged vertical lines, you call : ■ U.S.: (562) 276-4382, 6 AM - ... the following information ready: ■ Product name (WorkForce 545/645 Series) ■ Product serial number (located on ink.
...Epson with your printouts or they are too faint, run a nozzle check (see page 24) to see page 27). ■ Clean the scanner glass with a soft, dry, lint-free cloth (paper towels are subject to align the print head...may need to change without notice. Check your cartridge levels (see page 26) and replace cartridges, if necessary (see if the print head needs cleaning. ■ If you notice jagged vertical lines, you call : ■ U.S.: (562) 276-4382, 6 AM - ... the following information ready: ■ Product name (WorkForce 545/645 Series) ■ Product serial number (located on ink.
Quick Guide
Page 37
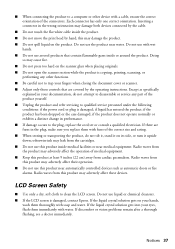
... scanner. ■ Adjust only those controls that contain flammable gases inside the product. ■ Do not move the print head by the cable. ■ Do not touch the flat white cable inside or around the product. Except as automatic ...a dry, soft cloth to qualified service personnel under the following conditions: if the power cord or plug is damaged, contact Epson. Radio waves from cardiac pacemakers. Do not use this product at least 9 inches (22 cm) away from the product may... of the product yourself. ■ Unplug the product and refer servicing to clean the LCD screen.
... scanner. ■ Adjust only those controls that contain flammable gases inside the product. ■ Do not move the print head by the cable. ■ Do not touch the flat white cable inside or around the product. Except as automatic ...a dry, soft cloth to qualified service personnel under the following conditions: if the power cord or plug is damaged, contact Epson. Radio waves from cardiac pacemakers. Do not use this product at least 9 inches (22 cm) away from the product may... of the product yourself. ■ Unplug the product and refer servicing to clean the LCD screen.
User Guide
Page 9
... the Nozzles Using a Computer Utility 248 Print Head Cleaning ...251 Cleaning the Print Head Using the Product Control Panel 251 Cleaning the Print Head Using a Computer Utility 253 Print Head Alignment ...256 Aligning the Print Head Using the Product Control Panel 257 Aligning the Print Head Using a Computer Utility 258 Cleaning the Paper Path ...261 Cleaning and Transporting Your Product 262 Cleaning Your Product ...262 Transporting Your Product...
... the Nozzles Using a Computer Utility 248 Print Head Cleaning ...251 Cleaning the Print Head Using the Product Control Panel 251 Cleaning the Print Head Using a Computer Utility 253 Print Head Alignment ...256 Aligning the Print Head Using the Product Control Panel 257 Aligning the Print Head Using a Computer Utility 258 Cleaning the Paper Path ...261 Cleaning and Transporting Your Product 262 Cleaning Your Product ...262 Transporting Your Product...
User Guide
Page 231
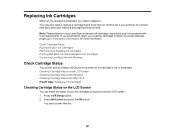
...the LCD Screen You can check the status of your printouts do not look their best, even after cleaning and aligning the print head. Press the Setup button. 2. You may also need to www.epson.com/recycle for proper disposal, please go to replace it. Note: Please dispose of your ink ...cartridges using your used ink cartridges to Epson for more than six months old, if your used Epson branded ink cartridges...
...the LCD Screen You can check the status of your printouts do not look their best, even after cleaning and aligning the print head. Press the Setup button. 2. You may also need to www.epson.com/recycle for proper disposal, please go to replace it. Note: Please dispose of your ink ...cartridges using your used ink cartridges to Epson for more than six months old, if your used Epson branded ink cartridges...

User Guide
Page 245
... the ink cartridges. Print Head Nozzle Check Print Head Cleaning Parent topic: Adjusting Print Quality Related topics Replacing Ink Cartridges Print Head Nozzle Check You can check the print head nozzles using the control panel on your printouts become too light, or you see dark or light bands across them unnecessarily. Print Head Maintenance Print Head Alignment Cleaning the Paper Path Print Head Maintenance If your product...
... the ink cartridges. Print Head Nozzle Check Print Head Cleaning Parent topic: Adjusting Print Quality Related topics Replacing Ink Cartridges Print Head Nozzle Check You can check the print head nozzles using the control panel on your printouts become too light, or you see dark or light bands across them unnecessarily. Print Head Maintenance Print Head Alignment Cleaning the Paper Path Print Head Maintenance If your product...

User Guide
Page 247
Check the printed pattern to exit. • If there are gaps or the pattern is clean Print head needs cleaning 7. Print head is faint, select Head Cleaning and press the OK button and continue. 247 6. Do one of the following: • If there are gaps in the lines. Press the Copy button to see if there are no gaps, select Finish Nozzle Check and press the OK button.
Check the printed pattern to exit. • If there are gaps or the pattern is clean Print head needs cleaning 7. Print head is faint, select Head Cleaning and press the OK button and continue. 247 6. Do one of the following: • If there are gaps in the lines. Press the Copy button to see if there are no gaps, select Finish Nozzle Check and press the OK button.
User Guide
Page 248
...these windows: 248 You see any improvement after cleaning the print head up to 4 times, leave the product turned on and wait at least 6 hours. Follow the instructions on your product, and select Open Print Queue or Print Queue. Parent topic: Print Head Nozzle Check Checking the Nozzles Using a Computer ...the Apple menu or the Dock, select System Preferences. Do one of the ink cartridges may be old or damaged and needs to clean the print head, check the nozzles, and repeat the process as necessary. Select Nozzle Check. Select Utility and select Open Printer Utility. • ...
...these windows: 248 You see any improvement after cleaning the print head up to 4 times, leave the product turned on and wait at least 6 hours. Follow the instructions on your product, and select Open Print Queue or Print Queue. Parent topic: Print Head Nozzle Check Checking the Nozzles Using a Computer ...the Apple menu or the Dock, select System Preferences. Do one of the ink cartridges may be old or damaged and needs to clean the print head, check the nozzles, and repeat the process as necessary. Select Nozzle Check. Select Utility and select Open Printer Utility. • ...

User Guide
Page 250
Check the printed pattern to see if there are gaps in the lines. 4. Print head is clean Print head needs cleaning 250 Click Print. 5.
Check the printed pattern to see if there are gaps in the lines. 4. Print head is clean Print head needs cleaning 250 Click Print. 5.

User Guide
Page 251
... Related concepts Print Head Cleaning Print Head Cleaning If print quality has declined and the nozzle check pattern indicates clogged nozzles, you can clean the print head using the control panel on your product. 1. Make sure plain paper is faint, clean the print head. You see this screen: 251 You must replace the cartridge first. Cleaning the Print Head Using the Product Control Panel Cleaning the Print Head Using...
... Related concepts Print Head Cleaning Print Head Cleaning If print quality has declined and the nozzle check pattern indicates clogged nozzles, you can clean the print head using the control panel on your product. 1. Make sure plain paper is faint, clean the print head. You see this screen: 251 You must replace the cartridge first. Cleaning the Print Head Using the Product Control Panel Cleaning the Print Head Using...

User Guide
Page 252
You see this screen: 252 4. Press the OK button. 6. You see this screen: 5. Caution: Never turn off the product during the cleaning cycle. Select the cleaning cycle you may damage it. When the cleaning cycle is finished, you see a message on the LCD screen during a cleaning cycle or you want to run, then press one of the Start buttons to clean the print head. Select Head Cleaning and press the OK button.
You see this screen: 252 4. Press the OK button. 6. You see this screen: 5. Caution: Never turn off the product during the cleaning cycle. Select the cleaning cycle you may damage it. When the cleaning cycle is finished, you see a message on the LCD screen during a cleaning cycle or you want to run, then press one of the Start buttons to clean the print head. Select Head Cleaning and press the OK button.
User Guide
Page 253
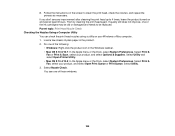
...8226; Windows: Right-click the product icon in the product. 2. Select Print & Fax, select your product, and select Options & Supplies. You see any improvement after cleaning the print head up to confirm that the print head is clean. Do one of the Start buttons to 4 times, leave the product ...• Mac OS X 10.6/10.7: In the Apple menu or the Dock, select System Preferences. Parent topic: Print Head Cleaning Related topics Replacing Ink Cartridges Cleaning the Print Head Using a Computer Utility You can clean the print head using a utility on and wait at least 6 hours. Select...
...8226; Windows: Right-click the product icon in the product. 2. Select Print & Fax, select your product, and select Options & Supplies. You see any improvement after cleaning the print head up to confirm that the print head is clean. Do one of the Start buttons to 4 times, leave the product ...• Mac OS X 10.6/10.7: In the Apple menu or the Dock, select System Preferences. Parent topic: Print Head Cleaning Related topics Replacing Ink Cartridges Cleaning the Print Head Using a Computer Utility You can clean the print head using a utility on and wait at least 6 hours. Select...

User Guide
Page 255
Select the cleaning cycle you may damage it. 6. Caution: Never turn off the product during a cleaning cycle or you want to see if there are clean; The On light flashes throughout the cleaning cycle and stays on the nozzle check pattern. 5. 4. click Print Nozzle Check Pattern and click Print. 7. Print head is finished. When the cleaning cycle is finished, you can check to run, based on when the cleaning cycle is clean 255 Check the printed pattern to begin the cleaning cycle. Click Start to see if the nozzles are gaps in the lines.
Select the cleaning cycle you may damage it. 6. Caution: Never turn off the product during a cleaning cycle or you want to see if there are clean; The On light flashes throughout the cleaning cycle and stays on the nozzle check pattern. 5. 4. click Print Nozzle Check Pattern and click Print. 7. Print head is finished. When the cleaning cycle is finished, you can check to run, based on when the cleaning cycle is clean 255 Check the printed pattern to begin the cleaning cycle. Click Start to see if the nozzles are gaps in the lines.
User Guide
Page 256
... the print head. Parent topic: Print Head Cleaning Related topics Replacing Ink Cartridges Print Head Alignment If your print head nozzles need to 4 times, leave the product turned on and wait at least 6 hours. Then try cleaning the print head again. Aligning the Print Head Using the Product Control Panel Aligning the Print Head Using a Computer Utility Parent topic: Adjusting Print Quality Related concepts Print Head Cleaning 256 Print head needs cleaning •...
... the print head. Parent topic: Print Head Cleaning Related topics Replacing Ink Cartridges Print Head Alignment If your print head nozzles need to 4 times, leave the product turned on and wait at least 6 hours. Then try cleaning the print head again. Aligning the Print Head Using the Product Control Panel Aligning the Print Head Using a Computer Utility Parent topic: Adjusting Print Quality Related concepts Print Head Cleaning 256 Print head needs cleaning •...

User Guide
Page 264
... down; Removing the cartridges can dry out the print head and may damage the product. 1. Turn off the product. 264 Parent topic: Cleaning and Transporting Your Product Related tasks Cleaning the Paper Path Transporting Your Product If you need to clean the rollers and the interior of the ADF. ...7. this may prevent the product from printing. • Do not carry the product by...
... down; Removing the cartridges can dry out the print head and may damage the product. 1. Turn off the product. 264 Parent topic: Cleaning and Transporting Your Product Related tasks Cleaning the Paper Path Transporting Your Product If you need to clean the rollers and the interior of the ADF. ...7. this may prevent the product from printing. • Do not carry the product by...

User Guide
Page 266
Lower the control panel by squeezing the release bar and gently pushing the panel down. Place the product in its original packing materials, if possible, or use equivalent materials with cushioning around the product. If print quality has declined when you may damage your product. 8. Keep the product level during transportation. Parent topic: Cleaning and Transporting Your Product Related concepts Print Head Cleaning Print Head Alignment 266 Caution: Do not lower the control panel without first squeezing the release bar or you print again, clean and align the print head. 7.
Lower the control panel by squeezing the release bar and gently pushing the panel down. Place the product in its original packing materials, if possible, or use equivalent materials with cushioning around the product. If print quality has declined when you may damage your product. 8. Keep the product level during transportation. Parent topic: Cleaning and Transporting Your Product Related concepts Print Head Cleaning Print Head Alignment 266 Caution: Do not lower the control panel without first squeezing the release bar or you print again, clean and align the print head. 7.
User Guide
Page 271
Parent topic: Solving Problems Related concepts Print Head Cleaning Print Head Alignment When to Uninstall Your Product Software Related references Where to Get Help Resetting Control Panel Defaults If you can choose which settings to reset ..., clean or align the print head. • If the page does not print, the product may have a problem with settings on the results of the product check: • If the page prints and the nozzle check pattern is complete, the product is operating properly. You can reset them all. 1. 7. If they do not work, contact Epson.
Parent topic: Solving Problems Related concepts Print Head Cleaning Print Head Alignment When to Uninstall Your Product Software Related references Where to Get Help Resetting Control Panel Defaults If you can choose which settings to reset ..., clean or align the print head. • If the page does not print, the product may have a problem with settings on the results of the product check: • If the page prints and the nozzle check pattern is complete, the product is operating properly. You can reset them all. 1. 7. If they do not work, contact Epson.

User Guide
Page 300
... sheet with special paper, or load special paper one sheet at a time. 300 Parent topic: Solving Print Quality Problems Related concepts Print Head Cleaning Print Head Alignment Related references Paper or Media Type Settings Related tasks Selecting Additional Layout and Print Options - Mac OS X 10.4 Related topics Loading Paper Replacing Ink Cartridges Blurry or Smeared Printout If...
... sheet with special paper, or load special paper one sheet at a time. 300 Parent topic: Solving Print Quality Problems Related concepts Print Head Cleaning Print Head Alignment Related references Paper or Media Type Settings Related tasks Selecting Additional Layout and Print Options - Mac OS X 10.4 Related topics Loading Paper Replacing Ink Cartridges Blurry or Smeared Printout If...

User Guide
Page 301
... will not operate properly while tilted at an angle. Parent topic: Solving Print Quality Problems Related concepts Print Head Cleaning Print Head Alignment Related references Available Epson Papers Paper Specifications Related tasks Selecting Basic Print Settings - Windows Selecting Basic Print Settings - Mac OS X 10.5/10.6/10.7 Selecting Basic Print Settings - If one side of heavily saturated or dark images. Windows...
... will not operate properly while tilted at an angle. Parent topic: Solving Print Quality Problems Related concepts Print Head Cleaning Print Head Alignment Related references Available Epson Papers Paper Specifications Related tasks Selecting Basic Print Settings - Windows Selecting Basic Print Settings - Mac OS X 10.5/10.6/10.7 Selecting Basic Print Settings - If one side of heavily saturated or dark images. Windows...


