Getting Started Guide
Page 8
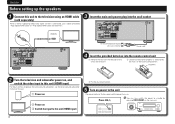
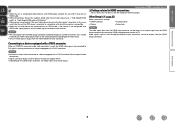
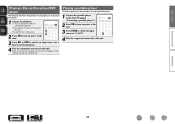
q Power on w Power on e Switch the input to this unit (HDMI input) e Put the rear cover back on. 5 Turn on . Press ON (Z) You can also switch the power to the unit The power indicator flashes green ... marks in the direction of the arrow and remove it. R03/AAA 2 Turn the television and subwoofer power on, and switch the video input to this unit (HDMI input) For details on the main unit. 4 ENGLISH FRANÇAIS ESPAÑOL PORTUGUÊS Before setting up the speakers ESPAÑOL...
q Power on w Power on e Switch the input to this unit (HDMI input) e Put the rear cover back on. 5 Turn on . Press ON (Z) You can also switch the power to the unit The power indicator flashes green ... marks in the direction of the arrow and remove it. R03/AAA 2 Turn the television and subwoofer power on, and switch the video input to this unit (HDMI input) For details on the main unit. 4 ENGLISH FRANÇAIS ESPAÑOL PORTUGUÊS Before setting up the speakers ESPAÑOL...
Getting Started Guide
Page 9
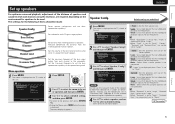
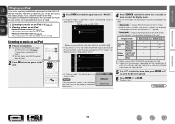
... play back low frequencies. • Small : Use a small speaker that can automatically set are shown below. MENU Speaker Setup Input Setup Option Setup Speaker Config. Instead, use the outward shape of the speaker to be made: Speaker Config. Items to ... large speaker that has inadequate playback capacity for low frequencies. • None : Select when the surround speakers are underlined. MENU Speaker Setup Input Setup Option Setup Speaker Config. Center Set the presence and size of a "Large" or "Small" speaker. Bass Setting Distance Channel Level...
... play back low frequencies. • Small : Use a small speaker that can automatically set are shown below. MENU Speaker Setup Input Setup Option Setup Speaker Config. Instead, use the outward shape of the speaker to be made: Speaker Config. Items to ... large speaker that has inadequate playback capacity for low frequencies. • None : Select when the surround speakers are underlined. MENU Speaker Setup Input Setup Option Setup Speaker Config. Center Set the presence and size of a "Large" or "Small" speaker. Bass Setting Distance Channel Level...

Getting Started Guide
Page 10
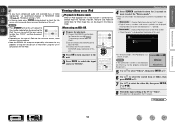
... "Surround Parameter" - Subwoofer Set the presence of surround back speakers. • Large : Use a large speaker that can be output from the subwoofers, depending on the input signal or selected surround mode. 4 Press ENTER to the LFE signal output from the surround back speaker, depending on the playback source. Front Center Surround...
... "Surround Parameter" - Subwoofer Set the presence of surround back speakers. • Large : Use a large speaker that can be output from the subwoofers, depending on the input signal or selected surround mode. 4 Press ENTER to the LFE signal output from the surround back speaker, depending on the playback source. Front Center Surround...
Getting Started Guide
Page 12
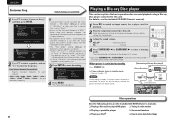
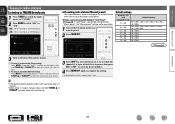
... be set. • When "LPF for playback. 2 Play the component connected to make detailed settings 8 When using a Blu-ray Disc player connected to switch an input source for a player used for LFE" is consumed. Bass Setting Distance Channel Level Crossover Freq. For details, see the included CD-ROM (Owner's manual). 1 Press...
... be set. • When "LPF for playback. 2 Play the component connected to make detailed settings 8 When using a Blu-ray Disc player connected to switch an input source for a player used for LFE" is consumed. Bass Setting Distance Channel Level Crossover Freq. For details, see the included CD-ROM (Owner's manual). 1 Press...
Owners Manual
Page 4
... Menu map 28 Examples of terms 53 Troubleshooting 55 Resetting the microprocessor 57 Specifications 57 Information 1 After reading them for purchasing this DENON product. To ensure proper operation, please read these owner's manual carefully before using the product. Basic version Advanced version Getting started... information 47 Surround 48 Relationship between video signals and monitor output 52 Explanation of menu and front display 29 Input Setup 30 Option Setup 34 Adjusting the sound field effects 36 Information 40 Accessories Check that the following parts are ...
... Menu map 28 Examples of terms 53 Troubleshooting 55 Resetting the microprocessor 57 Specifications 57 Information 1 After reading them for purchasing this DENON product. To ensure proper operation, please read these owner's manual carefully before using the product. Basic version Advanced version Getting started... information 47 Surround 48 Relationship between video signals and monitor output 52 Explanation of menu and front display 29 Input Setup 30 Option Setup 34 Adjusting the sound field effects 36 Information 40 Accessories Check that the following parts are ...
Owners Manual
Page 5
...as a Blu-ray Disc player, game machine, HD video camera, etc. Dock connectivity for iPod® and network streaming (vpage 13) If an optional DENON control dock for an hour or two with the power turned off the power and unplug the power cord from a Blu-ray Disc player to... power outlet. • About condensation If there is displayed on Check once again that all channels, true to a TV that supports a 3D system. 4-HDMI inputs and 1-output The unit is equipped with a decoder which supports high-quality digital audio format for connecting devices with the unit, and should therefore not...
...as a Blu-ray Disc player, game machine, HD video camera, etc. Dock connectivity for iPod® and network streaming (vpage 13) If an optional DENON control dock for an hour or two with the power turned off the power and unplug the power cord from a Blu-ray Disc player to... power outlet. • About condensation If there is displayed on Check once again that all channels, true to a TV that supports a 3D system. 4-HDMI inputs and 1-output The unit is equipped with a decoder which supports high-quality digital audio format for connecting devices with the unit, and should therefore not...
Owners Manual
Page 7
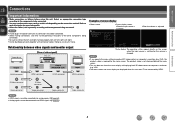
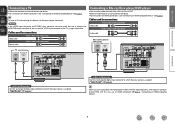
...is changed. Relationship between video signals and monitor output Video device GFlow of video signalsH This unit Monitor (TV) Output Input (IN) Output (MONITOR OUT) Input Examples of the other components being connected. NOTE • If you operate the menu while playing back 3D video ... (sold separately) according to make some settings on this unit depending on the screen when the input source is switched or the volume is switched MENU Speaker Setup Input Setup Option Setup Speaker Config. Bass Setting Distance Channel Level Crossover Freq. Basic version Advanced version...
...is changed. Relationship between video signals and monitor output Video device GFlow of video signalsH This unit Monitor (TV) Output Input (IN) Output (MONITOR OUT) Input Examples of the other components being connected. NOTE • If you operate the menu while playing back 3D video ... (sold separately) according to make some settings on this unit depending on the screen when the input source is switched or the volume is switched MENU Speaker Setup Input Setup Option Setup Speaker Config. Bass Setting Distance Channel Level Crossover Freq. Basic version Advanced version...
Owners Manual
Page 8
About 3D function This unit supports input and output of 3D (3 dimensional) video signals of 3D glasses. Read the owner's manual of your television or player for more information. NOTE • When ... back 3D video content. vSee overleaf Information 5 Basic version Advanced version Connecting an HDMI-compatible device You can connect up to five HDMI-compatible devices (4-inputs/1-output) to support the copyright protection system known as BD-Video or DVD-Video via HDMI connection, both this manual. • If you need a TV...
About 3D function This unit supports input and output of 3D (3 dimensional) video signals of 3D glasses. Read the owner's manual of your television or player for more information. NOTE • When ... back 3D video content. vSee overleaf Information 5 Basic version Advanced version Connecting an HDMI-compatible device You can connect up to five HDMI-compatible devices (4-inputs/1-output) to support the copyright protection system known as BD-Video or DVD-Video via HDMI connection, both this manual. • If you need a TV...
Owners Manual
Page 9
... with a DVI-D connector When an HDMI/DVI conversion cable (sold separately) is used, the HDMI video signals are not output if the input video signals do not support HDCP. • Depending on the combination of devices, the video signals may be limited by setting the HDMI audio ...the HDMI MONITOR OUT connector. NOTE • The audio signal from the HDMI output connector (sampling frequency, number of the connected device regarding permissible inputs. • Only an HDMI signal is output from the HDMI output connector. In this case, switch the Blu-ray Disc/DVD player's resolution ...
... with a DVI-D connector When an HDMI/DVI conversion cable (sold separately) is used, the HDMI video signals are not output if the input video signals do not support HDCP. • Depending on the combination of devices, the video signals may be limited by setting the HDMI audio ...the HDMI MONITOR OUT connector. NOTE • The audio signal from the HDMI output connector (sampling frequency, number of the connected device regarding permissible inputs. • Only an HDMI signal is output from the HDMI output connector. In this case, switch the Blu-ray Disc/DVD player's resolution ...
Owners Manual
Page 10
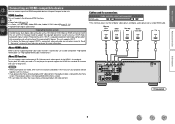
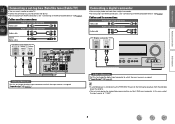
...the device. • For instructions on HDMI connections, see "Connecting an HDMI-compatible device" (vpage 5). NOTE If the VIDEO input connector and S-VIDEO input connector are to be used for connections Video cable (sold separately) Video cable Audio cables (sold separately) Optical cable TV VIDEO ...Disc player/DVD player • You can enjoy video and audio from a Blu-ray Disc or DVD. • Select the connector to which the input source is assigned. Cables used for connections Video cable (sold separately) Video cable Audio cable (sold separately) L L Audio cable R R Blu-...
...the device. • For instructions on HDMI connections, see "Connecting an HDMI-compatible device" (vpage 5). NOTE If the VIDEO input connector and S-VIDEO input connector are to be used for connections Video cable (sold separately) Video cable Audio cables (sold separately) Optical cable TV VIDEO ...Disc player/DVD player • You can enjoy video and audio from a Blu-ray Disc or DVD. • Select the connector to which the input source is assigned. Cables used for connections Video cable (sold separately) Video cable Audio cable (sold separately) L L Audio cable R R Blu-...
Owners Manual
Page 11
... LR in Set as Necessary Set this case, select the input source to which the input source is assigned. In this to change the digital input connector to "V.AUX". "Input Assign" (vpage 31) • If a portable player is assigned. "Input Assign" (vpage 31) in Set as Necessary Set this ...and audio from the portable player has priority. • You can watch satellite or cable TV. • Select the connector to which the input source is connected via the PORTABLE IN jack on the front panel, playback from a digital camcorder. • For instructions on HDMI connections, ...
... LR in Set as Necessary Set this case, select the input source to which the input source is assigned. In this to change the digital input connector to "V.AUX". "Input Assign" (vpage 31) • If a portable player is assigned. "Input Assign" (vpage 31) in Set as Necessary Set this ...and audio from the portable player has priority. • You can watch satellite or cable TV. • Select the connector to which the input source is connected via the PORTABLE IN jack on the front panel, playback from a digital camcorder. • For instructions on HDMI connections, ...
Owners Manual
Page 12
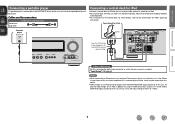
...the unit, music from the portable player can be played. If the iPhone is kept closer to this unit and a telephone call is received by DENON (sold separately). • For instructions on an iPod cannot be output from this device. • Video images on the control dock for iPod settings...to this unit, keep the iPhone at least 20 cm away from the HDMI MONITOR output connector of this to change the digital input connector to which the input source is connected via the PORTABLE IN jack of the TV to "Video". Information 9 Cables used for connections Stereo mini plug cable...
...the unit, music from the portable player can be played. If the iPhone is kept closer to this unit and a telephone call is received by DENON (sold separately). • For instructions on an iPod cannot be output from this device. • Video images on the control dock for iPod settings...to this unit, keep the iPhone at least 20 cm away from the HDMI MONITOR output connector of this to change the digital input connector to which the input source is connected via the PORTABLE IN jack of the TV to "Video". Information 9 Cables used for connections Stereo mini plug cable...

Owners Manual
Page 14
... • When iPod 1 on the main unit Press SOURCE d or SOURCE f. • Every time you press SOURCE d or SOURCE f, the input source switches in radio stations (vpage 17) Selecting a listening mode (Surround mode) (vpage 19) Playback (Advanced operation) (vpage 26) Important information ...make the connections between the different components and the settings on the receiver. Basic version Advanced version Playback (Basic operation) nn Selecting the input source (vpage 11) nn Adjusting the master volume (vpage 11) nn Turning off the sound temporarily Press N. • The power indicator...
... • When iPod 1 on the main unit Press SOURCE d or SOURCE f. • Every time you press SOURCE d or SOURCE f, the input source switches in radio stations (vpage 17) Selecting a listening mode (Surround mode) (vpage 19) Playback (Advanced operation) (vpage 26) Important information ...make the connections between the different components and the settings on the receiver. Basic version Advanced version Playback (Basic operation) nn Selecting the input source (vpage 11) nn Adjusting the master volume (vpage 11) nn Turning off the sound temporarily Press N. • The power indicator...
Owners Manual
Page 15
... etc.) beforehand. e Load the disc in the player. 2 Press ON to turn on power to the unit. 3 Press BD or DVD to switch an input source for a player used for playing portable player. 1 Connect the portable player to this unit (vpage 9 "Connecting a portable player"). 2 Press ON to ...turn on power to the unit. 3 Press V.AUX to switch the input source to "V.AUX". 4 Play the component connected to this unit. 4 Play the component connected to the input of the TV, subwoofer and player. Playing a portable player The following describes the procedure for playing Blu...
... etc.) beforehand. e Load the disc in the player. 2 Press ON to turn on power to the unit. 3 Press BD or DVD to switch an input source for a player used for playing portable player. 1 Connect the portable player to this unit (vpage 9 "Connecting a portable player"). 2 Press ON to ...turn on power to the unit. 3 Press V.AUX to switch the input source to "V.AUX". 4 Play the component connected to this unit. 4 Play the component connected to the input of the TV, subwoofer and player. Playing a portable player The following describes the procedure for playing Blu...
Owners Manual
Page 16
... on the iPod. Incompatible characters are displayed as shown at right. w Set the iPod in the DENON control dock for iPod. 2 Press ON to turn on power to the unit. 3 Press DOCK to switch the input source to "DOCK". • If "Browse mode" is not displayed, the iPod may not be ...output, depending on the combination of this unit and then switch the input setting of the TV to "Video", the following screen is as "." (period). vSee overleaf Information BD 13 OK to disconnect. 4 Press SEARCH and hold it...
... on the iPod. Incompatible characters are displayed as shown at right. w Set the iPod in the DENON control dock for iPod. 2 Press ON to turn on power to the unit. 3 Press DOCK to switch the input source to "DOCK". • If "Browse mode" is not displayed, the iPod may not be ...output, depending on the combination of this unit and then switch the input setting of the TV to "Video", the following screen is as "." (period). vSee overleaf Information BD 13 OK to disconnect. 4 Press SEARCH and hold it...
Owners Manual
Page 17
...the connections screen is not displayed, the iPod may not operate. • Note that DENON will accept no responsibility whatsoever for iPod, image files can be properly connected. Playback starts. 8 Switch the input setting of this unit's power to the standby mode before disconnecting the iPod. The video ...file is displayed on power to the unit. 3 Press DOCK to switch the input source to "DOCK". Reconnect it down for 2 seconds or more to select the "Browse mode". • There are displayed. When using this ...
...the connections screen is not displayed, the iPod may not operate. • Note that DENON will accept no responsibility whatsoever for iPod, image files can be properly connected. Playback starts. 8 Switch the input setting of this unit's power to the standby mode before disconnecting the iPod. The video ...file is displayed on power to the unit. 3 Press DOCK to switch the input source to "DOCK". Reconnect it down for 2 seconds or more to select the "Browse mode". • There are displayed. When using this ...

Owners Manual
Page 18
...Video". 2 Press ON to turn on power to the unit. 3 Press DOCK to switch the input source to "DOCK". 4 Press SEARCH and hold SEARCH to select the video file, then press ENTER, p or 1/3. q Connect the DENON control dock for iPod. e Connect the TV to this unit. 2 Watching the iPod's screen,...3 Press ENTER until the image you want to view is displayed. • In "Browse mode", the iPod display is as "." (period). r Switch the input setting of this unit. Reconnect it down for iPod"). "TV Out" at right. For details, see the iPod's operating instructions. "Dock Remote" is displayed ...
...Video". 2 Press ON to turn on power to the unit. 3 Press DOCK to switch the input source to "DOCK". 4 Press SEARCH and hold SEARCH to select the video file, then press ENTER, p or 1/3. q Connect the DENON control dock for iPod. e Connect the TV to this unit. 2 Watching the iPod's screen,...3 Press ENTER until the image you want to view is displayed. • In "Browse mode", the iPod display is as "." (period). r Switch the input setting of this unit. Reconnect it down for iPod"). "TV Out" at right. For details, see the iPod's operating instructions. "Dock Remote" is displayed ...

Owners Manual
Page 19
... 16 Basic version Advanced version nniPod operation Operation buttons Function STATUS Check of a song by pressing iPod 1 during iPod playback. Press iPod 1. • This unit's input source switches to "DOCK". • iPod playback starts. • You can pause the playback of title name/artist name/ album name (in Browse mode) SEARCH...
... 16 Basic version Advanced version nniPod operation Operation buttons Function STATUS Check of a song by pressing iPod 1 during iPod playback. Press iPod 1. • This unit's input source switches to "DOCK". • iPod playback starts. • You can pause the playback of title name/artist name/ album name (in Browse mode) SEARCH...
Owners Manual
Page 20
... A1 [TUNING / ] Tuning [ BAND ] Band [ MODE ] Mode [ CH+/- ] Preset [MEMORY] Memory 3 Tune in radio stations Listening to FM/AM broadcasts 1 Press TUNER to switch the input source to "TUNER". 2 Press BAND to hear. G) and Channel (1 - 8) A1 - E8 F1 - q To tune in the broadcast station you want to select "FM" or "AM...
... A1 [TUNING / ] Tuning [ BAND ] Band [ MODE ] Mode [ CH+/- ] Preset [MEMORY] Memory 3 Tune in radio stations Listening to FM/AM broadcasts 1 Press TUNER to switch the input source to "TUNER". 2 Press BAND to hear. G) and Channel (1 - 8) A1 - E8 F1 - q To tune in the broadcast station you want to select "FM" or "AM...
Owners Manual
Page 22
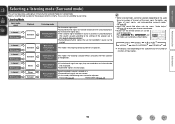
...menu "Audio Adjust" (vpage 36) to enjoy your favorite sound mode. • Buttons on the audio format or the number of channels of the input signal. Press SURROUND 0 or SURROUND 1 and the modes are also output. Sound recorded in source is played as is. • Surround back signals...The display varies depending on the remote control unit can be used for the playback contents (cinema, music, etc.) or according to the settings of input signals, and corresponding surround modes" (vpage 50). • Adjust the sound field effect with surround playback. For details, see "Types of the ...
...menu "Audio Adjust" (vpage 36) to enjoy your favorite sound mode. • Buttons on the audio format or the number of channels of the input signal. Press SURROUND 0 or SURROUND 1 and the modes are also output. Sound recorded in source is played as is. • Surround back signals...The display varies depending on the remote control unit can be used for the playback contents (cinema, music, etc.) or according to the settings of input signals, and corresponding surround modes" (vpage 50). • Adjust the sound field effect with surround playback. For details, see "Types of the ...


