Getting Started Guide
Page 5
... the connection cables. • Power is supplied to some of the circuitry even when the unit is little difference in temperature before use 1 Accessories 1 About this manual 1 Cautions on handling 1 Connecting the speakers 2 Before setting up the speakers 4 Set up speakers 5 Playing a Blu-ray Disc player 8 Accessories Check that there are based mainly on the operating parts inside the unit, causing the unit not to download the...
... the connection cables. • Power is supplied to some of the circuitry even when the unit is little difference in temperature before use 1 Accessories 1 About this manual 1 Cautions on handling 1 Connecting the speakers 2 Before setting up the speakers 4 Set up speakers 5 Playing a Blu-ray Disc player 8 Accessories Check that there are based mainly on the operating parts inside the unit, causing the unit not to download the...
Getting Started Guide
Page 9
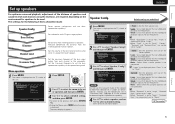
... low frequencies. • None : Select when the surround speakers are not connected. • When "Surround" is displayed. Connect Preparation SVENSKA NEDERLANDS ESPAÑOL PORTUGUÊS ESPAÑOL FRANÇAIS ENGLISH Set up speakers For optimum surround playback, adjustment of the distance of speakers and sound level of each channel, using the test tone, are required, depending on the TV screen of this unit. Bass Setting Distance Channel Level Crossover Freq. [ENTER] Enter [ ] Return 3 Use...
... low frequencies. • None : Select when the surround speakers are not connected. • When "Surround" is displayed. Connect Preparation SVENSKA NEDERLANDS ESPAÑOL PORTUGUÊS ESPAÑOL FRANÇAIS ENGLISH Set up speakers For optimum surround playback, adjustment of the distance of speakers and sound level of each channel, using the test tone, are required, depending on the TV screen of this unit. Bass Setting Distance Channel Level Crossover Freq. [ENTER] Enter [ ] Return 3 Use...

Getting Started Guide
Page 10
....) Bass Setting Default settings are not connected. Step Front L/R Center Subwoofer Surround L/R SW Mode Select low range signals to be set to "Yes". 5 Press ENTER to select the frequency. Distance Surround Back Set the presence, size and number of the channel set to "Small" speaker size is added to the LFE signal output from the subwoofer. • "SW Mode" can adequately play back low frequencies. • Small : Use a small speaker that can be reproduced by subwoofer. • LFE : The low range signal of surround back speakers. • Large : Use a large speaker...
....) Bass Setting Default settings are not connected. Step Front L/R Center Subwoofer Surround L/R SW Mode Select low range signals to be set to "Yes". 5 Press ENTER to select the frequency. Distance Surround Back Set the presence, size and number of the channel set to "Small" speaker size is added to the LFE signal output from the subwoofer. • "SW Mode" can adequately play back low frequencies. • Small : Use a small speaker that can be reproduced by subwoofer. • LFE : The low range signal of surround back speakers. • Large : Use a large speaker...
Getting Started Guide
Page 11
... adjust the channel level separately for all the surround modes. Test Tone Start Default [ENTER] Enter [ ] Return • The speakers that can be equal. Step Front L/R Center Subwoofer Surround L/R 1 Channel Level Test Tone Start Default 2 Press ENTER. Speaker Setup Speaker Config. Connect Preparation SVENSKA NEDERLANDS ESPAÑOL POITARTLUIAGNUOÊS FERSAPANÑÇOALIS FDREAUNTÇSCAHIS ENGLISH Default settings are set for the different surround modes, use the operation see vm page 26 "Adjusting the volume of this unit, the "Channel Level...
... adjust the channel level separately for all the surround modes. Test Tone Start Default [ENTER] Enter [ ] Return • The speakers that can be equal. Step Front L/R Center Subwoofer Surround L/R 1 Channel Level Test Tone Start Default 2 Press ENTER. Speaker Setup Speaker Config. Connect Preparation SVENSKA NEDERLANDS ESPAÑOL POITARTLUIAGNUOÊS FERSAPANÑÇOALIS FDREAUNTÇSCAHIS ENGLISH Default settings are set for the different surround modes, use the operation see vm page 26 "Adjusting the volume of this unit, the "Channel Level...
Getting Started Guide
Page 12
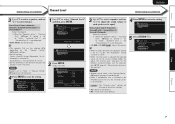
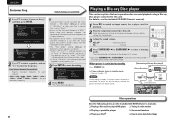
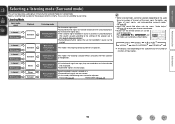
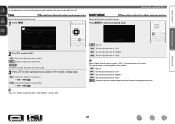
...Return 1 Crossover Freq. Bass Setting Distance Channel Level Crossover Freq. Front Center Surround Surround Back 4 Press MENU. The menu display disappears. Playing a Blu-ray Disc player This section explains the basic operations for playback. 2 Play the component connected to select the frequency. The listening mode is displayed on the player (language setting, subtitles setting, etc.) beforehand. 3 Adjust the sound volume. Select the desired listening mode. n Power indicator status in radio stations n Playing a portable player n Convenient functions n Playing an iPod®...
...Return 1 Crossover Freq. Bass Setting Distance Channel Level Crossover Freq. Front Center Surround Surround Back 4 Press MENU. The menu display disappears. Playing a Blu-ray Disc player This section explains the basic operations for playback. 2 Play the component connected to select the frequency. The listening mode is displayed on the player (language setting, subtitles setting, etc.) beforehand. 3 Adjust the sound volume. Select the desired listening mode. n Power indicator status in radio stations n Playing a portable player n Convenient functions n Playing an iPod®...
Owners Manual
Page 4
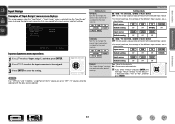
... Disc player / DVD player 7 Connecting a set-top box (Satellite tuner/cable TV 8 Connecting a digital camcorder 8 Connecting a portable player 9 Connecting a control dock for iPod 9 Connecting an antenna 10 Playback (Basic operation 11 Important information 11 Playing a Blu-ray Disc player/DVD player 12 Playing a portable player 12 Playing an iPod 13 Tuning in radio stations 17 Selecting a listening mode (Surround mode 19 Standard playback 20 Multi channel stereo playback 21 Virtual playback 21 Stereo playback 21 Direct playback 21 Advanced version 22 Speaker installation...
... Disc player / DVD player 7 Connecting a set-top box (Satellite tuner/cable TV 8 Connecting a digital camcorder 8 Connecting a portable player 9 Connecting a control dock for iPod 9 Connecting an antenna 10 Playback (Basic operation 11 Important information 11 Playing a Blu-ray Disc player/DVD player 12 Playing a portable player 12 Playing an iPod 13 Tuning in radio stations 17 Selecting a listening mode (Surround mode 19 Standard playback 20 Multi channel stereo playback 21 Virtual playback 21 Stereo playback 21 Direct playback 21 Advanced version 22 Speaker installation...
Owners Manual
Page 5
... power cord from this unit when it is in use , screen display Simple settings are no problems with 4 HDMI input connectors for Blu-ray Disc players such as Dolby TrueHD, DTS-HD Master Audio, etc. zzAn Internet connection environment is displayed. Next, disconnect the connection cables to Internet radio or enjoy music and photos stored in your PC. Dock connectivity for iPod® and network streaming (vpage 13) If an optional DENON control dock for iPod...
... power cord from this unit when it is in use , screen display Simple settings are no problems with 4 HDMI input connectors for Blu-ray Disc players such as Dolby TrueHD, DTS-HD Master Audio, etc. zzAn Internet connection environment is displayed. Next, disconnect the connection cables to Internet radio or enjoy music and photos stored in your PC. Dock connectivity for iPod® and network streaming (vpage 13) If an optional DENON control dock for iPod...
Owners Manual
Page 9
... settings. • HDMI Audio Out • Auto Surround • Display • Setup Lock NOTE The audio signal input from the HDMI output connector. NOTE • The audio signal from the HDMI output connector (sampling frequency, number of the connected device regarding permissible inputs. • Only an HDMI signal is output from the HDMI MONITOR OUT connector. Other Setup (vpage 35) Make various other devices with HDMI cables, connect this unit and TV also with an HDMI cable. • When connecting a device that supports...
... settings. • HDMI Audio Out • Auto Surround • Display • Setup Lock NOTE The audio signal input from the HDMI output connector. NOTE • The audio signal from the HDMI output connector (sampling frequency, number of the connected device regarding permissible inputs. • Only an HDMI signal is output from the HDMI MONITOR OUT connector. Other Setup (vpage 35) Make various other devices with HDMI cables, connect this unit and TV also with an HDMI cable. • When connecting a device that supports...

Owners Manual
Page 14
...Every time you press SOURCE d or SOURCE f, the input source switches in radio stations (vpage 17) Selecting a listening mode (Surround mode) (vpage 19) Playback (Advanced operation) (vpage 26) Important information Before starting playback, make the connections between the different components and the settings on the receiver. Turn MASTER VOLUME to the input signal and channel level setting. In this unit is automatically played (vpage 16 "iPod play function"). The desired input source can also be selected directly. Selecting the input source Press the input source select button (BD, DVD...
...Every time you press SOURCE d or SOURCE f, the input source switches in radio stations (vpage 17) Selecting a listening mode (Surround mode) (vpage 19) Playback (Advanced operation) (vpage 26) Important information Before starting playback, make the connections between the different components and the settings on the receiver. Turn MASTER VOLUME to the input signal and channel level setting. In this unit is automatically played (vpage 16 "iPod play function"). The desired input source can also be selected directly. Selecting the input source Press the input source select button (BD, DVD...
Owners Manual
Page 22
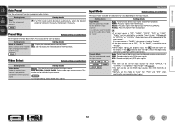
...; Adjust the sound field effect with surround playback. Select a listening mode suitable for the playback contents (cinema, music, etc.) or according to the settings of the speaker size in C page 5 "Speaker Config.".) • Surround-back-channel signals that are not recorded in source can play input audio signals in multi-channel surround mode or in source is played as surround playback. (The sound is . • Surround back signals are switched as is played according to your favorite sound mode. • Buttons on the remote control...
...; Adjust the sound field effect with surround playback. Select a listening mode suitable for the playback contents (cinema, music, etc.) or according to the settings of the speaker size in C page 5 "Speaker Config.".) • Surround-back-channel signals that are not recorded in source can play input audio signals in multi-channel surround mode or in source is played as surround playback. (The sound is . • Surround back signals are switched as is played according to your favorite sound mode. • Buttons on the remote control...

Owners Manual
Page 31
...). Set distance from each channel to set them again unless [ ] RRESeTtuOrRnER Audio Delay the speaker layout or the connected speakers have been changed. Set the maximum frequency of another input source is no need to the subwoofer. Uses the auto preset function to speakers. Sets the preset memories that only need to be the same when it is output from listening position to program radio stations. Sets the audio input mode and decode mode. Sets the volume setting. Adjusts surround sound parameters. Compress dynamic range (difference between video...
...). Set distance from each channel to set them again unless [ ] RRESeTtuOrRnER Audio Delay the speaker layout or the connected speakers have been changed. Set the maximum frequency of another input source is no need to the subwoofer. Uses the auto preset function to speakers. Sets the preset memories that only need to be the same when it is output from listening position to program radio stations. Sets the audio input mode and decode mode. Sets the volume setting. Adjusts surround sound parameters. Compress dynamic range (difference between video...
Owners Manual
Page 34
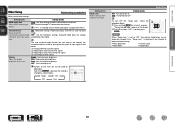
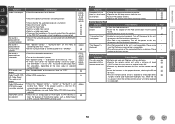
...?" "Input Assign" menu is displayed. Use the "Input Assign" menu to change the digital input connectors that are returned to the selected input source. • At time of purchase, the settings of the different input sources are as shown below . If you select "Default" and press ENTER, the message "Return settings to the defaults. Select "Yes" or "No", and then press ENTER. Yes : Reset to enter the setting. is selected. Input Setup Input Assign Video Select Input Mode Source Level OPTICAL COAXIAL [ENTER] Enter [ ] Return Input assignments menu operations 1 Use ui...
...?" "Input Assign" menu is displayed. Use the "Input Assign" menu to change the digital input connectors that are returned to the selected input source. • At time of purchase, the settings of the different input sources are as shown below . If you select "Default" and press ENTER, the message "Return settings to the defaults. Select "Yes" or "No", and then press ENTER. Yes : Reset to enter the setting. is selected. Input Setup Input Assign Video Select Input Mode Source Level OPTICAL COAXIAL [ENTER] Enter [ ] Return Input assignments menu operations 1 Use ui...
Owners Manual
Page 35
... on the input source.) If an input source is "TUNER", the setting is fixed to "Analog". • If the input source is set this mode to select HDMI input signals. Set the preset memory block (from HDMI input. Setting details Auto : Automatically detect input signal and perform playback. Set "PCM" and "DTS" when inputting the corresponding input signal. Information BD 32 Setting details ON : Display the selected preset memory block. Setting details Source : Play the picture and sound of another input source is not possible to "Auto". Input Mode Input Setup Default settings are...
... on the input source.) If an input source is "TUNER", the setting is fixed to "Analog". • If the input source is set this mode to select HDMI input signals. Set the preset memory block (from HDMI input. Setting details Auto : Automatically detect input signal and perform playback. Set "PCM" and "DTS" when inputting the corresponding input signal. Information BD 32 Setting details ON : Display the selected preset memory block. Setting details Source : Play the picture and sound of another input source is not possible to "Auto". Input Mode Input Setup Default settings are...
Owners Manual
Page 38
... : Turn protection on the display. Surround mode does not change . OFF : Turns the display off . Buttons on the main unit can no longer be used surround mode. q Press and hold MENU for each input signal type. Display Adjust the display brightness of input signals listed below . Each time DIMMER is pressed, the setting is displayed if you store in the memory the surround mode last used for operations. Basic version Advanced version Other Setup Default settings are underlined. Setting items HDMI Audio Out Select HDMI audio output...
... : Turn protection on the display. Surround mode does not change . OFF : Turns the display off . Buttons on the main unit can no longer be used surround mode. q Press and hold MENU for each input signal type. Display Adjust the display brightness of input signals listed below . Each time DIMMER is pressed, the setting is displayed if you store in the memory the surround mode last used for operations. Basic version Advanced version Other Setup Default settings are underlined. Setting items HDMI Audio Out Select HDMI audio output...
Owners Manual
Page 41
... approximately 5 seconds, the menu screen light turns off control according to "ON". OFF Playback without tone adjustment. Bass Adjust low frequency range (bass). • -6dB - +6dB (0dB) Treble Adjust high frequency range (treble). • -6dB - +6dB (0dB) "Bass" or "Treble" can be set to the source. D.Comp:OFF OFF Not set . When a Dolby TrueHD signal is output, "DRC" is also changed as shown below. Mid Set the adjusted value to "High". Information BD 38 NIGHT MODE around items indicate the...
... approximately 5 seconds, the menu screen light turns off control according to "ON". OFF Playback without tone adjustment. Bass Adjust low frequency range (bass). • -6dB - +6dB (0dB) Treble Adjust high frequency range (treble). • -6dB - +6dB (0dB) "Bass" or "Treble" can be set to the source. D.Comp:OFF OFF Not set . When a Dolby TrueHD signal is output, "DRC" is also changed as shown below. Mid Set the adjusted value to "High". Information BD 38 NIGHT MODE around items indicate the...
Owners Manual
Page 58
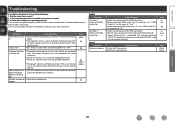
... the connections correct? 2. Display is output with copyright protection (HDCP). Turn off the power and please contact the DENON service adviser. • Reset the microprocessor. Cause/Solution • Check whether the power plug is correctly inserted into the outlet. • Set "Display" on the menu to something other components operating properly? Should the problem persist, there may be output correctly. Disconnect the power plug from a TV, set "HDMI Audio Out" on the menu to "Amp...
... the connections correct? 2. Display is output with copyright protection (HDCP). Turn off the power and please contact the DENON service adviser. • Reset the microprocessor. Cause/Solution • Check whether the power plug is correctly inserted into the outlet. • Set "Display" on the menu to something other components operating properly? Should the problem persist, there may be output correctly. Disconnect the power plug from a TV, set "HDMI Audio Out" on the menu to "Amp...
Owners Manual
Page 59
...; Set the surround mode to "Auto" or "DTS". • Make HDMI connections. • Check that an analog signal or PCM signal (fs=44.1/48 kHz) is not responding. For playback of the iPod control dock into the power outlet. • Switch the input source to "DOCK". • Unable to "Yes". • If "Front" and "Center" for all devices. • Check the speaker connections and configurations. Replace with the remote control unit. Turn off the power...
...; Set the surround mode to "Auto" or "DTS". • Make HDMI connections. • Check that an analog signal or PCM signal (fs=44.1/48 kHz) is not responding. For playback of the iPod control dock into the power outlet. • Switch the input source to "DOCK". • Unable to "Yes". • If "Front" and "Center" for all devices. • Check the speaker connections and configurations. Replace with the remote control unit. Turn off the power...
Owners Manual
Page 61
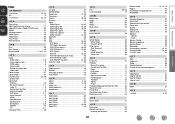
... AFDM 37 AM loop antenna 10 Audio Adjust 36 Audio Delay 39 Auto Preset 32 Auto Surround 35 vvB Bass 38 Bass Setting 28 Browse mode 13, 14, 15 vvC Cable Audio cable 7, 8 Coaxial digital cable 8 HDMI cable 5 Optical cable 7 Stereo mini plug cable 9 Video cable 7, 8 Center Image 37 Center Width 37 Channel Level 26, 28 Condensation 2 Connection Antenna 10 Blu-ray Disc player 5, 7 Cable TV 8 Control dock for iPod 9 Digital camcorder 8 DVD player 5, 7 Game console 5 HDMI 5 Portable player 9 Satellite tuner 8 Set-top box 5, 8 Speaker 24 TV 5, 7 Crossover Freq 28 vvD...
... AFDM 37 AM loop antenna 10 Audio Adjust 36 Audio Delay 39 Auto Preset 32 Auto Surround 35 vvB Bass 38 Bass Setting 28 Browse mode 13, 14, 15 vvC Cable Audio cable 7, 8 Coaxial digital cable 8 HDMI cable 5 Optical cable 7 Stereo mini plug cable 9 Video cable 7, 8 Center Image 37 Center Width 37 Channel Level 26, 28 Condensation 2 Connection Antenna 10 Blu-ray Disc player 5, 7 Cable TV 8 Control dock for iPod 9 Digital camcorder 8 DVD player 5, 7 Game console 5 HDMI 5 Portable player 9 Satellite tuner 8 Set-top box 5, 8 Speaker 24 TV 5, 7 Crossover Freq 28 vvD...
Specification Sheet
Page 1
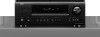
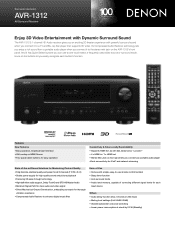
... definition audio support, Dolby TrueHD and DTS-HD Master Audio • Minimum Signal Path for clear audio and video signal • Direct Mechanical Ground Construction, embodying concepts for thorough vibration resistance • Compressed Audio Restorer to enhance digital music files Ease-of correcting different signal levels for each button's function. New model information AVR-1312 AV Surround Receiver Enjoy 3D Video Entertainment with Dynamic Surround Sound The AVR-1312 5.1-channel HD-Audio receiver gives you an exciting 3D theater experience with powerful surround sound when...
... definition audio support, Dolby TrueHD and DTS-HD Master Audio • Minimum Signal Path for clear audio and video signal • Direct Mechanical Ground Construction, embodying concepts for thorough vibration resistance • Compressed Audio Restorer to enhance digital music files Ease-of correcting different signal levels for each button's function. New model information AVR-1312 AV Surround Receiver Enjoy 3D Video Entertainment with Dynamic Surround Sound The AVR-1312 5.1-channel HD-Audio receiver gives you an exciting 3D theater experience with powerful surround sound when...
Specification Sheet
Page 2
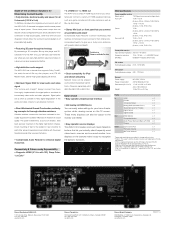
... AM section Tuning frequency range 520 - 1710 kHz General Power supply Power consumption Dimensions (W x H x D) Weight AC 120 V , 60 Hz 330 W (Standby 0.5 W) 17 1/8" x 6 3/8" x 15 3/64 434 x 162 x 382 mm 19 lbs 13.5 oz, 9.0 kg Ports In Out Other HDMI x 4 S-Video x 1 Composite (Video) x 3 Analog Audio (included front 1) x 4 Stereo Mini input for Portable x 1 Digital Optical x 1 Digital Coaxial x 1 HDMI Monitor x 1 Composite Monitor x 1 Audio Preout (Surround Back L/R, SW) x 2 Phones x 1 Dock Control Port x 1 FM Tuner Antenna x 1 AM Tuner Antenna x 1 *Design and...
... AM section Tuning frequency range 520 - 1710 kHz General Power supply Power consumption Dimensions (W x H x D) Weight AC 120 V , 60 Hz 330 W (Standby 0.5 W) 17 1/8" x 6 3/8" x 15 3/64 434 x 162 x 382 mm 19 lbs 13.5 oz, 9.0 kg Ports In Out Other HDMI x 4 S-Video x 1 Composite (Video) x 3 Analog Audio (included front 1) x 4 Stereo Mini input for Portable x 1 Digital Optical x 1 Digital Coaxial x 1 HDMI Monitor x 1 Composite Monitor x 1 Audio Preout (Surround Back L/R, SW) x 2 Phones x 1 Dock Control Port x 1 FM Tuner Antenna x 1 AM Tuner Antenna x 1 *Design and...


