Getting Started Guide
Page 5
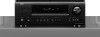
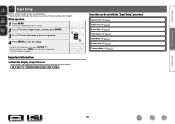
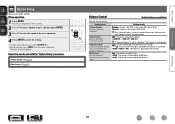
...) • Before turning the power switch on Check once again that all connections are correct and that the following parts are supplied with the product. Setup Playback 1 q Getting Started 1 w CD-ROM (Owner's manual 1 e Warranty (for North America model only 1 r Service network list 1 t Remote control unit (RC-1158 1 y... to the standby mode. This manual explains the removal of time, be used. When going on vacation or leaving home for purchasing this DENON product. If this happens, let the unit sit for an hour or two with a soft cloth. • Follow the instructions when...
...) • Before turning the power switch on Check once again that all connections are correct and that the following parts are supplied with the product. Setup Playback 1 q Getting Started 1 w CD-ROM (Owner's manual 1 e Warranty (for North America model only 1 r Service network list 1 t Remote control unit (RC-1158 1 y... to the standby mode. This manual explains the removal of time, be used. When going on vacation or leaving home for purchasing this DENON product. If this happens, let the unit sit for an hour or two with a soft cloth. • Follow the instructions when...

Getting Started Guide
Page 7
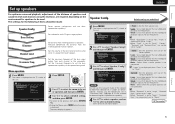
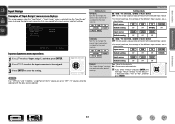
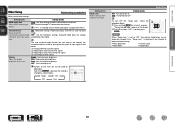
... or terminate it. Doing so could result in electric shock. • Use speakers with the speaker impedances shown below. Connect FL SW FR C SL SR Setup Playback 3 The protection circuit may be sure to the this unit, and be activated if the core wires touch the rear panel or if the...
... or terminate it. Doing so could result in electric shock. • Use speakers with the speaker impedances shown below. Connect FL SW FR C SL SR Setup Playback 3 The protection circuit may be sure to the this unit, and be activated if the core wires touch the rear panel or if the...
Getting Started Guide
Page 9
..."Speaker Config.", and then press ENTER. 1 Speaker Config. "Large" is not displayed when "Front" is displayed. vSee overleaf Setup Playback 5 The menu is displayed on the TV screen of each speaker. Surround Set the presence and size of this unit. The menu... has inadequate playback capacity for low frequencies. • When "Subwoofer" is set to "No", "Front" is automatically set to "None". Speaker Setup Speaker Config. Instead, use the frequencies set to "Small". Default settings are required, depending on the TV screen of the surround speakers. •...
..."Speaker Config.", and then press ENTER. 1 Speaker Config. "Large" is not displayed when "Front" is displayed. vSee overleaf Setup Playback 5 The menu is displayed on the TV screen of each speaker. Surround Set the presence and size of this unit. The menu... has inadequate playback capacity for low frequencies. • When "Subwoofer" is set to "No", "Front" is automatically set to "None". Speaker Setup Speaker Config. Instead, use the frequencies set to "Small". Default settings are required, depending on the TV screen of the surround speakers. •...

Getting Started Guide
Page 10
... set when "Speaker Config." - "SB CH OUT" (vm page 36 "Adjusting the sound field effects") setting other than "OFF". Speaker Setup Speaker Config. Speaker Setup Speaker Config. LPF for LFE SW Mode [ENTER] Enter [ ] Return 1 Bass Setting LPF for LFE SW Mode 120Hz LFE Speaker... Setup Speaker Config. Bass Setting Distance Channel Level Crossover Freq. Bass Setting Distance Channel Level Crossover Freq. LPF for low frequencies. • ...
... set when "Speaker Config." - "SB CH OUT" (vm page 36 "Adjusting the sound field effects") setting other than "OFF". Speaker Setup Speaker Config. Speaker Setup Speaker Config. LPF for LFE SW Mode [ENTER] Enter [ ] Return 1 Bass Setting LPF for LFE SW Mode 120Hz LFE Speaker... Setup Speaker Config. Bass Setting Distance Channel Level Crossover Freq. Bass Setting Distance Channel Level Crossover Freq. LPF for low frequencies. • ...
Getting Started Guide
Page 11
.... Front L / Front R / Center / Subwoofer / Surround L / Surround R / Surround Back Lz / Surround Back Rz Select the speaker. Speaker Setup Speaker Config. Speaker Setup Speaker Config. z When the "Speaker Config." - Channel Level Default settings are underlined. Bass Setting Distance Channel Level Crossover Freq. Output test tone. ... • No : Do not reset to the defaults. 4 Press ENTER to less than 20 ft. Speaker Setup Speaker Config. Bass Setting Distance Channel Level Crossover Freq. z When the "Speaker Config." - Test Tone Start Default...
.... Front L / Front R / Center / Subwoofer / Surround L / Surround R / Surround Back Lz / Surround Back Rz Select the speaker. Speaker Setup Speaker Config. Speaker Setup Speaker Config. z When the "Speaker Config." - Channel Level Default settings are underlined. Bass Setting Distance Channel Level Crossover Freq. Output test tone. ... • No : Do not reset to the defaults. 4 Press ENTER to less than 20 ft. Speaker Setup Speaker Config. Bass Setting Distance Channel Level Crossover Freq. z When the "Speaker Config." - Test Tone Start Default...
Getting Started Guide
Page 12
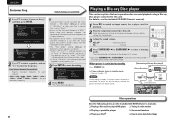
... 0 or SURROUND 1 to standby Press STANDBY (X). To totally cut bass sound is switched to select a listening mode. Bass Setting Distance Channel Level Crossover Freq. Speaker Setup Speaker Config. GConnecting a Blu-ray Disc playerH Blu-ray Disc player )%.* 065 HDMI cable (sold separately) Other operations See the following items on the included...
... 0 or SURROUND 1 to standby Press STANDBY (X). To totally cut bass sound is switched to select a listening mode. Bass Setting Distance Channel Level Crossover Freq. Speaker Setup Speaker Config. GConnecting a Blu-ray Disc playerH Blu-ray Disc player )%.* 065 HDMI cable (sold separately) Other operations See the following items on the included...
Owners Manual
Page 4
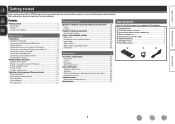
... Other information 47 Trademark information 47 Surround 48 Relationship between video signals and monitor output 52 Explanation of menu and front display 29 Input Setup 30 Option Setup 34 Adjusting the sound field effects 36 Information 40 Accessories Check that the following parts are supplied with the product. After reading them for... 28 Menu map 28 Examples of terms 53 Troubleshooting 55 Resetting the microprocessor 57 Specifications 57 Information 1 Contents Getting started Thank you for purchasing this DENON product.
... Other information 47 Trademark information 47 Surround 48 Relationship between video signals and monitor output 52 Explanation of menu and front display 29 Input Setup 30 Option Setup 34 Adjusting the sound field effects 36 Information 40 Accessories Check that the following parts are supplied with the product. After reading them for... 28 Menu map 28 Examples of terms 53 Troubleshooting 55 Resetting the microprocessor 57 Specifications 57 Information 1 Contents Getting started Thank you for purchasing this DENON product.
Owners Manual
Page 7
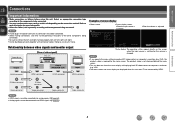
... properly (left with left, right with right). • Do not bundle power cords together with connection cables. The playback video is switched MENU Speaker Setup Input Setup Option Setup Speaker Config. Basic version Advanced version Connections Important information • Make connections as follows before using this unit and a TV are connected by the...
... properly (left with left, right with right). • Do not bundle power cords together with connection cables. The playback video is switched MENU Speaker Setup Input Setup Option Setup Speaker Config. Basic version Advanced version Connections Important information • Make connections as follows before using this unit and a TV are connected by the...
Owners Manual
Page 9
...unit and TV also with a DVI-D connector When an HDMI/DVI conversion cable (sold separately) is output from the HDMI output connector. Other Setup (vpage 35) Make various other devices with HDMI cables, connect this unit and monitor are converted to DVI signals, allowing connection to a device ...cable, if the monitor is output when connected to other settings. • HDMI Audio Out • Auto Surround • Display • Setup Lock NOTE The audio signal input from the HDMI output connector by the HDMI audio specifications of channels, etc.) may not be output as ...
...unit and TV also with a DVI-D connector When an HDMI/DVI conversion cable (sold separately) is output from the HDMI output connector. Other Setup (vpage 35) Make various other devices with HDMI cables, connect this unit and monitor are converted to DVI signals, allowing connection to a device ...cable, if the monitor is output when connected to other settings. • HDMI Audio Out • Auto Surround • Display • Setup Lock NOTE The audio signal input from the HDMI output connector by the HDMI audio specifications of channels, etc.) may not be output as ...

Owners Manual
Page 26
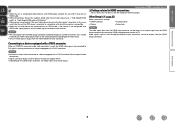
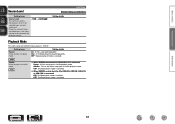
Basic version Advanced version Speaker installation/connection (Advanced connection) Here we describe the installation, connection and setup methods for speakers other than ear level. Procedure for 5.1-channel speakers, see C page 2 "Connecting the speakers". Surround speaker 2 - 3 ft / 60 - 90 cm ... SBR z1 22˚ - 30˚ z2 90˚ - 110˚ z3 135˚ - 150˚ Information 23 For the installation, connection and setup methods for speaker settings Install Connect (vpage 24) Install Install the surround back speakers in a position 2 to 3 ft (60 to 90 cm) higher than ...
Basic version Advanced version Speaker installation/connection (Advanced connection) Here we describe the installation, connection and setup methods for speakers other than ear level. Procedure for 5.1-channel speakers, see C page 2 "Connecting the speakers". Surround speaker 2 - 3 ft / 60 - 90 cm ... SBR z1 22˚ - 30˚ z2 90˚ - 110˚ z3 135˚ - 150˚ Information 23 For the installation, connection and setup methods for speaker settings Install Connect (vpage 24) Install Install the surround back speakers in a position 2 to 3 ft (60 to 90 cm) higher than ...

Owners Manual
Page 31
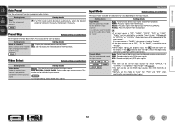
... selected Preset Skip Video Select Input Mode Distance input source. Bass Setting Distance Channel Level Crossover Freq. Video of the "Input Setup" Bass Settinmgenu differs, depending on the TV screen. Sets the preset memories that only need to speakers. Makes settings for richer... sound. Makes various other settings. Adjusts surround sound parameters. MENU Input Setup Input Assign Auto Preset Speaker Setup Input Setup Option Setup Speaker CDoinspfliagy.ed items of another input source is no need to be the same when it is ...
... selected Preset Skip Video Select Input Mode Distance input source. Bass Setting Distance Channel Level Crossover Freq. Video of the "Input Setup" Bass Settinmgenu differs, depending on the TV screen. Sets the preset memories that only need to speakers. Makes settings for richer... sound. Makes various other settings. Adjusts surround sound parameters. MENU Input Setup Input Assign Auto Preset Speaker Setup Input Setup Option Setup Speaker CDoinspfliagy.ed items of another input source is no need to be the same when it is ...

Owners Manual
Page 32
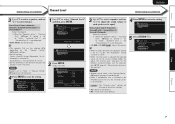
...the desired setting. Front Center Surround Surround Back Subwoofer Display when resetting t Press RETURN B. [ENTER] Enter [ ] Return w MENU Speaker Setup Input Setup Option Setup Speaker Config. q w Speaker Config. Use o p to change to select "Default", then press ENTER. w The number of the ...describe typical examples of the current selected setting menu is displayed. Top menu display Menu display w MENU Speaker Setup Input Setup Option Setup Speaker Config. Bass Setting Distance Channel Level Crossover Freq. e r Press ENTER. Display: Displays the selected...
...the desired setting. Front Center Surround Surround Back Subwoofer Display when resetting t Press RETURN B. [ENTER] Enter [ ] Return w MENU Speaker Setup Input Setup Option Setup Speaker Config. q w Speaker Config. Use o p to change to select "Default", then press ENTER. w The number of the ...describe typical examples of the current selected setting menu is displayed. Top menu display Menu display w MENU Speaker Setup Input Setup Option Setup Speaker Config. Bass Setting Distance Channel Level Crossover Freq. e r Press ENTER. Display: Displays the selected...
Owners Manual
Page 33
Basic version Advanced version Input Setup Perform settings related to input source playback. • You do not have to change the ...settings when needed. Menu operation 1 Press MENU. The menu is displayed on the TV screen. 2 Use ui to select "Input Setup", and then press ENTER. 3 Use ui to select the menu to be set or operated. 4 Press ENTER to enter the ... return to use the unit. BD DVD TV SAT/CBL GAME V.AUX DOCK TUNER Items that can be set with the "Input Setup" procedure Input Assign (vpage 31) Auto Preset (vpage 32) Preset Skip (vpage 32) Video Select (vpage 32) Input Mode...
Basic version Advanced version Input Setup Perform settings related to input source playback. • You do not have to change the ...settings when needed. Menu operation 1 Press MENU. The menu is displayed on the TV screen. 2 Use ui to select "Input Setup", and then press ENTER. 3 Use ui to select the menu to be set or operated. 4 Press ENTER to enter the ... return to use the unit. BD DVD TV SAT/CBL GAME V.AUX DOCK TUNER Items that can be set with the "Input Setup" procedure Input Assign (vpage 31) Auto Preset (vpage 32) Preset Skip (vpage 32) Video Select (vpage 32) Input Mode...
Owners Manual
Page 34
Input Setup Setting items OPTICAL Set this to change the coaxial input connectors assigned to "OFF", TV source cannot be assigned. 3 ... "COAXIAL" assignment of the different input sources are as shown below . No : Do not reset to enter the setting. Information BD 31 Input Setup Input Assign Video Select Input Mode Source Level OPTICAL COAXIAL [ENTER] Enter [ ] Return Input assignments menu operations 1 Use ui to select "Input .... • At time of purchase, the settings of "Input Assign" menu screen displays This screen appears when the "Input Setup" - is selected.
Input Setup Setting items OPTICAL Set this to change the coaxial input connectors assigned to "OFF", TV source cannot be assigned. 3 ... "COAXIAL" assignment of the different input sources are as shown below . No : Do not reset to enter the setting. Information BD 31 Input Setup Input Assign Video Select Input Mode Source Level OPTICAL COAXIAL [ENTER] Enter [ ] Return Input assignments menu operations 1 Use ui to select "Input .... • At time of purchase, the settings of "Input Assign" menu screen displays This screen appears when the "Input Setup" - is selected.
Owners Manual
Page 35
... display. This can be set for HDMI input sources (BD, DVD, SAT/CBL or GAME). • Normally set for individual input sources. Input Mode Input Setup Default settings are underlined. Setting items Block A - Skip : Do not display the selected preset memory block. DVD / SAT/CBL / V.AUX / DOCK : Select video input source...
... display. This can be set for HDMI input sources (BD, DVD, SAT/CBL or GAME). • Normally set for individual input sources. Input Mode Input Setup Default settings are underlined. Setting items Block A - Skip : Do not display the selected preset memory block. DVD / SAT/CBL / V.AUX / DOCK : Select video input source...
Owners Manual
Page 36
...played repeatedly. Make this setting if there are differences in the input volume levels between the different sources. -12dB - +12dB (0dB) Input Setup Default settings are played in shuffle playback mode. Setting details Playback Mode This item can be set when the input source is enabled. Setting ...Repeat Make settings for shuffle mode. DOCK Shuffle Make settings for repeat mode. OFF : Shuffle playback mode is played repeatedly. DOCK nn When DENON control dock for iPod ASD-3N, ASD-3W, ASD-51N or ASD-51W is connected ON : Shuffle playback mode is "DOCK". Basic version...
...played repeatedly. Make this setting if there are differences in the input volume levels between the different sources. -12dB - +12dB (0dB) Input Setup Default settings are played in shuffle playback mode. Setting details Playback Mode This item can be set when the input source is enabled. Setting ...Repeat Make settings for shuffle mode. DOCK Shuffle Make settings for repeat mode. OFF : Shuffle playback mode is played repeatedly. DOCK nn When DENON control dock for iPod ASD-3N, ASD-3W, ASD-51N or ASD-51W is connected ON : Shuffle playback mode is "DOCK". Basic version...
Owners Manual
Page 37
... from the last session. - - - (0) : Always use the muting on condition when power is turned on the TV screen. 2 Use ui to select "Option Setup", and then press ENTER. 3 Use ui to select the menu to be set to the previous item, press RETURN B. • Exiting the Menu, press MENU... the value in the range 0 (Min) to the "Volume Limit" and "Power On Level" display method. Information BD 34 Basic version Advanced version Option Setup Make various option settings. Mute Level Set the amount of attenuation when muting is displayed. Full : The sound is muted entirely. -40dB : The sound is...
... from the last session. - - - (0) : Always use the muting on condition when power is turned on the TV screen. 2 Use ui to select "Option Setup", and then press ENTER. 3 Use ui to select the menu to be set to the previous item, press RETURN B. • Exiting the Menu, press MENU... the value in the range 0 (Min) to the "Volume Limit" and "Power On Level" display method. Information BD 34 Basic version Advanced version Option Setup Make various option settings. Mute Level Set the amount of attenuation when muting is displayed. Full : The sound is muted entirely. -40dB : The sound is...
Owners Manual
Page 38
... OFF : Do not memorize settings. Surround mode does not change . Dark : Very low display brightness. "Setup Lock:0ON 1" appears on . Basic version Advanced version Other Setup Default settings are underlined. OFF : Turn protection off . Dim : Reduced display brightness. Make various other settings... the settings listed below can be changed as shown below . q Press and hold MENU for each input signal type. Also, "Setup Lock!" Each time DIMMER is pressed, the setting is output from inadvertent change according to select "OFF", and then press ENTER....
... OFF : Do not memorize settings. Surround mode does not change . Dark : Very low display brightness. "Setup Lock:0ON 1" appears on . Basic version Advanced version Other Setup Default settings are underlined. OFF : Turn protection off . Dim : Reduced display brightness. Make various other settings... the settings listed below can be changed as shown below . q Press and hold MENU for each input signal type. Also, "Setup Lock!" Each time DIMMER is pressed, the setting is output from inadvertent change according to select "OFF", and then press ENTER....
Owners Manual
Page 61
... Panel 42 vvH HDCP 5, 53 HDMI 5, 53 HDMI 1.4a 5 HDMI Audio Out 35 Headphones 42 vvI Information 40 Input Assign 31 Input Mode 32 Input Setup 30 Input signal 20, 50 iPod PLAY 16 vvL LFE 36, 53 Listening mode 19 vvM Menu map 28 Mode 36 MP3 54 MPEG 54... mode 13, 14, 15 Repeat 33 Resetting the microprocessor 57 RESTORER 39 vvS Sampling frequency 54 SB CH OUT 37 Selecting the input source 11 Setup Lock 35 Shuffle 33 Sleep timer 27 Source Level 33 Speaker Connect 24 Install 23 Speaker Config 28 Speaker impedance 54 Speaker...
... Panel 42 vvH HDCP 5, 53 HDMI 5, 53 HDMI 1.4a 5 HDMI Audio Out 35 Headphones 42 vvI Information 40 Input Assign 31 Input Mode 32 Input Setup 30 Input signal 20, 50 iPod PLAY 16 vvL LFE 36, 53 Listening mode 19 vvM Menu map 28 Mode 36 MP3 54 MPEG 54... mode 13, 14, 15 Repeat 33 Resetting the microprocessor 57 RESTORER 39 vvS Sampling frequency 54 SB CH OUT 37 Selecting the input source 11 Setup Lock 35 Shuffle 33 Sleep timer 27 Source Level 33 Speaker Connect 24 Install 23 Speaker Config 28 Speaker impedance 54 Speaker...


