Getting Started Guide
Page 8
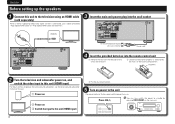
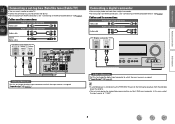
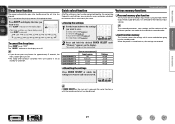
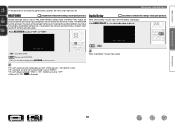
... to operate the television and subwoofer , see the television and subwoofer instruction manual. R03/AAA 2 Turn the television and subwoofer power on, and switch the video input to this unit (HDMI input) e Put the rear cover back on. 5 Turn on power to the unit The power indicator flashes green and...
... to operate the television and subwoofer , see the television and subwoofer instruction manual. R03/AAA 2 Turn the television and subwoofer power on, and switch the video input to this unit (HDMI input) e Put the rear cover back on. 5 Turn on power to the unit The power indicator flashes green and...
Owners Manual
Page 4
Contents Getting started Thank you for purchasing this DENON product. q Getting Started 1 w CD-ROM (Owner's manual 1 e Warranty (for North America model only 1 r Service network list 1 t Remote control unit (RC-1158 1 y R03/AAA batteries 2 u AM ... and functions 42 Front panel 42 Display 43 Rear panel 44 Remote control unit 45 Other information 47 Trademark information 47 Surround 48 Relationship between video signals and monitor output 52 Explanation of menu and front display 29 Input Setup 30 Option Setup 34 Adjusting the sound field effects 36 Information...
Contents Getting started Thank you for purchasing this DENON product. q Getting Started 1 w CD-ROM (Owner's manual 1 e Warranty (for North America model only 1 r Service network list 1 t Remote control unit (RC-1158 1 y R03/AAA batteries 2 u AM ... and functions 42 Front panel 42 Display 43 Rear panel 44 Remote control unit 45 Other information 47 Trademark information 47 Surround 48 Relationship between video signals and monitor output 52 Explanation of menu and front display 29 Input Setup 30 Option Setup 34 Adjusting the sound field effects 36 Information...
Owners Manual
Page 5
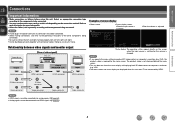
...display Simple settings are no problems with HDMI connectors, such as a Blu-ray Disc player, game machine, HD video camera, etc. Easy to the original sound. When you can output 3D video signals input from the power outlet. Dock connectivity for iPod® and network streaming (vpage 13) If an optional... DENON control dock for iPod (ASD-3N, ASD-3W, ASD-51N or ASD-51W) is connected to this unit...
...display Simple settings are no problems with HDMI connectors, such as a Blu-ray Disc player, game machine, HD video camera, etc. Easy to the original sound. When you can output 3D video signals input from the power outlet. Dock connectivity for iPod® and network streaming (vpage 13) If an optional... DENON control dock for iPod (ASD-3N, ASD-3W, ASD-51N or ASD-51W) is connected to this unit...
Owners Manual
Page 7
...This unit does not show the status display while playing back 3D video content or computer's resolution (e.g. HDMI connector HDMI connector HDMI connector HDMI connector S-Video connector S-Video connector Video connector Video connector Video connector NOTE • HDMI signals cannot be converted into HDMI signals ..., right with right). • Do not bundle power cords together with connection cables. Relationship between video signals and monitor output Video device GFlow of video signalsH This unit Monitor (TV) Output Input (IN) Output (MONITOR OUT) Input Examples of the...
...This unit does not show the status display while playing back 3D video content or computer's resolution (e.g. HDMI connector HDMI connector HDMI connector HDMI connector S-Video connector S-Video connector Video connector Video connector Video connector NOTE • HDMI signals cannot be converted into HDMI signals ..., right with right). • Do not bundle power cords together with connection cables. Relationship between video signals and monitor output Video device GFlow of video signalsH This unit Monitor (TV) Output Input (IN) Output (MONITOR OUT) Input Examples of the...
Owners Manual
Page 8
... both this manual. • If you need to the instructions provided in the manual of your television or player for connections Audio and video cable (sold separately) HDMI cable • This interface allows transfer of your playback device together with Ethernet". This unit supports HDCP. ...data encryption and authentication of the connected AV device. About 3D function This unit supports input and output of 3D (3 dimensional) video signals of 3D glasses. Basic version Advanced version Connecting an HDMI-compatible device You can connect up to five HDMI-compatible devices (4-...
... both this manual. • If you need to the instructions provided in the manual of your television or player for connections Audio and video cable (sold separately) HDMI cable • This interface allows transfer of your playback device together with Ethernet". This unit supports HDCP. ...data encryption and authentication of the connected AV device. About 3D function This unit supports input and output of 3D (3 dimensional) video signals of 3D glasses. Basic version Advanced version Connecting an HDMI-compatible device You can connect up to five HDMI-compatible devices (4-...
Owners Manual
Page 9
... permissible inputs. • Only an HDMI signal is output from the HDMI output connector by the HDMI audio specifications of devices, the video signals may not be output to DVI-D devices that supports Deep Color transmission, please use a "High Speed HDMI cable" or "High...Setup (vpage 35) Make various other devices with HDMI cables, connect this unit and monitor are connected with HDMI audio signal playback, only the video signals are converted to DVI signals, allowing connection to TV. Information 6 Connecting to a device equipped with a DVI-D connector When an HDMI...
... permissible inputs. • Only an HDMI signal is output from the HDMI output connector by the HDMI audio specifications of devices, the video signals may not be output to DVI-D devices that supports Deep Color transmission, please use a "High Speed HDMI cable" or "High...Setup (vpage 35) Make various other devices with HDMI cables, connect this unit and monitor are connected with HDMI audio signal playback, only the video signals are converted to DVI signals, allowing connection to TV. Information 6 Connecting to a device equipped with a DVI-D connector When an HDMI...
Owners Manual
Page 10
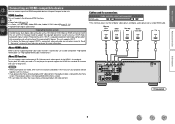
...use the optical digital connection. Cables used , be sure to connect the MONITOR output connector of the unit and the VIDEO input connector of the TV, using a video cable. "Input Assign" (vpage 31) When you want to play back HD Audio (Dolby TrueHD, DTS-HD, ...Connecting an HDMI-compatible device"). NOTE If the VIDEO input connector and S-VIDEO input connector are to be used for connections Video cable (sold separately) Video cable Audio cable (sold separately) L L Audio cable R R Blu-ray Disc player / DVD player VIDEO AUDIO VIDEO OUT AUDIO OUT LR LR LR in Set as...
...use the optical digital connection. Cables used , be sure to connect the MONITOR output connector of the unit and the VIDEO input connector of the TV, using a video cable. "Input Assign" (vpage 31) When you want to play back HD Audio (Dolby TrueHD, DTS-HD, ...Connecting an HDMI-compatible device"). NOTE If the VIDEO input connector and S-VIDEO input connector are to be used for connections Video cable (sold separately) Video cable Audio cable (sold separately) L L Audio cable R R Blu-ray Disc player / DVD player VIDEO AUDIO VIDEO OUT AUDIO OUT LR LR LR in Set as...
Owners Manual
Page 11
...see "Connecting an HDMI-compatible device" (vpage 5). Cables used for connections Video cable (sold separately) Video cable Audio cables (sold separately) L L Audio cable R R Digital camcorder VIDEO AUDIO VIDEO OUT AUDIO OUT LR LR LR in Set as Necessary Set this to ..."Connecting an HDMI-compatible device" (vpage 5). Cables used for connections Video cable (sold separately) Video cable Audio cable (sold separately) L L Audio cable R R Coaxial digital cable Satellite tuner/Cable TV VIDEO VIDEO OUT AUDIO COAXIAL OUT AUDIO OUT LR LR LR Connecting a digital ...
...see "Connecting an HDMI-compatible device" (vpage 5). Cables used for connections Video cable (sold separately) Video cable Audio cables (sold separately) L L Audio cable R R Digital camcorder VIDEO AUDIO VIDEO OUT AUDIO OUT LR LR LR in Set as Necessary Set this to ..."Connecting an HDMI-compatible device" (vpage 5). Cables used for connections Video cable (sold separately) Video cable Audio cable (sold separately) L L Audio cable R R Coaxial digital cable Satellite tuner/Cable TV VIDEO VIDEO OUT AUDIO COAXIAL OUT AUDIO OUT LR LR LR Connecting a digital ...
Owners Manual
Page 12
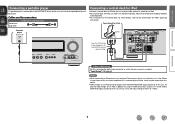
...Information 9 If the iPhone is kept closer to this unit and a telephone call is received by DENON (sold separately) Connecting a control dock for iPod • Connect a control dock for iPod to the unit to enjoy video and music stored on an iPod. • For a control dock for iPod, use ASD-11R... AUDIO AUDIO OUT ASD-11R RL Use the AV/Control Cable supplied with the DENON control dock for iPod's operating instructions. RL in addition to using an HDMI connection, connect a TV to the VIDEO MONITOR output connector of this to change the digital input connector to the control ...
...Information 9 If the iPhone is kept closer to this unit and a telephone call is received by DENON (sold separately) Connecting a control dock for iPod • Connect a control dock for iPod to the unit to enjoy video and music stored on an iPod. • For a control dock for iPod, use ASD-11R... AUDIO AUDIO OUT ASD-11R RL Use the AV/Control Cable supplied with the DENON control dock for iPod's operating instructions. RL in addition to using an HDMI connection, connect a TV to the VIDEO MONITOR output connector of this to change the digital input connector to the control ...
Owners Manual
Page 16
... select the file to be able to select the display mode. • There are displayed. GWhen using an ASD-11RH iPod [1/2] Music Videos GWhen using an ASD-11R DENON control dock for playback. Remote mode Display iPod information on the iPod screen. • "Dock Remote" is displayed on an iPod 1 ... Reconnect it down for 2 seconds or more to play back the video and photo files on the TV. z2 Video may not be played back (music or video). Basic version Advanced version Playing an iPod If you use a separately sold DENON control dock for iPod (ASD-11R, ASD-3N, ASD-3W, ...
... select the file to be able to select the display mode. • There are displayed. GWhen using an ASD-11RH iPod [1/2] Music Videos GWhen using an ASD-11R DENON control dock for playback. Remote mode Display iPod information on the iPod screen. • "Dock Remote" is displayed on an iPod 1 ... Reconnect it down for 2 seconds or more to play back the video and photo files on the TV. z2 Video may not be played back (music or video). Basic version Advanced version Playing an iPod If you use a separately sold DENON control dock for iPod (ASD-11R, ASD-3N, ASD-3W, ...
Owners Manual
Page 17
...• To play back compressed audio with the data on an iPod when using an ASD-11R 1 Prepare for iPod. iPod Music Videos [1/2] • In "Browse mode", the iPod display is connected to a DENON ASD-11R, ASD-3N, ASD-3W, ASD-51N and ASD-51W control dock for 2 seconds or more to...of this unit's power to "DOCK". You can be properly connected. e Connect the TV to the VIDEO MONITOR output connector of iPod and the software version, some functions may not be played in the DENON control dock for playback. The default setting is not displayed, the iPod may not operate. • ...
...• To play back compressed audio with the data on an iPod when using an ASD-11R 1 Prepare for iPod. iPod Music Videos [1/2] • In "Browse mode", the iPod display is connected to a DENON ASD-11R, ASD-3N, ASD-3W, ASD-51N and ASD-51W control dock for 2 seconds or more to...of this unit's power to "DOCK". You can be properly connected. e Connect the TV to the VIDEO MONITOR output connector of iPod and the software version, some functions may not be played in the DENON control dock for playback. The default setting is not displayed, the iPod may not operate. • ...

Owners Manual
Page 18
...input source to "DOCK". 4 Press SEARCH and hold SEARCH to set to "On" in the DENON control dock for iPod to display the iPod's photo data or videos on an iPod equipped with a slide show or video function. 1 Press and hold it . Playback starts. For details, see the iPod's operating instructions... not be set the Remote mode. vSee overleaf Information BD 15 q Connect the DENON control dock for iPod. w Set the iPod in order to this unit. Incompatible characters are displayed. iPod Music Video Up/Down Select Playing an iPod nnPlayback in Remote mode This unit can play back...
...input source to "DOCK". 4 Press SEARCH and hold SEARCH to set to "On" in the DENON control dock for iPod to display the iPod's photo data or videos on an iPod equipped with a slide show or video function. 1 Press and hold it . Playback starts. For details, see the iPod's operating instructions... not be set the Remote mode. vSee overleaf Information BD 15 q Connect the DENON control dock for iPod. w Set the iPod in order to this unit. Incompatible characters are displayed. iPod Music Video Up/Down Select Playing an iPod nnPlayback in Remote mode This unit can play back...
Owners Manual
Page 30
... function Convenient functions Various memory functions The power automatically goes into the standby mode. q Input source (vpage 11) w Volume (vpage 11) e Surround mode (vpage 19) r Video Select (vpage 32) 2 Press and hold the desired QUICK SELECT until "Memory" appears on the main unit is pressed. The current settings will be obtained...
... function Convenient functions Various memory functions The power automatically goes into the standby mode. q Input source (vpage 11) w Volume (vpage 11) e Surround mode (vpage 19) r Video Select (vpage 32) 2 Press and hold the desired QUICK SELECT until "Memory" appears on the main unit is pressed. The current settings will be obtained...

Owners Manual
Page 31
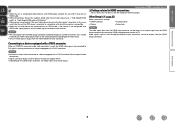
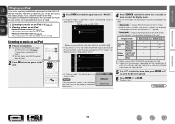
... settings Menu map For menu operation, connect a TV to this unit and display the menu on the selected Preset Skip Video Select Input Mode Distance input source. Description Select speaker configuration and size (bass reproduction capability). Sets the preset memories that ...only need to the subwoofer. Compress dynamic range (difference between video and audio. Source Level Channel Level Playback Mode CrossoverOFprteioqn. Set the volume of the bass signal output from each speaker. For ...
... settings Menu map For menu operation, connect a TV to this unit and display the menu on the selected Preset Skip Video Select Input Mode Distance input source. Description Select speaker configuration and size (bass reproduction capability). Sets the preset memories that ...only need to the subwoofer. Compress dynamic range (difference between video and audio. Source Level Channel Level Playback Mode CrossoverOFprteioqn. Set the volume of the bass signal output from each speaker. For ...
Owners Manual
Page 33
... V.AUX DOCK TUNER Items that can be set with the "Input Setup" procedure Input Assign (vpage 31) Auto Preset (vpage 32) Preset Skip (vpage 32) Video Select (vpage 32) Input Mode (vpage 32) Source Level (vpage 33) Playback Mode (vpage 33) Information BD 30 The menu is displayed. The menu display...
... V.AUX DOCK TUNER Items that can be set with the "Input Setup" procedure Input Assign (vpage 31) Auto Preset (vpage 32) Preset Skip (vpage 32) Video Select (vpage 32) Input Mode (vpage 32) Source Level (vpage 33) Playback Mode (vpage 33) Information BD 30 The menu is displayed. The menu display...
Owners Manual
Page 34
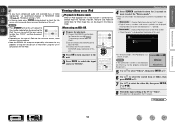
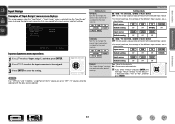
Input Setup Input Assign Video Select Input Mode Source Level OPTICAL COAXIAL [ENTER] Enter [ ] Return Input assignments menu operations 1 Use ui to select "Input Assign", and then press ENTER. 2 Use ...
Input Setup Input Assign Video Select Input Mode Source Level OPTICAL COAXIAL [ENTER] Enter [ ] Return Input assignments menu operations 1 Use ui to select "Input Assign", and then press ENTER. 2 Use ...
Owners Manual
Page 35
... (from HDMI input. HDMI : Play only signals from A to G) you do not want to display. Information BD 32 Setting items Video Select Video of another input source is normally recommended to "Auto". If the indicator does not light, check the digital input connector assignment and the ... decode mode for the different input sources. Setting items Start Start the auto preset process. DVD / SAT/CBL / V.AUX / DOCK : Select video input source to program radio stations. NOTE It is set this mode to "BD", "TV" or "GAME", it manually. The input modes available...
... (from HDMI input. HDMI : Play only signals from A to G) you do not want to display. Information BD 32 Setting items Video Select Video of another input source is normally recommended to "Auto". If the indicator does not light, check the digital input connector assignment and the ... decode mode for the different input sources. Setting items Start Start the auto preset process. DVD / SAT/CBL / V.AUX / DOCK : Select video input source to program radio stations. NOTE It is set this mode to "BD", "TV" or "GAME", it manually. The input modes available...
Owners Manual
Page 42
...; This item default setting for "iPod" is displayed. 0ms - 200ms Audio Delay : 0ms Store "Audio Delay" for each input source. Information BD 39 While viewing video, manually adjust the time to select "ON" or "OFF". RESTORER:OFF ON Use RESTORER. It also corrects the sense of volume of the bass to...
...; This item default setting for "iPod" is displayed. 0ms - 200ms Audio Delay : 0ms Store "Audio Delay" for each input source. Information BD 39 While viewing video, manually adjust the time to select "ON" or "OFF". RESTORER:OFF ON Use RESTORER. It also corrects the sense of volume of the bass to...
Owners Manual
Page 43
... The information displayed differs according to be checkedH • Input source • Surround mode • Input digital terminal • Input mode • Decode mode • Video select • Dialogue normalization etc. The correction value can be changed. This cannot be checked using STATUS. GItems to the input source. It automatically corrects...
... The information displayed differs according to be checkedH • Input source • Surround mode • Input digital terminal • Input mode • Decode mode • Video select • Dialogue normalization etc. The correction value can be changed. This cannot be checked using STATUS. GItems to the input source. It automatically corrects...
Owners Manual
Page 47
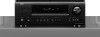
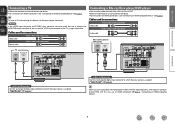
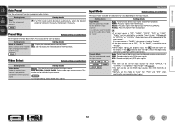
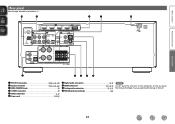
Electrostatic discharge may cause permanent damage to the unit. 44 Q0 o i u y Advanced version Information q wer t q PRE OUT connectors C 3, 24, 25) w Speaker terminals C 3, 24, 25) e DOCK CONTROL jack 9) r S-VIDEO connector 9) t VIDEO connectors 7, 8) y Power cord C 4) u Digital audio connectors 7, 8) i HDMI connectors C 4, 5) o Analog audio connectors 7, 8, 9) Q0 FM/AM antenna terminals 10) NOTE Do not touch the inner pins of the connectors on the rear panel. Basic version Rear panel See the page indicated in parentheses ( ).
Electrostatic discharge may cause permanent damage to the unit. 44 Q0 o i u y Advanced version Information q wer t q PRE OUT connectors C 3, 24, 25) w Speaker terminals C 3, 24, 25) e DOCK CONTROL jack 9) r S-VIDEO connector 9) t VIDEO connectors 7, 8) y Power cord C 4) u Digital audio connectors 7, 8) i HDMI connectors C 4, 5) o Analog audio connectors 7, 8, 9) Q0 FM/AM antenna terminals 10) NOTE Do not touch the inner pins of the connectors on the rear panel. Basic version Rear panel See the page indicated in parentheses ( ).


