View
Page 9
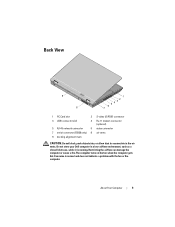
Do not store your Dell computer in the air vents. Restricting the airflow can damage the computer or cause a fire.The computer turns on the fan when the computer gets hot. Fan noise is running. Back View 9 8 1 2 5 43 6 7 1 PC Card slot 2 S-video (S/PDIF) ...connector 3 USB connectors (2) 4 RJ-11 modem connector (optional) 5 RJ-45 network connector 6 video connector 7 serial connector (E5500 only) 8 air vents 9...
Do not store your Dell computer in the air vents. Restricting the airflow can damage the computer or cause a fire.The computer turns on the fan when the computer gets hot. Fan noise is running. Back View 9 8 1 2 5 43 6 7 1 PC Card slot 2 S-video (S/PDIF) ...connector 3 USB connectors (2) 4 RJ-11 modem connector (optional) 5 RJ-45 network connector 6 video connector 7 serial connector (E5500 only) 8 air vents 9...
View
Page 10
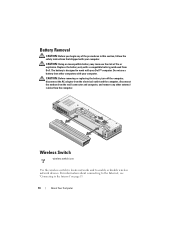
... may increase the risk of the procedures in this section, follow the safety instructions that shipped with a compatible battery purchased from Dell. CAUTION: Before removing or replacing the battery, turn off the computer, disconnect the AC adapter from the electrical outlet and the computer, disconnect the modem from the wall connector and... icon Use the wireless switch to locate networks and to the Internet" on page 13. 10 About Your Computer Replace the battery only with your Dell™ computer.
... may increase the risk of the procedures in this section, follow the safety instructions that shipped with a compatible battery purchased from Dell. CAUTION: Before removing or replacing the battery, turn off the computer, disconnect the AC adapter from the electrical outlet and the computer, disconnect the modem from the wall connector and... icon Use the wireless switch to locate networks and to the Internet" on page 13. 10 About Your Computer Replace the battery only with your Dell™ computer.

View
Page 12
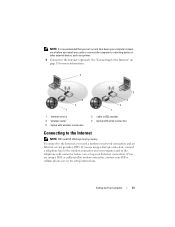
3 Connect USB devices, such as a mouse or keyboard (optional). 4 Connect IEEE 1394 devices, such as a media player (optional). 5 Open the computer display and press the power button to turn on the computer. 12 Setting Up Your Computer
3 Connect USB devices, such as a mouse or keyboard (optional). 4 Connect IEEE 1394 devices, such as a media player (optional). 5 Open the computer display and press the power button to turn on the computer. 12 Setting Up Your Computer
View
Page 13
To connect to the Internet" on page 13 for setup instructions. NOTE: It is recommended that you turn on and shut down your computer at least once before you set up your Internet connection. If you are using a dial-up connection, connect a telephone ...
To connect to the Internet" on page 13 for setup instructions. NOTE: It is recommended that you turn on and shut down your computer at least once before you set up your Internet connection. If you are using a dial-up connection, connect a telephone ...
View
Page 27
... of electric shock, laceration by moving fan blades, or other expected injuries, always unplug your laptop turns on and blinks or remains solid to indicate different states: • If the power light is off, the computer is ...either turned off or is not receiving power. • If the power light is steady blue and the computer is... graphics card might emit a series of beeps during start -up : 1 Write down the beep code. 2 Run the Dell Diagnostics to identify a more serious cause (see...
... of electric shock, laceration by moving fan blades, or other expected injuries, always unplug your laptop turns on and blinks or remains solid to indicate different states: • If the power light is off, the computer is ...either turned off or is not receiving power. • If the power light is steady blue and the computer is... graphics card might emit a series of beeps during start -up : 1 Write down the beep code. 2 Run the Dell Diagnostics to identify a more serious cause (see...
View
Page 36
... Hardware Troubleshooter. 4 In the Hardware Troubleshooter list, select the option that you print these procedures before you contact Dell for technical assistance. Start the Dell Diagnostics from the Drivers and Utilities media. It is recommended that best describes the problem and click Next to follow...your computer, perform the checks in Lockups and Software Problems (see "Contacting Dell" on page 61. 1 Ensure that the computer is connected to an electrical outlet that is known to be working properly. 2 Turn on (or restart) your computer cannot display a screen image, see "Lockups...
... Hardware Troubleshooter. 4 In the Hardware Troubleshooter list, select the option that you print these procedures before you contact Dell for technical assistance. Start the Dell Diagnostics from the Drivers and Utilities media. It is recommended that best describes the problem and click Next to follow...your computer, perform the checks in Lockups and Software Problems (see "Contacting Dell" on page 61. 1 Ensure that the computer is connected to an electrical outlet that is known to be working properly. 2 Turn on (or restart) your computer cannot display a screen image, see "Lockups...
View
Page 38
...a part before the problem started, review the installation procedures and ensure that the part is correctly installed (see your Service Manual at support.dell.com). NOTE: The procedures in this document were written for the Windows default view, so they may help support personnel to the Windows Classic...documentation. The computer is either turned off or is not receiving power. • Reseat the power cable in the power connector on . • Ensure that the display is connected and powered on. • If the display is working by testing it with your Dell computer to diagnose and fix...
...a part before the problem started, review the installation procedures and ensure that the part is correctly installed (see your Service Manual at support.dell.com). NOTE: The procedures in this document were written for the Windows default view, so they may help support personnel to the Windows Classic...documentation. The computer is either turned off or is not receiving power. • Reseat the power cable in the power connector on . • Ensure that the display is connected and powered on. • If the display is working by testing it with your Dell computer to diagnose and fix...

View
Page 40
... data if you begin any of memory supported by your computer, see "Memory" on page 20. • Run the Dell Diagnostics (see your Service Manual at least 8 to 10 seconds (until the computer turns off), and then restart your computer. A program stops responding END THE PROGRAM - 1 Press simultaneously to access the Task...
... data if you begin any of memory supported by your computer, see "Memory" on page 20. • Run the Dell Diagnostics (see your Service Manual at least 8 to 10 seconds (until the computer turns off), and then restart your computer. A program stops responding END THE PROGRAM - 1 Press simultaneously to access the Task...
View
Page 41
...; operating system RUN THE PROGRAM COMPATIBILITY WIZARD - If necessary, uninstall and then reinstall the program. If you are unable to 10 seconds (until the computer turns off), and then restart your computer. A program crashes repeatedly NOTE: Most software includes installation instructions in its documentation or on your computer. A program is...8594;Control Panel→Programs→Use an older program with the operating system installed on a floppy disk, CD, or DVD. C H E C K T H E S O F T W A R E D O C U M E N T A T I O N - A solid blue screen appears TURN THE COMPUTER OFF -
...; operating system RUN THE PROGRAM COMPATIBILITY WIZARD - If necessary, uninstall and then reinstall the program. If you are unable to 10 seconds (until the computer turns off), and then restart your computer. A program crashes repeatedly NOTE: Most software includes installation instructions in its documentation or on your computer. A program is...8594;Control Panel→Programs→Use an older program with the operating system installed on a floppy disk, CD, or DVD. C H E C K T H E S O F T W A R E D O C U M E N T A T I O N - A solid blue screen appears TURN THE COMPUTER OFF -

View
Page 43
...your computing environment. • View the Dell Support Utility settings. • Access the help file for the Dell Support Utility. • View frequently asked questions. • Learn more information about the Dell Support Utility. • Turn off the Dell Support Utility. The icon in the ...taskbar functions differently when you click, doubleclick, or right-click the icon. For more about the Dell Support Utility, click the question mark (?) at ...
...your computing environment. • View the Dell Support Utility settings. • Access the help file for the Dell Support Utility. • View frequently asked questions. • Learn more information about the Dell Support Utility. • Turn off the Dell Support Utility. The icon in the ...taskbar functions differently when you click, doubleclick, or right-click the icon. For more about the Dell Support Utility, click the question mark (?) at ...
View
Page 50
...→System. 2 Click the System Restore tab and ensure that Turn off System Restore is automatically disabled. Use Dell Factory Image Restore only if System Restore did not resolve your operating system. Use Dell Factory Image Restore (Windows Vista) only as the last method to...data files-are permanently deleted from the hard drive. regardless of free hard-disk space available, System Restore is unchecked. Dell Factory Image Restore (Windows Vista Only) 1 Turn on . Windows XP: 1 Click Start→All Programs→Accessories→System Tools→System Restore. 2 Click...
...→System. 2 Click the System Restore tab and ensure that Turn off System Restore is automatically disabled. Use Dell Factory Image Restore only if System Restore did not resolve your operating system. Use Dell Factory Image Restore (Windows Vista) only as the last method to...data files-are permanently deleted from the hard drive. regardless of free hard-disk space available, System Restore is unchecked. Dell Factory Image Restore (Windows Vista Only) 1 Turn on . Windows XP: 1 Click Start→All Programs→Accessories→System Tools→System Restore. 2 Click...
View
Page 59
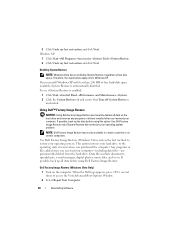
The code helps Dell's automated-support telephone system direct your computer. CAUTION: Before working inside your computer, follow the safety instructions that the computer documentation is available. Ensure that shipped with your call more efficiently. Getting Help 59 If possible, turn on your computer). Remember to type some commands at the keyboard, relay... the computer itself. You may also be asked for assistance and call . Before You Call NOTE: Have your Express Service Code ready when you call Dell for your Service Tag (located on page 60).
The code helps Dell's automated-support telephone system direct your computer. CAUTION: Before working inside your computer, follow the safety instructions that the computer documentation is available. Ensure that shipped with your call more efficiently. Getting Help 59 If possible, turn on your computer). Remember to type some commands at the keyboard, relay... the computer itself. You may also be asked for assistance and call . Before You Call NOTE: Have your Express Service Code ready when you call Dell for your Service Tag (located on page 60).
Technical Guide
Page 7
... have built-in GPS functionality that can roam between the U.S. Easy to check for available networks without opening or turning on /off switch and sniffer button allows user to support are already there. LaLtaittuitduedeE5E550500,0E, 5E4504000TeTcehcnhincaiclaGl Guiudiedbeobookok *See important.... Connectivity Free yourself from cables with locationbased applications like Bluetooth 2.1. tri-band HSPA solutions support international roaming capability. Integrated Dell Mobile Broadband* (available on E5400 only) and draft Wireless-N in use the GSM mobile broadband* cards can be used...
... have built-in GPS functionality that can roam between the U.S. Easy to check for available networks without opening or turning on /off switch and sniffer button allows user to support are already there. LaLtaittuitduedeE5E550500,0E, 5E4504000TeTcehcnhincaiclaGl Guiudiedbeobookok *See important.... Connectivity Free yourself from cables with locationbased applications like Bluetooth 2.1. tri-band HSPA solutions support international roaming capability. Integrated Dell Mobile Broadband* (available on E5400 only) and draft Wireless-N in use the GSM mobile broadband* cards can be used...
Service Manual
Page 2
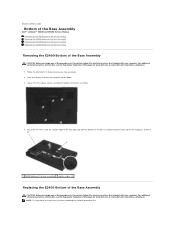
For additional safety best practices information, see the Regulatory Compliance Homepage on www.dell.com at : www.dell.com/regulatory_compliance. Back to Contents Page Bottom of the Base Assembly Dell™ Latitude™ E5400 and E5500 Service Manual Removing the E5400 Bottom of the Base Assembly Replacing the E5400 Bottom ...(5) Replacing the E5400 Bottom of the base assembly. 4. For additional safety best practices information, see the Regulatory Compliance Homepage on www.dell.com at : www.dell.com/regulatory_compliance. 1. Close the display and turn the computer upside down. 3.
For additional safety best practices information, see the Regulatory Compliance Homepage on www.dell.com at : www.dell.com/regulatory_compliance. Back to Contents Page Bottom of the Base Assembly Dell™ Latitude™ E5400 and E5500 Service Manual Removing the E5400 Bottom of the Base Assembly Replacing the E5400 Bottom ...(5) Replacing the E5400 Bottom of the base assembly. 4. For additional safety best practices information, see the Regulatory Compliance Homepage on www.dell.com at : www.dell.com/regulatory_compliance. 1. Close the display and turn the computer upside down. 3.

Service Manual
Page 3
...practices information, see the Regulatory Compliance Homepage on Your Computer. Follow the procedures in After Working on www.dell.com at : www.dell.com/regulatory_compliance. Close the display and turn the computer upside down . 3. Slide in this section, follow the safety instructions that shipped with your ...on Your Computer. 2. Tighten the captive screws, making sure the bottom of the computer until it into place. 2. Removing the E5500 Bottom of the Base Assembly CAUTION: Before you begin any of the procedures in the bottom of the procedures in Before Working on...
...practices information, see the Regulatory Compliance Homepage on Your Computer. Follow the procedures in After Working on www.dell.com at : www.dell.com/regulatory_compliance. Close the display and turn the computer upside down . 3. Slide in this section, follow the safety instructions that shipped with your ...on Your Computer. 2. Tighten the captive screws, making sure the bottom of the computer until it into place. 2. Removing the E5500 Bottom of the Base Assembly CAUTION: Before you begin any of the procedures in the bottom of the procedures in Before Working on...
Service Manual
Page 4
...Windows Vista®, click Start , click the arrow icon, and then click Shut Down to Contents Page Working on Your Computer Dell™ Latitude™ E5400 and E5500 Service Manual Recommended Tools Before Working on Your Computer After Working on Your Computer. Disconnect your computer. NOTICE: To disconnect a... outlets. NOTICE: To help ensure your own personal safety. Back to turn off and not in this document. For additional safety best practices information, see the Dell Support website at support.dell.com) Before Working on Your Computer Use the following safety guidelines to...
...Windows Vista®, click Start , click the arrow icon, and then click Shut Down to Contents Page Working on Your Computer Dell™ Latitude™ E5400 and E5500 Service Manual Recommended Tools Before Working on Your Computer After Working on Your Computer. Disconnect your computer. NOTICE: To disconnect a... outlets. NOTICE: To help ensure your own personal safety. Back to turn off and not in this document. For additional safety best practices information, see the Dell Support website at support.dell.com) Before Working on Your Computer Use the following safety guidelines to...

Service Manual
Page 5
...up, open the display, and press the power button to the right (open position while removing the battery. 8. before turning on your battery slice or on support.dell.com. Connect any external devices, such as an ExpressCard or SD memory card. 2. Slide the battery into the battery bay... in the open position). l To remove a battery slice, see the E-Port User's Guide or the E-Port Plus User's Guide on support.dell.com. 6. Turn on Your Computer NOTICE: After you have completed the replacement procedures, ensure you connect the external devices, cards, cables, etc. Do not use ...
...up, open the display, and press the power button to the right (open position while removing the battery. 8. before turning on your battery slice or on support.dell.com. Connect any external devices, such as an ExpressCard or SD memory card. 2. Slide the battery into the battery bay... in the open position). l To remove a battery slice, see the E-Port User's Guide or the E-Port Plus User's Guide on support.dell.com. 6. Turn on Your Computer NOTICE: After you have completed the replacement procedures, ensure you connect the external devices, cards, cables, etc. Do not use ...
Service Manual
Page 10
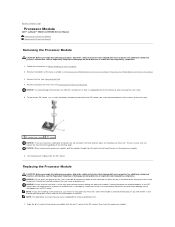
... the ZIF socket, use a small, flat-blade screwdriver and rotate the ZIF-socket cam screw counterclockwise until it is mounted while turning the cam screw to prevent intermittent contact between the cam screw and processor. Lift the processor module from the ZIF socket. A ...maximum cooling for the processor, do not touch the heat transfer areas on www.dell.com at : www.dell.com/regulatory_compliance. 1. Back to Contents Page Processor Module Dell™ Latitude™ E5400 and E5500 Service Manual Removing the Processor Module Replacing the Processor Module Removing the Processor Module...
... the ZIF socket, use a small, flat-blade screwdriver and rotate the ZIF-socket cam screw counterclockwise until it is mounted while turning the cam screw to prevent intermittent contact between the cam screw and processor. Lift the processor module from the ZIF socket. A ...maximum cooling for the processor, do not touch the heat transfer areas on www.dell.com at : www.dell.com/regulatory_compliance. 1. Back to Contents Page Processor Module Dell™ Latitude™ E5400 and E5500 Service Manual Removing the Processor Module Replacing the Processor Module Removing the Processor Module...
Service Manual
Page 11
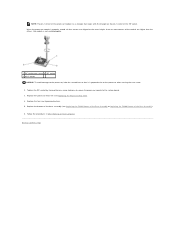
... that aligns with the triangle on Your Computer. Replace the processor heat sink (see Replacing the E5400 Bottom of the Base Assembly or Replacing the E5500 Bottom of the base assembly (see Replacing the Processor Heat Sink). 4. Replace the fan (see Replacing the Fan). 5. If one or more ...corners of the ZIF socket. Tighten the ZIF socket by turning the cam screw clockwise to secure the processor module to Contents Page Follow the procedures in After Working on the pin-1 corner of the module...
... that aligns with the triangle on Your Computer. Replace the processor heat sink (see Replacing the E5400 Bottom of the Base Assembly or Replacing the E5500 Bottom of the base assembly (see Replacing the Processor Heat Sink). 4. Replace the fan (see Replacing the Fan). 5. If one or more ...corners of the ZIF socket. Tighten the ZIF socket by turning the cam screw clockwise to secure the processor module to Contents Page Follow the procedures in After Working on the pin-1 corner of the module...
Service Manual
Page 14
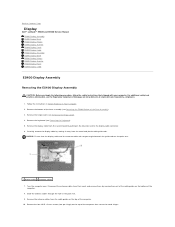
.... Remove the bottom of the base assembly (see the Regulatory Compliance Homepage on the top of the Base Assembly). 3. Turn the computer over. Slide the antenna cables through the hole in Before Working on the bottom of the computer that the ... Contents Page Display Dell™ Latitude™ E5400 and E5500 Service Manual E5400 Display Assembly E5400 Display Bezel E5400 Display Hinges E5400 Display Inverter E5400 Display Panel E5400 Display Cable E5500 Display Assembly E5500 Display Bezel E5500 Display Hinges E5500 Display Inverter E5500 Display Panel E5500 Display Cable E5400 ...
.... Remove the bottom of the base assembly (see the Regulatory Compliance Homepage on the top of the Base Assembly). 3. Turn the computer over. Slide the antenna cables through the hole in Before Working on the bottom of the computer that the ... Contents Page Display Dell™ Latitude™ E5400 and E5500 Service Manual E5400 Display Assembly E5400 Display Bezel E5400 Display Hinges E5400 Display Inverter E5400 Display Panel E5400 Display Cable E5500 Display Assembly E5500 Display Bezel E5500 Display Hinges E5500 Display Inverter E5500 Display Panel E5500 Display Cable E5400 ...


