View
Page 30
... another card. Take the appropriate action. D I S K D R I V E C O N F I G U R A T I L U R E 0 - Shut down the computer, remove the hard drive (see "Dell Diagnostics" on page 36). Run the Hard Disk Drive tests in the Dell Diagnostics (see your Service Manual at support.dell.com for more information. Then, shut down the computer, reinstall the hard drive, and restart the computer. GATE A20 FAILURE - Reinsert the card...
... another card. Take the appropriate action. D I S K D R I V E C O N F I G U R A T I L U R E 0 - Shut down the computer, remove the hard drive (see "Dell Diagnostics" on page 36). Run the Hard Disk Drive tests in the Dell Diagnostics (see your Service Manual at support.dell.com for more information. Then, shut down the computer, reinstall the hard drive, and restart the computer. GATE A20 FAILURE - Reinsert the card...
View
Page 31
... the mouse during the boot routine. Run the Keyboard Controller test in the Dell Diagnostics (see "Dell Diagnostics" on page 36). For external keyboards, check the cable connection. HA R D - The hard drive may be faulty or improperly seated. INSERT BOOTABLE MEDIA - Run the Keyboard ... check the cable connection. MEMORY ADDRESS LINE FAILURE AT ADDRESS, READ VALUE EXPECTING VALUE - Then, shut down the computer, remove the hard drive (see "Dell Diagnostics" on page 36). The operating system is trying to boot to occur after a memory module is most likely to nonbootable...
... the mouse during the boot routine. Run the Keyboard Controller test in the Dell Diagnostics (see "Dell Diagnostics" on page 36). For external keyboards, check the cable connection. HA R D - The hard drive may be faulty or improperly seated. INSERT BOOTABLE MEDIA - Run the Keyboard ... check the cable connection. MEMORY ADDRESS LINE FAILURE AT ADDRESS, READ VALUE EXPECTING VALUE - Then, shut down the computer, remove the hard drive (see "Dell Diagnostics" on page 36). The operating system is trying to boot to occur after a memory module is most likely to nonbootable...

View
Page 33
... Uninstall. 4 See the program documentation for installation instructions. The operating system cannot locate a sector on the hard drive. SECTOR NOT FOUND - O F- D A Y C L O C K L O S T P O W E R - Contact Dell (see your computer to an electrical outlet to remove. 3 Click Uninstall. 4 See the program documentation for instructions (click Start→ Help and Support). If a large number of sectors are defective, back...
... Uninstall. 4 See the program documentation for installation instructions. The operating system cannot locate a sector on the hard drive. SECTOR NOT FOUND - O F- D A Y C L O C K L O S T P O W E R - Contact Dell (see your computer to an electrical outlet to remove. 3 Click Uninstall. 4 See the program documentation for instructions (click Start→ Help and Support). If a large number of sectors are defective, back...
View
Page 47
...→Device Manager. If you want to your hard drive as described in your media drive directory to display the media contents, and then double-click the autorcd.exe file. 3 When the InstallShield Wizard Complete window appears, remove the Drivers and Utilities media and click Finish to... enter the Device Manager. Reinstalling Software 47 If it does not, start Windows Explorer, click your computer appears. For drivers information, see the Windows desktop, reinsert the Drivers and Utilities media. 5 At the Welcome Dell...
...→Device Manager. If you want to your hard drive as described in your media drive directory to display the media contents, and then double-click the autorcd.exe file. 3 When the InstallShield Wizard Complete window appears, remove the Drivers and Utilities media and click Finish to... enter the Device Manager. Reinstalling Software 47 If it does not, start Windows Explorer, click your computer appears. For drivers information, see the Windows desktop, reinsert the Drivers and Utilities media. 5 At the Welcome Dell...

View
Page 48
...If you received an Operating System media with your computer, you received the computer. This program permanently deletes all data on the hard drive and removes any programs installed after you can restore your operating system in an undesirable operating state. Use System Restore as the first solution...→Next. 8 Click Finish and restart your computer. However, using the Operating System media also deletes all data on the hard drive. Use Dell Factory Image Restore only if System Restore did not resolve your operating system. Restoring Your Operating System You can use it to...
...If you received an Operating System media with your computer, you received the computer. This program permanently deletes all data on the hard drive and removes any programs installed after you can restore your operating system in an undesirable operating state. Use System Restore as the first solution...→Next. 8 Click Finish and restart your computer. However, using the Operating System media also deletes all data on the hard drive. Use Dell Factory Image Restore only if System Restore did not resolve your operating system. Restoring Your Operating System You can use it to...
View
Page 50
...Select Repair Your Computer. 50 Reinstalling Software Use Dell Factory Image Restore only if System Restore did not resolve your hard drive to restore your computer-including data files-are permanently deleted from the hard drive. NOTE: Dell Factory Image Restore may not be available in...Dell™ Factory Image Restore NOTICE: Using Dell Factory Image Restore permanently deletes all data before using Dell Factory Image Restore. Use Dell Factory Image Restore (Windows Vista) only as the last method to the operating state it was in certain countries or on the hard drive and removes...
...Select Repair Your Computer. 50 Reinstalling Software Use Dell Factory Image Restore only if System Restore did not resolve your hard drive to restore your computer-including data files-are permanently deleted from the hard drive. NOTE: Dell Factory Image Restore may not be available in...Dell™ Factory Image Restore NOTICE: Using Dell Factory Image Restore permanently deletes all data before using Dell Factory Image Restore. Use Dell Factory Image Restore (Windows Vista) only as the last method to the operating state it was in certain countries or on the hard drive and removes...

View
Page 63
...battery removal, 10 beep codes, 27 C computer beep codes, 27 connecting AC adapter, 11 IEEE 1394 devices, 12 network cable, 11 USB devices, 12 contacting Dell, 61 D Dell contacting, 61 Factory Image Restore, 50 software updates, 42 Support Utility, 42 Technical Update Service, 42 Dell ...Diagnostics, 36 starting from the Drivers and Utilities media, 37 starting from your hard drive, 36 Dell Factory Image Restore, 51 Dell Technology Guide, 54 DellConnect, 56 diagnostics beep codes, 27 Dell, 36 documentation, 53 Dell Technology Guide, 54 Service Manual, ...
...battery removal, 10 beep codes, 27 C computer beep codes, 27 connecting AC adapter, 11 IEEE 1394 devices, 12 network cable, 11 USB devices, 12 contacting Dell, 61 D Dell contacting, 61 Factory Image Restore, 50 software updates, 42 Support Utility, 42 Technical Update Service, 42 Dell ...Diagnostics, 36 starting from the Drivers and Utilities media, 37 starting from your hard drive, 36 Dell Factory Image Restore, 51 Dell Technology Guide, 54 DellConnect, 56 diagnostics beep codes, 27 Dell, 36 documentation, 53 Dell Technology Guide, 54 Service Manual, ...
Service Manual
Page 6
... boot only. Press the eject button at support.dell.com. 4. Back to an electrical outlet, that the main battery is properly installed, and that a network cable is attached. 2. If you see Flashing the BIOS From the Hard Drive. Remove the flash BIOS update program CD from the media... to an electrical outlet that the AC adapter is connected to Contents Page Flashing the BIOS Dell™ Latitude™ E5400 and E5500 Service Manual Flashing the BIOS From a CD Flashing the BIOS From the Hard Drive If a BIOS-update program media, such as a CD, is complete, the computer automatically...
... boot only. Press the eject button at support.dell.com. 4. Back to an electrical outlet, that the main battery is properly installed, and that a network cable is attached. 2. If you see Flashing the BIOS From the Hard Drive. Remove the flash BIOS update program CD from the media... to an electrical outlet that the AC adapter is connected to Contents Page Flashing the BIOS Dell™ Latitude™ E5400 and E5500 Service Manual Flashing the BIOS From a CD Flashing the BIOS From the Hard Drive If a BIOS-update program media, such as a CD, is complete, the computer automatically...
Service Manual
Page 31
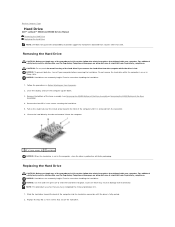
... off your computer. Replacing the Hard Drive CAUTION: Before you remove the hard drive from sources other than Dell. Excessive force may result in Before Working on Your Computer. 2. Back to Contents Page Hard Drive Dell™ Latitude™ E5400 and E5500 Service Manual Removing the Hard Drive Replacing the Hard Drive NOTE: Dell does not guarantee compatibility or provide support for hard drives obtained from the computer while...
... off your computer. Replacing the Hard Drive CAUTION: Before you remove the hard drive from sources other than Dell. Excessive force may result in Before Working on Your Computer. 2. Back to Contents Page Hard Drive Dell™ Latitude™ E5400 and E5500 Service Manual Removing the Hard Drive Replacing the Hard Drive NOTE: Dell does not guarantee compatibility or provide support for hard drives obtained from the computer while...
Service Manual
Page 34
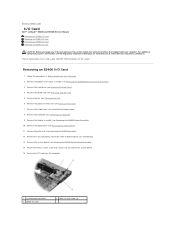
... Page I/O Card Dell™ Latitude™ E5400 and E5500 Service Manual Removing an E5400 I/O Card Replacing an E5400 I/O Card Removing an E5500 I/O Card Replacing an E5500 I /O card 2 M2.5 x 5-mm screw (1) Remove the bottom of the Base Assembly). 3. Remove the optical drive (see Removing the E5400 Bottom of the base assembly (see Removing the Optical Drive). 11. Remove the system board (see Removing the Hard Drive). 4. Removing an E5400...
... Page I/O Card Dell™ Latitude™ E5400 and E5500 Service Manual Removing an E5400 I/O Card Replacing an E5400 I/O Card Removing an E5500 I/O Card Replacing an E5500 I /O card 2 M2.5 x 5-mm screw (1) Remove the bottom of the Base Assembly). 3. Remove the optical drive (see Removing the E5400 Bottom of the base assembly (see Removing the Optical Drive). 11. Remove the system board (see Removing the Hard Drive). 4. Removing an E5400...
Service Manual
Page 35
... the Optical Drive). 5. Remove the system board (see Removing the Hard Drive). 4. Removing an E5500 I /O card from the computer. Remove the hard drive (see Removing the E5500 System Board Assembly). 11. Remove the I /O Card 1. Replace the bottom of the base assembly (see Replacing the Hinge Cover). 8. Remove the WLAN card (see Removing the E5500 Display Assembly). 8. Remove the display assembly (see Removing a WLAN Card). 5. Remove the optical drive (see Replacing...
... the Optical Drive). 5. Remove the system board (see Removing the Hard Drive). 4. Removing an E5500 I /O card from the computer. Remove the hard drive (see Removing the E5500 System Board Assembly). 11. Remove the I /O Card 1. Replace the bottom of the base assembly (see Replacing the Hinge Cover). 8. Remove the WLAN card (see Removing the E5500 Display Assembly). 8. Remove the display assembly (see Removing a WLAN Card). 5. Remove the optical drive (see Replacing...

Service Manual
Page 36
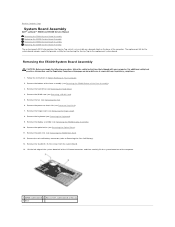
... the I /O Card NOTE: This procedure assumes that you have completed the removal procedure first. 1. 1 system board connector 3 E5500 I/O card 2 M2.5 x 5-mm screws (2) Replacing an E5500 I /O card and replace the two M2.5 x 5-mm screws. 2. Replace the keyboard (see Replacing the Hard Drive). 10. Replace the hard drive (see Replacing the Keyboard). 7. Follow the procedures in After Working on...
... the I /O Card NOTE: This procedure assumes that you have completed the removal procedure first. 1. 1 system board connector 3 E5500 I/O card 2 M2.5 x 5-mm screws (2) Replacing an E5500 I /O card and replace the two M2.5 x 5-mm screws. 2. Replace the keyboard (see Replacing the Hard Drive). 10. Replace the hard drive (see Replacing the Keyboard). 7. Follow the procedures in After Working on...

Service Manual
Page 40
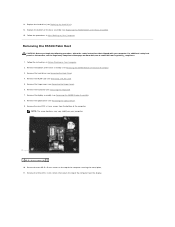
...the Regulatory Compliance Homepage on www.dell.com at : www.dell.com/regulatory_compliance. 1. Replace the hinge cover (see Replacing the Optical Drive). 7. Disconnect the cable to the motherboard by sliding it from the metal tab. 6. Removing the E5500 LED Dashboard CAUTION: Before you ...1 LED Dashboard cable 2 LED Dashboard cable connector 3 LED Dashboard Replacing the E5500 LED Dashboard CAUTION: Before you begin any of the procedures in Before Working on Your Computer. Replace the hard drive (see Replacing the Keyboard). 9. NOTE: This procedure assumes that shipped with ...
...the Regulatory Compliance Homepage on www.dell.com at : www.dell.com/regulatory_compliance. 1. Replace the hinge cover (see Replacing the Optical Drive). 7. Disconnect the cable to the motherboard by sliding it from the metal tab. 6. Removing the E5500 LED Dashboard CAUTION: Before you ...1 LED Dashboard cable 2 LED Dashboard cable connector 3 LED Dashboard Replacing the E5500 LED Dashboard CAUTION: Before you begin any of the procedures in Before Working on Your Computer. Replace the hard drive (see Replacing the Keyboard). 9. NOTE: This procedure assumes that shipped with ...
Service Manual
Page 48
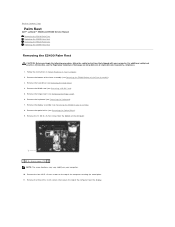
... of the computer securing the metal plate. 11. Remove the hinge cover (see Removing the Optical Drive). 9. Back to Contents Page Palm Rest Dell™ Latitude™ E5400 and E5500 Service Manual Removing the E5400 Palm Rest Replacing the E5400 Palm Rest Removing the E5500 Palm Rest Replacing the E5500 Palm Rest Removing the E5400 Palm Rest CAUTION: Before you begin...
... of the computer securing the metal plate. 11. Remove the hinge cover (see Removing the Optical Drive). 9. Back to Contents Page Palm Rest Dell™ Latitude™ E5400 and E5500 Service Manual Removing the E5400 Palm Rest Replacing the E5400 Palm Rest Removing the E5500 Palm Rest Replacing the E5500 Palm Rest Removing the E5400 Palm Rest CAUTION: Before you begin...
Service Manual
Page 50
....5 x 5-mm screws on www.dell.com at: www.dell.com/regulatory_compliance. 1. For additional safety best practices information, see Replacing the E5400 Bottom of the computer. Remove the bottom of the base assembly (see Replacing the Hard Drive). 14. Remove the keyboard (see Removing the E5500 Display Assembly). 8. Remove the optical drive (see Removing the Hinge Cover). 6. Remove the three M2 x 3-mm screws...
....5 x 5-mm screws on www.dell.com at: www.dell.com/regulatory_compliance. 1. For additional safety best practices information, see Replacing the E5400 Bottom of the computer. Remove the bottom of the base assembly (see Replacing the Hard Drive). 14. Remove the keyboard (see Removing the E5500 Display Assembly). 8. Remove the optical drive (see Removing the Hinge Cover). 6. Remove the three M2 x 3-mm screws...
Service Manual
Page 53
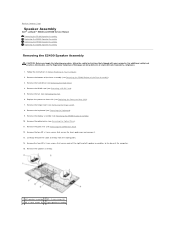
... Speaker Assembly Removing the E5500 Speaker Assembly Replacing the E5500 Speaker Assembly Removing the E5400 Speaker Assembly CAUTION: Before you begin the following procedure, follow the safety instructions that secure the touch pad cover and remove it. 13. Follow the instructions in Before Working on www.dell.com at: www.dell.com/regulatory_compliance. 1. Remove the hard drive (see Removing the Hinge...
... Speaker Assembly Removing the E5500 Speaker Assembly Replacing the E5500 Speaker Assembly Removing the E5400 Speaker Assembly CAUTION: Before you begin the following procedure, follow the safety instructions that secure the touch pad cover and remove it. 13. Follow the instructions in Before Working on www.dell.com at: www.dell.com/regulatory_compliance. 1. Remove the hard drive (see Removing the Hinge...
Service Manual
Page 54
... Replace the hinge cover (see Removing the Keyboard). Replace the bottom of the base assembly (see Removing the E5400 Bottom of the Base Assembly). 16. Removing the E5500 Speaker Assembly CAUTION: Before you have completed the removal procedure first. 1. Remove the hard drive (see Replacing the E5400 Display ...Working on Your Computer. 2. Follow the instructions in After Working on www.dell.com at : www.dell.com/regulatory_compliance. 1. Remove the fan (see Removing a WLAN Card). 5. Remove the WLAN card (see Removing the Fan). 6. Replace the four M2 x 3-mm screws that shipped...
... Replace the hinge cover (see Removing the Keyboard). Replace the bottom of the base assembly (see Removing the E5400 Bottom of the Base Assembly). 16. Removing the E5500 Speaker Assembly CAUTION: Before you have completed the removal procedure first. 1. Remove the hard drive (see Replacing the E5400 Display ...Working on Your Computer. 2. Follow the instructions in After Working on www.dell.com at : www.dell.com/regulatory_compliance. 1. Remove the fan (see Removing a WLAN Card). 5. Remove the WLAN card (see Removing the Fan). 6. Replace the four M2 x 3-mm screws that shipped...

Service Manual
Page 55
... cable guides. 13. Replace the WLAN card (see Removing the E5500 Display Assembly). 9. Remove the speaker assembly. 1 left speaker assemblies into place. 2. Replace the four M2 x 3-mm screws that shipped with the guide posts on www.dell.com at: www.dell.com/regulatory_compliance. Replace the hard drive (see Replacing the E5500 Display Assembly). 7. For additional safety best practices...
... cable guides. 13. Replace the WLAN card (see Removing the E5500 Display Assembly). 9. Remove the speaker assembly. 1 left speaker assemblies into place. 2. Replace the four M2 x 3-mm screws that shipped with the guide posts on www.dell.com at: www.dell.com/regulatory_compliance. Replace the hard drive (see Replacing the E5500 Display Assembly). 7. For additional safety best practices...
Service Manual
Page 57
... Dell™ Latitude™ E5400 and E5500 Service Manual Removing the E5400 System Board Assembly Replacing the E5400 System Board Assembly Removing the E5500 System Board Assembly Replacing the E5500 System...Removing the Optical Drive). 11. Remove the optical drive (see Processor Heat Sink). 7. Remove the bottom of the base assembly (see Removing the Hard Drive). 4. Remove the coin cell battery connector (refer to the replacement system board. Follow the instructions in Before Working on www.dell.com at: www.dell.com/regulatory_compliance. 1. Remove the hard drive (see Removing...
... Dell™ Latitude™ E5400 and E5500 Service Manual Removing the E5400 System Board Assembly Replacing the E5400 System Board Assembly Removing the E5500 System Board Assembly Replacing the E5500 System...Removing the Optical Drive). 11. Remove the optical drive (see Processor Heat Sink). 7. Remove the bottom of the base assembly (see Removing the Hard Drive). 4. Remove the coin cell battery connector (refer to the replacement system board. Follow the instructions in Before Working on www.dell.com at: www.dell.com/regulatory_compliance. 1. Remove the hard drive (see Removing...
Service Manual
Page 58
.... 2. Replace the two M2.5 x 5-mm screws on your computer or at : www.dell.com/regulatory_compliance. Replace the optical drive (see Removing the E5400 Bottom of the base assembly (see Removing the Hard Drive). 4. Replace the display assembly (see Replacing the Keyboard). 8. Replace the keyboard (see Replacing... 3. Otherwise, you must enter the system setup program to boot from the bottom side of the Base Assembly). Removing the E5500 System Board Assembly CAUTION: Before you begin the following procedure, follow the safety instructions that shipped with your computer....
.... 2. Replace the two M2.5 x 5-mm screws on your computer or at : www.dell.com/regulatory_compliance. Replace the optical drive (see Removing the E5400 Bottom of the base assembly (see Removing the Hard Drive). 4. Replace the display assembly (see Replacing the Keyboard). 8. Replace the keyboard (see Replacing... 3. Otherwise, you must enter the system setup program to boot from the bottom side of the Base Assembly). Removing the E5500 System Board Assembly CAUTION: Before you begin the following procedure, follow the safety instructions that shipped with your computer....


