Dell Latitude E5530 Support Question
Dell Latitude E5530 Support Question
Find answers below for this question about Dell Latitude E5530.Need a Dell Latitude E5530 manual? We have 3 online manuals for this item!
Question posted by beDave on July 25th, 2014
How To Make The Hard Drive Removable On A Dell E5530
The person who posted this question about this Dell product did not include a detailed explanation. Please use the "Request More Information" button to the right if more details would help you to answer this question.
Current Answers
Answer #1: Posted by RaviCatDell on July 28th, 2014 7:52 AM
RaviCatDell

Member since:
April 18th, 2014 Points: 294,210

Member since:
April 18th, 2014 Points: 294,210
Hi beDave,
I'm a part of Dell Social Media Team. Here's a link to the Owner's Manual http://dell.to/1rKMQXf Refer to Page 26 onwards to help you remove / replace hard drive on the system.
Feel free to reply here, should you need any further assistance on the same.
Dell-Ravi C
#IWorkforDell
Follow me on Twitter: @RaviCAtDell
Social Media & communities Professional
Related Dell Latitude E5530 Manual Pages
Statement of Volatility - Page 2

... DELL logo, Dell Precision™, OptiPlex™, Latitude™, PowerEdge™, PowerVault™, PowerConnect™, OpenManage™, EqualLogic™, KACE™, FlexAddress™ and Vostro™ are either registered trademarks or trademarks of Intel Corporation in the United States and/or other countries. Primary power loss (unplugging the power cord and removing...
User Manual - Page 2

... the Keyboard Trim...13 Installing the Keyboard Trim...14 Removing the Keyboard...14 Installing the Keyboard...17 Removing the Bottom Door...18 Installing the Bottom Door...19 Removing the Optical Drive...19 Installing the Optical Drive...21 Removing The Hard Drive...21 Installing the Hard Drive...23 Removing the Wireless Local Area Network (WLAN) Card 24 Installing the Wireless Local Area...
User Manual - Page 21

... that secures the optical drive in place. 6. Install :
a) bottom door b) battery 7. Follow the procedures in After Working Inside Your Computer. Insert the optical drive into the computer. 5. Remove the screws that secure the optical drive bracket. 7. Follow the procedures in Before Working Inside Your Computer. 2. Remove the optical drive bracket.
8. Removing The Hard Drive
1.
User Manual - Page 22

Remove the hard drive from its connector. a) battery b) bottom door 3. Figure 20. 5. Figure 19. 4.
Use the tab to pull the hard drive bracket and release the hard drive from the computer.
22 Remove the screws that secure the hard drive bracket in place.
User Manual - Page 23
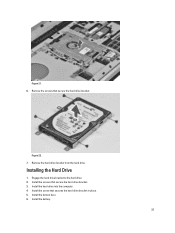
Remove the hard drive bracket from the hard drive. Install the hard drive into the computer. 4. Install the battery.
23 Install the bottom door. 6. Remove the screws that secure the hard drive bracket. 3. Engage the hard drive bracket to the hard drive. 2. Figure 22. 7. Installing the Hard Drive
1. Install the screws that secure the hard drive bracket.
Install the screw that secures ...
User Manual - Page 28
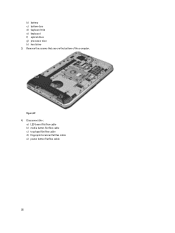
Disconnect the :
a) LED board flat flex cable b) media button flat flex cable c) touchpad flat flex cable d) fingerprint scanner flat flex cable e) power button flat flex cable
28 Remove the screws that secure the bottom of the computer. b) battery c) bottom door d) keyboard trim e) keyboard f) optical drive g) processor door h) hard drive 3. Figure 27. 4.
User Manual - Page 33

...Place the audio board in After Working Inside Your Computer. Follow the procedures in Before Working Inside Your Computer.
2. Remove: a) SD memory card b) battery c) access panel d) keyboard trim e) keyboard f) optical drive g) hard drive h) processor door i) palmrest
3. Remove the audio board from the routing channels.
33 Install: a) Bluetooth module b) palmrest c) processor door d) optical...
User Manual - Page 36
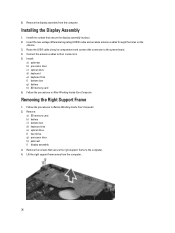
... Inside Your Computer. Lift the right support frame away from the computer. Installing the Display Assembly
1. Remove the display assembly from the computer.
36 Remove:
a) SD memory card b) battery c) bottom door d) keyboard trim e) optical drive f) hard drive g) processor door h) palmrest i) display assembly 3. 8.
Insert the low-voltage differential signaling (LVDS) cable and wireless...
User Manual - Page 37
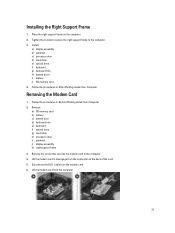
... Inside Your Computer. 2. Follow the procedures in After Working Inside Your Computer. Place the right support frame on the back of the card. 5. Remove:
a) SD memory card b) battery c) bottom door d) keyboard trim e) keyboard f) optical drive g) hard drive h) processor door i) palmrest j) display assembly k) right support frame
3. Install:
a) display assembly b) palmrest c) processor door...
User Manual - Page 38
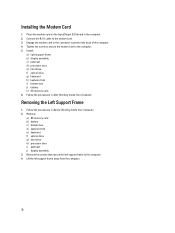
... to the modem card. 3. Install:
a) right support frame b) display assembly c) palmrest d) processor door e) hard drive f) optical drive g) keyboard h) keyboard trim i) bottom door j) battery k) SD memory card 6. Remove the screws that secure the left support frame away from the computer.
38 Removing the Left Support Frame
1. Engage the modem card to the computer. 4. Follow the procedures...
User Manual - Page 39
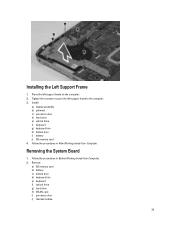
... 4. Place the left support frame to the computer. 3. Tighten the screws to secure the left support frame on the computer. 2.
Remove:
a) SD memory card b) battery c) bottom door d) keyboard trim e) keyboard f) optical drive g) hard drive h) WLAN card i) processor door j) thermal module
39 Follow the procedures in After Working Inside Your Computer. Installing the Left Support...
User Manual - Page 42
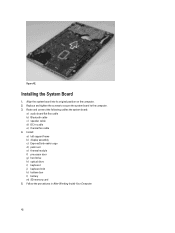
... system board into its original position on the computer. 2. Install : a) left support frame b) display assembly c) ExpressCard reader cage d) palm rest e) thermal module f) processor door g) hard drive h) optical drive i) keyboard j) keyboard trim k) bottom door l) battery m) SD memory card 5.
Replace and tighten the screws to secure the system board to the computer. 3. Installing the...
User Manual - Page 43
...left support frame o) system board 3. Follow the procedures in Before Working Inside Your Computer. 2.
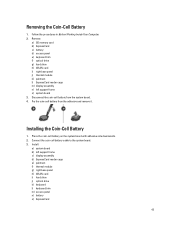
Removing the Coin-Cell Battery
1. Installing the Coin-Cell Battery
1. Remove:
a) SD memory card b) ExpressCard c) battery d) access panel e) keyboard trim f) optical drive g) hard drive h) WLAN card i) right base panel j) thermal module k) palmrest l) ExpressCard reader cage m) display...
User Manual - Page 44
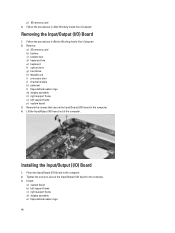
Tighten the screw to secure the Input/Output (I /O) Board
1. Install:
a) system board b) left support frame p) system board 3. Remove:
a) SD memory card b) battery c) bottom door d) keyboard trim e) keyboard f) optical drive g) hard drive h) WLAN card i) processor door j) thermal module k) palmrest l) ExpressCard reader cage m) display assembly n) right support frame o) left support frame c)...
User Manual - Page 45
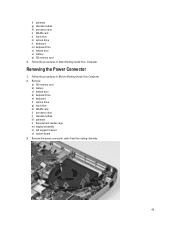
...card b) battery c) bottom door d) keyboard trim e) keyboard f) optical drive g) hard drive h) WLAN card i) processor door j) thermal module k) palmrest l) ExpressCard reader cage m) display assembly n) left support bracket o) system board 3. Removing the Power Connector
1. Follow the procedures in Before Working Inside Your Computer. 2. Remove the power connector cable from the routing channels...
User Manual - Page 46
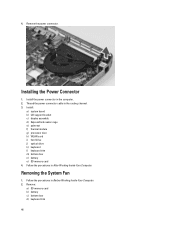
... support bracket c) display assembly d) ExpressCard reader cage e) palmrest f) thermal module g) processor door h) WLAN card i) hard drive j) optical drive k) keyboard l) keyboard trim m) bottom door n) battery o) SD memory card 4. Install the power connector in the routing channel. 3. Remove:
a) SD memory card b) battery c) bottom door d) keyboard trim
46 Installing the Power Connector
1.
User Manual - Page 47

... that secures the system fan and lift it to remove from the routing channel.
4. e) keyboard f) optical drive g) hard drive h) WLAN card i) processor door j) thermal module k) palmrest l) ExpressCard reader cage m) display assembly n) right support frame o) left support frame p) modem card q) network connector r) system board s) power connector 3. Remove the system fan cable from the computer.
47...
User Manual - Page 48
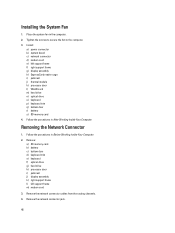
...2.
Install: a) power connector b) system board c) network connector d) modem card e) left support frame m) modem card
3. Remove the network connector jack.
48 Remove: a) SD memory card b) battery c) bottom door d) keyboard trim e) keyboard f) optical drive g) hard drive h) processor door i) palmrest j) display assembly k) right support frame l) left support frame f) right support frame...
User Manual - Page 49
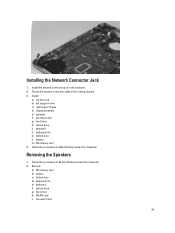
...c) right support frame d) display assembly e) palmrest f) processor door g) hard drive h) optical drive i) keyboard j) keyboard trim k) bottom door l) battery m) SD memory card 4. Follow the procedures in the routing channel. 3. Remove:
a) SD memory card b) battery c) bottom door d) keyboard trim e) keyboard f) optical drive g) hard drive h) WLAN card i) processor door
49 Thread the network...
User Manual - Page 61
...status and the type of hard drive installed. System Setup
Overview
System Setup allows you to:
• change the system configuration information after you add, change, or remove any hardware in this section...Fi Device, Cellular Device, Bluetooth Device.
When the blue DELL logo is displayed, you are prompted, this program. NOTE: The F2 prompt indicates that the keyboard has...
Similar Questions


How To Remove Hard Drive From Dell Latitude E5530
(Posted by Kikithetos 10 years ago)

How To Replace Dell Inspiron N5050 Hard Drive Removal
(Posted by HaiePp 10 years ago)

Dell Inspiron N5010/m5010 Won't Reboot After Hard Drive Removal
(Posted by maisa 10 years ago)

Help Me Get Into My Computer Please.
I'm currently locked out of my dell latitude E5530 laptop. I have completely blanked on what my pass...
I'm currently locked out of my dell latitude E5530 laptop. I have completely blanked on what my pass...
(Posted by Mpowledge29 11 years ago)