
View
Page 29
... memory modules and, if necessary, replace them. See your computer. Troubleshooting 29 Contact Dell. Ensure that shipped with your Service Manual at support.dell.com for more information. The primary cache internal to commands from the computer. One or more information. DI S K C : F A I A R Y DEVICE FAILURE - The operation requires a hard drive in the system setup program. The...
... memory modules and, if necessary, replace them. See your computer. Troubleshooting 29 Contact Dell. Ensure that shipped with your Service Manual at support.dell.com for more information. The primary cache internal to commands from the computer. One or more information. DI S K C : F A I A R Y DEVICE FAILURE - The operation requires a hard drive in the system setup program. The...
View
Page 30
... to commands from the computer. Reinstall the memory modules and, if necessary, replace them. Then, shut down the computer, remove the hard drive (see "Dell Diagnostics" on page 36). Run the Hard Disk Drive tests in the Dell Diagnostics (see your Service Manual at support.dell.com), and boot the computer from a CD. Shut down the computer, reinstall...
... to commands from the computer. Reinstall the memory modules and, if necessary, replace them. Then, shut down the computer, remove the hard drive (see "Dell Diagnostics" on page 36). Run the Hard Disk Drive tests in the Dell Diagnostics (see your Service Manual at support.dell.com), and boot the computer from a CD. Shut down the computer, reinstall...
View
Page 31
... as a floppy disk or CD. L I C E N S E D C O N T E N T I S N O T A C C E S S I B L E I N M E D I A D I L U R E - Shut down the computer, reinstall the hard drive, and restart the computer. Run the Keyboard Controller test in the Dell Diagnostics (see "Dell Diagnostics" on page 36). K E Y B O A R D C L O C K L I N E F A I R E C T - For external keyboards, check the cable connection. HA R D - Reinstall the memory modules and, if necessary, replace them. If the problem persists, try another...
... as a floppy disk or CD. L I C E N S E D C O N T E N T I S N O T A C C E S S I B L E I N M E D I A D I L U R E - Shut down the computer, reinstall the hard drive, and restart the computer. Run the Keyboard Controller test in the Dell Diagnostics (see "Dell Diagnostics" on page 36). K E Y B O A R D C L O C K L I N E F A I R E C T - For external keyboards, check the cable connection. HA R D - Reinstall the memory modules and, if necessary, replace them. If the problem persists, try another...

View
Page 32
... LOGIC FAILURE AT ADDRESS, READ VALUE EXPECTING VALUE - Reinstall the memory modules and, if necessary, replace them . A memory module may be corrupted. If the hard drive is your Service Manual at support.dell.com for more information. Contact Dell (see "Contacting Dell" on page 36). A chip on page 61). 32 Troubleshooting You have too many programs...
... LOGIC FAILURE AT ADDRESS, READ VALUE EXPECTING VALUE - Reinstall the memory modules and, if necessary, replace them . A memory module may be corrupted. If the hard drive is your Service Manual at support.dell.com for more information. Contact Dell (see "Contacting Dell" on page 36). A chip on page 61). 32 Troubleshooting You have too many programs...
Technical Guide
Page 21
...*, and provides one additional replacement battery during the term of your Hard Drive*, Dell ProSupport Certified Data Destruction* services. Extended Battery Service* aligns battery coverage with Extended Battery Service*, CompleteCare Accidental Damage Service* and Dell ProSupport Laptop Tracking and Recovery... surges, drops, falls, and extreme temperatures. Dell ProSupport Mobility Services* Our broadest solution for notebooks that have a failed hard drive and did not back up your notebooks and data. Dell ProSupport Laptop Tracking and Recovery and Remote Data Delete...
...*, and provides one additional replacement battery during the term of your Hard Drive*, Dell ProSupport Certified Data Destruction* services. Extended Battery Service* aligns battery coverage with Extended Battery Service*, CompleteCare Accidental Damage Service* and Dell ProSupport Laptop Tracking and Recovery... surges, drops, falls, and extreme temperatures. Dell ProSupport Mobility Services* Our broadest solution for notebooks that have a failed hard drive and did not back up your notebooks and data. Dell ProSupport Laptop Tracking and Recovery and Remote Data Delete...
Service Manual
Page 31
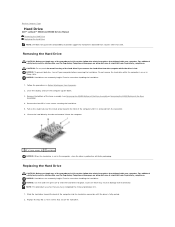
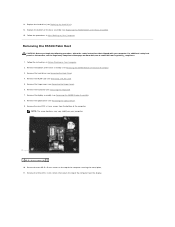
... your computer before removing the hard drive. Back to Contents Page Hard Drive Dell™ Latitude™ E5400 and E5500 Service Manual Removing the Hard Drive Replacing the Hard Drive NOTE: Dell does not guarantee compatibility or provide support for hard drives obtained from the computer. 1 M2 x 3-mm screws (4) 2 hard drive NOTICE: When the hard drive is fully seated. 2. Exercise care when handling the hard drive. 1. Follow the procedures in Before...
... your computer before removing the hard drive. Back to Contents Page Hard Drive Dell™ Latitude™ E5400 and E5500 Service Manual Removing the Hard Drive Replacing the Hard Drive NOTE: Dell does not guarantee compatibility or provide support for hard drives obtained from the computer. 1 M2 x 3-mm screws (4) 2 hard drive NOTICE: When the hard drive is fully seated. 2. Exercise care when handling the hard drive. 1. Follow the procedures in Before...
Service Manual
Page 34
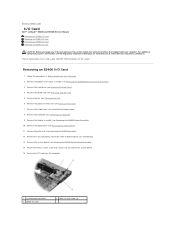
... Processor Heat Sink). 7. Remove the processor heat sink (see Removing the Hard Drive). 4. For additional safety best practices information, see Removing the E5400 Display Assembly). 10. Removing an E5400 I /O card provides DC-in, USB, ...drive (see Removing a WLAN Card). 5. Remove the palm rest (see Removing the E5400 System Board Assembly). 14. Remove the system board (see Removing the E5400 Palm Rest). 12. Remove the M2.5 x 5-mm screw that secures the I/O card to Contents Page I/O Card Dell™ Latitude™ E5400 and E5500 Service Manual Removing an E5400 I/O Card Replacing...
... Processor Heat Sink). 7. Remove the processor heat sink (see Removing the Hard Drive). 4. For additional safety best practices information, see Removing the E5400 Display Assembly). 10. Removing an E5400 I /O card provides DC-in, USB, ...drive (see Removing a WLAN Card). 5. Remove the palm rest (see Removing the E5400 System Board Assembly). 14. Remove the system board (see Removing the E5400 Palm Rest). 12. Remove the M2.5 x 5-mm screw that secures the I/O card to Contents Page I/O Card Dell™ Latitude™ E5400 and E5500 Service Manual Removing an E5400 I/O Card Replacing...
Service Manual
Page 35
... Assembly). 8. Remove the display assembly (see Removing a WLAN Card). 5. Remove the optical drive (see Replacing the Processor Heat Sink). 9. Replace the processor heat sink (see Removing the Optical Drive). 9. Replace the hard drive (see Replacing the E5400 Palm Rest). 4. Removing an E5500 I /O card from the computer. Remove the two M2.5 x 5-mm screws that you have completed the removal procedure...
... Assembly). 8. Remove the display assembly (see Removing a WLAN Card). 5. Remove the optical drive (see Replacing the Processor Heat Sink). 9. Replace the processor heat sink (see Removing the Optical Drive). 9. Replace the hard drive (see Replacing the E5400 Palm Rest). 4. Removing an E5500 I /O card from the computer. Remove the two M2.5 x 5-mm screws that you have completed the removal procedure...

Service Manual
Page 36
... Replacing the Optical Drive). 5. Replace the optical drive (see Replacing the E5500 System Board Assembly) 3. Back to Contents Page Replace the display assembly (see Replacing the Hinge Cover). 8. Replace the hinge cover (see Replacing the E5500 Display Assembly). 6. Follow the procedures in After Working on Your Computer. Replace the WLAN card (seeReplacing a WLAN Card). 9. Replace the bottom of the base assembly (see Replacing the Hard Drive...
... Replacing the Optical Drive). 5. Replace the optical drive (see Replacing the E5500 System Board Assembly) 3. Back to Contents Page Replace the display assembly (see Replacing the Hinge Cover). 8. Replace the hinge cover (see Replacing the E5500 Display Assembly). 6. Follow the procedures in After Working on Your Computer. Replace the WLAN card (seeReplacing a WLAN Card). 9. Replace the bottom of the base assembly (see Replacing the Hard Drive...

Service Manual
Page 40
... pulling on the tab near cable's connector. 1 LED Dashboard cable 2 LED Dashboard cable connector 3 LED Dashboard Replacing the E5500 LED Dashboard CAUTION: Before you begin any of the procedures in this section, follow the safety instructions that you begin... Compliance Homepage on www.dell.com at : www.dell.com/regulatory_compliance. Follow the procedures in this section, follow the safety instructions that shipped with your computer. Replace the optical drive (see Replacing the E5400 Display Assembly). 8. Replace the hard drive (see Replacing the Keyboard). 9. Remove...
... pulling on the tab near cable's connector. 1 LED Dashboard cable 2 LED Dashboard cable connector 3 LED Dashboard Replacing the E5500 LED Dashboard CAUTION: Before you begin any of the procedures in this section, follow the safety instructions that you begin... Compliance Homepage on www.dell.com at : www.dell.com/regulatory_compliance. Follow the procedures in this section, follow the safety instructions that shipped with your computer. Replace the optical drive (see Replacing the E5400 Display Assembly). 8. Replace the hard drive (see Replacing the Keyboard). 9. Remove...
Service Manual
Page 48
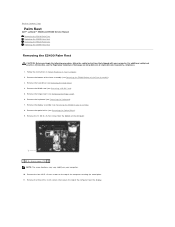
... the Hard Drive). 4. Remove the bottom of the base assembly (see Removing the Keyboard). 7. Remove the keyboard (see Removing the E5400 Bottom of the Base Assembly). 3. Back to Contents Page Palm Rest Dell™ Latitude™ E5400 and E5500 Service Manual Removing the E5400 Palm Rest Replacing the E5400 Palm Rest Removing the E5500 Palm Rest Replacing the E5500...
... the Hard Drive). 4. Remove the bottom of the base assembly (see Removing the Keyboard). 7. Remove the keyboard (see Removing the E5400 Bottom of the Base Assembly). 3. Back to Contents Page Palm Rest Dell™ Latitude™ E5400 and E5500 Service Manual Removing the E5400 Palm Rest Replacing the E5400 Palm Rest Removing the E5500 Palm Rest Replacing the E5500...
Service Manual
Page 50
...the keyboard (see the Regulatory Compliance Homepage on www.dell.com at: www.dell.com/regulatory_compliance. 1. Replace the bottom of the base assembly (see Removing the E5400 Bottom of the computer. Remove the optical drive (see Removing a WLAN Card). 5. Remove the two...display assembly (see Replacing the Hard Drive). 14. Replace the hard drive (see Removing the E5500 Display Assembly). 8. Follow the instructions in After Working on your computer. Remove the hard drive (see Removing the Hinge Cover). 6. Remove the hinge cover (see Removing the Hard Drive). 4. Remove ...
...the keyboard (see the Regulatory Compliance Homepage on www.dell.com at: www.dell.com/regulatory_compliance. 1. Replace the bottom of the base assembly (see Removing the E5400 Bottom of the computer. Remove the optical drive (see Removing a WLAN Card). 5. Remove the two...display assembly (see Replacing the Hard Drive). 14. Replace the hard drive (see Removing the E5500 Display Assembly). 8. Follow the instructions in After Working on your computer. Remove the hard drive (see Removing the Hinge Cover). 6. Remove the hinge cover (see Removing the Hard Drive). 4. Remove ...
Service Manual
Page 53
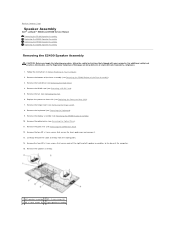
Back to the base of the Base Assembly). 3. Remove the hard drive (see Removing the Optical Drive). 11. Remove the optical drive (see Removing the Hard Drive). 4. Remove the palm rest (see Removing a WLAN Card). 5. Carefully remove the cable assembly from ... assembly. 1 left speaker assemblies to Contents Page Speaker Assembly Dell™ Latitude™ E5400 and E5500 Service Manual Removing the E5400 Speaker Assembly Replacing the E5400 Speaker Assembly Removing the E5500 Speaker Assembly Replacing the E5500 Speaker Assembly Removing the E5400 Speaker Assembly CAUTION: Before you ...
Back to the base of the Base Assembly). 3. Remove the hard drive (see Removing the Optical Drive). 11. Remove the optical drive (see Removing the Hard Drive). 4. Remove the palm rest (see Removing a WLAN Card). 5. Carefully remove the cable assembly from ... assembly. 1 left speaker assemblies to Contents Page Speaker Assembly Dell™ Latitude™ E5400 and E5500 Service Manual Removing the E5400 Speaker Assembly Replacing the E5400 Speaker Assembly Removing the E5500 Speaker Assembly Replacing the E5500 Speaker Assembly Removing the E5400 Speaker Assembly CAUTION: Before you ...
Service Manual
Page 54
... E5500 Speaker Assembly CAUTION: Before you have completed the removal procedure first. 1. Follow the instructions in After Working on www.dell.com at : www.dell.com/regulatory_compliance. Remove the WLAN card (see Replacing the Fan). 13. Replace the four M2 x 3-mm screws that shipped with your computer. Replace the processor heat sink (see Replacing the Hard Drive). 15. Replace the hard drive...
... E5500 Speaker Assembly CAUTION: Before you have completed the removal procedure first. 1. Follow the instructions in After Working on www.dell.com at : www.dell.com/regulatory_compliance. Remove the WLAN card (see Replacing the Fan). 13. Replace the four M2 x 3-mm screws that shipped with your computer. Replace the processor heat sink (see Replacing the Hard Drive). 15. Replace the hard drive...

Service Manual
Page 55
... the following procedure, follow the safety instructions that shipped with the guide posts on www.dell.com at: www.dell.com/regulatory_compliance. 8. Replace the hard drive (see Replacing the Keyboard). 8. Align the guide holes in the speaker assembly with your computer. Replace the keyboard (see Replacing the Hard Drive). 12. Carefully remove the cable assembly from the cable guides. 13.
... the following procedure, follow the safety instructions that shipped with the guide posts on www.dell.com at: www.dell.com/regulatory_compliance. 8. Replace the hard drive (see Replacing the Keyboard). 8. Align the guide holes in the speaker assembly with your computer. Replace the keyboard (see Replacing the Hard Drive). 12. Carefully remove the cable assembly from the cable guides. 13.
Service Manual
Page 57
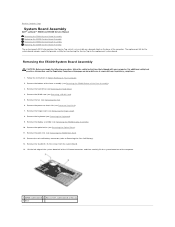
...Bottom of the computer. Remove the hard drive (see Processor Heat Sink). 7. Remove the coin cell battery connector (refer to the replacement system board. Remove the processor heat sink (see Removing the Hard Drive). 4. Remove the optical drive (see Removing the E5400 Palm Rest...8. Back to Contents Page System Board Assembly Dell™ Latitude™ E5400 and E5500 Service Manual Removing the E5400 System Board Assembly Replacing the E5400 System Board Assembly Removing the E5500 System Board Assembly Replacing the E5500 System Board Assembly The system board's BIOS ...
...Bottom of the computer. Remove the hard drive (see Processor Heat Sink). 7. Remove the coin cell battery connector (refer to the replacement system board. Remove the processor heat sink (see Removing the Hard Drive). 4. Remove the optical drive (see Removing the E5400 Palm Rest...8. Back to Contents Page System Board Assembly Dell™ Latitude™ E5400 and E5500 Service Manual Removing the E5400 System Board Assembly Replacing the E5400 System Board Assembly Removing the E5500 System Board Assembly Replacing the E5500 System Board Assembly The system board's BIOS ...
Service Manual
Page 58
... additional safety best practices information, see the Regulatory Compliance Homepage on www.dell.com at : www.dell.com/regulatory_compliance. 1. Replace the fan (see Replacing the E5400 Display Assembly). 7. NOTICE: Before turning on Your Computer. Remove the WLAN card (see Removing the Hard Drive). 4. Remove the hard drive (see Removing a WLAN Card). NOTICE: Ensure that no stray screws remain...
... additional safety best practices information, see the Regulatory Compliance Homepage on www.dell.com at : www.dell.com/regulatory_compliance. 1. Replace the fan (see Replacing the E5400 Display Assembly). 7. NOTICE: Before turning on Your Computer. Remove the WLAN card (see Removing the Hard Drive). 4. Remove the hard drive (see Removing a WLAN Card). NOTICE: Ensure that no stray screws remain...
Service Manual
Page 60
..., you use a BIOS update program media to Contents Page Replace the fan (see Replacing the Hard Drive). 13. Replace the WLAN card (see Replacing the E5500 Bottom of the Base Assembly). 14. Replace the bottom of the base assembly (see Replacing a WLAN Card). 12. Replace the hinge cover (see the Dell™ Technology Guide on Your Computer. For information on the...
..., you use a BIOS update program media to Contents Page Replace the fan (see Replacing the Hard Drive). 13. Replace the WLAN card (see Replacing the E5500 Bottom of the Base Assembly). 14. Replace the bottom of the base assembly (see Replacing a WLAN Card). 12. Replace the hinge cover (see the Dell™ Technology Guide on Your Computer. For information on the...
Service Manual
Page 69
... you are using to see if that it runs in an environment similar to non-Windows Vista operating system environments. 1. l Run the Dell Diagnostics (see Replacing a Memory Module). For more information about the type of Windows. 2. Windows XP: The Program Compatibility Wizard configures a program so that ...follow the safety instructions that you begin any open files and exit any of the procedures in an environment similar to check the hard drive, floppy disks, CDs, or DVDs Save and close any open programs you are following the memory installation guidelines (see the Setup...
... you are using to see if that it runs in an environment similar to non-Windows Vista operating system environments. 1. l Run the Dell Diagnostics (see Replacing a Memory Module). For more information about the type of Windows. 2. Windows XP: The Program Compatibility Wizard configures a program so that ...follow the safety instructions that you begin any open files and exit any of the procedures in an environment similar to check the hard drive, floppy disks, CDs, or DVDs Save and close any open programs you are following the memory installation guidelines (see the Setup...


