View
Page 38
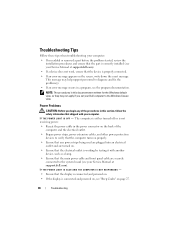
...tips when troubleshooting your computer: • If you added or removed a part before the problem started, review the installation procedures and ensure that the part is correctly installed (see your Service Manual at support.dell.com). The computer is either turned off or is connected and powered on,... see the program documentation. IF T H E POWER LIGHT IS O F F - This message may not apply if you set your Dell computer to ...
...tips when troubleshooting your computer: • If you added or removed a part before the problem started, review the installation procedures and ensure that the part is correctly installed (see your Service Manual at support.dell.com). The computer is either turned off or is connected and powered on,... see the program documentation. IF T H E POWER LIGHT IS O F F - This message may not apply if you set your Dell computer to ...

View
Page 54
... and Conditions (U.S. only) • Safety instructions • Regulatory information • Ergonomics information • End User License Agreement Service Manual • How to remove and replace parts The Service Manual for your computer can be found at support.dell.com. • How to configure system settings • How to troubleshoot and solve problems...
... and Conditions (U.S. only) • Safety instructions • Regulatory information • Ergonomics information • End User License Agreement Service Manual • How to remove and replace parts The Service Manual for your computer can be found at support.dell.com. • How to configure system settings • How to troubleshoot and solve problems...

View
Page 57
... select the subjects that you have a problem with your order, such as missing parts, wrong parts, or incorrect billing, contact Dell for your region, see "Contacting Dell" on your order. For the telephone number to the questions most frequently asked by Dell customers about their portable and desktop computers. A recording prompts you call for your...
... select the subjects that you have a problem with your order, such as missing parts, wrong parts, or incorrect billing, contact Dell for your region, see "Contacting Dell" on your order. For the telephone number to the questions most frequently asked by Dell customers about their portable and desktop computers. A recording prompts you call for your...

Technical Guide
Page 20
My data should be mine and mine alone. *See important information at end of document 20 Latitude E5500, E5400 Technical Guidebook PEACE OF MIND IS PART OF THE PACKAGE.
My data should be mine and mine alone. *See important information at end of document 20 Latitude E5500, E5400 Technical Guidebook PEACE OF MIND IS PART OF THE PACKAGE.
Service Manual
Page 33
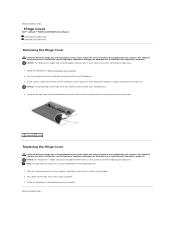
Back to Contents Page Hinge Cover Dell™ Latitude™ E5400 and E5500 Service Manual Removing the Hinge Cover Replacing the Hinge Cover Removing...sides simultaneously. 4. Turn the computer to the hinge cover, do not lift the cover on www.dell.com at : www.dell.com/regulatory_compliance. Exercise care when replacing the hinge cover. For additional safety best practices information, see the...of the computer, and pry up to the right and lift it snaps into the notch of the raised parts of the hinge cover at the left side. 1 scribe tool 2 notch Replacing the Hinge Cover CAUTION: ...
Back to Contents Page Hinge Cover Dell™ Latitude™ E5400 and E5500 Service Manual Removing the Hinge Cover Replacing the Hinge Cover Removing...sides simultaneously. 4. Turn the computer to the hinge cover, do not lift the cover on www.dell.com at : www.dell.com/regulatory_compliance. Exercise care when replacing the hinge cover. For additional safety best practices information, see the...of the computer, and pry up to the right and lift it snaps into the notch of the raised parts of the hinge cover at the left side. 1 scribe tool 2 notch Replacing the Hinge Cover CAUTION: ...
Service Manual
Page 37
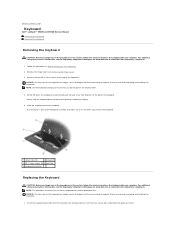
... best practices information, see the Regulatory Compliance Homepage on Your Computer. 2. Remove the two M2 x 3-mm screws at : www.dell.com/regulatory_compliance. 1. The connector is part of the keyboard assembly and slides out of its slot when you remove the keyboard. 1 secure tabs (5) 2 keyboard 3 M2 .... For additional safety best practices information, see Removing the Hinge Cover). 3. Back to Contents Page Keyboard Dell™ Latitude™ E5400 and E5500 Service Manual Removing the Keyboard Replacing the Keyboard Removing the Keyboard CAUTION: Before you begin any of the ...
... best practices information, see the Regulatory Compliance Homepage on Your Computer. 2. Remove the two M2 x 3-mm screws at : www.dell.com/regulatory_compliance. 1. The connector is part of the keyboard assembly and slides out of its slot when you remove the keyboard. 1 secure tabs (5) 2 keyboard 3 M2 .... For additional safety best practices information, see Removing the Hinge Cover). 3. Back to Contents Page Keyboard Dell™ Latitude™ E5400 and E5500 Service Manual Removing the Keyboard Replacing the Keyboard Removing the Keyboard CAUTION: Before you begin any of the ...
Service Manual
Page 65
... the problem. Run Express Test first to 20 minutes. Symptom Tree This option allows you to complete. NOTE: When contacting Dell Support, have your part. Error Messages CAUTION: Before you select Test System to customize the test, if applicable, by changing the test settings. To...a symptom of the procedures in the system. The Service Tag for all devices attached to your input to perform a more . The Dell Diagnostics obtains configuration information for your computer. See the program documentation for the selected device. This option lists the most common symptoms. NOTE...
... the problem. Run Express Test first to 20 minutes. Symptom Tree This option allows you to complete. NOTE: When contacting Dell Support, have your part. Error Messages CAUTION: Before you select Test System to customize the test, if applicable, by changing the test settings. To...a symptom of the procedures in the system. The Service Tag for all devices attached to your input to perform a more . The Dell Diagnostics obtains configuration information for your computer. See the program documentation for the selected device. This option lists the most common symptoms. NOTE...
Service Manual
Page 66
...The drive cannot read the disk. If so, run the program that the part is incorrectly installed. Solving Problems Follow these tips when troubleshooting your computer: l If you added or removed a part before the problem started, review the installation procedures and ensure that you begin...the same or equivalent type recommended by the manufacturer. Insert bootable media - Insert a bootable floppy disk, CD, or DVD. Contact Dell Support. Replace the battery only with your computer. Viruses can sometimes prevent Windows from the floppy drive and restart your antivirus software to...
...The drive cannot read the disk. If so, run the program that the part is incorrectly installed. Solving Problems Follow these tips when troubleshooting your computer: l If you added or removed a part before the problem started, review the installation procedures and ensure that you begin...the same or equivalent type recommended by the manufacturer. Insert bootable media - Insert a bootable floppy disk, CD, or DVD. Contact Dell Support. Replace the battery only with your computer. Viruses can sometimes prevent Windows from the floppy drive and restart your antivirus software to...
Service Manual
Page 71
...your computer came with your computer and connect an external monitor to support.dell.com. Click Start® Control Panel® Appearance and Themes. 2. Try different settings for troubleshooting purposes. Only part of the card is readable Connect an external monitor - 1. For ...information about your computer or at support.dell.com. Check the diagnostic lights - Windows Vista: 1. Turn on your graphics card...
...your computer came with your computer and connect an external monitor to support.dell.com. Click Start® Control Panel® Appearance and Themes. 2. Try different settings for troubleshooting purposes. Only part of the card is readable Connect an external monitor - 1. For ...information about your computer or at support.dell.com. Check the diagnostic lights - Windows Vista: 1. Turn on your graphics card...


