View
Page 17
..., browse to the old computer. To create a wizard disk, use your new computer with Windows XP and perform the following drive→Next. 5 Insert the removable media, such as a writable CD, and click OK. 6 When the disk creation completes and the Now go to your old computer message appears, do not ...click Next. 7 Go to the path for fastwiz (on the appropriate removable media) and click OK. 3 On the Files and Settings Transfer ...
..., browse to the old computer. To create a wizard disk, use your new computer with Windows XP and perform the following drive→Next. 5 Insert the removable media, such as a writable CD, and click OK. 6 When the disk creation completes and the Now go to your old computer message appears, do not ...click Next. 7 Go to the path for fastwiz (on the appropriate removable media) and click OK. 3 On the Files and Settings Transfer ...
View
Page 30
.... Run the Hard Disk Drive tests in the Dell Diagnostics (see "Dell Diagnostics" on page 36). 30 Troubleshooting Run the Hard Disk Drive tests in the Dell Diagnostics (see "Dell Diagnostics" on page 36). E X T E N D E D M E M O R Y S I V E - T H E F I L E B E I N G C O P I E D I S T O O L A R G E F O R T H E D E S T I N A T I O N D R I Z E H A S C H A N G E D - D I S K D R I V E C O N F I G U R A T I L U R E 0 - Shut down the computer, remove the hard drive (see your Service Manual at support.dell.com), and boot the computer from a CD. If the problem persists...
.... Run the Hard Disk Drive tests in the Dell Diagnostics (see "Dell Diagnostics" on page 36). 30 Troubleshooting Run the Hard Disk Drive tests in the Dell Diagnostics (see "Dell Diagnostics" on page 36). E X T E N D E D M E M O R Y S I V E - T H E F I L E B E I N G C O P I E D I S T O O L A R G E F O R T H E D E S T I N A T I O N D R I Z E H A S C H A N G E D - D I S K D R I V E C O N F I G U R A T I L U R E 0 - Shut down the computer, remove the hard drive (see your Service Manual at support.dell.com), and boot the computer from a CD. If the problem persists...
View
Page 31
...the Digital Rights Management (DRM) restrictions on page 36). See your Service Manual at support.dell.com), and boot the computer from a CD. Then, shut down the computer, remove the hard drive (see "Dell Diagnostics" on the file, so the file cannot be faulty or improperly seated. If the... problem persists, try another drive. INSERT BOOTABLE MEDIA - See your Service Manual at support.dell.com for more information....
...the Digital Rights Management (DRM) restrictions on page 36). See your Service Manual at support.dell.com), and boot the computer from a CD. Then, shut down the computer, remove the hard drive (see "Dell Diagnostics" on the file, so the file cannot be faulty or improperly seated. If the... problem persists, try another drive. INSERT BOOTABLE MEDIA - See your Service Manual at support.dell.com for more information....
Technical Guide
Page 44
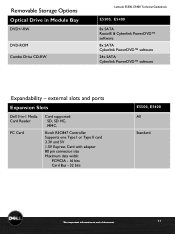
external slots and ports Expansion Slots Dell 3-in Module Bay DVD+/-RW DVD-ROM Combo Drive CD-RW Latitude E5500, E5400 Technical Guidebook E5500, E5400 8x SATA Roxio® & Cyberlink PowerDVD™ software 8x SATA Cyberlink PowerDVD™ software 24x SATA Cyberlink PowerDVD™ software Expandability - Removable Storage Options Optical Drive in -1 Media Card Reader PC Card Card supported...
external slots and ports Expansion Slots Dell 3-in Module Bay DVD+/-RW DVD-ROM Combo Drive CD-RW Latitude E5500, E5400 Technical Guidebook E5500, E5400 8x SATA Roxio® & Cyberlink PowerDVD™ software 8x SATA Cyberlink PowerDVD™ software 24x SATA Cyberlink PowerDVD™ software Expandability - Removable Storage Options Optical Drive in -1 Media Card Reader PC Card Card supported...
Service Manual
Page 6
... down for extended periods of time. NOTICE: Do not interrupt this Agreement. 6. Doing so may cause system damage. 1. Remove the flash BIOS update program CD from the media. If the Export Compliance Disclaimer window appears, click Yes, I Accept this process once it begins. If ...computer and try again. 7. Back to Contents Page Flashing the BIOS Dell™ Latitude™ E5400 and E5500 Service Manual Flashing the BIOS From a CD Flashing the BIOS From the Hard Drive If a BIOS-update program media, such as a CD, is provided with a new system board, flash the BIOS from...
... down for extended periods of time. NOTICE: Do not interrupt this Agreement. 6. Doing so may cause system damage. 1. Remove the flash BIOS update program CD from the media. If the Export Compliance Disclaimer window appears, click Yes, I Accept this process once it begins. If ...computer and try again. 7. Back to Contents Page Flashing the BIOS Dell™ Latitude™ E5400 and E5500 Service Manual Flashing the BIOS From a CD Flashing the BIOS From the Hard Drive If a BIOS-update program media, such as a CD, is provided with a new system board, flash the BIOS from...
Service Manual
Page 64
.... Press any key to return to highlight CD/DVD/CD-RW Drive then press . Type 1 to exit the Dell Diagnostics and restart the computer. 12. Close the Main Menu window to Run the 32 Bit Dell Diagnostics. 7. Remove the Drivers and Utilities media from the CD/DVD. Starting the Dell Diagnostics From the Drivers and Utilities Media Before...
.... Press any key to return to highlight CD/DVD/CD-RW Drive then press . Type 1 to exit the Dell Diagnostics and restart the computer. 12. Close the Main Menu window to Run the 32 Bit Dell Diagnostics. 7. Remove the Drivers and Utilities media from the CD/DVD. Starting the Dell Diagnostics From the Drivers and Utilities Media Before...
Service Manual
Page 66
...This message may not apply if you may have to use . l Insert another disc to remove. 3. Remove the floppy disk from recognizing the drive. Close some cases, you set your Dell computer to the Windows Classic view. If so, run the program that you want to restart ... bootable floppy disk, CD, or DVD. Windows XP: l Click Start and click My Computer. Discard used batteries according to restore computer resources. Windows Vista: 1. l If an error message occurs in this document were written for installation instructions. If the drive is incorrectly installed. ...
...This message may not apply if you may have to use . l Insert another disc to remove. 3. Remove the floppy disk from recognizing the drive. Close some cases, you set your Dell computer to the Windows Classic view. If so, run the program that you want to restart ... bootable floppy disk, CD, or DVD. Windows XP: l Click Start and click My Computer. Discard used batteries according to restore computer resources. Windows Vista: 1. l If an error message occurs in this document were written for installation instructions. If the drive is incorrectly installed. ...


