Owner's Manual
Page 6
... Connecting to a Wireless Local Area Network 72 Enabling/Disabling the Wireless Network Card 74 Monitoring the Status of Wireless Network Connections Through Dell™ QuickSet 74 Mobile Broadband or Wireless Wide Area Network (WWAN 74 What You Need to Establish a Mobile Broadband Network Connection ... 78 If Your Computer Is Lost or Stolen 78 10 Solving Problems 79 Dell Diagnostics 79 Dell Support Utility 82 Accessing the Dell Support Utility 82 Clicking the Dell Support Icon 82 Double-Clicking the Dell Support Icon 82 Drive Problems 83 CD and DVD drive problems 83 If you ...
... Connecting to a Wireless Local Area Network 72 Enabling/Disabling the Wireless Network Card 74 Monitoring the Status of Wireless Network Connections Through Dell™ QuickSet 74 Mobile Broadband or Wireless Wide Area Network (WWAN 74 What You Need to Establish a Mobile Broadband Network Connection ... 78 If Your Computer Is Lost or Stolen 78 10 Solving Problems 79 Dell Diagnostics 79 Dell Support Utility 82 Accessing the Dell Support Utility 82 Clicking the Dell Support Icon 82 Double-Clicking the Dell Support Icon 82 Drive Problems 83 CD and DVD drive problems 83 If you ...
Owner's Manual
Page 9
Only 166 Definition of "Dell-Installed" Software and Peripherals 167 Definition of "Third-Party" Software and Peripherals 167 FCC Notice (U.S. Only 167 FCC Class B 167 Macrovision Product Notice 168 Glossary ... 181 Contents 9 13 Traveling With Your Computer 131 Identifying Your Computer 131 Packing the Computer 131 Travel Tips 132 Traveling by Air 132 14 Contacting Dell 133 15 Specifications 155 16 Appendix 163 Using the System Setup Program 163 Viewing the System Setup Screen 163 System Setup Screen 163 Commonly Used...
Only 166 Definition of "Dell-Installed" Software and Peripherals 167 Definition of "Third-Party" Software and Peripherals 167 FCC Notice (U.S. Only 167 FCC Class B 167 Macrovision Product Notice 168 Glossary ... 181 Contents 9 13 Traveling With Your Computer 131 Identifying Your Computer 131 Packing the Computer 131 Travel Tips 132 Traveling by Air 132 14 Contacting Dell 133 15 Specifications 155 16 Appendix 163 Using the System Setup Program 163 Viewing the System Setup Screen 163 System Setup Screen 163 Commonly Used...
Owner's Manual
Page 11
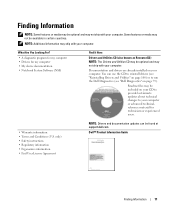
...: The Drivers and Utilities CD may be optional and may not ship with your computer. Dell™ Product Information Guide Finding Information 11 only) • Safety instructions • Regulatory information... Agreement NOTE: Drivers and documentation updates can use the CD to reinstall drivers (see "Dell Diagnostics" on page 79). Finding Information NOTE: Some features or media may be optional and... on your CD to provide last-minute updates about technical changes to run the Dell Diagnostics (see "Reinstalling Drivers and Utilities" on your computer. NOTE: Additional information...
...: The Drivers and Utilities CD may be optional and may not ship with your computer. Dell™ Product Information Guide Finding Information 11 only) • Safety instructions • Regulatory information... Agreement NOTE: Drivers and documentation updates can use the CD to reinstall drivers (see "Dell Diagnostics" on page 79). Finding Information NOTE: Some features or media may be optional and... on your CD to provide last-minute updates about technical changes to run the Dell Diagnostics (see "Reinstalling Drivers and Utilities" on your computer. NOTE: Additional information...

Owner's Manual
Page 12
What Are You Looking For? • How to set up my computer Find It Here Setup Diagram • Service Tag and Express Service Code • Microsoft Windows License Label Service Tag and Microsoft® Windows® License These labels are located on the bottom of your computer. • Use the Service Tag to identify your computer when you use support.dell.com or contact technical support. • Enter the Express Service Code to direct your call when contacting technical support. 12 Finding Information
What Are You Looking For? • How to set up my computer Find It Here Setup Diagram • Service Tag and Express Service Code • Microsoft Windows License Label Service Tag and Microsoft® Windows® License These labels are located on the bottom of your computer. • Use the Service Tag to identify your computer when you use support.dell.com or contact technical support. • Enter the Express Service Code to direct your call when contacting technical support. 12 Finding Information
Owner's Manual
Page 13
... the screen. Finding Information 13 online courses; Service call and order status, warranty, and repair information • Service and support - The software automatically detects your computer. To download Notebook System Software: 1 Go to support.dell.com and click Downloads. 2 Enter your Service Tag or product model. 3 In the Download Category drop-down menu...
... the screen. Finding Information 13 online courses; Service call and order status, warranty, and repair information • Service and support - The software automatically detects your computer. To download Notebook System Software: 1 Go to support.dell.com and click Downloads. 2 Enter your Service Tag or product model. 3 In the Download Category drop-down menu...
Owner's Manual
Page 15
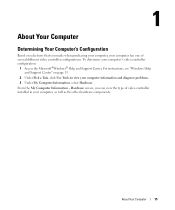
...a Task, click Use Tools to view your computer information and diagnose problems. 3 Under My Computer Information, select Hardware. For instructions, see "Windows Help and Support Center" on selections that you can view the type of several different video controller configurations. To determine your computer, as well as the other hardware...your computer, your computer has one of video controller installed in your computer's video controller configuration: 1 Access the Microsoft®Windows® Help and Support Center. About Your Computer 15 From the My Computer Information -
...a Task, click Use Tools to view your computer information and diagnose problems. 3 Under My Computer Information, select Hardware. For instructions, see "Windows Help and Support Center" on selections that you can view the type of several different video controller configurations. To determine your computer, as well as the other hardware...your computer, your computer has one of video controller installed in your computer's video controller configuration: 1 Access the Microsoft®Windows® Help and Support Center. About Your Computer 15 From the My Computer Information -
Owner's Manual
Page 18
...more information, see "Key Combinations" on page 36. You can press the Dell MediaDirect button to launch either Microsoft Windows Media Center Edition or another version of Windows XP with Dell Media Experience if either of the integrated speakers, press the media control buttons ...or speaker-volume keyboard shortcuts. Play the previous track. S P E A K E R S - For information on supported keyboard shortcuts, see "Speaker Functions" on the ...
...more information, see "Key Combinations" on page 36. You can press the Dell MediaDirect button to launch either Microsoft Windows Media Center Edition or another version of Windows XP with Dell Media Experience if either of the integrated speakers, press the media control buttons ...or speaker-volume keyboard shortcuts. Play the previous track. S P E A K E R S - For information on supported keyboard shortcuts, see "Speaker Functions" on the ...
Owner's Manual
Page 21
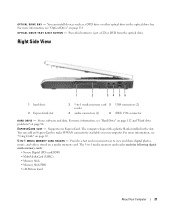
O P T I A M E M O R Y C A R D R E A D E R - Right Side View 1 2 34 56 1 hard drive 2 ExpressCard slot 3 5-in the slot. Supports one ExpressCard. I N - 1 M E D I C A L - D R I V E B A Y - The computer ships with a plastic blank installed in -1 media memory card 5 USB connectors (2) reader 4 audio connectors (2) 6 IEEE 1394 connector H A R D D R I V E - You can install devices ...
O P T I A M E M O R Y C A R D R E A D E R - Right Side View 1 2 34 56 1 hard drive 2 ExpressCard slot 3 5-in the slot. Supports one ExpressCard. I N - 1 M E D I C A L - D R I V E B A Y - The computer ships with a plastic blank installed in -1 media memory card 5 USB connectors (2) reader 4 audio connectors (2) 6 IEEE 1394 connector H A R D D R I V E - You can install devices ...
Owner's Manual
Page 22
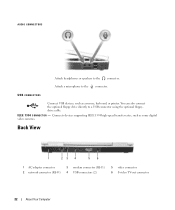
...-11) 4 USB connectors (2) 5 video connector 6 S-video TV-out connector 22 About Your Computer Attach a microphone to a USB connector using the optional floppydrive cable. Connects devices supporting IEEE 1394 high-speed transfer rates, such as a mouse, keyboard, or printer. I E E E 1 3 9 4 C O N N E C T O R - You can also connect the optional floppy drive directly to the connector. USB...
...-11) 4 USB connectors (2) 5 video connector 6 S-video TV-out connector 22 About Your Computer Attach a microphone to a USB connector using the optional floppydrive cable. Connects devices supporting IEEE 1394 high-speed transfer rates, such as a mouse, keyboard, or printer. I E E E 1 3 9 4 C O N N E C T O R - You can also connect the optional floppy drive directly to the connector. USB...
Owner's Manual
Page 26
... the Operating System CD NOTE: This procedure requires the Operating System CD. If you selected Set up a direct cable connection between two computers, go to support.microsoft.com and search for transfer to complete the setup. This CD is optional and may not be included with the Files and Settings Transfer...
... the Operating System CD NOTE: This procedure requires the Operating System CD. If you selected Set up a direct cable connection between two computers, go to support.microsoft.com and search for transfer to complete the setup. This CD is optional and may not be included with the Files and Settings Transfer...
Owner's Manual
Page 28
...to transfer and click Next. screen, select the items you chose for transferring your old computer screen on the Run window, browse to My New Dell Computer Using the Microsoft® Windows® XP Operating System?). Create a Wizard Disk 1 Click the Start button. 2 Click Files and Settings ...Files and Settings Transfer Wizard welcome screen, click Next. 5 On the Which computer is this ? NOTE: For more information about this procedure, search dell.support.com for fastwiz (on the screen. Transfer Data to the New Computer 1 On the Now go to your old computer message appears, do you...
...to transfer and click Next. screen, select the items you chose for transferring your old computer screen on the Run window, browse to My New Dell Computer Using the Microsoft® Windows® XP Operating System?). Create a Wizard Disk 1 Click the Start button. 2 Click Files and Settings ...Files and Settings Transfer Wizard welcome screen, click Next. 5 On the Which computer is this ? NOTE: For more information about this procedure, search dell.support.com for fastwiz (on the screen. Transfer Data to the New Computer 1 On the Now go to your old computer message appears, do you...
Owner's Manual
Page 33
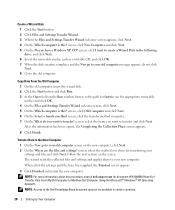
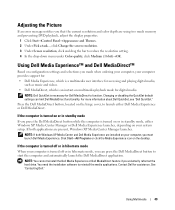
Using the Display Adjusting Brightness When a Dell™ computer is running on battery power, you can press the following keys... choose a resolution or color palette that is connected to an external monitor and you try to the closest supported values. 1 Click the Start button and click Control Panel. 2 Under Pick a category, click Appearance and Themes...Setting Display Resolution To display a program at a specific resolution, both the graphics card and the display must support the program, and the necessary video drivers must be installed. Before you start the computer with an external ...
Using the Display Adjusting Brightness When a Dell™ computer is running on battery power, you can press the following keys... choose a resolution or color palette that is connected to an external monitor and you try to the closest supported values. 1 Click the Start button and click Control Panel. 2 Under Pick a category, click Appearance and Themes...Setting Display Resolution To display a program at a specific resolution, both the graphics card and the display must support the program, and the necessary video drivers must be installed. Before you start the computer with an external ...
Owner's Manual
Page 37
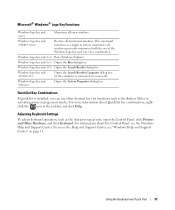
... power management modes. Windows logo key and Opens the System Properties dialog box. To access the Help and Support Center, see the Windows Help and Support Center. Microsoft® Windows® Logo Key Functions Windows logo key and Minimizes all open the Control Panel... Hardware, and click Keyboard. Using the Keyboard and Touch Pad 37 For more information about the Control Panel, see "Windows Help and Support Center" on page 13. Windows logo key and Restores all minimized windows. Adjusting Keyboard Settings To adjust keyboard operation, such as a ...
... power management modes. Windows logo key and Opens the System Properties dialog box. To access the Help and Support Center, see the Windows Help and Support Center. Microsoft® Windows® Logo Key Functions Windows logo key and Minimizes all open the Control Panel... Hardware, and click Keyboard. Using the Keyboard and Touch Pad 37 For more information about the Control Panel, see "Windows Help and Support Center" on page 13. Windows logo key and Restores all minimized windows. Adjusting Keyboard Settings To adjust keyboard operation, such as a ...

Owner's Manual
Page 38
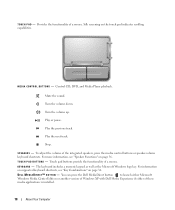
..., and then click Mouse. To disable this feature, modify the mouse properties through the Control Panel. To access the Help and Support Center, see the Windows Help and Support Center. Scrolling is enabled by sliding your finger over the touch pad. • To select an object, position the cursor on...touch pad or use your thumb to press the left touch-pad button twice. For information about the Control Panel, see "Windows Help and Support Center" on two sides to indicate scrolling capability in these scroll zones. Touch Pad The touch pad detects the pressure and movement of your ...
..., and then click Mouse. To disable this feature, modify the mouse properties through the Control Panel. To access the Help and Support Center, see the Windows Help and Support Center. Scrolling is enabled by sliding your finger over the touch pad. • To select an object, position the cursor on...touch pad or use your thumb to press the left touch-pad button twice. For information about the Control Panel, see "Windows Help and Support Center" on two sides to indicate scrolling capability in these scroll zones. Touch Pad The touch pad detects the pressure and movement of your ...
Owner's Manual
Page 46
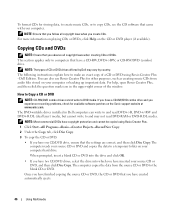
... or DVD player (if available). NOTE: The types of the window. For help, open Roxio Creator Plus, and then click the question mark icon in Dell computers can also use Roxio Creator Plus for other purposes, such as creating music CDs from the source CD or DVD to the blank CD... combo drives cannot write to DVD media. The computer reads your source CD or DVD and copies the data to a temporary folder on the Sonic support website at www.sonic.com. NOTE: Most commercial DVDs have created automatically ejects. 46 Using Multimedia When prompted, insert a blank CD or DVD into the...
... or DVD player (if available). NOTE: The types of the window. For help, open Roxio Creator Plus, and then click the question mark icon in Dell computers can also use Roxio Creator Plus for other purposes, such as creating music CDs from the source CD or DVD to the blank CD... combo drives cannot write to DVD media. The computer reads your source CD or DVD and copies the data to a temporary folder on the Sonic support website at www.sonic.com. NOTE: Most commercial DVDs have created automatically ejects. 46 Using Multimedia When prompted, insert a blank CD or DVD into the...
Owner's Manual
Page 48
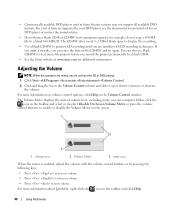
.... • Use a blank CD-RW to its maximum capacity; Either click the icon in home theater systems may not support all available DVD formats. The CD-RW drive needs 1-2 MB of formats supported by pressing the following keys: • Press to increase volume. • Press to decrease volume. • Press to increase...
.... • Use a blank CD-RW to its maximum capacity; Either click the icon in home theater systems may not support all available DVD formats. The CD-RW drive needs 1-2 MB of formats supported by pressing the following keys: • Press to increase volume. • Press to decrease volume. • Press to increase...
Owner's Manual
Page 49
... ordering your computer, your system setup. If both Windows XP Media Center and Dell Media Experience are installed on your computer provides support for: • Dell Media Experience, which is turned off or in standby mode, either Dell Media Experience or Dell MediaDirect. Click Start→All Programs or click the Media Experience icon on...
... ordering your computer, your system setup. If both Windows XP Media Center and Dell Media Experience are installed on your computer provides support for: • Dell Media Experience, which is turned off or in standby mode, either Dell Media Experience or Dell MediaDirect. Click Start→All Programs or click the Media Experience icon on...

Owner's Manual
Page 52
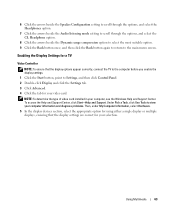
... S-video cable directly to the S-video TV-out connector on the computer (without the TV/digital audio adapter cable) if your TV or audio device supports S-video but not S/PDIF digital audio. 2 Plug one end of the S-video cable into the S-video output connector on the computer. 3 Plug the other end...
... S-video cable directly to the S-video TV-out connector on the computer (without the TV/digital audio adapter cable) if your TV or audio device supports S-video but not S/PDIF digital audio. 2 Plug one end of the S-video cable into the S-video output connector on the computer. 3 Plug the other end...
Owner's Manual
Page 63
... Display and click the Settings tab. 3 Click Advanced. 4 Click the tab for your computer, see the Windows Help and Support Center. To access the Help and Support Center, click Start→Help and Support. Under Pick a Task, click Use Tools to view your computer information and diagnose problems. Then, under My Computer Information...
... Display and click the Settings tab. 3 Click Advanced. 4 Click the tab for your computer, see the Windows Help and Support Center. To access the Help and Support Center, click Start→Help and Support. Under Pick a Task, click Use Tools to view your computer information and diagnose problems. Then, under My Computer Information...

Owner's Manual
Page 65
... installed in the ExpressCard slot. See "Specifications" on page 155 for use when no ExpressCard is not clear, see "Removing an ExpressCard or Blank" on supported ExpressCards. Save the blank for information on page 66. The computer automatically detects the card. Check the card orientation and try again. To install an...
... installed in the ExpressCard slot. See "Specifications" on page 155 for use when no ExpressCard is not clear, see "Removing an ExpressCard or Blank" on supported ExpressCards. Save the blank for information on page 66. The computer automatically detects the card. Check the card orientation and try again. To install an...


