Owner's Manual
Page 5
... Tips 47 Adjusting the Volume 48 Adjusting the Picture 49 Using Dell Media Experience™ and Dell MediaDirect 49 If the computer is turned on or in standby mode 49 If the computer is turned off or in hibernate mode 49 Dell MediaDirect and Dell Media Experience Help 50 Connecting Your Computer to a TV or Audio...
... Tips 47 Adjusting the Volume 48 Adjusting the Picture 49 Using Dell Media Experience™ and Dell MediaDirect 49 If the computer is turned on or in standby mode 49 If the computer is turned off or in hibernate mode 49 Dell MediaDirect and Dell Media Experience Help 50 Connecting Your Computer to a TV or Audio...
Owner's Manual
Page 8
...and Utilities 100 Resolving Software and Hardware Incompatibilities 102 Restoring Your Operating System 102 Using Microsoft Windows XP System Restore 103 Using Dell PC Restore by Symantec 104 Using the Operating System CD 106 11 Adding and Replacing Parts 109 Before You Begin 109 Recommended Tools... 109 Turning Off Your Computer 109 Before Working Inside Your Computer 110 Optical Drive 111 Hard Drive 112 Returning a Hard Drive to Dell 114 Memory 114 Modem 117 Hinge Cover 118 Keyboard 119 Wireless Mini-Card...
...and Utilities 100 Resolving Software and Hardware Incompatibilities 102 Restoring Your Operating System 102 Using Microsoft Windows XP System Restore 103 Using Dell PC Restore by Symantec 104 Using the Operating System CD 106 11 Adding and Replacing Parts 109 Before You Begin 109 Recommended Tools... 109 Turning Off Your Computer 109 Before Working Inside Your Computer 110 Optical Drive 111 Hard Drive 112 Returning a Hard Drive to Dell 114 Memory 114 Modem 117 Hinge Cover 118 Keyboard 119 Wireless Mini-Card...

Owner's Manual
Page 17
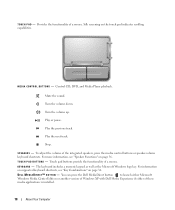
... the light operates as follows: • Off: The battery is adequately charged (or the computer is turned off the computer while the light is flashing. About Your Computer 17 Turns on the computer or to enter or exit a power management mode. POWER BUTTON Press the power button to...and blinks when the computer is almost fully charged. See "Power Management Modes" on when the computer reads or writes data. DEVICE STATUS LIGHTS Turns on when you turn on a battery, the light operates as follows: • Solid green: The battery is charging. • Flashing green: The battery is ...
... the light operates as follows: • Off: The battery is adequately charged (or the computer is turned off the computer while the light is flashing. About Your Computer 17 Turns on the computer or to enter or exit a power management mode. POWER BUTTON Press the power button to...and blinks when the computer is almost fully charged. See "Power Management Modes" on when the computer reads or writes data. DEVICE STATUS LIGHTS Turns on when you turn on a battery, the light operates as follows: • Solid green: The battery is charging. • Flashing green: The battery is ...
Owner's Manual
Page 18
...Silk screening on page 36. M E D I R E C T ™ B U T T O N - Play or pause. To adjust the volume of a mouse. Turn the volume up. T O U C H P A D B U T T O N S - Turn the volume down. Play the next track. K E Y B O A R D - The keyboard includes a numeric keypad as well as the Microsoft Windows logo key. Mute the...CD, DVD, and Media Player playback. Stop. You can press the Dell MediaDirect button to launch either Microsoft Windows Media Center Edition or another version of Windows XP with Dell Media Experience if either of a mouse. Play the previous track. For ...
...Silk screening on page 36. M E D I R E C T ™ B U T T O N - Play or pause. To adjust the volume of a mouse. Turn the volume up. T O U C H P A D B U T T O N S - Turn the volume down. Play the next track. K E Y B O A R D - The keyboard includes a numeric keypad as well as the Microsoft Windows logo key. Mute the...CD, DVD, and Media Player playback. Stop. You can press the Dell MediaDirect button to launch either Microsoft Windows Media Center Edition or another version of Windows XP with Dell Media Experience if either of a mouse. Play the previous track. For ...
Owner's Manual
Page 19
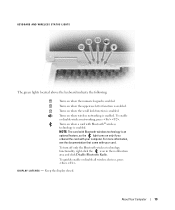
... if you ordered the card with Bluetooth wireless technology is enabled. NOTE: The card with your card. To turn off only the Bluetooth wireless technology functionality, right-click the icon in the notification area and click Disable Bluetooth ...® wireless technology is enabled. To enable or disable wireless networking, press . D I S P L A Y L A T C H E S - Turns on when a card with your computer. Turns on when wireless networking is enabled. Turns on when the scroll lock function is enabled. KEYBOARD AND WIRELESS STATUS LIGHTS The green lights located above the...
... if you ordered the card with Bluetooth wireless technology is enabled. NOTE: The card with your card. To turn off only the Bluetooth wireless technology functionality, right-click the icon in the notification area and click Disable Bluetooth ...® wireless technology is enabled. To enable or disable wireless networking, press . D I S P L A Y L A T C H E S - Turns on when a card with your computer. Turns on when wireless networking is enabled. Turns on when the scroll lock function is enabled. KEYBOARD AND WIRELESS STATUS LIGHTS The green lights located above the...

Owner's Manual
Page 23
... a TV. For additional information on using the modem, see the online network adapter documentation supplied with your computer. S-VIDEO TV-OUT CONNECTOR Connects your computer turned either on using the TV/digital audio adapter cable. Also connects digital audio-capable devices using the network adapter, see the online modem documentation supplied...
... a TV. For additional information on using the modem, see the online network adapter documentation supplied with your computer. S-VIDEO TV-OUT CONNECTOR Connects your computer turned either on using the TV/digital audio adapter cable. Also connects digital audio-capable devices using the network adapter, see the online modem documentation supplied...

Owner's Manual
Page 29
... Printer NOTE: You can connect USB devices while the computer is compatible with either a USB cable or a parallel cable. See the documentation that it is turned on the computer and the printer. If you purchased a printer cable at the same time you purchase a cable separately, ensure that came with the printer...
... Printer NOTE: You can connect USB devices while the computer is compatible with either a USB cable or a parallel cable. See the documentation that it is turned on the computer and the printer. If you purchased a printer cable at the same time you purchase a cable separately, ensure that came with the printer...

Owner's Manual
Page 30
Carefully read the device warranty when choosing a surge protector. 1 3 2 1 USB connector on computer 2 USB printer cable 3 connector on printer 3 Turn on the printer and then turn on the computer. A device with surge protection help prevent damage to your printer. Power Protection Devices Several devices are available to determine the relative effectiveness ...
Carefully read the device warranty when choosing a surge protector. 1 3 2 1 USB connector on computer 2 USB printer cable 3 connector on printer 3 Turn on the printer and then turn on the computer. A device with surge protection help prevent damage to your printer. Power Protection Devices Several devices are available to determine the relative effectiveness ...
Owner's Manual
Page 33
...• Press and the down -arrow key on either the computer display or the external device. Using the Display Adjusting Brightness When a Dell™ computer is running on battery power, you can press the following keys (key combinations) to adjust display brightness: • Press and...choose a resolution or color palette that you start the computer with an external device (such as an external monitor or projector) attached and turned on, the image may appear, but the brightness level on your portable computer or docking device. Setting Display Resolution To display a program...
...• Press and the down -arrow key on either the computer display or the external device. Using the Display Adjusting Brightness When a Dell™ computer is running on battery power, you can press the following keys (key combinations) to adjust display brightness: • Press and...choose a resolution or color palette that you start the computer with an external device (such as an external monitor or projector) attached and turned on, the image may appear, but the brightness level on your portable computer or docking device. Setting Display Resolution To display a program...
Owner's Manual
Page 41
...See "Configuring Power Management Settings" on page 43 for more information on the battery as described below or by using the Battery Meter in Dell QuickSet. To check the battery health using the charge gauge, press and hold the status button on using the Power Management Wizard. Power Management... Modes Standby Mode Standby mode conserves power by turning off the display and the hard drive after a low-battery warning, and then connect the computer to the same operating state it may ...
...See "Configuring Power Management Settings" on page 43 for more information on the battery as described below or by using the Battery Meter in Dell QuickSet. To check the battery health using the charge gauge, press and hold the status button on using the Power Management Wizard. Power Management... Modes Standby Mode Standby mode conserves power by turning off the display and the hard drive after a low-battery warning, and then connect the computer to the same operating state it may ...
Owner's Manual
Page 42
...you set the power management options on the Advanced tab (see "Configuring Power Management Settings" on the hard drive and then completely turning off the computer. NOTICE: You cannot remove devices or undock your computer while your computer. Your computer enters hibernate mode if ...the documentation that came with your operating system. 42 Using a Battery To manually enter hibernate mode: • Click the Start button, click Turn off computer, press and hold , and then click Hibernate. For more information on hibernate mode, see "Removing an ExpressCard or Blank" on ...
...you set the power management options on the Advanced tab (see "Configuring Power Management Settings" on the hard drive and then completely turning off the computer. NOTICE: You cannot remove devices or undock your computer while your computer. Your computer enters hibernate mode if ...the documentation that came with your operating system. 42 Using a Battery To manually enter hibernate mode: • Click the Start button, click Turn off computer, press and hold , and then click Hibernate. For more information on hibernate mode, see "Removing an ExpressCard or Blank" on ...
Owner's Manual
Page 43
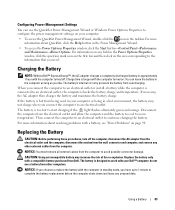
...on the title bar and then click on the area corresponding to avoid possible connector damage. NOTICE: You must remove all external cables from Dell. Replace the battery only with the computer in standby mode, you need. NOTICE: If you choose to replace the battery with a .... Charge time is connected to start charging if the light flashes alternately green and orange. Replacing the Battery CAUTION: Before performing these procedures, turn off . The battery's internal circuitry prevents the battery from being in a hot environment, the battery may increase the risk of fire or ...
...on the title bar and then click on the area corresponding to avoid possible connector damage. NOTICE: You must remove all external cables from Dell. Replace the battery only with the computer in standby mode, you need. NOTICE: If you choose to replace the battery with a .... Charge time is connected to start charging if the light flashes alternately green and orange. Replacing the Battery CAUTION: Before performing these procedures, turn off . The battery's internal circuitry prevents the battery from being in a hot environment, the battery may increase the risk of fire or ...
Owner's Manual
Page 44
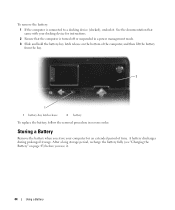
.... See the documentation that the computer is connected to a docking device (docked), undock it . 44 Using a Battery To remove the battery: 1 If the computer is turned off or suspended in reverse order. A battery discharges during prolonged storage.
.... See the documentation that the computer is connected to a docking device (docked), undock it . 44 Using a Battery To remove the battery: 1 If the computer is turned off or suspended in reverse order. A battery discharges during prolonged storage.
Owner's Manual
Page 49
... (16 bit)→OK. Contact Dell for Dell MediaDirect to start the computer and automatically launch the Dell MediaDirect application. If the computer is turned on or in standby mode, either Dell Media Experience or Dell MediaDirect. If the computer is turned off or in hibernate mode, you... multimedia user interface for digital media. If both Windows XP Media Center and Dell Media Experience are installed on your computer provides support for: • Dell Media Experience, which is turned on or in standby mode If you made when ordering your computer, your ...
... (16 bit)→OK. Contact Dell for Dell MediaDirect to start the computer and automatically launch the Dell MediaDirect application. If the computer is turned on or in standby mode, either Dell Media Experience or Dell MediaDirect. If the computer is turned off or in hibernate mode, you... multimedia user interface for digital media. If both Windows XP Media Center and Dell Media Experience are installed on your computer provides support for: • Dell Media Experience, which is turned on or in standby mode If you made when ordering your computer, your ...

Owner's Manual
Page 52
.... 5 Plug the two RCA connectors on the other end of the audio cable into the audio input connectors on your TV or other audio device. 6 Turn on the TV and any audio device that you want to ensure that you connected (if applicable), and then... Display Settings for a TV" on page 63 to connect. S-Video and Standard Audio 1 2 1 audio connector 2 S-video TV-out connector 1 2 1 standard S-video cable 2 standard audio cable 1 Turn off the computer and the TV and/or audio device that the computer recognizes and works properly with the TV. 52 Using Multimedia
.... 5 Plug the two RCA connectors on the other end of the audio cable into the audio input connectors on your TV or other audio device. 6 Turn on the TV and any audio device that you want to ensure that you connected (if applicable), and then... Display Settings for a TV" on page 63 to connect. S-Video and Standard Audio 1 2 1 audio connector 2 S-video TV-out connector 1 2 1 standard S-video cable 2 standard audio cable 1 Turn off the computer and the TV and/or audio device that the computer recognizes and works properly with the TV. 52 Using Multimedia

Owner's Manual
Page 53
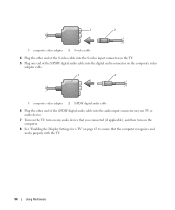
S-Video and S/PDIF Digital Audio 1 2 1 S-video TV-out connector 2 composite video adapter 1 1 composite video adapter 2 S-video cable 2 3 3 S/PDIF digital audio cable 1 Turn off the computer and the TV and/or the audio device that you want to connect. 2 Connect the composite video adapter to the S-video TV-out connector on your computer. 3 Plug one end of the S-video cable into the S-video output connector on the composite video adapter. Using Multimedia 53
S-Video and S/PDIF Digital Audio 1 2 1 S-video TV-out connector 2 composite video adapter 1 1 composite video adapter 2 S-video cable 2 3 3 S/PDIF digital audio cable 1 Turn off the computer and the TV and/or the audio device that you want to connect. 2 Connect the composite video adapter to the S-video TV-out connector on your computer. 3 Plug one end of the S-video cable into the S-video output connector on the composite video adapter. Using Multimedia 53
Owner's Manual
Page 54
... end of the S/PDIF digital audio cable into the audio input connector on your TV or audio device. 7 Turn on the TV, turn on any audio device that you connected (if applicable), and then turn on the computer. 8 See "Enabling the Display Settings for a TV" on page 63 to ensure that the computer...
... end of the S/PDIF digital audio cable into the audio input connector on your TV or audio device. 7 Turn on the TV, turn on any audio device that you connected (if applicable), and then turn on the computer. 8 See "Enabling the Display Settings for a TV" on page 63 to ensure that the computer...

Owner's Manual
Page 55
Using Multimedia 55 Composite Video and Standard Audio 1 2 3 1 audio input connector 2 S-video TV-out connector 3 composite video adapter 1 2 3 1 composite video adapter 2 composite video cable 3 standard audio cable 1 Turn off the computer and the TV and/or audio device that you want to connect. 2 Connect the composite video adapter to the S-video TV-out connector on your computer. 3 Plug one end of the composite video cable into the composite video-output connector on the composite video adapter.
Using Multimedia 55 Composite Video and Standard Audio 1 2 3 1 audio input connector 2 S-video TV-out connector 3 composite video adapter 1 2 3 1 composite video adapter 2 composite video cable 3 standard audio cable 1 Turn off the computer and the TV and/or audio device that you want to connect. 2 Connect the composite video adapter to the S-video TV-out connector on your computer. 3 Plug one end of the composite video cable into the composite video-output connector on the composite video adapter.

Owner's Manual
Page 56
... end of the audio cable in to the audio input connectors on your TV or other audio device. 7 Turn on the TV, turn on any audio device that you connected (if applicable), and then turn on the computer. 8 See "Enabling the Display Settings for a TV" on page 63 to ensure that the computer...
... end of the audio cable in to the audio input connectors on your TV or other audio device. 7 Turn on the TV, turn on any audio device that you connected (if applicable), and then turn on the computer. 8 See "Enabling the Display Settings for a TV" on page 63 to ensure that the computer...

Owner's Manual
Page 57
1 2 3 1 composite video adapter 2 composite video cable 3 standard audio cable 1 Turn off the computer and the TV and/or audio device that you want to connect. 2 Connect the composite video adapter to the S-video TV-out ...
1 2 3 1 composite video adapter 2 composite video cable 3 standard audio cable 1 Turn off the computer and the TV and/or audio device that you want to connect. 2 Connect the composite video adapter to the S-video TV-out ...


