Owner's Manual
Page 5
... Tips 47 Adjusting the Volume 48 Adjusting the Picture 49 Using Dell Media Experience™ and Dell MediaDirect 49 If the computer is turned on or in standby mode 49 If the computer is turned off or in hibernate mode 49 Dell MediaDirect and Dell Media Experience Help 50 Connecting Your Computer to a TV or Audio...
... Tips 47 Adjusting the Volume 48 Adjusting the Picture 49 Using Dell Media Experience™ and Dell MediaDirect 49 If the computer is turned on or in standby mode 49 If the computer is turned off or in hibernate mode 49 Dell MediaDirect and Dell Media Experience Help 50 Connecting Your Computer to a TV or Audio...
Owner's Manual
Page 8
...and Utilities 100 Resolving Software and Hardware Incompatibilities 102 Restoring Your Operating System 102 Using Microsoft Windows XP System Restore 103 Using Dell PC Restore by Symantec 104 Using the Operating System CD 106 11 Adding and Replacing Parts 109 Before You Begin 109 Recommended Tools... 109 Turning Off Your Computer 109 Before Working Inside Your Computer 110 Optical Drive 111 Hard Drive 112 Returning a Hard Drive to Dell 114 Memory 114 Modem 117 Hinge Cover 118 Keyboard 119 Wireless Mini-Card...
...and Utilities 100 Resolving Software and Hardware Incompatibilities 102 Restoring Your Operating System 102 Using Microsoft Windows XP System Restore 103 Using Dell PC Restore by Symantec 104 Using the Operating System CD 106 11 Adding and Replacing Parts 109 Before You Begin 109 Recommended Tools... 109 Turning Off Your Computer 109 Before Working Inside Your Computer 110 Optical Drive 111 Hard Drive 112 Returning a Hard Drive to Dell 114 Memory 114 Modem 117 Hinge Cover 118 Keyboard 119 Wireless Mini-Card...

Owner's Manual
Page 17
... orange: The battery charge is low. • Solid orange: The battery charge is in a power management mode. NOTICE: To avoid loss of data, never turn on steadily or blinks to an electrical outlet, the light operates as follows: • Off: The battery is adequately charged (or the computer is... the computer or to enter or exit a power management mode. If the computer is connected to indicate battery charge status. Turns on a battery, the light operates as follows: • Solid green: The battery is charging. • Flashing green: The battery is almost fully charged. See ...
... orange: The battery charge is low. • Solid orange: The battery charge is in a power management mode. NOTICE: To avoid loss of data, never turn on steadily or blinks to an electrical outlet, the light operates as follows: • Off: The battery is adequately charged (or the computer is... the computer or to enter or exit a power management mode. If the computer is connected to indicate battery charge status. Turns on a battery, the light operates as follows: • Solid green: The battery is charging. • Flashing green: The battery is almost fully charged. See ...
Owner's Manual
Page 18
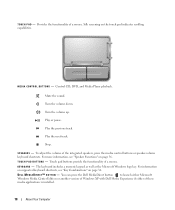
Control CD, DVD, and Media Player playback. Turn the volume down. Turn the volume up. Stop. To adjust the volume of a mouse. Touch pad buttons provide the functionality of the integrated ...a numeric keypad as well as the Microsoft Windows logo key. D E L L M E D I A D I A C O N T R O L B U T T O N S - You can press the Dell MediaDirect button to launch either Microsoft Windows Media Center Edition or another version of Windows XP with Dell Media Experience if either of a mouse. Mute the sound. T O U C H P A D B U T T O N S - Play or pause. S P E A K E R S - Play the previous...
Control CD, DVD, and Media Player playback. Turn the volume down. Turn the volume up. Stop. To adjust the volume of a mouse. Touch pad buttons provide the functionality of the integrated ...a numeric keypad as well as the Microsoft Windows logo key. D E L L M E D I A D I A C O N T R O L B U T T O N S - You can press the Dell MediaDirect button to launch either Microsoft Windows Media Center Edition or another version of Windows XP with Dell Media Experience if either of a mouse. Mute the sound. T O U C H P A D B U T T O N S - Play or pause. S P E A K E R S - Play the previous...
Owner's Manual
Page 19
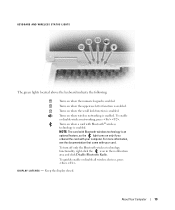
...Keep the display closed. To enable or disable wireless networking, press . Turns on when a card with your computer. To turn off only the Bluetooth wireless technology functionality, right-click the icon in the notification area and click Disable Bluetooth Radio. A Turns on when the uppercase letter function is enabled. For more information, ...your card. To quickly enable or disable all wireless devices, press . Turns on when wireless networking is enabled. About Your Computer 19 Turns on when the scroll lock function is enabled. KEYBOARD AND WIRELESS STATUS LIGHTS...
...Keep the display closed. To enable or disable wireless networking, press . Turns on when a card with your computer. To turn off only the Bluetooth wireless technology functionality, right-click the icon in the notification area and click Disable Bluetooth Radio. A Turns on when the uppercase letter function is enabled. For more information, ...your card. To quickly enable or disable all wireless devices, press . Turns on when wireless networking is enabled. About Your Computer 19 Turns on when the scroll lock function is enabled. KEYBOARD AND WIRELESS STATUS LIGHTS...

Owner's Manual
Page 23
... telephone line to the connector indicate activity for wired network communications. To help prevent damage to a TV. A C A D A P T E R C O N N E C T O R - CAUTION: The AC adapter works with your computer turned either on using the TV/digital audio adapter cable. NETWORK CONNECTOR (RJ-45) Connects the computer to the computer, do not plug a telephone line into...
... telephone line to the connector indicate activity for wired network communications. To help prevent damage to a TV. A C A D A P T E R C O N N E C T O R - CAUTION: The AC adapter works with your computer turned either on using the TV/digital audio adapter cable. NETWORK CONNECTOR (RJ-45) Connects the computer to the computer, do not plug a telephone line into...

Owner's Manual
Page 29
... for setup information, including how to: • Obtain and install updated drivers. • Connect the printer to the computer. See the documentation that it is turned on the computer and the printer. Your printer may arrive in the box in which your computer with either a USB cable or a parallel cable. Printer...
... for setup information, including how to: • Obtain and install updated drivers. • Connect the printer to the computer. See the documentation that it is turned on the computer and the printer. Your printer may arrive in the box in which your computer with either a USB cable or a parallel cable. Printer...

Owner's Manual
Page 30
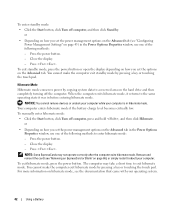
... prevent damage to determine the relative effectiveness of damage. Compare joule ratings to your printer. 1 3 2 1 USB connector on computer 2 USB printer cable 3 connector on printer 3 Turn on the printer and then turn on the computer. If the Add New Hardware Wizard window appears, click Cancel. 4 Install the printer driver if necessary.
... prevent damage to determine the relative effectiveness of damage. Compare joule ratings to your printer. 1 3 2 1 USB connector on computer 2 USB printer cable 3 connector on printer 3 Turn on the printer and then turn on the computer. If the Add New Hardware Wizard window appears, click Cancel. 4 Install the printer driver if necessary.
Owner's Manual
Page 33
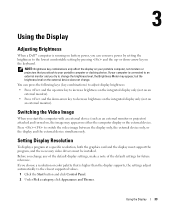
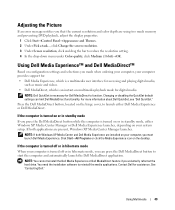
...If you choose a resolution or color palette that you attach to your portable computer or docking device. Using the Display Adjusting Brightness When a Dell™ computer is running on your portable computer, not monitors or projectors that is connected to an external monitor and you try to change the...necessary video drivers must be installed. Before you start the computer with an external device (such as an external monitor or projector) attached and turned on, the image may appear, but the brightness level on the keyboard. Using the Display 33 or down -arrow key to switch the...
...If you choose a resolution or color palette that you attach to your portable computer or docking device. Using the Display Adjusting Brightness When a Dell™ computer is running on your portable computer, not monitors or projectors that is connected to an external monitor and you try to change the...necessary video drivers must be installed. Before you start the computer with an external device (such as an external monitor or projector) attached and turned on, the image may appear, but the brightness level on the keyboard. Using the Display 33 or down -arrow key to switch the...
Owner's Manual
Page 41
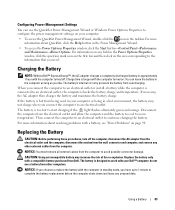
...good condition, and more information about accessing QuickSet or the Power Options Properties window. Power Management Modes Standby Mode Standby mode conserves power by turning off the display and the hard drive after a low-battery warning, and then connect the computer to optimize your computer's power usage. ... is largely determined by using the charge gauge on page 39 for long periods of two ways: by using the Battery Meter in Dell QuickSet. Low-Battery Warning NOTICE: To avoid losing or corrupting data, save your computer loses AC and battery power while in standby mode...
...good condition, and more information about accessing QuickSet or the Power Options Properties window. Power Management Modes Standby Mode Standby mode conserves power by turning off the display and the hard drive after a low-battery warning, and then connect the computer to optimize your computer's power usage. ... is largely determined by using the charge gauge on page 39 for long periods of two ways: by using the Battery Meter in Dell QuickSet. Low-Battery Warning NOTICE: To avoid losing or corrupting data, save your computer loses AC and battery power while in standby mode...
Owner's Manual
Page 42
... battery charge level becomes critically low. or • Depending on how you set the power management options on the hard drive and then completely turning off computer, press and hold , and then click Hibernate. Press the power button. - You cannot make the computer exit hibernate mode by... Battery NOTE: Some ExpressCards may take a short time to exit hibernate mode. To enter standby mode: • Click the Start button, click Turn off computer, and then click Stand by copying system data to a reserved area on the Advanced tab in the Power Options Properties window, use ...
... battery charge level becomes critically low. or • Depending on how you set the power management options on the hard drive and then completely turning off computer, press and hold , and then click Hibernate. Press the power button. - You cannot make the computer exit hibernate mode by... Battery NOTE: Some ExpressCards may take a short time to exit hibernate mode. To enter standby mode: • Click the Start button, click Turn off computer, and then click Stand by copying system data to a reserved area on the Advanced tab in the Power Options Properties window, use ...
Owner's Manual
Page 43
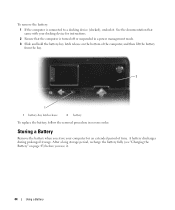
...management settings on page 94. When you need. Replacing the Battery CAUTION: Before performing these procedures, turn off . The battery's internal circuitry prevents the battery from Dell. The battery is designed to complete the battery replacement before the computer shuts down and loses any ... approximately 1 hour with a battery, see "Power Problems" on your Dell™ computer; For information on any other computers. Charge time is connected to replace the battery with the computer turned on the area corresponding to the information that you connect the computer to...
...management settings on page 94. When you need. Replacing the Battery CAUTION: Before performing these procedures, turn off . The battery's internal circuitry prevents the battery from Dell. The battery is designed to complete the battery replacement before the computer shuts down and loses any ... approximately 1 hour with a battery, see "Power Problems" on your Dell™ computer; For information on any other computers. Charge time is connected to replace the battery with the computer turned on the area corresponding to the information that you connect the computer to...
Owner's Manual
Page 44
... . After a long storage period, recharge the battery fully (see "Charging the Battery" on the bottom of time. To remove the battery: 1 If the computer is turned off or suspended in a power management mode. 3 Slide and hold the battery-bay latch release on page 43) before you store your docking device for...
... . After a long storage period, recharge the battery fully (see "Charging the Battery" on the bottom of time. To remove the battery: 1 If the computer is turned off or suspended in a power management mode. 3 Slide and hold the battery-bay latch release on page 43) before you store your docking device for...
Owner's Manual
Page 49
...a multimedia user interface for accessing and playing digital media, such as music and videos. • Dell MediaDirect, which is turned on or in standby mode, either Dell Media Experience or Dell MediaDirect. NOTE: If both applications are using too much memory and preventing DVD playback, adjust the display...Click Start→All Programs or click the Media Experience icon on your computer is turned off or in hibernate mode, you can limit Dell MediaDirect functionality. If the computer is turned off or in hibernate mode When your system setup. You need the installation software...
...a multimedia user interface for accessing and playing digital media, such as music and videos. • Dell MediaDirect, which is turned on or in standby mode, either Dell Media Experience or Dell MediaDirect. NOTE: If both applications are using too much memory and preventing DVD playback, adjust the display...Click Start→All Programs or click the Media Experience icon on your computer is turned off or in hibernate mode, you can limit Dell MediaDirect functionality. If the computer is turned off or in hibernate mode When your system setup. You need the installation software...

Owner's Manual
Page 52
.... 5 Plug the two RCA connectors on the other end of the audio cable into the audio input connectors on your TV or other audio device. 6 Turn on page 63 to connect. S-Video and Standard Audio 1 2 1 audio connector 2 S-video TV-out connector 1 2 1 standard S-video cable 2 standard audio cable... the computer and the TV and/or audio device that you want to ensure that you connected (if applicable), and then turn on the computer. 7 See "Enabling the Display Settings for a TV" on the TV and any audio device that the computer recognizes and works properly with ...
.... 5 Plug the two RCA connectors on the other end of the audio cable into the audio input connectors on your TV or other audio device. 6 Turn on page 63 to connect. S-Video and Standard Audio 1 2 1 audio connector 2 S-video TV-out connector 1 2 1 standard S-video cable 2 standard audio cable... the computer and the TV and/or audio device that you want to ensure that you connected (if applicable), and then turn on the computer. 7 See "Enabling the Display Settings for a TV" on the TV and any audio device that the computer recognizes and works properly with ...

Owner's Manual
Page 53
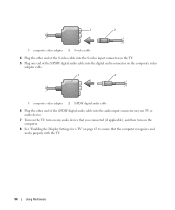
Using Multimedia 53 S-Video and S/PDIF Digital Audio 1 2 1 S-video TV-out connector 2 composite video adapter 1 1 composite video adapter 2 S-video cable 2 3 3 S/PDIF digital audio cable 1 Turn off the computer and the TV and/or the audio device that you want to connect. 2 Connect the composite video adapter to the S-video TV-out connector on your computer. 3 Plug one end of the S-video cable into the S-video output connector on the composite video adapter.
Using Multimedia 53 S-Video and S/PDIF Digital Audio 1 2 1 S-video TV-out connector 2 composite video adapter 1 1 composite video adapter 2 S-video cable 2 3 3 S/PDIF digital audio cable 1 Turn off the computer and the TV and/or the audio device that you want to connect. 2 Connect the composite video adapter to the S-video TV-out connector on your computer. 3 Plug one end of the S-video cable into the S-video output connector on the composite video adapter.
Owner's Manual
Page 54
... end of the S/PDIF digital audio cable into the audio input connector on your TV or audio device. 7 Turn on the TV, turn on any audio device that you connected (if applicable), and then turn on the computer. 8 See "Enabling the Display Settings for a TV" on page 63 to ensure that the computer...
... end of the S/PDIF digital audio cable into the audio input connector on your TV or audio device. 7 Turn on the TV, turn on any audio device that you connected (if applicable), and then turn on the computer. 8 See "Enabling the Display Settings for a TV" on page 63 to ensure that the computer...

Owner's Manual
Page 55
Using Multimedia 55 Composite Video and Standard Audio 1 2 3 1 audio input connector 2 S-video TV-out connector 3 composite video adapter 1 2 3 1 composite video adapter 2 composite video cable 3 standard audio cable 1 Turn off the computer and the TV and/or audio device that you want to connect. 2 Connect the composite video adapter to the S-video TV-out connector on your computer. 3 Plug one end of the composite video cable into the composite video-output connector on the composite video adapter.
Using Multimedia 55 Composite Video and Standard Audio 1 2 3 1 audio input connector 2 S-video TV-out connector 3 composite video adapter 1 2 3 1 composite video adapter 2 composite video cable 3 standard audio cable 1 Turn off the computer and the TV and/or audio device that you want to connect. 2 Connect the composite video adapter to the S-video TV-out connector on your computer. 3 Plug one end of the composite video cable into the composite video-output connector on the composite video adapter.

Owner's Manual
Page 56
... end of the audio cable in to the audio input connectors on your TV or other audio device. 7 Turn on the TV, turn on any audio device that you connected (if applicable), and then turn on the computer. 8 See "Enabling the Display Settings for a TV" on page 63 to ensure that the computer...
... end of the audio cable in to the audio input connectors on your TV or other audio device. 7 Turn on the TV, turn on any audio device that you connected (if applicable), and then turn on the computer. 8 See "Enabling the Display Settings for a TV" on page 63 to ensure that the computer...

Owner's Manual
Page 57
1 2 3 1 composite video adapter 2 composite video cable 3 standard audio cable 1 Turn off the computer and the TV and/or audio device that you want to connect. 2 Connect the composite video adapter to the S-video TV-out ...
1 2 3 1 composite video adapter 2 composite video cable 3 standard audio cable 1 Turn off the computer and the TV and/or audio device that you want to connect. 2 Connect the composite video adapter to the S-video TV-out ...


