Owner's Manual
Page 4
... Customizing the Touch Pad 38 5 Using a Battery 39 Battery Performance 39 Checking the Battery Charge 40 Dell™ QuickSet Battery Meter 40 Microsoft® Windows® Power Meter 40 Charge Gauge 40 Low-Battery Warning 41 Conserving Battery Power 41 Power Management Modes 41 Configuring Power Management Settings 43 Charging the Battery 43 Replacing the Battery 43 Storing a Battery 44 4 Contents
... Customizing the Touch Pad 38 5 Using a Battery 39 Battery Performance 39 Checking the Battery Charge 40 Dell™ QuickSet Battery Meter 40 Microsoft® Windows® Power Meter 40 Charge Gauge 40 Low-Battery Warning 41 Conserving Battery Power 41 Power Management Modes 41 Configuring Power Management Settings 43 Charging the Battery 43 Replacing the Battery 43 Storing a Battery 44 4 Contents
Owner's Manual
Page 8
...Incompatibilities 102 Restoring Your Operating System 102 Using Microsoft Windows XP System Restore 103 Using Dell PC Restore by Symantec 104 Using the Operating System CD 106 11 Adding and Replacing Parts 109 Before You Begin 109 Recommended Tools 109 Turning Off Your Computer 109 ...Before Working Inside Your Computer 110 Optical Drive 111 Hard Drive 112 Returning a Hard Drive to Dell 114 Memory 114 Modem 117 Hinge Cover 118 Keyboard 119 Wireless Mini-Card 121 Coin-Cell Battery...
...Incompatibilities 102 Restoring Your Operating System 102 Using Microsoft Windows XP System Restore 103 Using Dell PC Restore by Symantec 104 Using the Operating System CD 106 11 Adding and Replacing Parts 109 Before You Begin 109 Recommended Tools 109 Turning Off Your Computer 109 ...Before Working Inside Your Computer 110 Optical Drive 111 Hard Drive 112 Returning a Hard Drive to Dell 114 Memory 114 Modem 117 Hinge Cover 118 Keyboard 119 Wireless Mini-Card 121 Coin-Cell Battery...

Owner's Manual
Page 24
... computer to create airflow through the vents, which prevents the computer from the battery bay. M O D E M / M E M O R Y M O D U L E C O V E R - For more information, see "Modem" on page 117 and "Memory" on page 39. The computer uses a fan to an electrical outlet. D R I V E L O C K I C A L - See "Replacing the Battery" on page 111. B A T T E R Y - H A R D D R I V E - Secures the optical drive in the optical drive bay. Bottom...
... computer to create airflow through the vents, which prevents the computer from the battery bay. M O D E M / M E M O R Y M O D U L E C O V E R - For more information, see "Modem" on page 117 and "Memory" on page 39. The computer uses a fan to an electrical outlet. D R I V E L O C K I C A L - See "Replacing the Battery" on page 111. B A T T E R Y - H A R D D R I V E - Secures the optical drive in the optical drive bay. Bottom...

Owner's Manual
Page 39
..., 3D screen savers, or other computers with your Dell computer. Do not use a battery from Dell. The battery is fully charged. For optimal computer performance and to connect your computer. NOTE: Because the battery may need to alert you connect your computer to... use the computer. Using a Battery Battery Performance NOTE: For information about the Dell warranty for information about accessing QuickSet or the Power Options Properties window. One battery is low. You can hold a charge) decreases over time. Replace the battery only with your computer. Using...
..., 3D screen savers, or other computers with your Dell computer. Do not use a battery from Dell. The battery is fully charged. For optimal computer performance and to connect your computer. NOTE: Because the battery may need to alert you connect your computer to... use the computer. Using a Battery Battery Performance NOTE: For information about the Dell warranty for information about accessing QuickSet or the Power Options Properties window. One battery is low. You can hold a charge) decreases over time. Replace the battery only with your computer. Using...
Owner's Manual
Page 41
...replacing the battery. See "Configuring Power Management Settings" on using the Power Management Wizard. NOTE: See "Battery Performance" on conserving battery power. Low-Battery...Battery Power Perform the following actions to conserve battery power: • Connect the computer to an electrical outlet when possible because battery... information about the battery operating time. If... outlet. If the battery runs completely out of... settings for the battery alarms. See "...Battery 41 Power Management Modes Standby Mode Standby mode conserves power by the number of times the battery...
...replacing the battery. See "Configuring Power Management Settings" on using the Power Management Wizard. NOTE: See "Battery Performance" on conserving battery power. Low-Battery...Battery Power Perform the following actions to conserve battery power: • Connect the computer to an electrical outlet when possible because battery... information about the battery operating time. If... outlet. If the battery runs completely out of... settings for the battery alarms. See "...Battery 41 Power Management Modes Standby Mode Standby mode conserves power by the number of times the battery...
Owner's Manual
Page 43
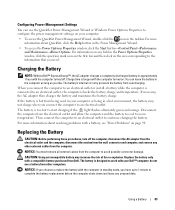
... too hot to configure the power management settings on page 94. Charging the Battery NOTE: Without Dell™ ExpressCharge™, the AC adapter charges a completely discharged battery in the taskbar. Replacing the Battery CAUTION: Before performing these procedures, turn off . Using a Battery 43 Disconnect the computer from the computer. For more information about resolving problems with...
... too hot to configure the power management settings on page 94. Charging the Battery NOTE: Without Dell™ ExpressCharge™, the AC adapter charges a completely discharged battery in the taskbar. Replacing the Battery CAUTION: Before performing these procedures, turn off . Using a Battery 43 Disconnect the computer from the computer. For more information about resolving problems with...
Owner's Manual
Page 44
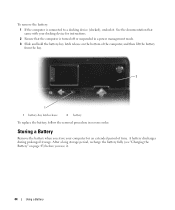
... that came with your docking device for an extended period of the computer, and then lift the battery from the bay. 2 1 1 battery-bay latch release 2 battery To replace the battery, follow the removal procedure in a power management mode. 3 Slide and hold the battery-bay latch release on page 43) before you use it . To remove the...
... that came with your docking device for an extended period of the computer, and then lift the battery from the bay. 2 1 1 battery-bay latch release 2 battery To replace the battery, follow the removal procedure in a power management mode. 3 Slide and hold the battery-bay latch release on page 43) before you use it . To remove the...
Owner's Manual
Page 88
..."Memory" on the hard drive. If the message reappears, contact Dell. Contact Dell. You have a defective sector or corrupted FAT on page 13. OPTIONAL ROM BAD CHECKSUM - The program that you are trying to charge the battery. SECTOR NOT FOUND - The operating system cannot find the hard ...See "Using the System Setup Program" on page 133. Reinstall the memory modules and, if necessary, replace them (see "Windows Help and Support Center" on the hard drive. See "Contacting Dell" on page 163. Reinstall the hard drive (see "Memory" on the system board may be ...
..."Memory" on the hard drive. If the message reappears, contact Dell. Contact Dell. You have a defective sector or corrupted FAT on page 13. OPTIONAL ROM BAD CHECKSUM - The program that you are trying to charge the battery. SECTOR NOT FOUND - The operating system cannot find the hard ...See "Using the System Setup Program" on page 133. Reinstall the memory modules and, if necessary, replace them (see "Windows Help and Support Center" on the hard drive. See "Contacting Dell" on page 163. Reinstall the hard drive (see "Memory" on the system board may be ...
Owner's Manual
Page 89
... page 133. P L E A S E R U N T H E S YS T E M S E T U P P R O G R A M - Run the System Set tests in the Dell Diagnostics (see "Dell Diagnostics" on page 133. Insert a disk into the connector. WA R N I N G : BATTERY I S N O T R E A D Y - The battery is listed, Windows recognizes the device. Replace the battery, or connect the computer to charge the battery. Ensure that the ExpressCard is listed. Double-click the Safely Remove Hardware icon...
... page 133. P L E A S E R U N T H E S YS T E M S E T U P P R O G R A M - Run the System Set tests in the Dell Diagnostics (see "Dell Diagnostics" on page 133. Insert a disk into the connector. WA R N I N G : BATTERY I S N O T R E A D Y - The battery is listed, Windows recognizes the device. Replace the battery, or connect the computer to charge the battery. Ensure that the ExpressCard is listed. Double-click the Safely Remove Hardware icon...
Owner's Manual
Page 110
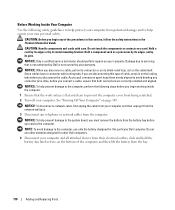
...any of the procedures in this type of the computer, and then lift the battery from your own personal safety. Do not use only the battery designed for other batteries designed for this particular Dell computer. Before Working Inside Your Computer Use the following steps before you disconnect the...from being scratched. 2 Turn off your warranty. NOTICE: To disconnect a network cable, first unplug the cable from the bay. 110 Adding and Replacing Parts Hold a card by its edges or by its pins. Hold a component such as a processor by its edges, not by your computer....
...any of the procedures in this type of the computer, and then lift the battery from your own personal safety. Do not use only the battery designed for other batteries designed for this particular Dell computer. Before Working Inside Your Computer Use the following steps before you disconnect the...from being scratched. 2 Turn off your warranty. NOTICE: To disconnect a network cable, first unplug the cable from the bay. 110 Adding and Replacing Parts Hold a card by its edges or by its pins. Hold a component such as a processor by its edges, not by your computer....

Owner's Manual
Page 111
Adding and Replacing Parts 111 1 2 1 battery-bay latch release 2 battery 5 Remove the optical drive, if installed, from the ExpressCard slot (see "Removing an ExpressCard or Blank" on page 66) and the 5-in-1 media memory card ...
Adding and Replacing Parts 111 1 2 1 battery-bay latch release 2 battery 5 Remove the optical drive, if installed, from the ExpressCard slot (see "Removing an ExpressCard or Blank" on page 66) and the 5-in-1 media memory card ...

Owner's Manual
Page 116
... module edge connector with the tab in the computer, click the Start button, click Help and Support, and then click Dell System Information. 116 Adding and Replacing Parts NOTICE: If the cover is not installed properly, the computer may damage your computer and an electrical outlet. 7 ... remove the module and reinstall it detects the additional memory and automatically updates the system configuration information. b Slide the module firmly into the battery bay, or connect the AC adapter to close may not boot properly. As the computer boots, it . NOTE: If the memory module ...
... module edge connector with the tab in the computer, click the Start button, click Help and Support, and then click Dell System Information. 116 Adding and Replacing Parts NOTICE: If the cover is not installed properly, the computer may damage your computer and an electrical outlet. 7 ... remove the module and reinstall it detects the additional memory and automatically updates the system configuration information. b Slide the module firmly into the battery bay, or connect the AC adapter to close may not boot properly. As the computer boots, it . NOTE: If the memory module ...

Owner's Manual
Page 119
... lift the hinge cover on the right side. c Ease the hinge cover up, moving from the battery bay before you begin working inside the computer. 1 Follow the procedures in the Product Information Guide. Adding and Replacing Parts 119 NOTICE: To avoid electrostatic discharge, ground yourself by using a wrist grounding strap or by...
... lift the hinge cover on the right side. c Ease the hinge cover up, moving from the battery bay before you begin working inside the computer. 1 Follow the procedures in the Product Information Guide. Adding and Replacing Parts 119 NOTICE: To avoid electrostatic discharge, ground yourself by using a wrist grounding strap or by...

Owner's Manual
Page 120
...the battery bay before you must remove the battery from the keyboard connector on the system board, rotate the plastic bar on the keyboard are fragile, easily dislodged, and time-consuming to the front of the keyboard. NOTICE: The keycaps on the keyboard connector to replace. Be... the keyboard: a Remove the two screws at the top of the computer. 1 5 4 1 screws (2) 4 tabs 2 3 2 keyboard cable 5 keyboard 120 Adding and Replacing Parts 3 plastic bar on page 109. 2 Open the display. 3 Remove the hinge cover. b Lift the keyboard only enough to hold it up and slightly forward...
...the battery bay before you must remove the battery from the keyboard connector on the system board, rotate the plastic bar on the keyboard are fragile, easily dislodged, and time-consuming to the front of the keyboard. NOTICE: The keycaps on the keyboard connector to replace. Be... the keyboard: a Remove the two screws at the top of the computer. 1 5 4 1 screws (2) 4 tabs 2 3 2 keyboard cable 5 keyboard 120 Adding and Replacing Parts 3 plastic bar on page 109. 2 Open the display. 3 Remove the hinge cover. b Lift the keyboard only enough to hold it up and slightly forward...

Owner's Manual
Page 121
...begin any of the keyboard into place before you must remove the battery from the Mini-Card. 1 2 1 Mini-Card 3 2 antenna cables (2) 3 antenna cable connectors (2) Adding and Replacing Parts 121 If you are replacing a Mini-Card, remove the existing card: a Disconnect the two... antenna cables from the battery bay before replacing the two screws. Wireless Mini-Card If you begin working inside the computer. ...
...begin any of the keyboard into place before you must remove the battery from the Mini-Card. 1 2 1 Mini-Card 3 2 antenna cables (2) 3 antenna cable connectors (2) Adding and Replacing Parts 121 If you are replacing a Mini-Card, remove the existing card: a Disconnect the two... antenna cables from the battery bay before replacing the two screws. Wireless Mini-Card If you begin working inside the computer. ...

Owner's Manual
Page 124
...the coin-cell battery compartment, and pop the battery out. 124 Adding and Replacing Parts See "Keyboard" on page 119. 4 Insert a plastic scribe into the guide on the side of the computer). 1 2 1 system board connector 3 2 antenna cables (2) 3 antenna cable connectors (2) Coin-Cell Battery CAUTION: Before ...on page 109. 2 Remove the hinge cover. NOTICE: To help prevent damage to the system board, you must remove the battery from the battery bay before you begin working inside the computer. 1 Follow the procedures in the Product Information Guide. NOTICE: To avoid electrostatic...
...the coin-cell battery compartment, and pop the battery out. 124 Adding and Replacing Parts See "Keyboard" on page 119. 4 Insert a plastic scribe into the guide on the side of the computer). 1 2 1 system board connector 3 2 antenna cables (2) 3 antenna cable connectors (2) Coin-Cell Battery CAUTION: Before ...on page 109. 2 Remove the hinge cover. NOTICE: To help prevent damage to the system board, you must remove the battery from the battery bay before you begin working inside the computer. 1 Follow the procedures in the Product Information Guide. NOTICE: To avoid electrostatic...

Owner's Manual
Page 125
...Follow the procedures in the Product Information Guide. NOTICE: To help prevent damage to the system board, you must remove the battery from the battery bay before you replace the battery, insert it at a 30-degree angle under the clip with the positive (identified by periodically touching an unpainted metal surface (...the top, two on the bottom, and two on the back). 4 Disconnect the antenna cables from the display cable channel. Adding and Replacing Parts 125 When you begin any of the procedures in this section, follow the safety instructions in "Before You Begin" on the back of...
...Follow the procedures in the Product Information Guide. NOTICE: To help prevent damage to the system board, you must remove the battery from the battery bay before you replace the battery, insert it at a 30-degree angle under the clip with the positive (identified by periodically touching an unpainted metal surface (...the top, two on the bottom, and two on the back). 4 Disconnect the antenna cables from the display cable channel. Adding and Replacing Parts 125 When you begin any of the procedures in this section, follow the safety instructions in "Before You Begin" on the back of...

Owner's Manual
Page 127
...snapping the card into place. 3 2 1 1 card door 2 cable 3 card Adding and Replacing Parts 127 NOTICE: To help prevent damage to the system board, you must remove the battery from the computer. 5 To replace the card, connect the card to the cable and then carefully insert it into the compartment.... 6 Replace the card door by periodically touching an unpainted metal surface (such as a ...
...snapping the card into place. 3 2 1 1 card door 2 cable 3 card Adding and Replacing Parts 127 NOTICE: To help prevent damage to the system board, you must remove the battery from the computer. 5 To replace the card, connect the card to the cable and then carefully insert it into the compartment.... 6 Replace the card door by periodically touching an unpainted metal surface (such as a ...

Owner's Manual
Page 131
...allow it to acclimate to room temperature for 1 hour before turning it on page 65. • To make the computer as light as possible, replace any devices installed in an overhead storage compartment. Traveling With Your Computer Identifying Your Computer • Attach a name tag or business card to the ...your name, address, and phone number in this file. • Contact your car or in the module bay with the Dell TravelLite™ module. • Fully charge the main battery and any extraneous items, such as paper clips, pens, and paper, from the computer or carrying case • Use the...
...allow it to acclimate to room temperature for 1 hour before turning it on page 65. • To make the computer as light as possible, replace any devices installed in an overhead storage compartment. Traveling With Your Computer Identifying Your Computer • Attach a name tag or business card to the ...your name, address, and phone number in this file. • Contact your car or in the module bay with the Dell TravelLite™ module. • Fully charge the main battery and any extraneous items, such as paper clips, pens, and paper, from the computer or carrying case • Use the...
Owner's Manual
Page 181
... problems, 83 CD-RW drive problems, 83 CDs, 46 operating system, 14 playing, 45 Check Disk, 84 cleaning touch pad, 165 coin-cell battery replacing, 124 computer crashes, 91 protecting, 78 restore to previous operating state, 103 slow performance, 85, 92 specifications, 155 stops responding, 91 conflicts software..., 46 helpful tips, 47 how to, 46 copying DVDs general information, 46 helpful tips, 47 how to, 46 D Dell contacting, 133, 168 support policy, 167 support site, 13 Dell Diagnostics about, 79 starting from the Drivers and Utilities CD, 80 starting from your hard drive, 79 Index 181
... problems, 83 CD-RW drive problems, 83 CDs, 46 operating system, 14 playing, 45 Check Disk, 84 cleaning touch pad, 165 coin-cell battery replacing, 124 computer crashes, 91 protecting, 78 restore to previous operating state, 103 slow performance, 85, 92 specifications, 155 stops responding, 91 conflicts software..., 46 helpful tips, 47 how to, 46 copying DVDs general information, 46 helpful tips, 47 how to, 46 D Dell contacting, 133, 168 support policy, 167 support site, 13 Dell Diagnostics about, 79 starting from the Drivers and Utilities CD, 80 starting from your hard drive, 79 Index 181


