Owner's Manual
Page 4
...Functions 36 Display Functions 36 Power Management 36 Speaker Functions 36 Microsoft® Windows® Logo Key Functions 37 QuickSet Key Combinations 37 Adjusting Keyboard Settings 37 Touch Pad 38 Customizing the Touch Pad 38 5 Using a Battery 39 Battery Performance 39 Checking the Battery Charge 40... Dell™ QuickSet Battery Meter 40 Microsoft® Windows® Power Meter 40 Charge Gauge 40 Low-Battery Warning 41 Conserving Battery Power 41 ...
...Functions 36 Display Functions 36 Power Management 36 Speaker Functions 36 Microsoft® Windows® Logo Key Functions 37 QuickSet Key Combinations 37 Adjusting Keyboard Settings 37 Touch Pad 38 Customizing the Touch Pad 38 5 Using a Battery 39 Battery Performance 39 Checking the Battery Charge 40... Dell™ QuickSet Battery Meter 40 Microsoft® Windows® Power Meter 40 Charge Gauge 40 Low-Battery Warning 41 Conserving Battery Power 41 ...

Owner's Manual
Page 7
E-Mail, Modem, and Internet Problems 84 Error Messages 85 ExpressCard Problems 89 IEEE 1394 Device Problems 89 Keyboard Problems 90 External Keyboard problems 90 Unexpected characters 90 Lockups and Software Problems 91 The computer does not start up 91 The ...computer stops responding 91 A program stops responding or crashes repeatedly 91 A program is designed for an earlier Microsoft® Windows® operating system 91 A solid blue screen appears 91 Dell...
E-Mail, Modem, and Internet Problems 84 Error Messages 85 ExpressCard Problems 89 IEEE 1394 Device Problems 89 Keyboard Problems 90 External Keyboard problems 90 Unexpected characters 90 Lockups and Software Problems 91 The computer does not start up 91 The ...computer stops responding 91 A program stops responding or crashes repeatedly 91 A program is designed for an earlier Microsoft® Windows® operating system 91 A solid blue screen appears 91 Dell...
Owner's Manual
Page 8
... and Utilities 100 Resolving Software and Hardware Incompatibilities 102 Restoring Your Operating System 102 Using Microsoft Windows XP System Restore 103 Using Dell PC Restore by Symantec 104 Using the Operating System CD 106 11 Adding and Replacing Parts 109 Before You Begin 109 Recommended...Computer 109 Before Working Inside Your Computer 110 Optical Drive 111 Hard Drive 112 Returning a Hard Drive to Dell 114 Memory 114 Modem 117 Hinge Cover 118 Keyboard 119 Wireless Mini-Card 121 Coin-Cell Battery 124 Display 125 Internal Card With Bluetooth® Wireless Technology 127...
... and Utilities 100 Resolving Software and Hardware Incompatibilities 102 Restoring Your Operating System 102 Using Microsoft Windows XP System Restore 103 Using Dell PC Restore by Symantec 104 Using the Operating System CD 106 11 Adding and Replacing Parts 109 Before You Begin 109 Recommended...Computer 109 Before Working Inside Your Computer 110 Optical Drive 111 Hard Drive 112 Returning a Hard Drive to Dell 114 Memory 114 Modem 117 Hinge Cover 118 Keyboard 119 Wireless Mini-Card 121 Coin-Cell Battery 124 Display 125 Internal Card With Bluetooth® Wireless Technology 127...
Owner's Manual
Page 9
... Traveling With Your Computer 131 Identifying Your Computer 131 Packing the Computer 131 Travel Tips 132 Traveling by Air 132 14 Contacting Dell 133 15 Specifications 155 16 Appendix 163 Using the System Setup Program 163 Viewing the System Setup Screen 163 System Setup Screen... 163 Commonly Used Options 164 Cleaning Your Computer 165 Computer, Keyboard, and Display 165 Touch Pad 165 Floppy Drive 166 CDs and DVDs 166 Dell Technical Support Policy (U.S. Only 166 Definition of "Dell-Installed" Software and Peripherals 167 Definition of "Third-Party" Software and...
... Traveling With Your Computer 131 Identifying Your Computer 131 Packing the Computer 131 Travel Tips 132 Traveling by Air 132 14 Contacting Dell 133 15 Specifications 155 16 Appendix 163 Using the System Setup Program 163 Viewing the System Setup Screen 163 System Setup Screen... 163 Commonly Used Options 164 Cleaning Your Computer 165 Computer, Keyboard, and Display 165 Touch Pad 165 Floppy Drive 166 CDs and DVDs 166 Dell Technical Support Policy (U.S. Only 166 Definition of "Dell-Installed" Software and Peripherals 167 Definition of "Third-Party" Software and...
Owner's Manual
Page 16
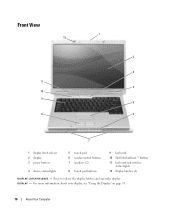
For more information about your display, see "Using the Display" on page 33. 16 About Your Computer Front View 1 12 2 3 11 4 10 9 5 8 6 7 1 display latch release 2 display 3 power button 4 device status lights 5 touch pad 6 media control buttons 7 speakers (2) 8 touch pad buttons 9 keyboard 10 Dell MediaDirect™ button 11 keyboard and wireless status lights 12 display latches (2) D I S P L A Y - D I S P L A Y L A T C H R E L E A S E - Press to release the display latches and open the display.
For more information about your display, see "Using the Display" on page 33. 16 About Your Computer Front View 1 12 2 3 11 4 10 9 5 8 6 7 1 display latch release 2 display 3 power button 4 device status lights 5 touch pad 6 media control buttons 7 speakers (2) 8 touch pad buttons 9 keyboard 10 Dell MediaDirect™ button 11 keyboard and wireless status lights 12 display latches (2) D I S P L A Y - D I S P L A Y L A T C H R E L E A S E - Press to release the display latches and open the display.
Owner's Manual
Page 18
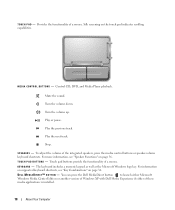
... button to launch either Microsoft Windows Media Center Edition or another version of Windows XP with Dell Media Experience if either of a mouse. Provides the functionality of these media applications is installed. 18 About Your Computer Touch pad ... Player playback. For more information, see "Key Combinations" on page 36. Play or pause. To adjust the volume of a mouse. Turn the volume down. The keyboard includes a numeric keypad as well as the Microsoft Windows logo key. T O U C H P A D - Play the next track. S P E A K E R S - Silk screening on the touch ...
... button to launch either Microsoft Windows Media Center Edition or another version of Windows XP with Dell Media Experience if either of a mouse. Provides the functionality of these media applications is installed. 18 About Your Computer Touch pad ... Player playback. For more information, see "Key Combinations" on page 36. Play or pause. To adjust the volume of a mouse. Turn the volume down. The keyboard includes a numeric keypad as well as the Microsoft Windows logo key. T O U C H P A D - Play the next track. S P E A K E R S - Silk screening on the touch ...
Owner's Manual
Page 19
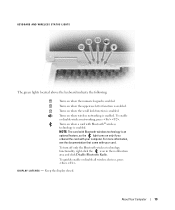
... devices, press . Turns on when wireless networking is enabled. For more information, see the documentation that came with your card. D I S P L A Y L A T C H E S - KEYBOARD AND WIRELESS STATUS LIGHTS The green lights located above the keyboard indicate the following: 9 Turns on when the numeric keypad is enabled. A Turns on when the uppercase letter function is enabled...
... devices, press . Turns on when wireless networking is enabled. For more information, see the documentation that came with your card. D I S P L A Y L A T C H E S - KEYBOARD AND WIRELESS STATUS LIGHTS The green lights located above the keyboard indicate the following: 9 Turns on when the numeric keypad is enabled. A Turns on when the uppercase letter function is enabled...
Owner's Manual
Page 22
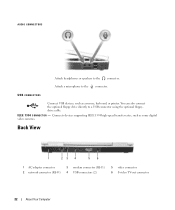
... Your Computer USB CONNECTORS Connect USB devices, such as some digital video cameras. Connects devices supporting IEEE 1394 high-speed transfer rates, such as a mouse, keyboard, or printer. I E E E 1 3 9 4 C O N N E C T O R - AUDIO CONNECTORS Attach headphones or speakers to a USB connector using the optional floppydrive cable. Attach a microphone to the connector...
... Your Computer USB CONNECTORS Connect USB devices, such as some digital video cameras. Connects devices supporting IEEE 1394 high-speed transfer rates, such as a mouse, keyboard, or printer. I E E E 1 3 9 4 C O N N E C T O R - AUDIO CONNECTORS Attach headphones or speakers to a USB connector using the optional floppydrive cable. Attach a microphone to the connector...
Owner's Manual
Page 33
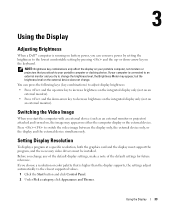
or down -arrow key to decrease brightness on the integrated display only (not on the keyboard. Press to adjust display brightness: • Press and the up - If you try to change the brightness level, the Brightness Meter may appear on ...settings for future reference. NOTE: Brightness key combinations only affect the display on your portable computer or docking device. Using the Display Adjusting Brightness When a Dell™ computer is higher than the display supports, the settings adjust automatically to the closest supported values. 1 Click the Start button and click Control ...
or down -arrow key to decrease brightness on the integrated display only (not on the keyboard. Press to adjust display brightness: • Press and the up - If you try to change the brightness level, the Brightness Meter may appear on ...settings for future reference. NOTE: Brightness key combinations only affect the display on your portable computer or docking device. Using the Display Adjusting Brightness When a Dell™ computer is higher than the display supports, the settings adjust automatically to the closest supported values. 1 Click the Start button and click Control ...

Owner's Manual
Page 35
The 9 light indicates that the keypad is active. • To disable the keypad, press again. Using the Keyboard and Touch Pad Numeric Keypad The numeric keypad functions like the numeric keypad on the keypad has multiple functions. Each key on an external keyboard. To type a number or symbol, press and the desired key after enabling the keypad. • To enable the keypad, press . Using the Keyboard and Touch Pad 35 The keypad numbers and symbols are marked in blue on the right of the keypad keys.
The 9 light indicates that the keypad is active. • To disable the keypad, press again. Using the Keyboard and Touch Pad Numeric Keypad The numeric keypad functions like the numeric keypad on the keypad has multiple functions. Each key on an external keyboard. To type a number or symbol, press and the desired key after enabling the keypad. • To enable the keypad, press . Using the Keyboard and Touch Pad 35 The keypad numbers and symbols are marked in blue on the right of the keypad keys.
Owner's Manual
Page 36
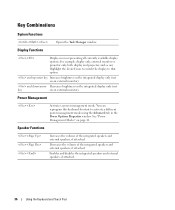
You can reprogram this keyboard shortcut to that option. See "Power Management Modes" on an external monitor). Decreases the volume of the integrated speakers and external speakers, if attached. Key ... brightness on the integrated display only (not key on page 41. Enables and disables the integrated speakers and external speakers, if attached. 36 Using the Keyboard and Touch Pad Power Management Activates a power management mode. Displays icons representing all currently available display options (for example, display only, external monitor or projector...
You can reprogram this keyboard shortcut to that option. See "Power Management Modes" on an external monitor). Decreases the volume of the integrated speakers and external speakers, if attached. Key ... brightness on the integrated display only (not key on page 41. Enables and disables the integrated speakers and external speakers, if attached. 36 Using the Keyboard and Touch Pad Power Management Activates a power management mode. Displays icons representing all currently available display options (for example, display only, external monitor or projector...
Owner's Manual
Page 37
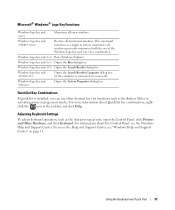
...for functions such as the character repeat rate, open windows. Windows logo key and Opens the Search Results dialog box. Adjusting Keyboard Settings To adjust keyboard operation, such as the Battery Meter or activating power management modes. Microsoft® Windows® Logo Key Functions Windows logo ...key and Minimizes all open the Control Panel, click Printers and Other Hardware, and click Keyboard. Windows logo key and Opens the Search Results-Computer dialog box (if the computer is installed, you can use of the Windows ...
...for functions such as the character repeat rate, open windows. Windows logo key and Opens the Search Results dialog box. Adjusting Keyboard Settings To adjust keyboard operation, such as the Battery Meter or activating power management modes. Microsoft® Windows® Logo Key Functions Windows logo ...key and Minimizes all open the Control Panel, click Printers and Other Hardware, and click Keyboard. Windows logo key and Opens the Search Results-Computer dialog box (if the computer is installed, you can use of the Windows ...

Owner's Manual
Page 38
... Properties window, click the Touch Pad tab to adjust touch pad settings. 3 Click OK to save the settings and close the window. 38 Using the Keyboard and Touch Pad The touch pad has silk screening on two sides to use the touch-pad scroll feature. Customizing the Touch Pad You can...
... Properties window, click the Touch Pad tab to adjust touch pad settings. 3 Click OK to save the settings and close the window. 38 Using the Keyboard and Touch Pad The touch pad has silk screening on two sides to use the touch-pad scroll feature. Customizing the Touch Pad You can...
Owner's Manual
Page 80
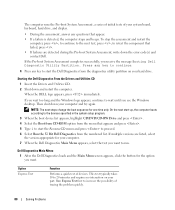
... steps change the boot sequence for the option you receive the message Booting Dell Diagnostic Utility Partition. The computer runs the Pre-boot System Assessment, a series of initial tests of your system board, keyboard, hard drive, and display. • During the assessment, answer any ...key to start the ResourceCD menu and press to increase the possibility of devices. Dell Diagnostics Main Menu 1 After the Dell Diagnostics loads and the Main Menu screen appears...
... steps change the boot sequence for the option you receive the message Booting Dell Diagnostic Utility Partition. The computer runs the Pre-boot System Assessment, a series of initial tests of your system board, keyboard, hard drive, and display. • During the assessment, answer any ...key to start the ResourceCD menu and press to increase the possibility of devices. Dell Diagnostics Main Menu 1 After the Dell Diagnostics loads and the Main Menu screen appears...
Owner's Manual
Page 87
... the Digital Rights Management (DRM) restrictions on page 79). INSERT BOOTABLE MEDIA - P L E A S E R U N S YS T E M S E T U P P R O G R A M - Run the Keyboard Controller test in the Dell Diagnostics (see "Dell Diagnostics" on page 79). Run the Keyboard Controller test in the Dell Diagnostics (see "Dell Diagnostics" on page 79). For external keyboards, check the cable connection. Restart the computer, and avoid touching the...
... the Digital Rights Management (DRM) restrictions on page 79). INSERT BOOTABLE MEDIA - P L E A S E R U N S YS T E M S E T U P P R O G R A M - Run the Keyboard Controller test in the Dell Diagnostics (see "Dell Diagnostics" on page 79). Run the Keyboard Controller test in the Dell Diagnostics (see "Dell Diagnostics" on page 79). For external keyboards, check the cable connection. Restart the computer, and avoid touching the...
Owner's Manual
Page 89
... page 79). P R O V I D E D I E E E 1 3 9 4 D E V I B L E . Connect your IEEE 1394 device is properly inserted into the drive and try again. See "Contacting Dell" on page 133. TIMER CHIP COUNTER 2 FAILED - Run the System Memory tests and the Keyboard Controller test in the Product Information Guide. ExpressCard Problems CAUTION: Before you begin any of the procedures in...
... page 79). P R O V I D E D I E E E 1 3 9 4 D E V I B L E . Connect your IEEE 1394 device is properly inserted into the drive and try again. See "Contacting Dell" on page 133. TIMER CHIP COUNTER 2 FAILED - Run the System Memory tests and the Keyboard Controller test in the Product Information Guide. ExpressCard Problems CAUTION: Before you begin any of the procedures in...
Owner's Manual
Page 90
... computer. If the characters appear now but did not with the external keyboard, you may have a defective external keyboard. NOTE: Use the integrated keyboard when running the Dell Diagnostics or the system setup program. Disconnect the keyboard cable and check it and connect the keyboard directly to Programs→Accessories, and then click Notepad. 4 Type some...
... computer. If the characters appear now but did not with the external keyboard, you may have a defective external keyboard. NOTE: Use the integrated keyboard when running the Dell Diagnostics or the system setup program. Disconnect the keyboard cable and check it and connect the keyboard directly to Programs→Accessories, and then click Notepad. 4 Type some...
Owner's Manual
Page 91
... if numbers are unable to Programs→Accessories, and then click Program Compatibility Wizard. 2 In the welcome screen, click Next. 3 Follow the instructions on your keyboard or moving your computer. Follow the instructions on a floppy disk or CD. Unexpected characters DISABLE THE NUMERIC KEYPAD - If you are displayed instead of the...
... if numbers are unable to Programs→Accessories, and then click Program Compatibility Wizard. 2 In the welcome screen, click Next. 3 Follow the instructions on your keyboard or moving your computer. Follow the instructions on a floppy disk or CD. Unexpected characters DISABLE THE NUMERIC KEYPAD - If you are displayed instead of the...
Owner's Manual
Page 92
... device drivers do not conflict with your computer. • Ensure that detects video content and dynamically adjusts the brightness/contrast/saturation ratios. See "Contacting Dell" on your keyboard or moving your computer. A solid blue screen appears TURN THE COMPUTER OFF - You can access licensed files in some graphics cards to access Help...
... device drivers do not conflict with your computer. • Ensure that detects video content and dynamically adjusts the brightness/contrast/saturation ratios. See "Contacting Dell" on your keyboard or moving your computer. A solid blue screen appears TURN THE COMPUTER OFF - You can access licensed files in some graphics cards to access Help...
Owner's Manual
Page 99
If an error message appears, see "Error Messages" on page 133. See "Contacting Dell" on page 85. Solving Problems 99 If the display is a program that controls a device such as a printer, mouse, or keyboard. ELIMINATE POSSIBLE INTERFERENCE - Eliminate sunlight glare, which can cause poor picture quality. ADJUST THE WINDOWS DISPLAY SETTINGS - 1 Click the...
If an error message appears, see "Error Messages" on page 133. See "Contacting Dell" on page 85. Solving Problems 99 If the display is a program that controls a device such as a printer, mouse, or keyboard. ELIMINATE POSSIBLE INTERFERENCE - Eliminate sunlight glare, which can cause poor picture quality. ADJUST THE WINDOWS DISPLAY SETTINGS - 1 Click the...


