Owner's Manual
Page 8
... the Operating System CD 106 11 Adding and Replacing Parts 109 Before You Begin 109 Recommended Tools 109 Turning Off Your Computer 109 Before Working Inside Your Computer 110 Optical Drive 111 Hard Drive 112 Returning a Hard Drive to Dell 114 Memory 114 Modem 117 Hinge Cover 118... Keyboard 119 Wireless Mini-Card 121 Coin-Cell Battery 124 Display 125 Internal Card With Bluetooth® Wireless Technology 127 12 Dell™ QuickSet Features 129...
... the Operating System CD 106 11 Adding and Replacing Parts 109 Before You Begin 109 Recommended Tools 109 Turning Off Your Computer 109 Before Working Inside Your Computer 110 Optical Drive 111 Hard Drive 112 Returning a Hard Drive to Dell 114 Memory 114 Modem 117 Hinge Cover 118... Keyboard 119 Wireless Mini-Card 121 Coin-Cell Battery 124 Display 125 Internal Card With Bluetooth® Wireless Technology 127 12 Dell™ QuickSet Features 129...

Owner's Manual
Page 24
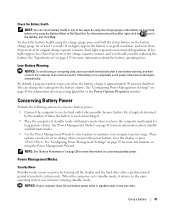
..., which prevents the computer from the battery bay. The computer uses a fan to an electrical outlet. See "Replacing the Battery" on page 40. H A R D D R I N G S C R E W .... BATTERY-BAY LATCH RELEASE - Covers the compartment that contains the modem and the memory modules. Bottom View 12 3 4 5 7 6 1 battery charge gauge 4 2 optical-drive locking screw 5 3 battery-bay latch release 6 battery hard drive modem/memory module cover 7 fan B A T T E R Y C H A R G E G A U G E - Provides information on page 84. B A T T E R Y - For more information, see "Using a Battery" on ...
..., which prevents the computer from the battery bay. The computer uses a fan to an electrical outlet. See "Replacing the Battery" on page 40. H A R D D R I N G S C R E W .... BATTERY-BAY LATCH RELEASE - Covers the compartment that contains the modem and the memory modules. Bottom View 12 3 4 5 7 6 1 battery charge gauge 4 2 optical-drive locking screw 5 3 battery-bay latch release 6 battery hard drive modem/memory module cover 7 fan B A T T E R Y C H A R G E G A U G E - Provides information on page 84. B A T T E R Y - For more information, see "Using a Battery" on ...
Owner's Manual
Page 41
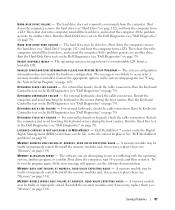
...If no lights appear, the battery is largely determined by turning off the display and the hard drive after a low-battery warning, and then connect the computer to optimize your computer's power... your work immediately after a predetermined period of the charge capacity remains, and you should consider replacing the battery. If the battery runs completely out of time. NOTE: See "Battery Performance"... on page 43 for more information about QuickSet, right-click the icon in Dell QuickSet. When the computer exits standby mode, it returns to an electrical outlet when ...
...If no lights appear, the battery is largely determined by turning off the display and the hard drive after a low-battery warning, and then connect the computer to optimize your computer's power... your work immediately after a predetermined period of the charge capacity remains, and you should consider replacing the battery. If the battery runs completely out of time. NOTE: See "Battery Performance"... on page 43 for more information about QuickSet, right-click the icon in Dell QuickSet. When the computer exits standby mode, it returns to an electrical outlet when ...
Owner's Manual
Page 86
..., reinstall the hard drive, and restart the computer. See "Dell Diagnostics" on page 79). DRIVE NOT READY - Install a hard drive in the bay before it can continue. If the error appears again, contact Dell. Reinstall the memory modules and, if necessary, replace them . Run the Hard-Disk Drive tests in the Dell Diagnostics (see "Hard Drive" on page 112. See "Contacting Dell" on the...
..., reinstall the hard drive, and restart the computer. See "Dell Diagnostics" on page 79). DRIVE NOT READY - Install a hard drive in the bay before it can continue. If the error appears again, contact Dell. Reinstall the memory modules and, if necessary, replace them . Run the Hard-Disk Drive tests in the Dell Diagnostics (see "Hard Drive" on page 112. See "Contacting Dell" on the...
Owner's Manual
Page 87
... Keyboard Controller test in the system setup program (see "Dell Diagnostics" on page 79). L I C E N S E D C O N T E N T I S N O T A C C E S S I B L E I N M E D I A D I N G V A L U E - M E M O R Y D A T A L I N E F A I L U R E A T A D D R E S S , R E A D V A L U E E X P E C T I O N - Solving Problems 87 Shut down the computer, remove the hard drive (see "Hard Drive" on page 112), and boot the computer from a... module may be played. Reinstall the memory modules and, if necessary, replace them (see "Dell Diagnostics" on page 114). MEMORY ALLOCATION ERROR - The software you are...
... Keyboard Controller test in the system setup program (see "Dell Diagnostics" on page 79). L I C E N S E D C O N T E N T I S N O T A C C E S S I B L E I N M E D I A D I N G V A L U E - M E M O R Y D A T A L I N E F A I L U R E A T A D D R E S S , R E A D V A L U E E X P E C T I O N - Solving Problems 87 Shut down the computer, remove the hard drive (see "Hard Drive" on page 112), and boot the computer from a... module may be played. Reinstall the memory modules and, if necessary, replace them (see "Dell Diagnostics" on page 114). MEMORY ALLOCATION ERROR - The software you are...
Owner's Manual
Page 88
Reinstall the memory modules and, if necessary, replace them (see "Memory" on page 79). NO BOOT SECTOR ON HARD DRIVE - Contact Dell. Run the System Set tests in the Dell Diagnostics (see "Dell Diagnostics" on page 114). N O T E N O U G H M E M O R Y O R R E S O U R C E S . OPTIONAL ROM BAD CHECKSUM - See the Windows Help and Support Center for installation instructions. TIME-OF-DAY CLOCK LOST POWER...
Reinstall the memory modules and, if necessary, replace them (see "Memory" on page 79). NO BOOT SECTOR ON HARD DRIVE - Contact Dell. Run the System Set tests in the Dell Diagnostics (see "Dell Diagnostics" on page 114). N O T E N O U G H M E M O R Y O R R E S O U R C E S . OPTIONAL ROM BAD CHECKSUM - See the Windows Help and Support Center for installation instructions. TIME-OF-DAY CLOCK LOST POWER...
Owner's Manual
Page 93
...anti-spyware protection (your computer is successfully communicating with the memory (see "Memory" on page 114). • Run the Dell Diagnostics (see "Dell Diagnostics" on page 79). Replace the network cable. If necessary, install additional memory (see "Memory" on page 114). • Reseat the memory modules..., follow the safety instructions in the Product Information Guide. BACK UP YOUR FILES IMMEDIATELY USE A VIRUS-SCANNING PROGRAM TO CHECK THE HARD DRIVE, FLOPPY DISKS, OR CDS SAVE AND CLOSE ANY OPEN FILES OR PROGRAMS AND SHUT DOWN YOUR COMPUTER THROUGH THE Start MENU SCAN...
...anti-spyware protection (your computer is successfully communicating with the memory (see "Memory" on page 114). • Run the Dell Diagnostics (see "Dell Diagnostics" on page 79). Replace the network cable. If necessary, install additional memory (see "Memory" on page 114). • Reseat the memory modules..., follow the safety instructions in the Product Information Guide. BACK UP YOUR FILES IMMEDIATELY USE A VIRUS-SCANNING PROGRAM TO CHECK THE HARD DRIVE, FLOPPY DISKS, OR CDS SAVE AND CLOSE ANY OPEN FILES OR PROGRAMS AND SHUT DOWN YOUR COMPUTER THROUGH THE Start MENU SCAN...

Owner's Manual
Page 111
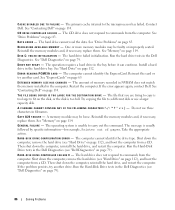
Adding and Replacing Parts 111 1 2 1 battery-bay latch release 2 battery 5 Remove the optical drive, if installed, from the ExpressCard slot (see "Removing an ExpressCard or Blank" on page 66) and the 5-in-1 media memory card reader (see "Removing a ...page 68). 8 Close the display and turn the computer upside down on a flat work surface. 9 Remove the hard drive (see "Hard Drive" on page 111. 6 Press the power button to release the drive from the bay. 4 Slide the drive out of the procedures in this section, follow the safety instructions in the Product Information Guide. 1 Turn...
Adding and Replacing Parts 111 1 2 1 battery-bay latch release 2 battery 5 Remove the optical drive, if installed, from the ExpressCard slot (see "Removing an ExpressCard or Blank" on page 66) and the 5-in-1 media memory card reader (see "Removing a ...page 68). 8 Close the display and turn the computer upside down on a flat work surface. 9 Remove the hard drive (see "Hard Drive" on page 111. 6 Press the power button to release the drive from the bay. 4 Slide the drive out of the procedures in this section, follow the safety instructions in the Product Information Guide. 1 Turn...
Owner's Manual
Page 112
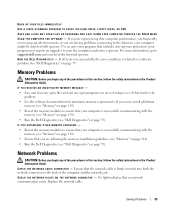
... 109) before removing the hard drive. NOTICE: To prevent data loss, turn off your computer (see "Turning Off Your Computer" on page 100. 112 Adding and Replacing Parts NOTE: Dell does not guarantee compatibility or provide support for hard drives from the computer when the drive is on, in standby ...mode, or in the Product Information Guide. Do not remove the hard drive while the computer is hot, do not...
... 109) before removing the hard drive. NOTICE: To prevent data loss, turn off your computer (see "Turning Off Your Computer" on page 100. 112 Adding and Replacing Parts NOTE: Dell does not guarantee compatibility or provide support for hard drives from the computer when the drive is on, in standby ...mode, or in the Product Information Guide. Do not remove the hard drive while the computer is hot, do not...

Owner's Manual
Page 113
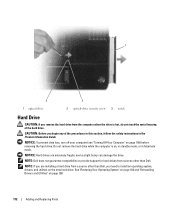
...packaging for storing or shipping the hard drive. To replace the hard drive in the hard drive bay: 1 Follow the procedures in "Before You Begin" on page 109. 2 Turn the computer over, and remove the hard drive screws. 1 2 1 screws (2) 2 hard drive NOTICE: When the hard drive is not in the computer, ...store it is fully seated. 6 Replace and tighten the screws. 7 Install the operating system for your computer. See "...
...packaging for storing or shipping the hard drive. To replace the hard drive in the hard drive bay: 1 Follow the procedures in "Before You Begin" on page 109. 2 Turn the computer over, and remove the hard drive screws. 1 2 1 screws (2) 2 hard drive NOTICE: When the hard drive is not in the computer, ...store it is fully seated. 6 Replace and tighten the screws. 7 Install the operating system for your computer. See "...

Owner's Manual
Page 114
... remove the memory module cover. 114 Adding and Replacing Parts Otherwise, the hard drive may be damaged in transit. 2 1 1 foam packaging 2 hard drive Memory CAUTION: Before you begin any of the procedures in this section, follow the safety instructions in its original or comparable foam packaging. Returning a Hard Drive to Dell Return your computer. See "Specifications" on page...
... remove the memory module cover. 114 Adding and Replacing Parts Otherwise, the hard drive may be damaged in transit. 2 1 1 foam packaging 2 hard drive Memory CAUTION: Before you begin any of the procedures in this section, follow the safety instructions in its original or comparable foam packaging. Returning a Hard Drive to Dell Return your computer. See "Specifications" on page...

Owner's Manual
Page 116
... and reinstall it clicks into the slot at a 45-degree angle, and rotate the module down until it . 1 2 1 notch 2 tab 5 Replace the memory module cover. See "Hard Drive" on page 112. 8 Turn on the computer. NOTICE: If the cover is not installed properly, the computer may damage your computer and an... the notch in the module edge connector with the tab in the computer, click the Start button, click Help and Support, and then click Dell System Information. 116 Adding and Replacing Parts To confirm the amount of memory installed in the connector slot. As the computer boots, it .
... and reinstall it clicks into the slot at a 45-degree angle, and rotate the module down until it . 1 2 1 notch 2 tab 5 Replace the memory module cover. See "Hard Drive" on page 112. 8 Turn on the computer. NOTICE: If the cover is not installed properly, the computer may damage your computer and an... the notch in the module edge connector with the tab in the computer, click the Start button, click Help and Support, and then click Dell System Information. 116 Adding and Replacing Parts To confirm the amount of memory installed in the connector slot. As the computer boots, it .

Owner's Manual
Page 131
... the computer as light as possible, replace any devices installed in the module bay with the Dell TravelLite™ module. • Fully charge the main battery and any spare batteries that it on. • Protect the computer, the batteries, and the hard drive from hazards such as extreme temperatures and...extraneous items, such as paper clips, pens, and paper, from the keyboard and palm rest and close the display. • Use the optional Dell™ carrying case to pack the computer and its accessories together safely. • Avoid packing the computer with you. • Shut down your...
... the computer as light as possible, replace any devices installed in the module bay with the Dell TravelLite™ module. • Fully charge the main battery and any spare batteries that it on. • Protect the computer, the batteries, and the hard drive from hazards such as extreme temperatures and...extraneous items, such as paper clips, pens, and paper, from the keyboard and palm rest and close the display. • Use the optional Dell™ carrying case to pack the computer and its accessories together safely. • Avoid packing the computer with you. • Shut down your...
Owner's Manual
Page 181
...24, 40 charging, 43 checking the charge, 40 conserving power, 41 description, 24 meter, 40 performance, 39 power meter, 40 removing, 43 replacing coin-cell battery, 124 storing, 44 battery-bay latch release, 24 blanks ExpressCards, 65 removing, 66, 68 Bluetooth wireless technology card device status... DVDs general information, 46 helpful tips, 47 how to, 46 D Dell contacting, 133, 168 support policy, 167 support site, 13 Dell Diagnostics about, 79 starting from the Drivers and Utilities CD, 80 starting from your hard drive, 79 Index 181 Index Numerics 5-in-1 media memory card reader, 67...
...24, 40 charging, 43 checking the charge, 40 conserving power, 41 description, 24 meter, 40 performance, 39 power meter, 40 removing, 43 replacing coin-cell battery, 124 storing, 44 battery-bay latch release, 24 blanks ExpressCards, 65 removing, 66, 68 Bluetooth wireless technology card device status... DVDs general information, 46 helpful tips, 47 how to, 46 D Dell contacting, 133, 168 support policy, 167 support site, 13 Dell Diagnostics about, 79 starting from the Drivers and Utilities CD, 80 starting from your hard drive, 79 Index 181 Index Numerics 5-in-1 media memory card reader, 67...
Owner's Manual
Page 182
Dell MediaDirect about , 101 Dell Diagnostics, 79 drives problems, 83 See also hard drive See also optical drive DVD drive problems, 83 DVDs, 46 playing, 45 E End User License Agreement, 11 ergonomics information, 11 error messages, 85 ExpressCard slot description,... WWAN, 65 F fan description, 21, 24 Files and Settings Transfer Wizard, 26 floppy drive connecting to a USB connector, 22 H hard drive description, 21, 24 problems, 84 replacing, 112 returning to Dell, 114 hardware conflicts, 102 Dell Diagnostics, 79 Hardware Troubleshooter, 102 Help and Support Center, 13 help file Windows Help and...
Dell MediaDirect about , 101 Dell Diagnostics, 79 drives problems, 83 See also hard drive See also optical drive DVD drive problems, 83 DVDs, 46 playing, 45 E End User License Agreement, 11 ergonomics information, 11 error messages, 85 ExpressCard slot description,... WWAN, 65 F fan description, 21, 24 Files and Settings Transfer Wizard, 26 floppy drive connecting to a USB connector, 22 H hard drive description, 21, 24 problems, 84 replacing, 112 returning to Dell, 114 hardware conflicts, 102 Dell Diagnostics, 79 Hardware Troubleshooter, 102 Help and Support Center, 13 help file Windows Help and...


