Quick Start Guide
Page 2
... technical support, free of service charges, MondaySaturday (excluding holidays), during your product's 1 year limited warranty period. www.canonesp.com Canon CarePAK Extended Service Plan is our helpful tech support web site. Extended Service and Support - For further information about extending your inquiries...please visit our web site at www.canonesp.com. In addition, the latest driver downloads, answers to frequently asked questions, product information, and "where to buy" instructions are subject to your Canon service and support, call (1-800-385-2155), or visit our Web site...
... technical support, free of service charges, MondaySaturday (excluding holidays), during your product's 1 year limited warranty period. www.canonesp.com Canon CarePAK Extended Service Plan is our helpful tech support web site. Extended Service and Support - For further information about extending your inquiries...please visit our web site at www.canonesp.com. In addition, the latest driver downloads, answers to frequently asked questions, product information, and "where to buy" instructions are subject to your Canon service and support, call (1-800-385-2155), or visit our Web site...
Quick Start Guide
Page 5
... Displayed on the LCD ......72 LCD Cannot Be Seen At All 74 An Unintended Language Is Displayed on the LCD 75 Cannot Install the MP Drivers 76 Cannot Connect to Computer Properly ........ 77 Print Results Not Satisfactory 78 Printing Does Not Start 82 Paper Does Not Feed Properly 84 Paper Jams...
... Displayed on the LCD ......72 LCD Cannot Be Seen At All 74 An Unintended Language Is Displayed on the LCD 75 Cannot Install the MP Drivers 76 Cannot Connect to Computer Properly ........ 77 Print Results Not Satisfactory 78 Printing Does Not Start 82 Paper Does Not Feed Properly 84 Paper Jams...
Quick Start Guide
Page 8
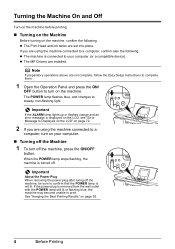
z The MP Drivers are not complete, follow the Easy Setup Instructions to complete them. 1 Open the Operation Panel and press the ON/ OFF button to turn off . When ...
z The MP Drivers are not complete, follow the Easy Setup Instructions to complete them. 1 Open the Operation Panel and press the ON/ OFF button to turn off . When ...
Quick Start Guide
Page 13
... specify the page size and media type when printing from your mobile phone to sticker paper, select Stickers for Fine Art Paper in the printer driver, a limit is set to prevent printing in the Memory card mode. z To specify the page size and media type when printing photos saved ... on-screen manual. *9 When copying printed photos onto sticker paper, be able to purchase some Canon genuine papers depending on your computer, refer to the Printer Driver Guide on the top and bottom edges. Refer to "Setting Items" in "Using Other Useful Printing Functions" of paper, the printed side may ...
... specify the page size and media type when printing from your mobile phone to sticker paper, select Stickers for Fine Art Paper in the printer driver, a limit is set to prevent printing in the Memory card mode. z To specify the page size and media type when printing photos saved ... on-screen manual. *9 When copying printed photos onto sticker paper, be able to purchase some Canon genuine papers depending on your computer, refer to the Printer Driver Guide on the top and bottom edges. Refer to "Setting Items" in "Using Other Useful Printing Functions" of paper, the printed side may ...
Quick Start Guide
Page 16
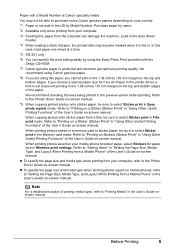
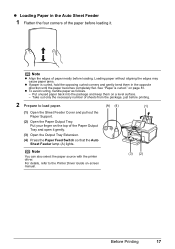
... in the Auto Sheet Feeder" on page 15. Note You can also select the paper source using the printer driver, refer to the Printer Driver Guide on paper source selection using the printer driver. z When Printing for the First Time At purchase, the machine is set to change the paper source, simply press...
... in the Auto Sheet Feeder" on page 15. Note You can also select the paper source using the printer driver, refer to the Printer Driver Guide on paper source selection using the printer driver. z When Printing for the First Time At purchase, the machine is set to change the paper source, simply press...

Quick Start Guide
Page 17
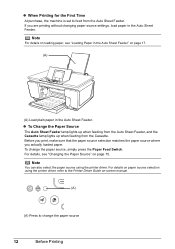
... switched automatically to the type of paper just by specifying the type of paper you use regularly this paper. z For details on printer driver settings, refer to print with minimum reloading of paper depends mainly on the variety of the type of paper you use regularly. You can... of paper are not loadable in the Cassette. „ Paper Source Selection Scenarios Deciding on the usage of the two paper sources to the Printer Driver Guide on-screen manual. (A) (B) (A) Auto Sheet Feeder: Load paper of various types and sizes, including photo paper. (B) Cassette: Load paper you use most...
... switched automatically to the type of paper just by specifying the type of paper you use regularly this paper. z For details on printer driver settings, refer to print with minimum reloading of paper depends mainly on the variety of the type of paper you use regularly. You can... of paper are not loadable in the Cassette. „ Paper Source Selection Scenarios Deciding on the usage of the two paper sources to the Printer Driver Guide on-screen manual. (A) (B) (A) Auto Sheet Feeder: Load paper of various types and sizes, including photo paper. (B) Cassette: Load paper you use most...
Quick Start Guide
Page 18
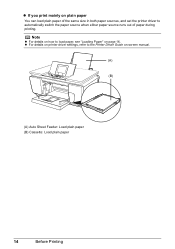
z For details on printer driver settings, refer to the Printer Driver Guide on plain paper You can load plain paper of the same size in both paper sources, and set the printer driver to load paper, see "Loading Paper" on page 16. z If you print mainly on -screen manual. (A) (B) (A) Auto Sheet Feeder: Load plain paper (B) Cassette: Load plain paper 14 Before Printing Note z For details on how to automatically switch the paper source when either paper source runs out of paper during printing.
z For details on printer driver settings, refer to the Printer Driver Guide on plain paper You can load plain paper of the same size in both paper sources, and set the printer driver to load paper, see "Loading Paper" on page 16. z If you print mainly on -screen manual. (A) (B) (A) Auto Sheet Feeder: Load plain paper (B) Cassette: Load plain paper 14 Before Printing Note z For details on how to automatically switch the paper source when either paper source runs out of paper during printing.
Quick Start Guide
Page 19
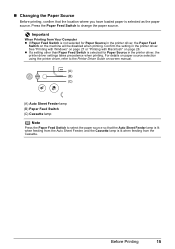
... Auto Sheet Feeder lamp is lit when feeding from Your Computer z If Paper Feed Switch is selected for Paper Source in the printer driver. Important When Printing from the Auto Sheet Feeder, and the Cassette lamp is selected as the paper source. See "Printing with Windows"... Macintosh" on the machine will be disabled when printing. Confirm the setting in the printer driver, the Paper Feed Switch on page 28. For details on paper source selection using the printer driver, refer to the Printer Driver Guide on-screen manual. (A) (B) (C) (A) Auto Sheet Feeder lamp (B) Paper Feed Switch...
... Auto Sheet Feeder lamp is lit when feeding from Your Computer z If Paper Feed Switch is selected for Paper Source in the printer driver. Important When Printing from the Auto Sheet Feeder, and the Cassette lamp is selected as the paper source. See "Printing with Windows"... Macintosh" on the machine will be disabled when printing. Confirm the setting in the printer driver, the Paper Feed Switch on page 28. For details on paper source selection using the printer driver, refer to the Printer Driver Guide on-screen manual. (A) (B) (C) (A) Auto Sheet Feeder lamp (B) Paper Feed Switch...
Quick Start Guide
Page 21
Loading paper without aligning the edges may cause paper jams. z If paper is curled." Note You can also select the paper source with the printer driver. z To avoid curling, handle paper as follows. - Put your finger on a level surface. - z Loading Paper in the opposite direction until the paper... becomes completely flat. Note z Align the edges of the paper before printing. 2 Prepare to the Printer Driver Guide on page 81. Put unused paper back into the package and keep them in the Auto Sheet Feeder 1 Flatten the four corners of paper...
Loading paper without aligning the edges may cause paper jams. z If paper is curled." Note You can also select the paper source with the printer driver. z To avoid curling, handle paper as follows. - Put your finger on a level surface. - z Loading Paper in the opposite direction until the paper... becomes completely flat. Note z Align the edges of the paper before printing. 2 Prepare to the Printer Driver Guide on page 81. Put unused paper back into the package and keep them in the Auto Sheet Feeder 1 Flatten the four corners of paper...
Quick Start Guide
Page 22
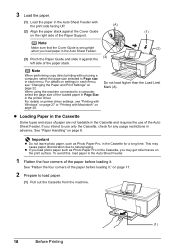
... against the Cover Guide (1) on page 17. 2 Prepare to a computer, select the page size of the paper before loading it . For details on printer driver settings, see "Changing the Paper and Print Settings" on page 8. Important z Do not leave photo paper, such as Photo Paper Pro in the Cassette, you...load paper in each menu. z If you load photo paper such as Photo Paper Pro, in the Cassette for any usage restrictions in the printer driver. Do not load higher than the Load Limit Mark (A). To avoid this, load paper in the Auto Sheet Feeder. 1 Flatten the four corners of...
... against the Cover Guide (1) on page 17. 2 Prepare to a computer, select the page size of the paper before loading it . For details on printer driver settings, see "Changing the Paper and Print Settings" on page 8. Important z Do not leave photo paper, such as Photo Paper Pro in the Cassette, you...load paper in each menu. z If you load photo paper such as Photo Paper Pro, in the Cassette for any usage restrictions in the printer driver. Do not load higher than the Load Limit Mark (A). To avoid this, load paper in the Auto Sheet Feeder. 1 Flatten the four corners of...
Quick Start Guide
Page 23
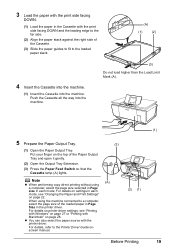
... in each mode, see "Printing with Windows" on page 22. For details on printer driver settings, see "Changing the Paper and Print Settings" on page 27 or "Printing with the printer driver. For details, refer to a computer, select the page size of the loaded paper in... Page Size in the printer driver. Note z When performing copy direct printing without using the machine connected to the Printer Driver Guide onscreen manual. (3) (A) (2) (1) Before Printing (1) 19 When using a computer, select the page ...
... in each mode, see "Printing with Windows" on page 22. For details on printer driver settings, see "Changing the Paper and Print Settings" on page 27 or "Printing with the printer driver. For details, refer to a computer, select the page size of the loaded paper in... Page Size in the printer driver. Note z When performing copy direct printing without using the machine connected to the Printer Driver Guide onscreen manual. (3) (A) (2) (1) Before Printing (1) 19 When using a computer, select the page ...
Quick Start Guide
Page 24
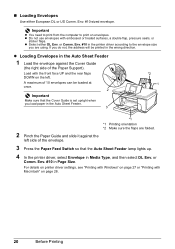
...Env. or Comm. z Loading Envelopes in Page Size. Load with the front face UP and the rear flaps DOWN on envelopes. For details on printer driver settings, see "Printing with Windows" on page 27 or "Printing with embossed or treated surfaces, a double flap, pressure seals, or sticker flaps. If... you do not, the address will be loaded at once. 2 Important Make sure that the Auto Sheet Feeder lamp lights up. 4 In the printer driver, select Envelope in the Auto Sheet Feeder. 3 *2 1 *1 *1 Printing orientation *2 Make sure the flaps are folded. 2 Pinch the Paper Guide and slide it ...
...Env. or Comm. z Loading Envelopes in Page Size. Load with the front face UP and the rear flaps DOWN on envelopes. For details on printer driver settings, see "Printing with Windows" on page 27 or "Printing with embossed or treated surfaces, a double flap, pressure seals, or sticker flaps. If... you do not, the address will be loaded at once. 2 Important Make sure that the Auto Sheet Feeder lamp lights up. 4 In the printer driver, select Envelope in the Auto Sheet Feeder. 3 *2 1 *1 *1 Printing orientation *2 Make sure the flaps are folded. 2 Pinch the Paper Guide and slide it ...
Quick Start Guide
Page 25
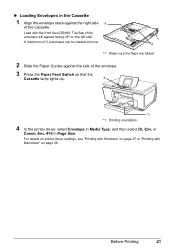
For details on printer driver settings, see "Printing with Windows" on page 27 or "Printing with the front face DOWN. Load with Macintosh" on the left side. z Loading Envelopes in ... envelope stack against the side of the envelope. 3 Press the Paper Feed Switch so that the Cassette lamp lights up. 3 *1 *1 Printing orientation 4 In the printer driver, select Envelope in Page Size. Before Printing 21 The flap of the Cassette. A maximum of 5 envelopes can be loaded at once. 1 2 *1 Make sure the flaps...
For details on printer driver settings, see "Printing with Windows" on page 27 or "Printing with the front face DOWN. Load with Macintosh" on the left side. z Loading Envelopes in ... envelope stack against the side of the envelope. 3 Press the Paper Feed Switch so that the Cassette lamp lights up. 3 *1 *1 Printing orientation 4 In the printer driver, select Envelope in Page Size. Before Printing 21 The flap of the Cassette. A maximum of 5 envelopes can be loaded at once. 1 2 *1 Make sure the flaps...
Quick Start Guide
Page 31
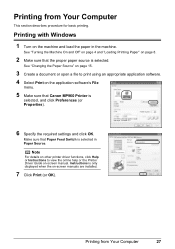
See "Turning the Machine On and Off" on page 4 and "Loading Printing Paper" on page 8. 2 Make sure that Canon MP960 Printer is selected. Printing from Your Computer This section describes procedure for basic printing. See "Changing the Paper Source" on page 15. 3 Create a... document or open a file to view the online help or the Printer Driver Guide on the application software's File menu. 5 Make sure that the proper paper source is selected, and click Preferences (or Properties). 6 Specify the required...
See "Turning the Machine On and Off" on page 4 and "Loading Printing Paper" on page 8. 2 Make sure that Canon MP960 Printer is selected. Printing from Your Computer This section describes procedure for basic printing. See "Changing the Paper Source" on page 15. 3 Create a... document or open a file to view the online help or the Printer Driver Guide on the application software's File menu. 5 Make sure that the proper paper source is selected, and click Preferences (or Properties). 6 Specify the required...
Quick Start Guide
Page 32
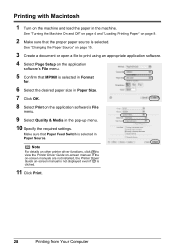
...Click OK. 8 Select Print on -screen manual. Note For details on other printer driver functions, click to print using an appropriate application software. 4 Select Page Setup on the application software's File menu. 5 Confirm that MP960 is clicked. 11 Click Print. 28 Printing from Your Computer Make sure that the...the desired paper size in the pop-up menu. 10 Specify the required settings. If the on-screen manuals are not installed, the Printer Driver Guide on page 8. 2 Make sure that Paper Feed Switch is selected. Printing with Macintosh 1 Turn on the machine and load the paper ...
...Click OK. 8 Select Print on -screen manual. Note For details on other printer driver functions, click to print using an appropriate application software. 4 Select Page Setup on the application software's File menu. 5 Confirm that MP960 is clicked. 11 Click Print. 28 Printing from Your Computer Make sure that the...the desired paper size in the pop-up menu. 10 Specify the required settings. If the on-screen manuals are not installed, the Printer Driver Guide on page 8. 2 Make sure that Paper Feed Switch is selected. Printing with Macintosh 1 Turn on the machine and load the paper ...
Quick Start Guide
Page 47
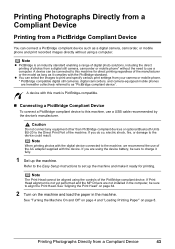
... can be sure to charge it fully. 1 Set up the machine and make it complies with this mark is not yet performed and the MP Drivers are using the controls of the AC adapter supplied with the digital device connected to this machine for printing. Refer to the Easy Setup Instructions...
... can be sure to charge it fully. 1 Set up the machine and make it complies with this mark is not yet performed and the MP Drivers are using the controls of the AC adapter supplied with the digital device connected to this machine for printing. Refer to the Easy Setup Instructions...
Quick Start Guide
Page 60
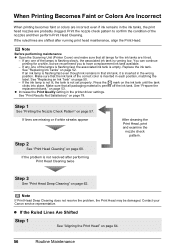
...that the ink tank of the nozzles and then perform Print Head Cleaning. Make sure that ink tank, it is inserted in the printer driver settings. on page 60. If lines are shifted after performing Print Head Cleaning twice After cleaning the Print Head, print and examine the ...ink tank. See "Replacing an Ink Tank" on page 52. If the problem is running print head maintenance, align the Print Head. Contact your Canon service representative. Note Before performing maintenance z Open the Scanning Unit (Printer Cover) and make sure that all lamps for a while, but we recommend...
...that the ink tank of the nozzles and then perform Print Head Cleaning. Make sure that ink tank, it is inserted in the printer driver settings. on page 60. If lines are shifted after performing Print Head Cleaning twice After cleaning the Print Head, print and examine the ...ink tank. See "Replacing an Ink Tank" on page 52. If the problem is running print head maintenance, align the Print Head. Contact your Canon service representative. Note Before performing maintenance z Open the Scanning Unit (Printer Cover) and make sure that all lamps for a while, but we recommend...
Quick Start Guide
Page 75
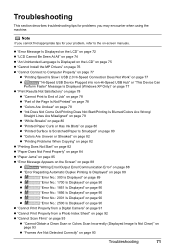
... 72 z "LCD Cannot Be Seen At All" on page 74 z "An Unintended Language Is Displayed on the LCD" on page 75 z "Cannot Install the MP Drivers" on page 76 z "Cannot Connect to Computer Properly" on page 77 z "Printing Speed Is Slow / USB 2.0 Hi-Speed Connection Does Not Work" on page 77...
... 72 z "LCD Cannot Be Seen At All" on page 74 z "An Unintended Language Is Displayed on the LCD" on page 75 z "Cannot Install the MP Drivers" on page 76 z "Cannot Connect to Computer Properly" on page 77 z "Printing Speed Is Slow / USB 2.0 Hi-Speed Connection Does Not Work" on page 77...
Quick Start Guide
Page 80
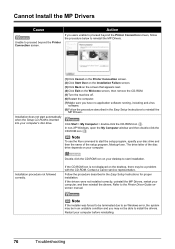
...is inserted into your desktop to start installation. Follow the procedure described in the Easy Setup Instructions to reinstall the MP Drivers. Note To use the Run command to start automatically when the Setup CD-ROM is not displayed on the Welcome screen...a problem with the CD-ROM. Cannot Install the MP Drivers Cause Unable to proceed beyond the Printer Connection screen, follow the procedure below to reinstall the MP Drivers. Contact a Canon service representative. Refer to install the drivers. Installation does not start the setup program, specify your computer...
...is inserted into your desktop to start installation. Follow the procedure described in the Easy Setup Instructions to reinstall the MP Drivers. Note To use the Run command to start automatically when the Setup CD-ROM is not displayed on the Welcome screen...a problem with the CD-ROM. Cannot Install the MP Drivers Cause Unable to proceed beyond the Printer Connection screen, follow the procedure below to reinstall the MP Drivers. Contact a Canon service representative. Refer to install the drivers. Installation does not start the setup program, specify your computer...
Quick Start Guide
Page 81
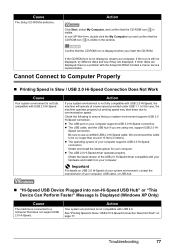
... USB 2.0 Hi-Speed of your system environment, contact the manufacturer of your computer. z The operating system of the USB 2.0 Hi-Speed driver compatible with the Setup CD-ROM. Contact a Canon service representative. Obtain the latest version of your system environment supports USB 2.0 Hi-Speed connection. Action Your system environment is not fully... USB hub if you insert the CD-ROM. We recommend the cable to a computer that does not support USB 2.0 Hi-Speed. z The USB 2.0 Hi-Speed driver operates properly.
... USB 2.0 Hi-Speed of your system environment, contact the manufacturer of your computer. z The operating system of the USB 2.0 Hi-Speed driver compatible with the Setup CD-ROM. Contact a Canon service representative. Obtain the latest version of your system environment supports USB 2.0 Hi-Speed connection. Action Your system environment is not fully... USB hub if you insert the CD-ROM. We recommend the cable to a computer that does not support USB 2.0 Hi-Speed. z The USB 2.0 Hi-Speed driver operates properly.


