Quick Start Guide
Page 11
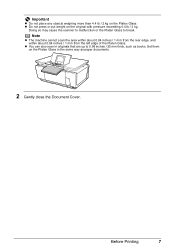
... the left edge of the Platen Glass. Set them on the Platen Glass in originals that are up to break. Doing so may cause the scanner to malfunction or the Platen Glass to 0.98 inches / 25 mm thick, such as paper documents. 2 Gently close the Document Cover. z Do not press or...
... the left edge of the Platen Glass. Set them on the Platen Glass in originals that are up to break. Doing so may cause the scanner to malfunction or the Platen Glass to 0.98 inches / 25 mm thick, such as paper documents. 2 Gently close the Document Cover. z Do not press or...

Quick Start Guide
Page 78
...is off and back on." z An Ink tank error has occurred. (The lamp on the ink tank is memorized. If the same error occurs, contact a Canon service representative. "The card is not released. The machine will display a message. On the Operation Panel, press a button other than the ON/OFF button. ... the screen-saver mode. See "Replacing an Ink Tank" on and the LCD will power on page 50. See "Replacing an Ink Tank" on . "Scanner is lit The LCD may damage the machine. After a while, plug the power cord of the following ink tank cannot be correctly detected. Slide the...
...is off and back on." z An Ink tank error has occurred. (The lamp on the ink tank is memorized. If the same error occurs, contact a Canon service representative. "The card is not released. The machine will display a message. On the Operation Panel, press a button other than the ON/OFF button. ... the screen-saver mode. See "Replacing an Ink Tank" on and the LCD will power on page 50. See "Replacing an Ink Tank" on . "Scanner is lit The LCD may damage the machine. After a while, plug the power cord of the following ink tank cannot be correctly detected. Slide the...
Quick Start Guide
Page 97
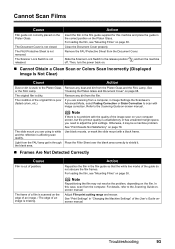
...is unsatisfactory or has unwanted margin space, you are using is white and the reflection is missing. The FAU Protective Sheet is not released. The Scanner Lock Switch is not removed. For loading the film, see "Mounting Films" on page 38. Remove the FAU Protective Sheet from the computer. ...Slide the Scanner Lock Switch to the Scanning Guide on . and turn the power back on -screen manual. "Cleaning the Platen Glass and Document Cover" on the...
...is unsatisfactory or has unwanted margin space, you are using is white and the reflection is missing. The FAU Protective Sheet is not released. The Scanner Lock Switch is not removed. For loading the film, see "Mounting Films" on page 38. Remove the FAU Protective Sheet from the computer. ...Slide the Scanner Lock Switch to the Scanning Guide on . and turn the power back on -screen manual. "Cleaning the Platen Glass and Document Cover" on the...
Quick Start Guide
Page 99
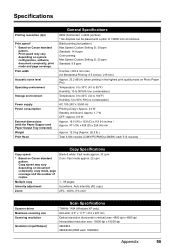
...: Fast mode approx. 22 cpm Multiple copy 1 - 99 pages Intensity adjustment 9 positions, Auto intensity (AE copy) Zoom 25% - 400% (1% unit) Scanner driver Maximum scanning size Scanning resolution Gradation (Input/Output) Scan Specifications TWAIN / WIA (Windows XP only) A4/Letter, 8.5" x 11.7" / 216 x 297 ...dpi Interpolated resolution max: 19200 dpi x 19200 dpi 48bit/8bit 48bit/24bit (RGB each 512 nozzles) Copy Specifications Copy speed * Based on Canon standard pattern. Print speed may vary depending on Photo Paper Pro) Temperature: 5 to 35°C (41 to 95°F) Humidity: 10...
...: Fast mode approx. 22 cpm Multiple copy 1 - 99 pages Intensity adjustment 9 positions, Auto intensity (AE copy) Zoom 25% - 400% (1% unit) Scanner driver Maximum scanning size Scanning resolution Gradation (Input/Output) Scan Specifications TWAIN / WIA (Windows XP only) A4/Letter, 8.5" x 11.7" / 216 x 297 ...dpi Interpolated resolution max: 19200 dpi x 19200 dpi 48bit/8bit 48bit/24bit (RGB each 512 nozzles) Copy Specifications Copy speed * Based on Canon standard pattern. Print speed may vary depending on Photo Paper Pro) Temperature: 5 to 35°C (41 to 95°F) Humidity: 10...
Easy Setup Instructions
Page 1
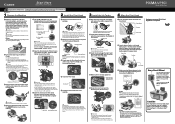
...9679; The machine starts operating. And Print Head is printed. b Unlock the Scanning Unit (Printer Cover). (1) Open the Document Cover. (2) Move the Scanner Lock Switch towards the lock mark. (2) (1) e Use the { or } button on the top of the machine. The Print Head Holder moves to ...) before turning the machine on. ● Before transporting the machine, always lock the Scanning Unit (Printer Cover) by moving the Scanner Lock Switch towards the release mark to the center. Easy-Scroll Wheel Turn the Easy-Scroll Wheel left end. The pattern is aligned...
...9679; The machine starts operating. And Print Head is printed. b Unlock the Scanning Unit (Printer Cover). (1) Open the Document Cover. (2) Move the Scanner Lock Switch towards the lock mark. (2) (1) e Use the { or } button on the top of the machine. The Print Head Holder moves to ...) before turning the machine on. ● Before transporting the machine, always lock the Scanning Unit (Printer Cover) by moving the Scanner Lock Switch towards the release mark to the center. Easy-Scroll Wheel Turn the Easy-Scroll Wheel left end. The pattern is aligned...


