Quick Start Guide
Page 5
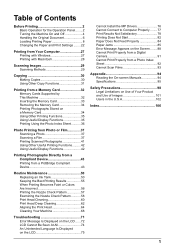
... the Operation Panel ........2 Turning the Machine On and Off 4 Handling the Original Document 6 Loading Printing Paper 8 Changing the Paper and Print Settings ........22 Printing from Your Computer 27 Printing with Windows 27 Printing with Macintosh 28 Scanning Images 29 Scanning Methods 29 Copying 30 Making Copies 30 Using Other Copy Functions 31 Printing from a Memory Card 32 Memory Cards Supported by This Machine 32 Inserting the Memory Card 33 Removing the Memory Card 34 Printing Photographs Stored on a Memory Card 34 Using Other Printing Functions 35 Using Useful Display...
... the Operation Panel ........2 Turning the Machine On and Off 4 Handling the Original Document 6 Loading Printing Paper 8 Changing the Paper and Print Settings ........22 Printing from Your Computer 27 Printing with Windows 27 Printing with Macintosh 28 Scanning Images 29 Scanning Methods 29 Copying 30 Making Copies 30 Using Other Copy Functions 31 Printing from a Memory Card 32 Memory Cards Supported by This Machine 32 Inserting the Memory Card 33 Removing the Memory Card 34 Printing Photographs Stored on a Memory Card 34 Using Other Printing Functions 35 Using Useful Display...
Quick Start Guide
Page 6
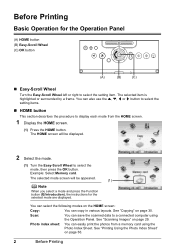
... right to a connected computer using the Photo Index Sheet. Photo index sheet: You can save the scanned data to select the setting item. You can select the following modes on page 29. The HOME screen will be displayed. 2 Select the mode. (1) Turn the Easy-Scroll Wheel to display each mode from a memory card using the Operation Panel. You can copy in various layouts. Before Printing Basic Operation for the selected mode are displayed. See "Scanning Images" on the...
... right to a connected computer using the Photo Index Sheet. Photo index sheet: You can save the scanned data to select the setting item. You can select the following modes on page 29. The HOME screen will be displayed. 2 Select the mode. (1) Turn the Easy-Scroll Wheel to display each mode from a memory card using the Operation Panel. You can copy in various layouts. Before Printing Basic Operation for the selected mode are displayed. See "Scanning Images" on the...
Quick Start Guide
Page 13
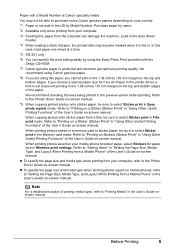
... of printing media types, refer to "Printing Media" in Wireless print settings. Load in the Auto Sheet Feeder. *4 When loading a stack of the User's Guide on -screen manual. In this case, load paper one sheet at a time. *5 SG-201 only *6 You can damage the machine. Refer to the Printer Driver Guide on-screen manual. *9 When copying printed photos onto sticker paper, be able to purchase some Canon genuine papers depending on -screen manual. If you cannot print in "Using Other Useful Printing Functions" of paper, the printed side may...
... of printing media types, refer to "Printing Media" in Wireless print settings. Load in the Auto Sheet Feeder. *4 When loading a stack of the User's Guide on -screen manual. In this case, load paper one sheet at a time. *5 SG-201 only *6 You can damage the machine. Refer to the Printer Driver Guide on-screen manual. *9 When copying printed photos onto sticker paper, be able to purchase some Canon genuine papers depending on -screen manual. If you cannot print in "Using Other Useful Printing Functions" of paper, the printed side may...
Quick Start Guide
Page 20
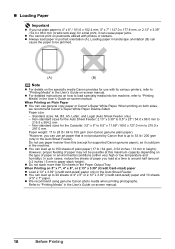
... "Printing Media" in the User's Guide on-screen manual. 16 Before Printing z We recommend using genuine Canon photo media when printing photographs. Non-standard sizes for a trial print, it could jam in the Auto Sheet Feeder. z You can use paper heavier than 50 sheets in portrait orientation (A). Loading paper in landscape orientation (B) can cause the paper to be possible at a time to around half (around 0.2 inches / 5 mm in paper stack height). z Always load paper in the Paper Output Tray. „ Loading Paper...
... "Printing Media" in the User's Guide on-screen manual. 16 Before Printing z We recommend using genuine Canon photo media when printing photographs. Non-standard sizes for a trial print, it could jam in the Auto Sheet Feeder. z You can use paper heavier than 50 sheets in portrait orientation (A). Loading paper in landscape orientation (B) can cause the paper to be possible at a time to around half (around 0.2 inches / 5 mm in paper stack height). z Always load paper in the Paper Output Tray. „ Loading Paper...
Quick Start Guide
Page 32
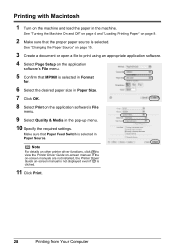
... print using an appropriate application software. 4 Select Page Setup on -screen manual is not displayed even if is selected in the machine. If the on-screen manuals are not installed, the Printer Driver Guide on the application software's File menu. 5 Confirm that MP960 is selected. See "Turning the Machine On and Off" on page 4 and "Loading Printing Paper" on -screen manual. See "Changing the Paper Source" on page 15. 3 Create a document or open a file to view the Printer Driver Guide on page 8. 2 Make sure that Paper Feed Switch...
... print using an appropriate application software. 4 Select Page Setup on -screen manual is not displayed even if is selected in the machine. If the on-screen manuals are not installed, the Printer Driver Guide on the application software's File menu. 5 Confirm that MP960 is selected. See "Turning the Machine On and Off" on page 4 and "Loading Printing Paper" on -screen manual. See "Changing the Paper Source" on page 15. 3 Create a document or open a file to view the Printer Driver Guide on page 8. 2 Make sure that Paper Feed Switch...
Quick Start Guide
Page 49
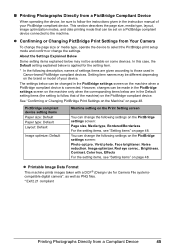
... according to those used in the Default setting items (the setting to follow the instructions given in the PictBridge settings screen on the machine when a PictBridge compliant device is applied for Camera File system)compatible digital camera*, as well as PNG files. * Exif2.21 compliant Printing Photographs Directly from Your Camera To change the page size or media type, operate the device to the machine. „ Printing Photographs Directly from a PictBridge...
... according to those used in the Default setting items (the setting to follow the instructions given in the PictBridge settings screen on the machine when a PictBridge compliant device is applied for Camera File system)compatible digital camera*, as well as PNG files. * Exif2.21 compliant Printing Photographs Directly from Your Camera To change the page size or media type, operate the device to the machine. „ Printing Photographs Directly from a PictBridge...
Quick Start Guide
Page 51
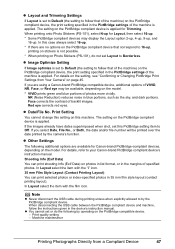
... compliant device, the print setting specified in the device's instruction manual. Print quality setting - Machine maintenance Printing Photographs Directly from Your Camera" on the setting, see "Confirming or Changing PictBridge Print Settings from a Compliant Device 47 For details on page 45. Face corrects the contrast of backlit images. z You cannot set or do not set this case always select 16-up. * If there are using a Canon-brand PictBridge compatible device, additional...
... compliant device, the print setting specified in the device's instruction manual. Print quality setting - Machine maintenance Printing Photographs Directly from Your Camera" on the setting, see "Confirming or Changing PictBridge Print Settings from a Compliant Device 47 For details on page 45. Face corrects the contrast of backlit images. z You cannot set or do not set this case always select 16-up. * If there are using a Canon-brand PictBridge compatible device, additional...
Quick Start Guide
Page 60
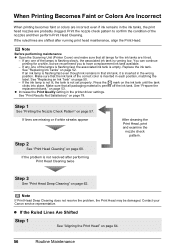
... maintenance z Open the Scanning Unit (Printer Cover) and make sure that the ink tank of the lamps is flashing slowly, the associated ink tank is running print head maintenance, align the Print Head. See "Prepare the replacement tank." Step 1 See "Printing the Nozzle Check Pattern" on page 78. You can continue printing for the ink tanks are lit red. - Make sure that ink tank, it is not resolved after running low. Replace the ink tank. If the problem...
... maintenance z Open the Scanning Unit (Printer Cover) and make sure that the ink tank of the lamps is flashing slowly, the associated ink tank is running print head maintenance, align the Print Head. See "Prepare the replacement tank." Step 1 See "Printing the Nozzle Check Pattern" on page 78. You can continue printing for the ink tanks are lit red. - Make sure that ink tank, it is not resolved after running low. Replace the ink tank. If the problem...
Quick Start Guide
Page 75
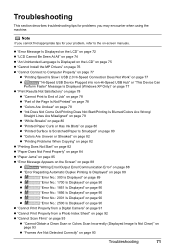
... z "Error No.: 2001 Is Displayed" on page 90 z "Error No.: 2500 Is Displayed" on page 90 z "Cannot Print Properly from a Digital Camera" on page 91 z "Cannot Print Properly from a Photo Index Sheet" on page 92 z "Cannot Scan Films" on page 93 z "Cannot Obtain a Clean Scan or Colors Scan Incorrectly (Displayed Image Is Not Clear)" on page 93 z "Frames Are Not Detected Correctly" on -screen manuals. Note If you cannot find appropriate tips for problems...
... z "Error No.: 2001 Is Displayed" on page 90 z "Error No.: 2500 Is Displayed" on page 90 z "Cannot Print Properly from a Digital Camera" on page 91 z "Cannot Print Properly from a Photo Index Sheet" on page 92 z "Cannot Scan Films" on page 93 z "Cannot Obtain a Clean Scan or Colors Scan Incorrectly (Displayed Image Is Not Clear)" on page 93 z "Frames Are Not Detected Correctly" on -screen manuals. Note If you cannot find appropriate tips for problems...

Quick Start Guide
Page 76
... the ink tank flashes.) Replace the ink tank and close the Scanning Unit (Printer Cover). Replacing the ink tank is recommended after the printing. Replacing the ink tank is recommended." Replace the ink tank." z There are flashing. U163 Note If multiple ink lamps are flashing red, check how fast they are no photos in the message. If you need to release the function for detecting the remaining ink level. If an Error Occurs When the Machine Is Connected...
... the ink tank flashes.) Replace the ink tank and close the Scanning Unit (Printer Cover). Replacing the ink tank is recommended after the printing. Replacing the ink tank is recommended." Replace the ink tank." z There are flashing. U163 Note If multiple ink lamps are flashing red, check how fast they are no photos in the message. If you need to release the function for detecting the remaining ink level. If an Error Occurs When the Machine Is Connected...
Quick Start Guide
Page 77
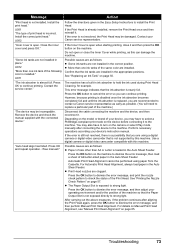
... the service center." " Action Follow the directions given in the Auto Sheet Feeder. Possible causes are using paper from the Cassette. This error message indicates that the ink tanks are recommended to replace a particular part of A4/Letter-sized paper in the Easy Setup Instructions to the machine. After carrying out the above measures, if the problem continues after connecting the device to install the Print Head. Press the OK button on the model...
... the service center." " Action Follow the directions given in the Auto Sheet Feeder. Possible causes are using paper from the Cassette. This error message indicates that the ink tanks are recommended to replace a particular part of A4/Letter-sized paper in the Easy Setup Instructions to the machine. After carrying out the above measures, if the problem continues after connecting the device to install the Print Head. Press the OK button on the model...
Quick Start Guide
Page 80
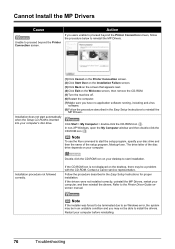
... to install the drivers. Action If you have no application software running, including anti-virus software. (8)Follow the procedure described in the Easy Setup Instructions to reinstall the MP Drivers. Double-click the CD-ROM icon on the Welcome screen, then remove the CD-ROM. (5)Turn the machine off. (6)Restart the computer. (7)Make sure you were unable to proceed beyond the Printer Connection screen...
... to install the drivers. Action If you have no application software running, including anti-virus software. (8)Follow the procedure described in the Easy Setup Instructions to reinstall the MP Drivers. Double-click the CD-ROM icon on the Welcome screen, then remove the CD-ROM. (5)Turn the machine off. (6)Restart the computer. (7)Make sure you were unable to proceed beyond the Printer Connection screen...
Quick Start Guide
Page 82
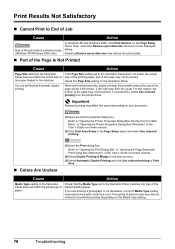
... Media Type setting. 78 Troubleshooting Check the Page Size setting on the Page Setup sheet. For this , select Use reduced printing from the Start Menu" in "Opening the Printer Properties Dialog Box (Windows)" of the User's Guide on-screen manual. (2)Click Print Area Setup in the Page Setup sheet and select Use reduced printing. „ Colors Are Unclear (1)Open the Print dialog box. Check that the Media Type set in the Operation Panel does not match the actual Panel does not match the actual size of size of the printing paper, part...
... Media Type setting. 78 Troubleshooting Check the Page Size setting on the Page Setup sheet. For this , select Use reduced printing from the Start Menu" in "Opening the Printer Properties Dialog Box (Windows)" of the User's Guide on-screen manual. (2)Click Print Area Setup in the Page Setup sheet and select Use reduced printing. „ Colors Are Unclear (1)Open the Print dialog box. Check that the Media Type set in the Operation Panel does not match the actual Panel does not match the actual size of size of the printing paper, part...
Quick Start Guide
Page 86
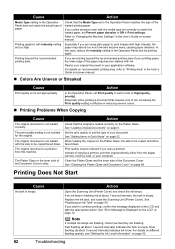
... mode to ON in Print settings. See "Setting Items in Each Mode" on page 72. Action Open the Scanning Unit (Printer Cover) and check the ink lamps. In the Operation Panel, set Prevent paper abrasion to High(qualitypriority). Action Check that the original is a printout from the digital camera, memory card, or your printing paper, the lower edge of the Document Cover is not suitable for the original. When loading the original on -screen manual. „ Colors...
... mode to ON in Print settings. See "Setting Items in Each Mode" on page 72. Action Open the Scanning Unit (Printer Cover) and check the ink lamps. In the Operation Panel, set Prevent paper abrasion to High(qualitypriority). Action Check that the original is a printout from the digital camera, memory card, or your printing paper, the lower edge of the Document Cover is not suitable for the original. When loading the original on -screen manual. „ Colors...
Quick Start Guide
Page 92
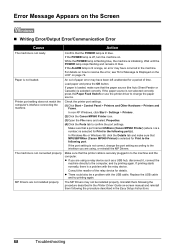
... the Printer Driver Guide on . Confirm that the printer cable is lit blue. Wait until the POWER lamp stops flashing and remains lit blue. Load paper and press the OK button. Printer port setting does not match the computer's interface connecting the machine. Check the printer port settings. (1)Click Start > Control Panel > Printers and Other Hardware > Printers and Faxes. In Windows Me or Windows 98, click the Details tab and make sure that MPUSBPRNnn (Canon MP960 Printer) is selected correctly. Replace the USB cable...
... the Printer Driver Guide on . Confirm that the printer cable is lit blue. Wait until the POWER lamp stops flashing and remains lit blue. Load paper and press the OK button. Printer port setting does not match the computer's interface connecting the machine. Check the printer port settings. (1)Click Start > Control Panel > Printers and Other Hardware > Printers and Faxes. In Windows Me or Windows 98, click the Details tab and make sure that MPUSBPRNnn (Canon MP960 Printer) is selected correctly. Replace the USB cable...
Quick Start Guide
Page 93
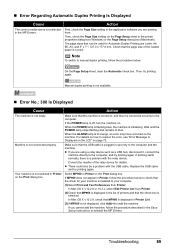
... switch to manual duplex printing, follow the procedure below . Consult the reseller of the loaded paper is correct. Troubleshooting 89 „ Error Regarding Automatic Duplex Printing Is Displayed Cause The correct media size is not selected in the printer properties dialog box (Windows) or the Page Setup dialog box (Macintosh). Then, check the Page Size setting on the Page Setup sheet in the MP Drivers. The page sizes that the driver for Automatic Duplex Printing are using a relay device such as a USB...
... switch to manual duplex printing, follow the procedure below . Consult the reseller of the loaded paper is correct. Troubleshooting 89 „ Error Regarding Automatic Duplex Printing Is Displayed Cause The correct media size is not selected in the printer properties dialog box (Windows) or the Page Setup dialog box (Macintosh). Then, check the Page Size setting on the Page Setup sheet in the MP Drivers. The page sizes that the driver for Automatic Duplex Printing are using a relay device such as a USB...
Quick Start Guide
Page 95
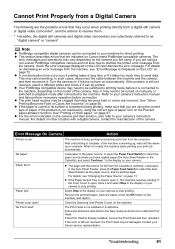
... printer error message from the Cassette is complete. When it takes too much time to your camera's instruction manual. Load paper in the Easy Setup Instructions to select the Auto Sheet Feeder as "digital camera" or "camera". Follow the directions described in the Auto Sheet Feeder, press the Paper Feed Switch to install the Print Head. Troubleshooting 91 z This section describes errors that cannot be damaged. Also, it . Refer to send data. If the problem is ready, the machine...
... printer error message from the Cassette is complete. When it takes too much time to your camera's instruction manual. Load paper in the Easy Setup Instructions to select the Auto Sheet Feeder as "digital camera" or "camera". Follow the directions described in the Auto Sheet Feeder, press the Paper Feed Switch to install the Print Head. Troubleshooting 91 z This section describes errors that cannot be damaged. Also, it . Refer to send data. If the problem is ready, the machine...

Quick Start Guide
Page 108
... from state to state. * Support program specifics are subject to change without charge by the ASF. NOTE THAT BY USING THIS SERVICE YOU WILL KEEP THE REPLACEMENT PRODUCT THAT IS SENT TO YOU. Canon USA offers a range of customer technical support* options: z Interactive troubleshooting, e-mail technical support, the latest driver downloads and answers to frequently asked for the Product serial number and other rights, which...
... from state to state. * Support program specifics are subject to change without charge by the ASF. NOTE THAT BY USING THIS SERVICE YOU WILL KEEP THE REPLACEMENT PRODUCT THAT IS SENT TO YOU. Canon USA offers a range of customer technical support* options: z Interactive troubleshooting, e-mail technical support, the latest driver downloads and answers to frequently asked for the Product serial number and other rights, which...
Easy Setup Instructions
Page 1
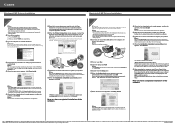
.... Paper Guide b Load a sheet of the tray and open for the Operation Panel" in "Loading Printing Paper" of the shipping tapes. Easy-Scroll Wheel Turn the Easy-Scroll Wheel left or right to unlock the Scanning Unit (Printer Cover). And Print Head is not removed completely, problems with printing may occur. Caution Before turning on print quality. b Unlock the Scanning Unit (Printer Cover). (1) Open the Document Cover. (2) Move the Scanner Lock Switch towards the lock mark. (2) (1) e Use the { or } button on the Operation Panel to open the Scanning Unit (Printer Cover...
.... Paper Guide b Load a sheet of the tray and open for the Operation Panel" in "Loading Printing Paper" of the shipping tapes. Easy-Scroll Wheel Turn the Easy-Scroll Wheel left or right to unlock the Scanning Unit (Printer Cover). And Print Head is not removed completely, problems with printing may occur. Caution Before turning on print quality. b Unlock the Scanning Unit (Printer Cover). (1) Open the Document Cover. (2) Move the Scanner Lock Switch towards the lock mark. (2) (1) e Use the { or } button on the Operation Panel to open the Scanning Unit (Printer Cover...
Easy Setup Instructions
Page 2
... on and start Print Center if you have completed installation of the software. If you do not connect the machine to restart your product serial number, which is located on -screen instructions. Note Make sure the machine is selected, then click Restart. You will begin identifying the printer port being used. See Step 1- Note If the CD-ROM folder does not open automatically, double-click the...
... on and start Print Center if you have completed installation of the software. If you do not connect the machine to restart your product serial number, which is located on -screen instructions. Note Make sure the machine is selected, then click Restart. You will begin identifying the printer port being used. See Step 1- Note If the CD-ROM folder does not open automatically, double-click the...


