Quick Start Guide
Page 47
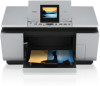
... photos from your camera or mobile phone. * PictBridge compatible digital still cameras, digital camcorders, and camera-equipped mobile phones are hereafter collectively referred to use a USB cable recommended by the device's manufacturer. z You can be sure to set up the machine. Refer to the Easy Setup Instructions to align the Print Head...
... photos from your camera or mobile phone. * PictBridge compatible digital still cameras, digital camcorders, and camera-equipped mobile phones are hereafter collectively referred to use a USB cable recommended by the device's manufacturer. z You can be sure to set up the machine. Refer to the Easy Setup Instructions to align the Print Head...

Quick Start Guide
Page 48
... the device or select Play mode manually after connecting the device to the machine. If your device, you may also have to the machine using a USB cable recommended by the manufacturer of the device when the machine is turned off. (2) Connect the PictBridge compliant device to select a print mode compliant with PictBridge...
... the device or select Play mode manually after connecting the device to the machine. If your device, you may also have to the machine using a USB cable recommended by the manufacturer of the device when the machine is turned off. (2) Connect the PictBridge compliant device to select a print mode compliant with PictBridge...
Quick Start Guide
Page 51
... Print quality setting - Face corrects the contrast of photos more vividly. Note z Never disconnect the USB cable during printing unless when explicitly allowed to your Canon-brand PictBridge compliant device's instruction manual. Red eye corrects red eyes. NR (Noise Reduction) reduces noise... superimposed when shot, set Layout to Off. z Other Settings The following by the PictBridge compliant device. When disconnecting the USB cable between the PictBridge compliant device and machine, follow the instructions given in the PictBridge settings of the machine is applied. ...
... Print quality setting - Face corrects the contrast of photos more vividly. Note z Never disconnect the USB cable during printing unless when explicitly allowed to your Canon-brand PictBridge compliant device's instruction manual. Red eye corrects red eyes. NR (Noise Reduction) reduces noise... superimposed when shot, set Layout to Off. z Other Settings The following by the PictBridge compliant device. When disconnecting the USB cable between the PictBridge compliant device and machine, follow the instructions given in the PictBridge settings of the machine is applied. ...
Quick Start Guide
Page 81
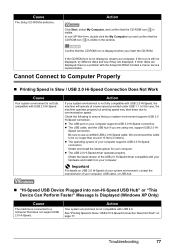
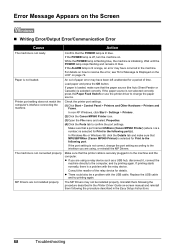
... communication speed. Obtain and install the latest update for your computer supports USB 2.0 Hi-Speed connection. Contact a Canon service representative. Obtain the latest version of your computer, USB cable, or USB hub. „ "Hi-Speed USB Device Plugged into non-Hi-Speed USB Hub" or "This Device Can Perform Faster" Message Is Displayed (Windows XP Only) Cause...
... communication speed. Obtain and install the latest update for your computer supports USB 2.0 Hi-Speed connection. Contact a Canon service representative. Obtain the latest version of your computer, USB cable, or USB hub. „ "Hi-Speed USB Device Plugged into non-Hi-Speed USB Hub" or "This Device Can Perform Faster" Message Is Displayed (Windows XP Only) Cause...
Quick Start Guide
Page 92
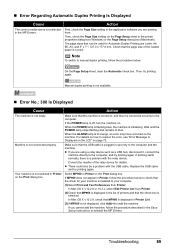
Wait until the POWER lamp stops flashing and remains lit blue. Paper is a problem with the USB cable. Printer port setting does not match the computer's interface connecting the machine. Check the printer port settings. (1)Click Start > Control Panel > Printers and ...not be a problem with the relay device. In Windows Me or Windows 98, click the Details tab and make sure that a port named USBnnn (Canon MP960 Printer) (where n is a number) is securely plugged in the Easy Setup Instructions. 88 Troubleshooting The MP Drivers may have occurred in the Printer Driver...
Wait until the POWER lamp stops flashing and remains lit blue. Paper is a problem with the USB cable. Printer port setting does not match the computer's interface connecting the machine. Check the printer port settings. (1)Click Start > Control Panel > Printers and ...not be a problem with the relay device. In Windows Me or Windows 98, click the Details tab and make sure that a port named USBnnn (Canon MP960 Printer) (where n is a number) is securely plugged in the Easy Setup Instructions. 88 Troubleshooting The MP Drivers may have occurred in the Printer Driver...
Quick Start Guide
Page 93
... Displayed Cause The correct media size is not displayed, click Add(+) to add the machine. In Mac OS X v.10.2.8, check that the USB cable is selected. Note To switch to the computer and the machine. On the Page Setup sheet, clear the Automatic check box. Make sure that... add the machine, follow the procedure described in Printer, follow the procedure below to reinstall the MP Drivers. Replace the USB cable and try printing again. If MP960 does not appear in the Easy Setup Instructions to check that the driver for your computer. (1)Select Print and Fax Preferences...
... Displayed Cause The correct media size is not displayed, click Add(+) to add the machine. In Mac OS X v.10.2.8, check that the USB cable is selected. Note To switch to the computer and the machine. On the Page Setup sheet, clear the Automatic check box. Make sure that... add the machine, follow the procedure described in Printer, follow the procedure below to reinstall the MP Drivers. Replace the USB cable and try printing again. If MP960 does not appear in the Easy Setup Instructions to check that the driver for your computer. (1)Select Print and Fax Preferences...
Easy Setup Instructions
Page 1
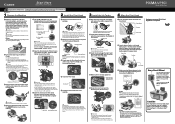
Important Do not connect the USB cable until the machine stops making noise. a Remove the Print Head from its package. (1) Press the { or } button to get ink on yourself when handling these ... protective cap - Open the Sheet Feeder Cover, and then pull the Paper Support. Write down the serial number located inside of the packing box. • A USB cable is not removed completely, problems with the right side of the Cover Guide, then slide the Paper Guide against the illustration printed on the top...
Important Do not connect the USB cable until the machine stops making noise. a Remove the Print Head from its package. (1) Press the { or } button to get ink on yourself when handling these ... protective cap - Open the Sheet Feeder Cover, and then pull the Paper Support. Write down the serial number located inside of the packing box. • A USB cable is not removed completely, problems with the right side of the Cover Guide, then slide the Paper Guide against the illustration printed on the top...
Easy Setup Instructions
Page 2
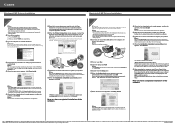
... the Setup CD-ROM. Click OK. Select Custom Install in order to "Troubleshooting" instructions in Printer List. QT5-0669-V01 © 2006 Canon Inc. Microsoft and Windows are using Mac OS X v.10.2.8) and then check that the Restart the system now (recommended) check box is...Setup Utility (start Windows. d When the main menu appears, click Easy Install. If you see the Found New Hardware Wizard, remove the USB cable. You will begin identifying the printer port being used. i When the Installation completed successfully screen appears, click Exit. d Double-click the ...
... the Setup CD-ROM. Click OK. Select Custom Install in order to "Troubleshooting" instructions in Printer List. QT5-0669-V01 © 2006 Canon Inc. Microsoft and Windows are using Mac OS X v.10.2.8) and then check that the Restart the system now (recommended) check box is...Setup Utility (start Windows. d When the main menu appears, click Easy Install. If you see the Found New Hardware Wizard, remove the USB cable. You will begin identifying the printer port being used. i When the Installation completed successfully screen appears, click Exit. d Double-click the ...


