Quick Start Guide
Page 4
... of products with all rights reserved. The program backs the development and dissemination of Canon U.S.A., Inc. © 2006 Canon U.S.A., Inc. and/or other countries. and are trademarks of Fuji Photo Film Co., Ltd. Canon PIXMA MP960 Photo All-in the U.S. Copyright This manual is a trademark of SD Association. Under the copyright laws, this product meets the...
... of products with all rights reserved. The program backs the development and dissemination of Canon U.S.A., Inc. © 2006 Canon U.S.A., Inc. and/or other countries. and are trademarks of Fuji Photo Film Co., Ltd. Canon PIXMA MP960 Photo All-in the U.S. Copyright This manual is a trademark of SD Association. Under the copyright laws, this product meets the...
Quick Start Guide
Page 5
... Cannot Print Properly from a Digital Camera 91 Cannot Print Properly from a Photo Index Sheet 92 Cannot Scan Films 93 Appendix 94 Reading the On-screen Manuals 94 Specifications 95 Safety Precautions 98 Legal Limitations on Use of Your Product and Use of Images 101 Users in the U.S.A 102 Index 106 1
... Cannot Print Properly from a Digital Camera 91 Cannot Print Properly from a Photo Index Sheet 92 Cannot Scan Films 93 Appendix 94 Reading the On-screen Manuals 94 Specifications 95 Safety Precautions 98 Legal Limitations on Use of Your Product and Use of Images 101 Users in the U.S.A 102 Index 106 1
Quick Start Guide
Page 7
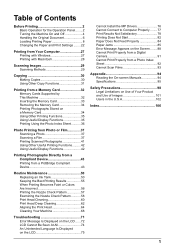
... on the screen that you want to select menus displayed at the bottom of a digital camera. See "Photo Printing from Photo or Film" on -screen manual. Settings: Easy photo reprint: Film print: Memory card: You can scan the image data on the 35 mm film strips and slides and then print...
... on the screen that you want to select menus displayed at the bottom of a digital camera. See "Photo Printing from Photo or Film" on -screen manual. Settings: Easy photo reprint: Film print: Memory card: You can scan the image data on the 35 mm film strips and slides and then print...
Quick Start Guide
Page 9
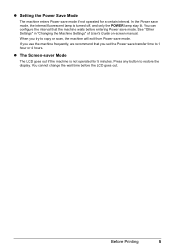
.... When you set the Power save transfer time to 1 hour or 4 hours. See "Other Settings" in "Changing the Machine Settings" of User's Guide on-screen manual. z Setting the Power Save Mode The machine enters Power save mode. In the Power save mode. If you use the machine frequently, we recommend that...
.... When you set the Power save transfer time to 1 hour or 4 hours. See "Other Settings" in "Changing the Machine Settings" of User's Guide on-screen manual. z Setting the Power Save Mode The machine enters Power save mode. In the Power save mode. If you use the machine frequently, we recommend that...
Quick Start Guide
Page 13
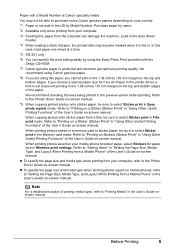
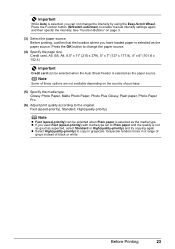
...photos stored in a memory card to sticker paper, be sure to select Sticker print in Film print mode. Refer to "Printing on -screen manual. We recommend using Canon genuine paper. *8 If you are using the Easy-Photo Print provided with a Model Number is fed in. Refer to "Printing on a ...by Model Number. If you cannot print in the 1.38 inches / 35 mm margin on -screen manual. *9 When copying printed photos onto sticker paper, be able to purchase some Canon genuine papers depending on -screen manual. In this case, load paper one sheet at a time. *5 SG-201 only *6 You can...
...photos stored in a memory card to sticker paper, be sure to select Sticker print in Film print mode. Refer to "Printing on -screen manual. We recommend using Canon genuine paper. *8 If you are using the Easy-Photo Print provided with a Model Number is fed in. Refer to "Printing on a ...by Model Number. If you cannot print in the 1.38 inches / 35 mm margin on -screen manual. *9 When copying printed photos onto sticker paper, be able to purchase some Canon genuine papers depending on -screen manual. In this case, load paper one sheet at a time. *5 SG-201 only *6 You can...
Quick Start Guide
Page 16
.... If you actually loaded paper. Note You can also select the paper source using the printer driver, refer to the Printer Driver Guide on-screen manual. (A) (A) Press to feed from the Cassette.
.... If you actually loaded paper. Note You can also select the paper source using the printer driver, refer to the Printer Driver Guide on-screen manual. (A) (A) Press to feed from the Cassette.

Quick Start Guide
Page 17
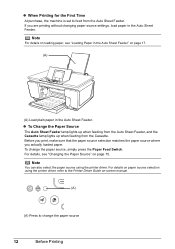
... of paper you use of the Auto Sheet Feeder. This way, you can switch the paper source according to the Printer Driver Guide on-screen manual. (A) (B) (A) Auto Sheet Feeder: Load paper of various types and sizes, including photo paper. (B) Cassette: Load paper you use photo paper as much as plain paper...
... of paper you use of the Auto Sheet Feeder. This way, you can switch the paper source according to the Printer Driver Guide on-screen manual. (A) (B) (A) Auto Sheet Feeder: Load paper of various types and sizes, including photo paper. (B) Cassette: Load paper you use photo paper as much as plain paper...
Quick Start Guide
Page 18
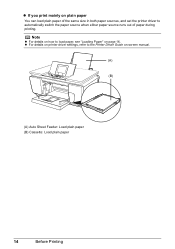
z For details on printer driver settings, refer to load paper, see "Loading Paper" on page 16. Note z For details on how to the Printer Driver Guide on plain paper You can load plain paper of the same size in both paper sources, and set the printer driver to automatically switch the paper source when either paper source runs out of paper during printing. z If you print mainly on -screen manual. (A) (B) (A) Auto Sheet Feeder: Load plain paper (B) Cassette: Load plain paper 14 Before Printing
z For details on printer driver settings, refer to load paper, see "Loading Paper" on page 16. Note z For details on how to the Printer Driver Guide on plain paper You can load plain paper of the same size in both paper sources, and set the printer driver to automatically switch the paper source when either paper source runs out of paper during printing. z If you print mainly on -screen manual. (A) (B) (A) Auto Sheet Feeder: Load plain paper (B) Cassette: Load plain paper 14 Before Printing
Quick Start Guide
Page 19
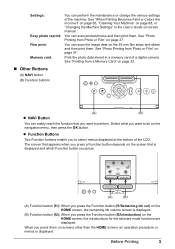
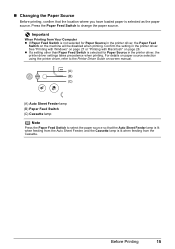
... the machine will be disabled when printing. For details on paper source selection using the printer driver, refer to the Printer Driver Guide on-screen manual. (A) (B) (C) (A) Auto Sheet Feeder lamp (B) Paper Feed Switch (C) Cassette lamp Note Press the Paper Feed Switch to change the paper source. Before Printing 15 Press the...
... the machine will be disabled when printing. For details on paper source selection using the printer driver, refer to the Printer Driver Guide on-screen manual. (A) (B) (C) (A) Auto Sheet Feeder lamp (B) Paper Feed Switch (C) Cassette lamp Note Press the Paper Feed Switch to change the paper source. Before Printing 15 Press the...
Quick Start Guide
Page 20
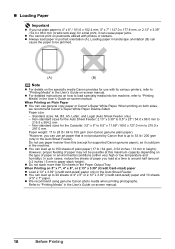
... Load 2.13" x 3.39" (credit card-sized) paper only in the User's Guide on both sides, we recommend Canon's Super White Paper Double-Sided. When Printing on -screen manual. 16 Before Printing Refer to "Printing Media" in the Auto Sheet Feeder. z Always load paper in the User's Guide... on Plain Paper z You can use general copy paper or Canon's Super White Paper. When printing on -screen manual. z For detailed instructions on how to load specialty media into the machine, refer to "Printing Media" in portrait orientation ...
... Load 2.13" x 3.39" (credit card-sized) paper only in the User's Guide on both sides, we recommend Canon's Super White Paper Double-Sided. When Printing on -screen manual. 16 Before Printing Refer to "Printing Media" in the Auto Sheet Feeder. z Always load paper in the User's Guide... on Plain Paper z You can use general copy paper or Canon's Super White Paper. When printing on -screen manual. z For detailed instructions on how to load specialty media into the machine, refer to "Printing Media" in portrait orientation ...
Quick Start Guide
Page 21
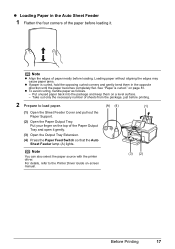
z To avoid curling, handle paper as follows. - Put your finger on -screen manual. (3) (2) Before Printing 17 For details, refer to load paper. (A) (4) (1) (1) Open the Sheet Feeder Cover and pull out the Paper Support. (2) Open the Paper Output Tray. ...
z To avoid curling, handle paper as follows. - Put your finger on -screen manual. (3) (2) Before Printing 17 For details, refer to load paper. (A) (4) (1) (1) Open the Sheet Feeder Cover and pull out the Paper Support. (2) Open the Paper Output Tray. ...
Quick Start Guide
Page 23
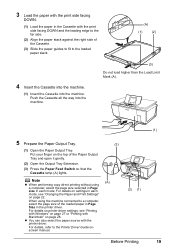
..." on page 27 or "Printing with Macintosh" on the top of the Cassette. (3) Slide the paper guides to fit to the Printer Driver Guide onscreen manual. (3) (A) (2) (1) Before Printing (1) 19 For details, refer to the loaded paper stack. (A) (1) (2) 4 Insert the Cassette into the machine. (1) Insert the Cassette into the machine. (3) Do not...
..." on page 27 or "Printing with Macintosh" on the top of the Cassette. (3) Slide the paper guides to fit to the Printer Driver Guide onscreen manual. (3) (A) (2) (1) Before Printing (1) 19 For details, refer to the loaded paper stack. (A) (1) (2) 4 Insert the Cassette into the machine. (1) Insert the Cassette into the machine. (3) Do not...
Quick Start Guide
Page 27
... x 177.8), 4" x 6" (101.6 x 152.4) Important Credit card can not change the paper source. (4) Specify the page size. Before Printing 23 Press the OK button to enable manual intensity settings again and then specify the intensity. Important While Auto is selected, you can be selected when Plain paper is selected as the media...
... x 177.8), 4" x 6" (101.6 x 152.4) Important Credit card can not change the paper source. (4) Specify the page size. Before Printing 23 Press the OK button to enable manual intensity settings again and then specify the intensity. Important While Auto is selected, you can be selected when Plain paper is selected as the media...
Quick Start Guide
Page 31
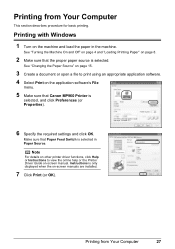
...click Help or Instructions to print using an appropriate application software. 4 Select Print on the application software's File menu. 5 Make sure that Canon MP960 Printer is selected, and click Preferences (or Properties). 6 Specify the required settings and click OK. Printing from Your Computer This section describes...Instructions is only displayed when the on page 8. 2 Make sure that Paper Feed Switch is selected. Printing with Windows 1 Turn on -screen manual. See "Changing the Paper Source" on page 15. 3 Create a document or open a file to view the online help or the Printer...
...click Help or Instructions to print using an appropriate application software. 4 Select Print on the application software's File menu. 5 Make sure that Canon MP960 Printer is selected, and click Preferences (or Properties). 6 Specify the required settings and click OK. Printing from Your Computer This section describes...Instructions is only displayed when the on page 8. 2 Make sure that Paper Feed Switch is selected. Printing with Windows 1 Turn on -screen manual. See "Changing the Paper Source" on page 15. 3 Create a document or open a file to view the online help or the Printer...
Quick Start Guide
Page 32
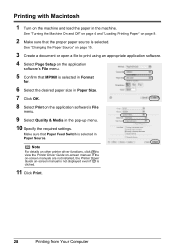
See "Turning the Machine On and Off" on page 4 and "Loading Printing Paper" on -screen manual is not displayed even if is selected in the pop-up menu. 10 Specify the required settings. Make ...Feed Switch is clicked. 11 Click Print. 28 Printing from Your Computer If the on-screen manuals are not installed, the Printer Driver Guide on page 8. 2 Make sure that MP960 is selected. Note For details on other printer driver functions, click to print using an appropriate ... Driver Guide on the machine and load the paper in the machine. Printing with Macintosh 1 Turn on -screen manual.
See "Turning the Machine On and Off" on page 4 and "Loading Printing Paper" on -screen manual is not displayed even if is selected in the pop-up menu. 10 Specify the required settings. Make ...Feed Switch is clicked. 11 Click Print. 28 Printing from Your Computer If the on-screen manuals are not installed, the Printer Driver Guide on page 8. 2 Make sure that MP960 is selected. Note For details on other printer driver functions, click to print using an appropriate ... Driver Guide on the machine and load the paper in the machine. Printing with Macintosh 1 Turn on -screen manual.
Quick Start Guide
Page 33
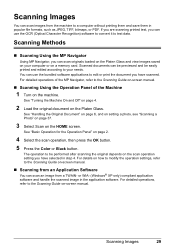
...Select Scan on the Platen Glass. For detailed operations, refer to the Scanning Guide on-screen manual. „ Scanning Using the Operation Panel of the MP Navigator, refer to the Scanning Guide on-screen manual. Scanning Images 29 Scanning Methods „ Scanning Using the MP Navigator Using MP Navigator, you...of the Machine 1 Turn on the scan operation setting you can scan originals loaded on the Platen Glass and view images saved on -screen manual. „ Scanning from an Application Software You can scan an image from the machine to a computer without printing them and save them ...
...Select Scan on the Platen Glass. For detailed operations, refer to the Scanning Guide on-screen manual. „ Scanning Using the Operation Panel of the MP Navigator, refer to the Scanning Guide on-screen manual. Scanning Images 29 Scanning Methods „ Scanning Using the MP Navigator Using MP Navigator, you...of the Machine 1 Turn on the scan operation setting you can scan originals loaded on the Platen Glass and view images saved on -screen manual. „ Scanning from an Application Software You can scan an image from the machine to a computer without printing them and save them ...

Quick Start Guide
Page 48
... off. (2) Connect the PictBridge compliant device to the machine using a USB cable recommended by the manufacturer of the device. Perform necessary operations on manually. (2) (3) Set up the PictBridge compliant device for direct printing. If your device, you may also have to select a print mode compliant with...compliant device to the machine. You may have to turn it to this machine according to instructions given in the device's instruction manual. (1) Make sure that the PictBridge compliant device is correctly connected. Note Depending on the device or select Play mode...
... off. (2) Connect the PictBridge compliant device to the machine using a USB cable recommended by the manufacturer of the device. Perform necessary operations on manually. (2) (3) Set up the PictBridge compliant device for direct printing. If your device, you may also have to select a print mode compliant with...compliant device to the machine. You may have to turn it to this machine according to instructions given in the device's instruction manual. (1) Make sure that the PictBridge compliant device is correctly connected. Note Depending on the device or select Play mode...
Quick Start Guide
Page 49
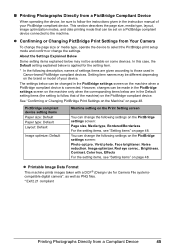
... according to follow that can change the page size or media type, operate the device to follow the instructions given in the instruction manual of your device. Setting item names may not be available on page 48. „ Printing Photographs Directly from a PictBridge Compliant Device... When operating the device, be sure to those used in Canon-brand PictBridge compliant devices. You can be set on page 48. PictBridge compliant device setting items Paper size: Default Paper type: Default Layout...
... according to follow that can change the page size or media type, operate the device to follow the instructions given in the instruction manual of your device. Setting item names may not be available on page 48. „ Printing Photographs Directly from a PictBridge Compliant Device... When operating the device, be sure to those used in Canon-brand PictBridge compliant devices. You can be set on page 48. PictBridge compliant device setting items Paper size: Default Paper type: Default Layout...
Quick Start Guide
Page 51
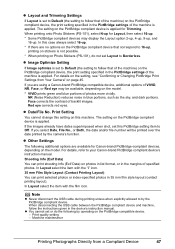
...date and/or file number will be available, depending on page 45. NR (Noise Reduction) reduces noise in the device's instruction manual. z Other Settings The following by the PictBridge compliant device. Note z Never disconnect the USB cable during printing unless when explicitly allowed...* If there are no options on the PictBridge compliant device that of specified photos. For details, refer to your Canon-brand PictBridge compliant device's instruction manual. The setting on the PictBridge compliant device is applied. Face corrects the contrast of the machine is applied. z...
...date and/or file number will be available, depending on page 45. NR (Noise Reduction) reduces noise in the device's instruction manual. z Other Settings The following by the PictBridge compliant device. Note z Never disconnect the USB cable during printing unless when explicitly allowed...* If there are no options on the PictBridge compliant device that of specified photos. For details, refer to your Canon-brand PictBridge compliant device's instruction manual. The setting on the PictBridge compliant device is applied. Face corrects the contrast of the machine is applied. z...
Quick Start Guide
Page 68
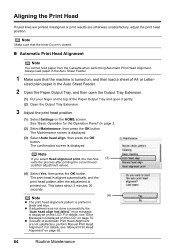
... The print head alignment pattern is displayed. z If adjustment was not done successfully, the "Auto head align has failed." For details, see "Manual Print Head Alignment" on page 72. Always load paper in black and blue. Note Make sure that the machine is printed out. Aligning the ...Print Head If ruled lines are printed misaligned or print results are not satisfactory, perform Manual Print Head Alignment. Note If you select Head alignment print, the machine (3) exits the process after the adjustment is turned on the...
... The print head alignment pattern is displayed. z If adjustment was not done successfully, the "Auto head align has failed." For details, see "Manual Print Head Alignment" on page 72. Always load paper in black and blue. Note Make sure that the machine is printed out. Aligning the ...Print Head If ruled lines are printed misaligned or print results are not satisfactory, perform Manual Print Head Alignment. Note If you select Head alignment print, the machine (3) exits the process after the adjustment is turned on the...


