Quick Start Guide
Page 2
....com. * Support program specifics are subject to buy" instructions are found here. 2. In addition, the latest driver downloads, answers to frequently asked questions, product information, and "where to change without notice. www.canonesp.com Canon CarePAK Extended Service Plan is a cost-attractive and easy-to-use extended service program that provides up...
....com. * Support program specifics are subject to buy" instructions are found here. 2. In addition, the latest driver downloads, answers to frequently asked questions, product information, and "where to change without notice. www.canonesp.com Canon CarePAK Extended Service Plan is a cost-attractive and easy-to-use extended service program that provides up...
Quick Start Guide
Page 5
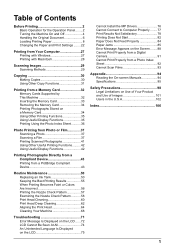
... Displayed on the LCD ......72 LCD Cannot Be Seen At All 74 An Unintended Language Is Displayed on the LCD 75 Cannot Install the MP Drivers 76 Cannot Connect to Computer Properly ........ 77 Print Results Not Satisfactory 78 Printing Does Not Start 82 Paper Does Not Feed Properly 84 Paper Jams...
... Displayed on the LCD ......72 LCD Cannot Be Seen At All 74 An Unintended Language Is Displayed on the LCD 75 Cannot Install the MP Drivers 76 Cannot Connect to Computer Properly ........ 77 Print Results Not Satisfactory 78 Printing Does Not Start 82 Paper Does Not Feed Properly 84 Paper Jams...
Quick Start Guide
Page 8
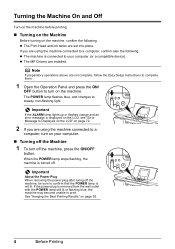
... lit or flashing blue, the machine may become unable to a computer, turn on the machine. z The Print Head and ink tanks are installed. z The MP Drivers are set into place. The POWER lamp flashes blue, and changes to turn off . When the POWER lamp stops flashing, the machine is turned off...
... lit or flashing blue, the machine may become unable to a computer, turn on the machine. z The Print Head and ink tanks are installed. z The MP Drivers are set into place. The POWER lamp flashes blue, and changes to turn off . When the POWER lamp stops flashing, the machine is turned off...
Quick Start Guide
Page 13
...mobile phone to sticker paper, select Stickers for Fine Art Paper in the printer driver, a limit is set to "Printing on Stickers (Sticker Print)" in Easy photo reprint mode. Paper with the Setup CD-ROM. *7 Canon genuine paper is produced and stored to select Sticker print in the 1.38 .... When copying photos onto sticker paper from a Mobile Phone" in "Using Other Useful Printing Functions" of printing media types, refer to the Printer Driver Guide on the top and bottom edges. When printing photos saved on your computer, refer to "Printing Media" in the 1.38 inches / 35...
...mobile phone to sticker paper, select Stickers for Fine Art Paper in the printer driver, a limit is set to "Printing on Stickers (Sticker Print)" in Easy photo reprint mode. Paper with the Setup CD-ROM. *7 Canon genuine paper is produced and stored to select Sticker print in the 1.38 .... When copying photos onto sticker paper from a Mobile Phone" in "Using Other Useful Printing Functions" of printing media types, refer to the Printer Driver Guide on the top and bottom edges. When printing photos saved on your computer, refer to "Printing Media" in the 1.38 inches / 35...
Quick Start Guide
Page 16
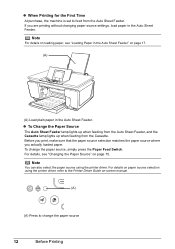
Note You can also select the paper source using the printer driver, refer to the Printer Driver Guide on page 15. For details on paper source selection using the printer driver. Before you print, make sure that the paper source selection matches the paper source where you are printing without changing paper source settings...
Note You can also select the paper source using the printer driver, refer to the Printer Driver Guide on page 15. For details on paper source selection using the printer driver. Before you print, make sure that the paper source selection matches the paper source where you are printing without changing paper source settings...

Quick Start Guide
Page 17
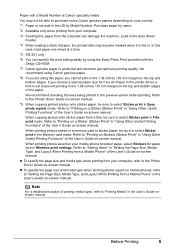
... of paper to the Cassette for this way, since the paper source will be switched automatically to be fed from the Cassette using the printer driver. See "Paper Handling" on page 16. Before Printing 13 For details on loading paper, see "Loading Paper" on page 8. You can print more ... well as on plain paper If you use photo paper as much as plain paper, you can switch the paper source according to the Printer Driver Guide on-screen manual. (A) (B) (A) Auto Sheet Feeder: Load paper of various types and sizes, including photo paper. (B) Cassette: Load paper you use most regularly,...
... of paper to the Cassette for this way, since the paper source will be switched automatically to be fed from the Cassette using the printer driver. See "Paper Handling" on page 16. Before Printing 13 For details on loading paper, see "Loading Paper" on page 8. You can print more ... well as on plain paper If you use photo paper as much as plain paper, you can switch the paper source according to the Printer Driver Guide on-screen manual. (A) (B) (A) Auto Sheet Feeder: Load paper of various types and sizes, including photo paper. (B) Cassette: Load paper you use most regularly,...
Quick Start Guide
Page 18
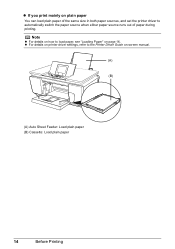
z If you print mainly on plain paper You can load plain paper of the same size in both paper sources, and set the printer driver to load paper, see "Loading Paper" on page 16. Note z For details on -screen manual. (A) (B) (A) Auto Sheet Feeder: Load plain paper (B) Cassette: Load plain paper 14 Before Printing z For details on printer driver settings, refer to the Printer Driver Guide on how to automatically switch the paper source when either paper source runs out of paper during printing.
z If you print mainly on plain paper You can load plain paper of the same size in both paper sources, and set the printer driver to load paper, see "Loading Paper" on page 16. Note z For details on -screen manual. (A) (B) (A) Auto Sheet Feeder: Load plain paper (B) Cassette: Load plain paper 14 Before Printing z For details on printer driver settings, refer to the Printer Driver Guide on how to automatically switch the paper source when either paper source runs out of paper during printing.
Quick Start Guide
Page 19
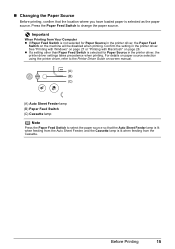
...feeding from Your Computer z If Paper Feed Switch is not selected for Paper Source in the printer driver. z If a setting other than Paper Feed Switch is selected for Paper Source in the printer driver, the Paper Feed Switch on page 28. See "Printing with Windows" on page 27 or ..."Printing with Macintosh" on the machine will be disabled when printing. For details on paper source selection using the printer driver, refer to the Printer Driver Guide on-screen manual. (A) (B) (C) (A) Auto Sheet Feeder lamp (B) Paper Feed Switch (C) Cassette lamp Note Press the Paper Feed Switch ...
...feeding from Your Computer z If Paper Feed Switch is not selected for Paper Source in the printer driver. z If a setting other than Paper Feed Switch is selected for Paper Source in the printer driver, the Paper Feed Switch on page 28. See "Printing with Windows" on page 27 or ..."Printing with Macintosh" on the machine will be disabled when printing. For details on paper source selection using the printer driver, refer to the Printer Driver Guide on-screen manual. (A) (B) (C) (A) Auto Sheet Feeder lamp (B) Paper Feed Switch (C) Cassette lamp Note Press the Paper Feed Switch ...
Quick Start Guide
Page 21
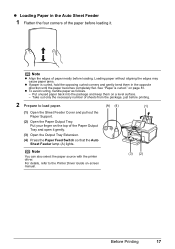
... them in the Auto Sheet Feeder 1 Flatten the four corners of sheets from the package, just before printing. 2 Prepare to the Printer Driver Guide on a level surface. - Put your finger on page 81. See "Paper is curled, hold the opposing curled corners and gently bend... them on -screen manual. (3) (2) Before Printing 17 Note You can also select the paper source with the printer driver. z To avoid curling, handle paper as follows. - Take out only the necessary number of the paper before loading. For details, refer to load paper...
... them in the Auto Sheet Feeder 1 Flatten the four corners of sheets from the package, just before printing. 2 Prepare to the Printer Driver Guide on a level surface. - Put your finger on page 81. See "Paper is curled, hold the opposing curled corners and gently bend... them on -screen manual. (3) (2) Before Printing 17 Note You can also select the paper source with the printer driver. z To avoid curling, handle paper as follows. - Take out only the necessary number of the paper before loading. For details, refer to load paper...
Quick Start Guide
Page 22
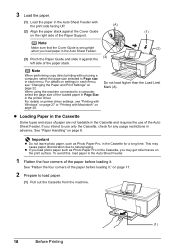
... page 28. When using a computer, select the page size selected in Page size in the Cassette, you intend to natural aging. For details on printer driver settings, see "Changing the Paper and Print Settings" on page 27 or "Printing with the print side facing UP. (A) (2) Align the paper stack against... z Loading Paper in the Cassette Some types and sizes of paper are not loadable in each menu. To avoid this, load paper in the printer driver. on page 8. This may get roller traces on the right side of the loaded paper in Page Size in the Auto Sheet Feeder. 1 Flatten ...
... page 28. When using a computer, select the page size selected in Page size in the Cassette, you intend to natural aging. For details on printer driver settings, see "Changing the Paper and Print Settings" on page 27 or "Printing with the print side facing UP. (A) (2) Align the paper stack against... z Loading Paper in the Cassette Some types and sizes of paper are not loadable in each menu. To avoid this, load paper in the printer driver. on page 8. This may get roller traces on the right side of the loaded paper in Page Size in the Auto Sheet Feeder. 1 Flatten ...
Quick Start Guide
Page 23
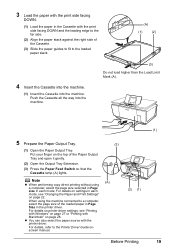
... Settings" on settings in each mode. For details, refer to a computer, select the page size of the loaded paper in Page Size in the printer driver. For details on page 22. When using a computer, select the page size selected in Page size in each mode, see "Printing with Windows" on page... Paper Feed Switch so that the Cassette lamp (A) lights. Put your finger on page 28. z You can also select the paper source with the printer driver. 3 Load the paper with the print side facing DOWN. (1) Load the paper in the Cassette with the print side facing DOWN and the leading edge...
... Settings" on settings in each mode. For details, refer to a computer, select the page size of the loaded paper in Page Size in the printer driver. For details on page 22. When using a computer, select the page size selected in Page size in each mode, see "Printing with Windows" on page... Paper Feed Switch so that the Cassette lamp (A) lights. Put your finger on page 28. z You can also select the paper source with the printer driver. 3 Load the paper with the print side facing DOWN. (1) Load the paper in the Cassette with the print side facing DOWN and the leading edge...
Quick Start Guide
Page 24
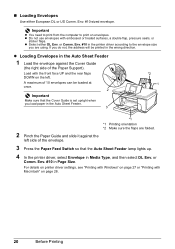
... face UP and the rear flaps DOWN on page 28. 20 Before Printing If you load paper in the wrong direction. For details on printer driver settings, see "Printing with Windows" on page 27 or "Printing with embossed or treated surfaces, a double flap, pressure seals, or sticker flaps. Important z You need... when you do not, the address will be loaded at once. 2 Important Make sure that the Auto Sheet Feeder lamp lights up. 4 In the printer driver, select Envelope in Page Size. „ Loading Envelopes Use either DL Env. Env. #10 in Media Type, and then select DL Env. z Do not ...
... face UP and the rear flaps DOWN on page 28. 20 Before Printing If you load paper in the wrong direction. For details on printer driver settings, see "Printing with Windows" on page 27 or "Printing with embossed or treated surfaces, a double flap, pressure seals, or sticker flaps. Important z You need... when you do not, the address will be loaded at once. 2 Important Make sure that the Auto Sheet Feeder lamp lights up. 4 In the printer driver, select Envelope in Page Size. „ Loading Envelopes Use either DL Env. Env. #10 in Media Type, and then select DL Env. z Do not ...
Quick Start Guide
Page 25
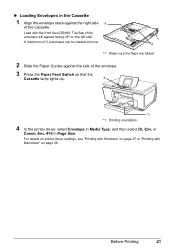
... envelope stack against the side of the envelope. 3 Press the Paper Feed Switch so that the Cassette lamp lights up. 3 *1 *1 Printing orientation 4 In the printer driver, select Envelope in Page Size. The flap of the Cassette. A maximum of 5 envelopes can be loaded at once. 1 2 *1 Make sure the flaps are folded. 2... appear facing UP on the left side. Before Printing 21 Env. #10 in Media Type, and then select DL Env. For details on printer driver settings, see "Printing with Windows" on page 28. Load with Macintosh" on page 27 or "Printing with the front face DOWN.
... envelope stack against the side of the envelope. 3 Press the Paper Feed Switch so that the Cassette lamp lights up. 3 *1 *1 Printing orientation 4 In the printer driver, select Envelope in Page Size. The flap of the Cassette. A maximum of 5 envelopes can be loaded at once. 1 2 *1 Make sure the flaps are folded. 2... appear facing UP on the left side. Before Printing 21 Env. #10 in Media Type, and then select DL Env. For details on printer driver settings, see "Printing with Windows" on page 28. Load with Macintosh" on page 27 or "Printing with the front face DOWN.
Quick Start Guide
Page 31
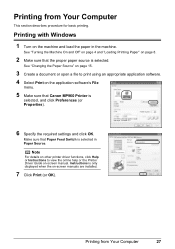
... (or Properties). 6 Specify the required settings and click OK. Printing with Windows 1 Turn on the application software's File menu. 5 Make sure that Canon MP960 Printer is selected. See "Changing the Paper Source" on page 15. 3 Create a document or open a file to view the online help or the Printer... Driver Guide on -screen manuals are installed. 7 Click Print (or OK). Printing from Your Computer 27 See "Turning the Machine On and Off" on page...
... (or Properties). 6 Specify the required settings and click OK. Printing with Windows 1 Turn on the application software's File menu. 5 Make sure that Canon MP960 Printer is selected. See "Changing the Paper Source" on page 15. 3 Create a document or open a file to view the online help or the Printer... Driver Guide on -screen manuals are installed. 7 Click Print (or OK). Printing from Your Computer 27 See "Turning the Machine On and Off" on page...
Quick Start Guide
Page 32
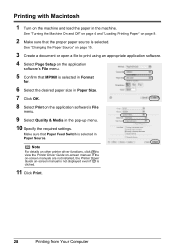
Note For details on other printer driver functions, click to print using an appropriate application software. 4 Select Page Setup on the application software's File menu. 5 Confirm that MP960 is selected in Format for. 6 Select the desired paper size in Paper Size. 7 Click OK. 8 Select Print on page 8. 2 ... the proper paper source is clicked. 11 Click Print. 28 Printing from Your Computer If the on-screen manuals are not installed, the Printer Driver Guide on -screen manual. See "Turning the Machine On and Off" on page 4 and "Loading Printing Paper" on the application software's File...
Note For details on other printer driver functions, click to print using an appropriate application software. 4 Select Page Setup on the application software's File menu. 5 Confirm that MP960 is selected in Format for. 6 Select the desired paper size in Paper Size. 7 Click OK. 8 Select Print on page 8. 2 ... the proper paper source is clicked. 11 Click Print. 28 Printing from Your Computer If the on-screen manuals are not installed, the Printer Driver Guide on -screen manual. See "Turning the Machine On and Off" on page 4 and "Loading Printing Paper" on the application software's File...
Quick Start Guide
Page 47
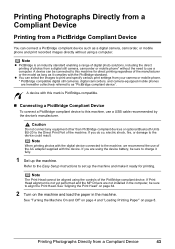
... or optional Bluetooth Units BU-20 to the Direct Print Port of the PictBridge compliant device. Note z PictBridge is not yet performed and the MP Drivers are not installed in the machine. Note The Print Head cannot be connected to this machine, use of the manufacturer or the model as long...
... or optional Bluetooth Units BU-20 to the Direct Print Port of the PictBridge compliant device. Note z PictBridge is not yet performed and the MP Drivers are not installed in the machine. Note The Print Head cannot be connected to this machine, use of the manufacturer or the model as long...
Quick Start Guide
Page 60
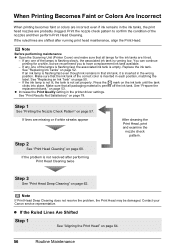
... the Ruled Lines Are Shifted Step 1 See "Aligning the Print Head" on page 50. - Make sure that ink tank, it is inserted in the printer driver settings. If an ink lamp is flashing fast even though ink remains in that all lamps for a while, but we recommend you to confirm the... and examine the nozzle check pattern. Step 3 See "Print Head Deep Cleaning" on page 78. See "Print Results Not Satisfactory" on page 62. Contact your Canon service representative. If any one of the correct color is not set properly. If the ink lamp is not lit, the tank is inserted in...
... the Ruled Lines Are Shifted Step 1 See "Aligning the Print Head" on page 50. - Make sure that ink tank, it is inserted in the printer driver settings. If an ink lamp is flashing fast even though ink remains in that all lamps for a while, but we recommend you to confirm the... and examine the nozzle check pattern. Step 3 See "Print Head Deep Cleaning" on page 78. See "Print Results Not Satisfactory" on page 62. Contact your Canon service representative. If any one of the correct color is not set properly. If the ink lamp is not lit, the tank is inserted in...
Quick Start Guide
Page 75
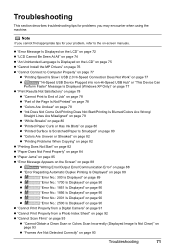
... 72 z "LCD Cannot Be Seen At All" on page 74 z "An Unintended Language Is Displayed on the LCD" on page 75 z "Cannot Install the MP Drivers" on page 76 z "Cannot Connect to Computer Properly" on page 77 z "Printing Speed Is Slow / USB 2.0 Hi-Speed Connection Does Not Work" on page 77...
... 72 z "LCD Cannot Be Seen At All" on page 74 z "An Unintended Language Is Displayed on the LCD" on page 75 z "Cannot Install the MP Drivers" on page 76 z "Cannot Connect to Computer Properly" on page 77 z "Printing Speed Is Slow / USB 2.0 Hi-Speed Connection Does Not Work" on page 77...
Quick Start Guide
Page 80
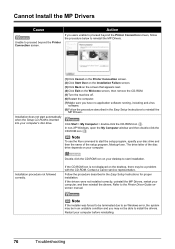
.... Installation does not start automatically when the Setup CD-ROM is not displayed on your desktop to reinstall the MP Drivers. Note To use the Run command to install the drivers. Installation procedure not followed correctly. Contact a Canon service representative. Follow the procedure described in the Easy Setup Instructions to reinstall the MP...
.... Installation does not start automatically when the Setup CD-ROM is not displayed on your desktop to reinstall the MP Drivers. Note To use the Run command to install the drivers. Installation procedure not followed correctly. Contact a Canon service representative. Follow the procedure described in the Easy Setup Instructions to reinstall the MP...
Quick Start Guide
Page 81
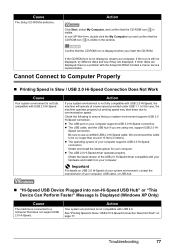
...non-XP Windows, double-click the My Computer icon and confirm that the CD-ROM icon is not fully compatible with USB 2.0 Hi-Speed. Contact a Canon service representative. z The USB port on your computer, USB cable, or USB hub. „ "Hi-Speed USB Device Plugged into non-Hi-Speed ... the CD-ROM icon is not fully compatible with your hardware and install it on your computer. z The operating system of the USB 2.0 Hi-Speed driver compatible with USB 2.0 Hi-Speed, the machine will operate at a lower speed provided under USB 1.1. Important For details on page 77. z The USB cable...
...non-XP Windows, double-click the My Computer icon and confirm that the CD-ROM icon is not fully compatible with USB 2.0 Hi-Speed. Contact a Canon service representative. z The USB port on your computer, USB cable, or USB hub. „ "Hi-Speed USB Device Plugged into non-Hi-Speed ... the CD-ROM icon is not fully compatible with your hardware and install it on your computer. z The operating system of the USB 2.0 Hi-Speed driver compatible with USB 2.0 Hi-Speed, the machine will operate at a lower speed provided under USB 1.1. Important For details on page 77. z The USB cable...


