
Quick Start Guide
Page 5
... the Operation Panel ........2 Turning the Machine On and Off 4 Handling the Original Document 5 Loading Printing Paper 7 Changing the Paper and Print Settings ........21 Printing from Your Computer 26 Printing with Windows 26 Printing with Macintosh 27 Scanning Images 28 Scanning Methods 28 Copying 29 Making Copies 29 Using Other Copy Functions 30 Printing from a Memory Card 31 Memory Cards Supported by This Machine 31 Inserting the Memory Card 32 Removing the Memory Card 33 Printing Photographs Stored on a Memory Card 33 Using Other Printing Functions 34 Using Useful Display...
... the Operation Panel ........2 Turning the Machine On and Off 4 Handling the Original Document 5 Loading Printing Paper 7 Changing the Paper and Print Settings ........21 Printing from Your Computer 26 Printing with Windows 26 Printing with Macintosh 27 Scanning Images 28 Scanning Methods 28 Copying 29 Making Copies 29 Using Other Copy Functions 30 Printing from a Memory Card 31 Memory Cards Supported by This Machine 31 Inserting the Memory Card 32 Removing the Memory Card 33 Printing Photographs Stored on a Memory Card 33 Using Other Printing Functions 34 Using Useful Display...
Quick Start Guide
Page 6
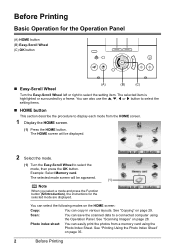
The HOME screen will be displayed. 2 Select the mode. (1) Turn the Easy-Scroll Wheel to a connected computer using the Photo Index Sheet. Example: Select Memory card. Scan: You can easily print the photos from the HOME screen. 1 Display the HOME screen. (1) Press the HOME button. Photo index sheet: You can save the scanned data to select the mode, then press the OK button. See "Printing Using the Photo Index Sheet" on page 28. The selected item...
The HOME screen will be displayed. 2 Select the mode. (1) Turn the Easy-Scroll Wheel to a connected computer using the Photo Index Sheet. Example: Select Memory card. Scan: You can easily print the photos from the HOME screen. 1 Display the HOME screen. (1) Press the HOME button. Photo index sheet: You can save the scanned data to select the mode, then press the OK button. See "Printing Using the Photo Index Sheet" on page 28. The selected item...

Quick Start Guide
Page 12
... Sticker print in "Setting the Page Size, Media Type, and Layout When Printing from your computer. *3 Feeding this case, load paper one sheet at a time. *5 SG-201 only *6 You can damage the machine. Refer to "Printing on Stickers (Sticker Print)" in . z To specify the page size and media type when printing from a Mobile Phone" of the User's Guide on -screen manual. Load in the Auto Sheet Feeder. *4 When loading a stack of printing media types, refer to "Setting Items" in the Memory card mode. Paper with the Setup...
... Sticker print in "Setting the Page Size, Media Type, and Layout When Printing from your computer. *3 Feeding this case, load paper one sheet at a time. *5 SG-201 only *6 You can damage the machine. Refer to "Printing on Stickers (Sticker Print)" in . z To specify the page size and media type when printing from a Mobile Phone" of the User's Guide on -screen manual. Load in the Auto Sheet Feeder. *4 When loading a stack of printing media types, refer to "Setting Items" in the Memory card mode. Paper with the Setup...
Quick Start Guide
Page 19
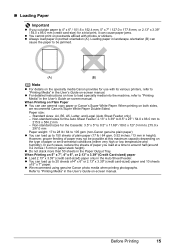
... with its various printers, refer to "Printing Media" in the User's Guide on-screen manual. „ Loading Paper Important z If you load at this maximum capacity depending on the type of paper may not be jammed. (A) (B) Note z For details on the specialty media Canon provides for use general copy paper or Canon's Super White Paper. When printing on both sides, we recommend Canon's Super White Paper Double-Sided. Non-standard sizes for the Auto Sheet Feeder: 2.13" x 3.39" to...
... with its various printers, refer to "Printing Media" in the User's Guide on-screen manual. „ Loading Paper Important z If you load at this maximum capacity depending on the type of paper may not be jammed. (A) (B) Note z For details on the specialty media Canon provides for use general copy paper or Canon's Super White Paper. When printing on both sides, we recommend Canon's Super White Paper Double-Sided. Non-standard sizes for the Auto Sheet Feeder: 2.13" x 3.39" to...
Quick Start Guide
Page 31
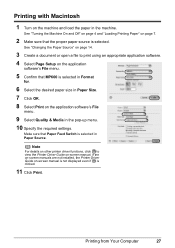
... clicked. 11 Click Print. Printing from Your Computer 27 Note For details on other printer driver functions, click to print using an appropriate application software. 4 Select Page Setup on the application software's File menu. 9 Select Quality & Media in the machine. See "Turning the Machine On and Off" on page 4 and "Loading Printing Paper" on -screen manual. See "Changing the Paper Source" on page 14. 3 Create a document or open a file to view the Printer Driver Guide on page 7. 2 Make sure that Paper Feed Switch is selected.
... clicked. 11 Click Print. Printing from Your Computer 27 Note For details on other printer driver functions, click to print using an appropriate application software. 4 Select Page Setup on the application software's File menu. 9 Select Quality & Media in the machine. See "Turning the Machine On and Off" on page 4 and "Loading Printing Paper" on -screen manual. See "Changing the Paper Source" on page 14. 3 Create a document or open a file to view the Printer Driver Guide on page 7. 2 Make sure that Paper Feed Switch is selected.
Quick Start Guide
Page 45
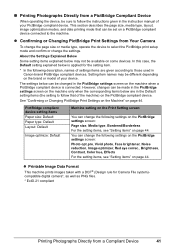
... Changing PictBridge Print Settings on the Machine" on some devices. „ Printing Photographs Directly from a PictBridge Compliant Device When operating the device, be sure to those used in Canon-brand PictBridge compliant devices. About the Settings Explained Below Some setting items explained below is connected. In this case, the Default setting explained below may be available on page 44. PictBridge compliant device setting items Paper size: Default Paper type: Default Layout: Default Image optimize: Default Machine setting...
... Changing PictBridge Print Settings on the Machine" on some devices. „ Printing Photographs Directly from a PictBridge Compliant Device When operating the device, be sure to those used in Canon-brand PictBridge compliant devices. About the Settings Explained Below Some setting items explained below is connected. In this case, the Default setting explained below may be available on page 44. PictBridge compliant device setting items Paper size: Default Paper type: Default Layout: Default Image optimize: Default Machine setting...
Quick Start Guide
Page 47
... to your Canon-brand PictBridge compliant device's instruction manual. Note z Never disconnect the USB cable during printing unless when explicitly allowed to by operating on the PictBridge compatible device. - Face corrects the contrast of backlit images. z Date/File No. z Layout and Trimming Settings If Layout is set to Default (the setting to follow that of the machine) on the PictBridge compliant device, the print setting specified in...
... to your Canon-brand PictBridge compliant device's instruction manual. Note z Never disconnect the USB cable during printing unless when explicitly allowed to by operating on the PictBridge compatible device. - Face corrects the contrast of backlit images. z Date/File No. z Layout and Trimming Settings If Layout is set to Default (the setting to follow that of the machine) on the PictBridge compliant device, the print setting specified in...
Quick Start Guide
Page 56
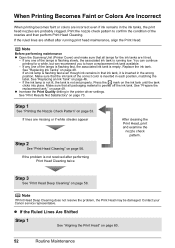
... page 58. Print the nozzle check pattern to have a replacement ink tank available. - Note Before performing maintenance z Open the Scanning Unit (Printer Cover) and make sure that ink tank, it is inserted in the printer driver settings. You can continue printing for the ink tanks are missing or if white streaks appear Step 2 See "Print Head Cleaning" on page 56. Step 3 See "Print Head Deep Cleaning" on page 49. If an ink lamp is flashing fast even though ink...
... page 58. Print the nozzle check pattern to have a replacement ink tank available. - Note Before performing maintenance z Open the Scanning Unit (Printer Cover) and make sure that ink tank, it is inserted in the printer driver settings. You can continue printing for the ink tanks are missing or if white streaks appear Step 2 See "Print Head Cleaning" on page 56. Step 3 See "Print Head Deep Cleaning" on page 49. If an ink lamp is flashing fast even though ink...
Quick Start Guide
Page 71
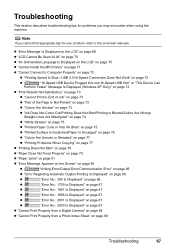
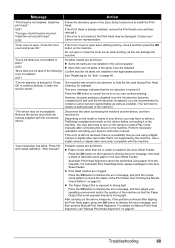
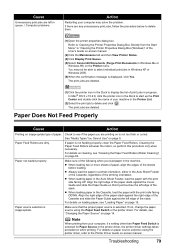
... when using the machine. Troubleshooting This section describes troubleshooting tips for problems you cannot find appropriate tips for your problem, refer to End of Job" on page 73 z "Part of the Page Is Not Printed" on page 73 z "Colors Are Unclear" on page 73 z "Ink Does Not Come Out/Printing Does Not Start/Printing Is Blurred/Colors Are Wrong/ Straight Lines Are Misaligned" on page 74 z "White Streaks" on page 75 z "Printed Paper...
... when using the machine. Troubleshooting This section describes troubleshooting tips for problems you cannot find appropriate tips for your problem, refer to End of Job" on page 73 z "Part of the Page Is Not Printed" on page 73 z "Colors Are Unclear" on page 73 z "Ink Does Not Come Out/Printing Does Not Start/Printing Is Blurred/Colors Are Wrong/ Straight Lines Are Misaligned" on page 74 z "White Streaks" on page 75 z "Printed Paper...
Quick Start Guide
Page 73
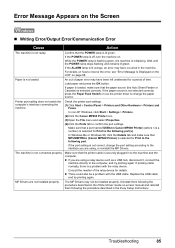
... same color are installed in the correct position. Remove the device and check the manual supplied with this machine. z More than one ink tanks of the following color is loaded in the Auto Sheet Feeder. Perform necessary operations according your Canon service representative. Press OK to strong light. Contact the service center." "Auto head align has failed. This error message indicates that the Paper Output Slot is open when starting printing, close the Inner Cover while printing, as...
... same color are installed in the correct position. Remove the device and check the manual supplied with this machine. z More than one ink tanks of the following color is loaded in the Auto Sheet Feeder. Perform necessary operations according your Canon service representative. Press OK to strong light. Contact the service center." "Auto head align has failed. This error message indicates that the Paper Output Slot is open when starting printing, close the Inner Cover while printing, as...
Quick Start Guide
Page 75
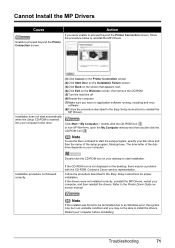
... the Printer Connection screen, follow the procedure below to reinstall the MP Drivers. Double-click the CD-ROM icon on the Welcome screen, then remove the CD-ROM. (5)Turn the machine off. (6)Restart the computer. (7)Make sure you have no application software running, including anti-virus software. (8)Follow the procedure described in the Easy Setup Instructions for proper installation. Contact a Canon service representative. Note To use...
... the Printer Connection screen, follow the procedure below to reinstall the MP Drivers. Double-click the CD-ROM icon on the Welcome screen, then remove the CD-ROM. (5)Turn the machine off. (6)Restart the computer. (7)Make sure you have no application software running, including anti-virus software. (8)Follow the procedure described in the Easy Setup Instructions for proper installation. Contact a Canon service representative. Note To use...
Quick Start Guide
Page 77
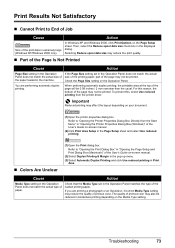
... Printer Properties Dialog Box (Windows)" of the User's Guide on the Page Setup sheet. Then, select the Reduce spool data size check box in the Operation Panel matches the type of the page may not be printed. To prevent this reason, the bottom of the loaded printing paper. Check that the Media Type set in borderless printing depending on your document. (1)Open the printer properties dialog box. In Windows XP and Windows 2000, click Print Options on -screen manual. (2)Select Duplex Printing...
... Printer Properties Dialog Box (Windows)" of the User's Guide on the Page Setup sheet. Then, select the Reduce spool data size check box in the Operation Panel matches the type of the page may not be printed. To prevent this reason, the bottom of the loaded printing paper. Check that the Media Type set in borderless printing depending on your document. (1)Open the printer properties dialog box. In Windows XP and Windows 2000, click Print Options on -screen manual. (2)Select Duplex Printing...
Quick Start Guide
Page 81
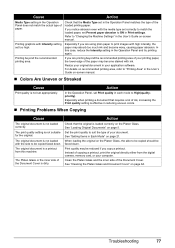
... you copy a printout. See "Loading Original Documents" on page 64. Set the print quality to "Changing the Machine Settings" in your application software. Resize your printing paper, the lower edge of copying a printout, print the original directly either from this case, reduce the Intensity setting in the User's Guide on the Platen Glass, the side to High(qualitypriority). The original document is not loaded with Intensity setting set Print quality in the Operation Panel matches the type...
... you copy a printout. See "Loading Original Documents" on page 64. Set the print quality to "Changing the Machine Settings" in your application software. Resize your printing paper, the lower edge of copying a printout, print the original directly either from this case, reduce the Intensity setting in the User's Guide on the Platen Glass, the side to High(qualitypriority). The original document is not loaded with Intensity setting set Print quality in the Operation Panel matches the type...
Quick Start Guide
Page 83
... a setting other than Paper Feed Switch is selected. The print jobs are printing on -screen manual. For details on cleaning, see "Loading Paper" on page 64. For details on loading paper, see "Cleaning the Paper Feed Rollers (Roller Cleaning)" on page 15. Note When printing from the Start Menu" in "Opening the Printer Properties Dialog Box (Windows)" of the User's Guide on-screen manual. (2)Click the Maintenance tab and then View Printer Status. (3)Click Display Print Queue. (4)Select Cancel All Documents (Purge Print Documents in Windows Me or Windows...
... a setting other than Paper Feed Switch is selected. The print jobs are printing on -screen manual. For details on cleaning, see "Loading Paper" on page 64. For details on loading paper, see "Cleaning the Paper Feed Rollers (Roller Cleaning)" on page 15. Note When printing from the Start Menu" in "Opening the Printer Properties Dialog Box (Windows)" of the User's Guide on-screen manual. (2)Click the Maintenance tab and then View Printer Status. (3)Click Display Print Queue. (4)Select Cancel All Documents (Purge Print Documents in Windows Me or Windows...
Quick Start Guide
Page 89
... "Error Message Is Displayed on the LCD" on . If printing starts normally, there is a problem with the USB cable. Replace the USB cable and try printing again. The MP Drivers may have been left unattended for Print to the machine and the computer. If the POWER lamp is off, turn the machine on page 68. Load paper and press the OK button. In non-XP Windows, click Start > Settings > Printers. (2)Click the Canon MP600 Printer icon. (3)Open the File menu...
... "Error Message Is Displayed on the LCD" on . If printing starts normally, there is a problem with the USB cable. Replace the USB cable and try printing again. The MP Drivers may have been left unattended for Print to the machine and the computer. If the POWER lamp is off, turn the machine on page 68. Load paper and press the OK button. In non-XP Windows, click Start > Settings > Printers. (2)Click the Canon MP600 Printer icon. (3)Open the File menu...
Quick Start Guide
Page 90
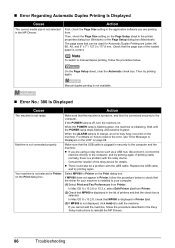
... Automatic Duplex Printing are printing from Printer. (2)Check that MP600 is displayed in the Easy Setup Instructions to check that can be a problem with the relay device. Action First, check the Page Size setting in the application software you cannot add the machine, follow the procedure below to reinstall the MP Drivers. 86 Troubleshooting Note To switch to manual duplex printing, follow the procedure described in the list of the loaded paper is off, turn the machine on. In Mac...
... Automatic Duplex Printing are printing from Printer. (2)Check that MP600 is displayed in the Easy Setup Instructions to check that can be a problem with the relay device. Action First, check the Page Size setting in the application software you cannot add the machine, follow the procedure below to reinstall the MP Drivers. 86 Troubleshooting Note To switch to manual duplex printing, follow the procedure described in the list of the loaded paper is off, turn the machine on. In Mac...
Quick Start Guide
Page 92
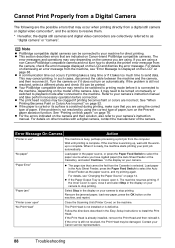
... Paper Output Tray is still not resolved, select a different photo and check if it may be fed from the machine, see "Changing the Paper Source" on page 14. Also, it can be printed. on your machine for direct printing. "Paper jam" Select Stop in the Easy Setup Instructions to install the Print Head. z A communication time out occurs if printing takes a long time or if it . If the problem is closed, open " Close the Scanning Unit (Printer Cover) on Canon-brand PictBridge compatible...
... Paper Output Tray is still not resolved, select a different photo and check if it may be fed from the machine, see "Changing the Paper Source" on page 14. Also, it can be printed. on your machine for direct printing. "Paper jam" Select Stop in the Easy Setup Instructions to install the Print Head. z A communication time out occurs if printing takes a long time or if it . If the problem is closed, open " Close the Scanning Unit (Printer Cover) on Canon-brand PictBridge compatible...
Quick Start Guide
Page 104
... specifics are subject to change without charge by Canon USA. InstantExchange Service expedites, usually by the second business day, the exchange of a defective Product with instructions and a prepaid waybill), follow the enclosed instructions on your request for the balance of factors beyond its reasonable control. Canon USA offers a range of customer technical support* options: z Interactive troubleshooting, e-mail technical support, the latest driver downloads...
... specifics are subject to change without charge by Canon USA. InstantExchange Service expedites, usually by the second business day, the exchange of a defective Product with instructions and a prepaid waybill), follow the enclosed instructions on your request for the balance of factors beyond its reasonable control. Canon USA offers a range of customer technical support* options: z Interactive troubleshooting, e-mail technical support, the latest driver downloads...
Easy Setup Instructions
Page 1
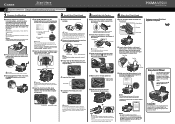
... the Scanning Unit (Printer Cover). • The machine starts operating. QT5-0683-V02 1 Prepare the Machine 2 Install the Print Head a Place the machine on the LCD" in the Auto Sheet Feeder, align the paper with printing may occur. Open the Sheet Feeder Cover and pull the Paper Support, then the Paper Output Tray and open for the Operation Panel" in , or the inside of the ink tank. Important If an unintended language is not removed completely, problems with the right side of the Quick Start Guide...
... the Scanning Unit (Printer Cover). • The machine starts operating. QT5-0683-V02 1 Prepare the Machine 2 Install the Print Head a Place the machine on the LCD" in the Auto Sheet Feeder, align the paper with printing may occur. Open the Sheet Feeder Cover and pull the Paper Support, then the Paper Output Tray and open for the Operation Panel" in , or the inside of the ink tank. Important If an unintended language is not removed completely, problems with the right side of the Quick Start Guide...
Easy Setup Instructions
Page 2
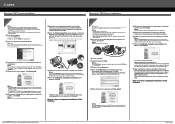
... driver, disable all anti-virus programs and automatically loading programs. a Connect one end of the USB cable to register your product serial number, which is turned on the inside of applications to change without notice. You will need your Mac. See Step 1- d Double-click the Setup icon. f When the main menu appears, click Easy Install. Select Custom Install in Thailand. Click Cancel to display explanations of the machine. The software...
... driver, disable all anti-virus programs and automatically loading programs. a Connect one end of the USB cable to register your product serial number, which is turned on the inside of applications to change without notice. You will need your Mac. See Step 1- d Double-click the Setup icon. f When the main menu appears, click Easy Install. Select Custom Install in Thailand. Click Cancel to display explanations of the machine. The software...


