Quick Start Guide
Page 52
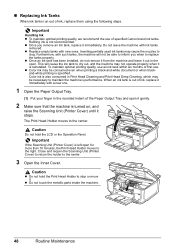
...Replacing...Unit (Printer Cover) until it is out of ink, replace it . z Color ink may cause the nozzles to stop...Output Tray. (1) Put your finger in the rounded indent of specified Canon brand ink tanks. Caution z Do not hold the LCD or the...within six months of ink, replace them using the following steps. Color ink is specified. z Replace empty tanks with ink tanks...Once you when to inform you remove an ink tank, replace it out in Print Head Cleaning and Print Head Deep...partially used ink tanks may be able to replace the tanks properly. Close and reopen the Scanning Unit...
...Replacing...Unit (Printer Cover) until it is out of ink, replace it . z Color ink may cause the nozzles to stop...Output Tray. (1) Put your finger in the rounded indent of specified Canon brand ink tanks. Caution z Do not hold the LCD or the...within six months of ink, replace them using the following steps. Color ink is specified. z Replace empty tanks with ink tanks...Once you when to inform you remove an ink tank, replace it out in Print Head Cleaning and Print Head Deep...partially used ink tanks may be able to replace the tanks properly. Close and reopen the Scanning Unit...
Quick Start Guide
Page 53
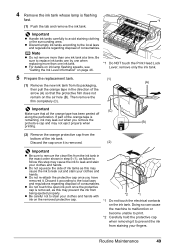
remove only the ink tank. 5 Prepare the replacement tank. (1) (A) (1) Remove the new ink tank from its packaging, then pull the orange tape in step 5-(1), as failure to follow this may prevent the ink ... removed. (2) Important z Be sure to remove the clear film from being ejected properly. Then remove the film completely (C). If part of consumables. Be sure to replace ink tanks one by one when replacing more than one ink tank at a time. Important (C) Make sure that the protective film does not remain on the air...
remove only the ink tank. 5 Prepare the replacement tank. (1) (A) (1) Remove the new ink tank from its packaging, then pull the orange tape in step 5-(1), as failure to follow this may prevent the ink ... removed. (2) Important z Be sure to remove the clear film from being ejected properly. Then remove the film completely (C). If part of consumables. Be sure to replace ink tanks one by one when replacing more than one ink tank at a time. Important (C) Make sure that the protective film does not remain on the air...
Quick Start Guide
Page 73
... the Auto Sheet Feeder. If the Inner Cover is loaded in the Easy Setup Instructions to strong light. Press the OK button to replace a particular part of the machine.) Disconnect the cable connecting the machine and the device, and then reconnect it and then press the OK button on ...used during Print Head Cleaning, for example. You may have to turn on the machine to dismiss the error message, and then adjust your Canon service representative. Remove the device and check the manual supplied with this can continue printing. If the Print Head is incorrect. Depending on ...
... the Auto Sheet Feeder. If the Inner Cover is loaded in the Easy Setup Instructions to strong light. Press the OK button to replace a particular part of the machine.) Disconnect the cable connecting the machine and the device, and then reconnect it and then press the OK button on ...used during Print Head Cleaning, for example. You may have to turn on the machine to dismiss the error message, and then adjust your Canon service representative. Remove the device and check the manual supplied with this can continue printing. If the Print Head is incorrect. Depending on ...
Quick Start Guide
Page 78
Contact your Canon service representative. If an ink lamp is flashing red fast at about 1-second intervals or is not lit, the tank is ejecting properly. Make sure all of the orange parts. (A) (B) Media Type setting in (B), remove all of the orange tape is remaining. Print Head nozzles ...Head Deep Cleaning, turn off the tape completely along the perforation. z If the problem is not lit, press the mark on page 46. Replace the ink tank, and close the Scanning Unit (Printer Cover). Note For details on different flashing speeds, see "When Printing Becomes Faint or...
Contact your Canon service representative. If an ink lamp is flashing red fast at about 1-second intervals or is not lit, the tank is ejecting properly. Make sure all of the orange parts. (A) (B) Media Type setting in (B), remove all of the orange tape is remaining. Print Head nozzles ...Head Deep Cleaning, turn off the tape completely along the perforation. z If the problem is not lit, press the mark on page 46. Replace the ink tank, and close the Scanning Unit (Printer Cover). Note For details on different flashing speeds, see "When Printing Becomes Faint or...
Quick Start Guide
Page 82
...a wrong position. Open the Scanning Unit (Printer Cover) and check the ink lamps. If any orange parts are left as illustrated in (A). Peel off the ink tank and the air hole is empty. Replace the ink tank, and close the Scanning Unit (Printer Cover). Open the Scanning Unit (Printer Cover) and... check the ink lamps. The ink lamp lights up red when the ink tank is remaining. See "Replacing an Ink Tank" on page 68. Note If multiple ink lamps are flashing, check how fast they are installed in the appropriate positions. See...
...a wrong position. Open the Scanning Unit (Printer Cover) and check the ink lamps. If any orange parts are left as illustrated in (A). Peel off the ink tank and the air hole is empty. Replace the ink tank, and close the Scanning Unit (Printer Cover). Open the Scanning Unit (Printer Cover) and... check the ink lamps. The ink lamp lights up red when the ink tank is remaining. See "Replacing an Ink Tank" on page 68. Note If multiple ink lamps are flashing, check how fast they are installed in the appropriate positions. See...
Quick Start Guide
Page 91
... of your device's instruction manual before connecting it to the machine. Perform necessary operations according your device, you are recommended to contact a Canon service representative as early as possible. (You will start again. „ Error No.: 1856 Is Displayed Cause Inner Cover was opened while...may have to turn on the camera or select Play mode manually after connecting the device to replace a particular part of the error will be erased, so print that the ink absorber is replaced, you are using a digital camera or digital video camcorder that is not compatible with this...
... of your device's instruction manual before connecting it to the machine. Perform necessary operations according your device, you are recommended to contact a Canon service representative as early as possible. (You will start again. „ Error No.: 1856 Is Displayed Cause Inner Cover was opened while...may have to turn on the camera or select Play mode manually after connecting the device to replace a particular part of the error will be erased, so print that the ink absorber is replaced, you are using a digital camera or digital video camcorder that is not compatible with this...
Quick Start Guide
Page 93
...need to call for example. Press and hold the ink used during Print Head Cleaning, for servicing to replace the absorber and to resolve the error. After a while, plug the power cord of the machine back... ink level. Please be advised that Canon shall not be liable for detecting the remaining ink level is replaced, you can continue printing by refilled ink tanks. See "Replacing an Ink Tank" on page 68....the Photo Index Sheet is set in ink absorber to replace a particular part of the machine.) "No ink" An ink tank is not installed properly, or is nearly full....
...need to call for example. Press and hold the ink used during Print Head Cleaning, for servicing to replace the absorber and to resolve the error. After a while, plug the power cord of the machine back... ink level. Please be advised that Canon shall not be liable for detecting the remaining ink level is replaced, you can continue printing by refilled ink tanks. See "Replacing an Ink Tank" on page 68....the Photo Index Sheet is set in ink absorber to replace a particular part of the machine.) "No ink" An ink tank is not installed properly, or is nearly full....
Quick Start Guide
Page 102
... on a circuit different from the date of original purchase for a period of one or more of the FCC Rules. Warranty repair or replacement shall not extend the original warranty period of the FCC Rules. z Connect the equipment into an outlet on , the user is warranted...) For 120V, 60Hz model Model Number: K10287 This device complies with Part 15 of the Product. Defective parts or a defective Product returned to a Canon USA repair facility or a Canon USA Authorized Service Facility ("ASF"), and proven to Part 15 of purchase is connected. This warranty does not cover any accessories,...
... on a circuit different from the date of original purchase for a period of one or more of the FCC Rules. Warranty repair or replacement shall not extend the original warranty period of the FCC Rules. z Connect the equipment into an outlet on , the user is warranted...) For 120V, 60Hz model Model Number: K10287 This device complies with Part 15 of the Product. Defective parts or a defective Product returned to a Canon USA repair facility or a Canon USA Authorized Service Facility ("ASF"), and proven to Part 15 of purchase is connected. This warranty does not cover any accessories,...


