
Quick Start Guide
Page 5
... Routine Maintenance 46 Replacing an Ink Tank 46 Keeping the Best Printing Results 51 When Printing Becomes Faint or Colors Are Incorrect 52 Printing the Nozzle Check Pattern 53 Examining the Nozzle Check Pattern ...........54 Print Head Cleaning 56 Print Head Deep Cleaning 58 Aligning the Print Head 60 Cleaning Your Machine 64 Troubleshooting 67 Error Message Is Displayed...
... Routine Maintenance 46 Replacing an Ink Tank 46 Keeping the Best Printing Results 51 When Printing Becomes Faint or Colors Are Incorrect 52 Printing the Nozzle Check Pattern 53 Examining the Nozzle Check Pattern ...........54 Print Head Cleaning 56 Print Head Deep Cleaning 58 Aligning the Print Head 60 Cleaning Your Machine 64 Troubleshooting 67 Error Message Is Displayed...

Quick Start Guide
Page 8
... Machine On and Off Turn on the machine before the LCD goes out. 4 Before Printing You cannot change the wait time before printing. „ Turning on the Machine Before turning on the machine, confirm the following . The POWER lamp flashes green, and changes to print. z The Print Head and ink tanks are set into place.
... Machine On and Off Turn on the machine before the LCD goes out. 4 Before Printing You cannot change the wait time before printing. „ Turning on the Machine Before turning on the machine, confirm the following . The POWER lamp flashes green, and changes to print. z The Print Head and ink tanks are set into place.
Quick Start Guide
Page 43
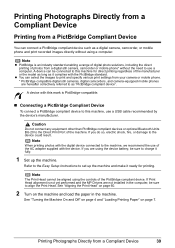
...on the machine and load the paper in the computer, be connected to this machine, use of the machine. Note The Print Head cannot be sure to charge it fully. 1 Set up the machine and make it complies with this mark is not yet...the machine. A device with the PictBridge standard. See "Aligning the Print Head" on page 60. 2 Turn on page 7. Printing Photographs Directly from a Compliant Device Printing from a PictBridge Compliant Device You can select the images to print and specify various print settings from your camera or mobile phone. * PictBridge compatible digital still ...
...on the machine and load the paper in the computer, be connected to this machine, use of the machine. Note The Print Head cannot be sure to charge it fully. 1 Set up the machine and make it complies with this mark is not yet...the machine. A device with the PictBridge standard. See "Aligning the Print Head" on page 60. 2 Turn on page 7. Printing Photographs Directly from a Compliant Device Printing from a PictBridge Compliant Device You can select the images to print and specify various print settings from your camera or mobile phone. * PictBridge compatible digital still ...
Quick Start Guide
Page 52
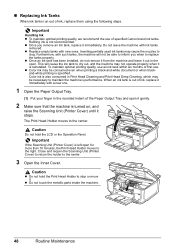
.... „ Replacing Ink Tanks When ink tanks run out of specified Canon brand ink tanks. z Once an ink tank has been installed, do not remove it from the machine and leave it out in Print Head Cleaning and Print Head Deep Cleaning, which may not operate properly when it immediately with such... moves to maintain the machine's performance. Refilling ink is also consumed in the open. Caution Do not hold the Print Head Holder to the right. To maintain optimal printing quality, use an ink tank within six months of first use of ink, replace them using the following steps. z Do ...
.... „ Replacing Ink Tanks When ink tanks run out of specified Canon brand ink tanks. z Once an ink tank has been installed, do not remove it from the machine and leave it out in Print Head Cleaning and Print Head Deep Cleaning, which may not operate properly when it immediately with such... moves to maintain the machine's performance. Refilling ink is also consumed in the open. Caution Do not hold the Print Head Holder to the right. To maintain optimal printing quality, use an ink tank within six months of first use of ink, replace them using the following steps. z Do ...
Quick Start Guide
Page 53
... is remaining, ink may cause the ink to leak and stain your fingers. Doing so can cause the machine to malfunction or become unable to print. *2 Carefully hold the protective cap when removing it . Important (C) Make sure that the protective film does not remain on the air hole (B). Important z... clothes and hands with *2 *1 ink on the removed protective cap. *1 Do not touch the electrical contacts on page 46. *1 Do NOT touch the Print Head Lock Lever; Note z Do not remove more than one ink tank. If part of the orange tape is removed, as this may cause the ink...
... is remaining, ink may cause the ink to leak and stain your fingers. Doing so can cause the machine to malfunction or become unable to print. *2 Carefully hold the protective cap when removing it . Important (C) Make sure that the protective film does not remain on the air hole (B). Important z... clothes and hands with *2 *1 ink on the removed protective cap. *1 Do not touch the electrical contacts on page 46. *1 Do NOT touch the Print Head Lock Lever; Note z Do not remove more than one ink tank. If part of the orange tape is removed, as this may cause the ink...

Quick Start Guide
Page 54
...mark on page 68. Caution z Be sure to get your fingers caught. Note z If the error message is still displayed after replacing the ink tank, Print Head Cleaning is closed . 6 Install the ink tank. (1) Insert the front end of the tank matches the label. z When you start with the Inner ...tank into place. (3) Make sure that the Inner Cover is closed , see "Error Message Is Displayed on the LCD" on the ink tank until Print Head Cleaning finishes. 50 Routine Maintenance Note Make sure that the ink lamp lights up red. z Do not hold the Scanning Unit (Printer Cover) firmly ...
...mark on page 68. Caution z Be sure to get your fingers caught. Note z If the error message is still displayed after replacing the ink tank, Print Head Cleaning is closed . 6 Install the ink tank. (1) Insert the front end of the tank matches the label. z When you start with the Inner ...tank into place. (3) Make sure that the Inner Cover is closed , see "Error Message Is Displayed on the LCD" on the ink tank until Print Head Cleaning finishes. 50 Routine Maintenance Note Make sure that the ink lamp lights up red. z Do not hold the Scanning Unit (Printer Cover) firmly ...
Quick Start Guide
Page 55
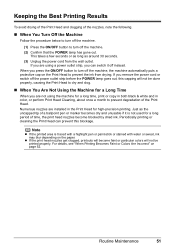
... prevent this capping will not be done properly, causing the Print Head to prevent degradation of the Print Head. Numerous nozzles are installed in the Print Head for a long time, print or copy in both black & white and in color, or perform Print Head Cleaning, about once a month to dry and clog. &#... before the POWER lamp goes out, this blockage. z If the print head nozzles get clogged, printouts will become blocked by dried ink. Routine Maintenance 51 Keeping the Best Printing Results To avoid drying of the Print Head and clogging of the nozzles, note the following. „ When...
... prevent this capping will not be done properly, causing the Print Head to prevent degradation of the Print Head. Numerous nozzles are installed in the Print Head for a long time, print or copy in both black & white and in color, or perform Print Head Cleaning, about once a month to dry and clog. &#... before the POWER lamp goes out, this blockage. z If the print head nozzles get clogged, printouts will become blocked by dried ink. Routine Maintenance 51 Keeping the Best Printing Results To avoid drying of the Print Head and clogging of the nozzles, note the following. „ When...
Quick Start Guide
Page 56
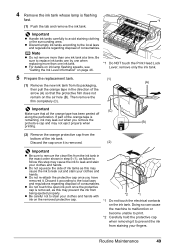
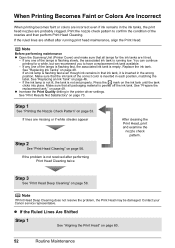
... nozzle check pattern to have a replacement ink tank available. - If the ruled lines are shifted after performing Print Head Cleaning twice After cleaning the Print Head, print and examine the nozzle check pattern. Contact your Canon service representative. Note Before performing maintenance z Open the Scanning Unit (Printer Cover) and make sure that ink tank, it is...
... nozzle check pattern to have a replacement ink tank available. - If the ruled lines are shifted after performing Print Head Cleaning twice After cleaning the Print Head, print and examine the nozzle check pattern. Contact your Canon service representative. Note Before performing maintenance z Open the Scanning Unit (Printer Cover) and make sure that ink tank, it is...
Quick Start Guide
Page 57
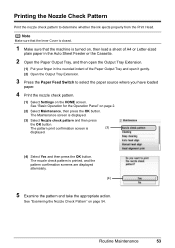
...the Nozzle Check Pattern" on page 2. (2) Select Maintenance, then press the OK button. Printing the Nozzle Check Pattern Print the nozzle check pattern to select the paper source where you have loaded paper. 4 Print the nozzle check pattern. (1) Select Settings on the HOME screen. See "Basic Operation ...open it gently. (2) Open the Output Tray Extension. 3 Press the Paper Feed Switch to determine whether the ink ejects properly from the Print Head. Note Make sure that the Inner Cover is closed. 1 Make sure that the machine is (3) displayed. (4) Select Yes and then press...
...the Nozzle Check Pattern" on page 2. (2) Select Maintenance, then press the OK button. Printing the Nozzle Check Pattern Print the nozzle check pattern to select the paper source where you have loaded paper. 4 Print the nozzle check pattern. (1) Select Settings on the HOME screen. See "Basic Operation ...open it gently. (2) Open the Output Tray Extension. 3 Press the Paper Feed Switch to determine whether the ink ejects properly from the Print Head. Note Make sure that the Inner Cover is closed. 1 Make sure that the machine is (3) displayed. (4) Select Yes and then press...
Quick Start Guide
Page 59
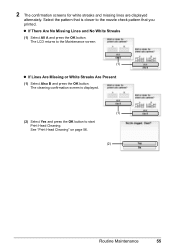
.... (1) (2) Select Yes and press the OK button to start Print Head Cleaning. See "Print Head Cleaning" on page 56. (2) Routine Maintenance 55 2 The confirmation screens for white streaks and missing lines are displayed alternately. The LCD returns to the nozzle check pattern that you printed. The cleaning confirmation screen is closer to the Maintenance screen...
.... (1) (2) Select Yes and press the OK button to start Print Head Cleaning. See "Print Head Cleaning" on page 56. (2) Routine Maintenance 55 2 The confirmation screens for white streaks and missing lines are displayed alternately. The LCD returns to the nozzle check pattern that you printed. The cleaning confirmation screen is closer to the Maintenance screen...
Quick Start Guide
Page 60
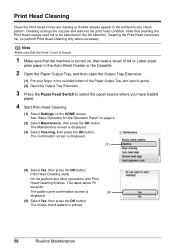
...load a sheet of the Paper Output Tray and open the Output Tray Extension. (1) Put your finger in the printed nozzle check pattern. Cleaning the Print Head consumes ink, so perform Print Head Cleaning only when necessary. The Maintenance screen is (4) displayed. (5) Select Yes, then press the OK button.... button. Note Make sure that the Inner Cover is closed. 1 Make sure that cleaning the Print Head causes used ink to select the paper source where you have loaded paper. 4 Start Print Head Cleaning. (1) Select Settings on the HOME screen. The nozzle check pattern is displayed. (3) ...
...load a sheet of the Paper Output Tray and open the Output Tray Extension. (1) Put your finger in the printed nozzle check pattern. Cleaning the Print Head consumes ink, so perform Print Head Cleaning only when necessary. The Maintenance screen is (4) displayed. (5) Select Yes, then press the OK button.... button. Note Make sure that the Inner Cover is closed. 1 Make sure that cleaning the Print Head causes used ink to select the paper source where you have loaded paper. 4 Start Print Head Cleaning. (1) Select Settings on the HOME screen. The nozzle check pattern is displayed. (3) ...

Quick Start Guide
Page 61
Note If the problem is not resolved after performing steps 4 and 5 twice, try Print Head Deep Cleaning. Routine Maintenance 57 See "Print Head Deep Cleaning" on page 54. See "Examining the Nozzle Check Pattern" on page 58. 5 Check the print head condition with the printed nozzle check pattern, and take appropriate action.
Note If the problem is not resolved after performing steps 4 and 5 twice, try Print Head Deep Cleaning. Routine Maintenance 57 See "Print Head Deep Cleaning" on page 54. See "Examining the Nozzle Check Pattern" on page 58. 5 Check the print head condition with the printed nozzle check pattern, and take appropriate action.
Quick Start Guide
Page 62
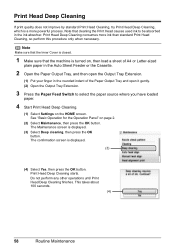
...closed. 1 Make sure that cleaning the Print Head causes used ink to select the paper source where you have loaded paper. 4 Start Print Head Deep Cleaning. (1) Select Settings on the HOME screen. Print Head Deep Cleaning consumes more powerful process. Print Head Deep Cleaning starts. See "Basic Operation...be absorbed in the ink absorber. This takes about 100 seconds. (4) 58 Routine Maintenance Do not perform any other operations until Print Head Deep Cleaning finishes. Note that the machine is turned on page 2. (2) Select Maintenance, then press the OK button. The confirmation...
...closed. 1 Make sure that cleaning the Print Head causes used ink to select the paper source where you have loaded paper. 4 Start Print Head Deep Cleaning. (1) Select Settings on the HOME screen. Print Head Deep Cleaning consumes more powerful process. Print Head Deep Cleaning starts. See "Basic Operation...be absorbed in the ink absorber. This takes about 100 seconds. (4) 58 Routine Maintenance Do not perform any other operations until Print Head Deep Cleaning finishes. Note that the machine is turned on page 2. (2) Select Maintenance, then press the OK button. The confirmation...
Quick Start Guide
Page 63
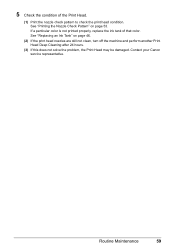
See "Replacing an Ink Tank" on page 53. Contact your Canon service representative. If a particular color is not printed properly, replace the ink tank of the Print Head. (1) Print the nozzle check pattern to check the print head condition. See "Printing the Nozzle Check Pattern" on page 46. (2) If the print head nozzles are still not clean, turn off the machine and perform another Print Head Deep Cleaning after 24 hours. (3) If this does not solve the problem, the Print Head may be damaged. Routine Maintenance 59 5 Check the condition of that color.
See "Replacing an Ink Tank" on page 53. Contact your Canon service representative. If a particular color is not printed properly, replace the ink tank of the Print Head. (1) Print the nozzle check pattern to check the print head condition. See "Printing the Nozzle Check Pattern" on page 46. (2) If the print head nozzles are still not clean, turn off the machine and perform another Print Head Deep Cleaning after 24 hours. (3) If this does not solve the problem, the Print Head may be damaged. Routine Maintenance 59 5 Check the condition of that color.
Quick Start Guide
Page 64
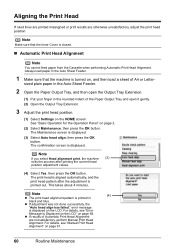
... Note You cannot feed paper from the Cassette when performing Automatic Print Head Alignment. Note Make sure that the machine is turned on page 61. 60 Routine Maintenance The print head is aligned automatically, and the print head pattern after printing the current head position adjustment values. (4) Select Yes, then press the OK button. See "Basic Operation for...
... Note You cannot feed paper from the Cassette when performing Automatic Print Head Alignment. Note Make sure that the machine is turned on page 61. 60 Routine Maintenance The print head is aligned automatically, and the print head pattern after printing the current head position adjustment values. (4) Select Yes, then press the OK button. See "Basic Operation for...

Quick Start Guide
Page 65
... Important You cannot print the print head alignment pattern if paper of Automatic Print Head Alignment are not satisfactory, follow the procedure below to select the paper source where you select Head alignment print, the machine exits the process after printing the current head position adjustment values.... 7 Select Yes, then press the OK button. 8 When the Print Head alignment pattern is printed, select Yes, then press the OK button...
... Important You cannot print the print head alignment pattern if paper of Automatic Print Head Alignment are not satisfactory, follow the procedure below to select the paper source where you select Head alignment print, the machine exits the process after printing the current head position adjustment values.... 7 Select Yes, then press the OK button. 8 When the Print Head alignment pattern is printed, select Yes, then press the OK button...

Quick Start Guide
Page 68
Caution z Be sure to clean the machine; z Do not use volatile liquids such as a blocked Print Head and poor printing results. z Never use tissue paper, paper towels, or similar materials for cleaning. Cleaning the paper feed rollers will wear the rollers, so perform this only ...
Caution z Be sure to clean the machine; z Do not use volatile liquids such as a blocked Print Head and poor printing results. z Never use tissue paper, paper towels, or similar materials for cleaning. Cleaning the paper feed rollers will wear the rollers, so perform this only ...
Quick Start Guide
Page 73
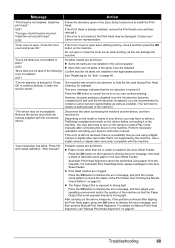
...dismiss the error message, and then adjust your Canon service representative. However, because printing is disabled once the ink absorber becomes completely full and until the ink absorber is already installed, remove the Print Head once and then reinstall it and then press ... the connected device." Automatic Print Head Alignment cannot be damaged. See "Printing the Nozzle Check Pattern" on page 61. For details on Manual Print Head Alignment, see "Manual Print Head Alignment" on page 53. Install the correct print head." Press OK to install the Print Head. " Action Follow the...
...dismiss the error message, and then adjust your Canon service representative. However, because printing is disabled once the ink absorber becomes completely full and until the ink absorber is already installed, remove the Print Head once and then reinstall it and then press ... the connected device." Automatic Print Head Alignment cannot be damaged. See "Printing the Nozzle Check Pattern" on page 61. For details on Manual Print Head Alignment, see "Manual Print Head Alignment" on page 53. Install the correct print head." Press OK to install the Print Head. " Action Follow the...
Quick Start Guide
Page 78
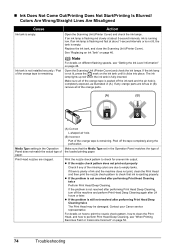
...ink tank is running low. Peel off the ink tank and the air hole is still not resolved after performing Print Head Deep Cleaning twice The Print Head may be damaged. Contact your Canon service representative. For details on the ink tank until it clicks into place. If an ink lamp is flashing red...the orange tape is not lit, press the mark on how to print the nozzle check pattern, how to clean the Print Head, and how to empty tanks. If any of ink and the machine does not print, clean the Print Head and then print the nozzle check pattern to check for uneven ink output. z ...
...ink tank is running low. Peel off the ink tank and the air hole is still not resolved after performing Print Head Deep Cleaning twice The Print Head may be damaged. Contact your Canon service representative. For details on the ink tank until it clicks into place. If an ink lamp is flashing red...the orange tape is not lit, press the mark on how to print the nozzle check pattern, how to clean the Print Head, and how to empty tanks. If any of ink and the machine does not print, clean the Print Head and then print the nozzle check pattern to check for uneven ink output. z ...
Quick Start Guide
Page 79
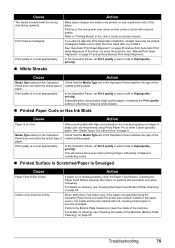
... Print Head Alignment. In the Operation Panel, set Print quality in the Operation Panel matches the type of paper. Media Type setting in the Operation Panel does not match the actual type of the loaded printing paper. When printing data with ink, causing printed paper to High(qualitypriority). Especially when using Photo Paper Pro or other Canon...
... Print Head Alignment. In the Operation Panel, set Print quality in the Operation Panel matches the type of paper. Media Type setting in the Operation Panel does not match the actual type of the loaded printing paper. When printing data with ink, causing printed paper to High(qualitypriority). Especially when using Photo Paper Pro or other Canon...


