Quick Start Guide
Page 11
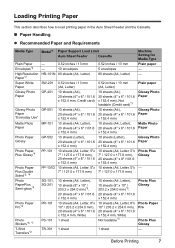
... how to load printing paper in the Auto Sheet Feeder and the Cassette. „ Paper Handling z Recommended Paper and Requirements Media Type Plain Paper Envelopes*2 High Resolution Paper*2 Super White Paper Glossy Photo Paper Glossy Photo Paper "Everyday Use" Matte Photo Paper ..., Letter, 8"x 10" / 203.2 x 254.0 mm), 20 sheets (4" x 6" / 101.6 x 152.4 mm, Wide) Not loadable*3 TR-301 1 sheet 1 sheet Machine Setting for Media Type Plain paper - - Photo Plus Glossy Photo Paper Pro Photo Plus Glossy - Before Printing 7 Plain paper Glossy Photo Paper Glossy Photo Paper Matte Photo Paper...
... how to load printing paper in the Auto Sheet Feeder and the Cassette. „ Paper Handling z Recommended Paper and Requirements Media Type Plain Paper Envelopes*2 High Resolution Paper*2 Super White Paper Glossy Photo Paper Glossy Photo Paper "Everyday Use" Matte Photo Paper ..., Letter, 8"x 10" / 203.2 x 254.0 mm), 20 sheets (4" x 6" / 101.6 x 152.4 mm, Wide) Not loadable*3 TR-301 1 sheet 1 sheet Machine Setting for Media Type Plain paper - - Photo Plus Glossy Photo Paper Pro Photo Plus Glossy - Before Printing 7 Plain paper Glossy Photo Paper Glossy Photo Paper Matte Photo Paper...

Quick Start Guide
Page 12
...(Sticker Print)" in . Refer to "Printing on Stickers (Sticker Print)" in the User's Guide onscreen manual. 8 Before Printing z To specify the page size and media type when printing from your computer. *3 Feeding this case, load paper one sheet at a time. *5 SG-201 only *6 You can damage the machine. Load ...Available only when printing from the Cassette can specify the print setting easily by using the Easy-Photo Print provided with a Model Number is Canon specialty media. You may become marked when it is not sold in the Auto Sheet Feeder. *4 When loading a stack of printing...
...(Sticker Print)" in . Refer to "Printing on Stickers (Sticker Print)" in the User's Guide onscreen manual. 8 Before Printing z To specify the page size and media type when printing from your computer. *3 Feeding this case, load paper one sheet at a time. *5 SG-201 only *6 You can damage the machine. Load ...Available only when printing from the Cassette can specify the print setting easily by using the Easy-Photo Print provided with a Model Number is Canon specialty media. You may become marked when it is not sold in the Auto Sheet Feeder. *4 When loading a stack of printing...
Quick Start Guide
Page 13
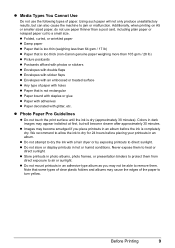
z Media Types You Cannot Use Do not use paper thinner than 105 gsm / 28 lb) z Picture postcards z Postcards affixed with photos or stickers z Envelopes with double ... attempt to dry the ink with glitter, etc. Before Printing 9 We recommend to allow the ink to direct sunlight. Note that is too thick (non-Canon genuine paper weighing more than a post card, including plain paper or notepad paper cut to heat or direct sunlight. z Folded, curled, or wrinkled paper z Damp...
z Media Types You Cannot Use Do not use paper thinner than 105 gsm / 28 lb) z Picture postcards z Postcards affixed with photos or stickers z Envelopes with double ... attempt to dry the ink with glitter, etc. Before Printing 9 We recommend to allow the ink to direct sunlight. Note that is too thick (non-Canon genuine paper weighing more than a post card, including plain paper or notepad paper cut to heat or direct sunlight. z Folded, curled, or wrinkled paper z Damp...

Quick Start Guide
Page 14
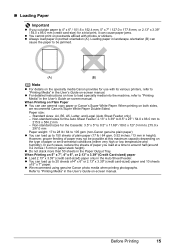
... Photo Paper z Matte Photo Paper z Photo Paper Plus Double Sided z Photo Paper Plus Glossy z Photo Paper Plus Semi-gloss z Photo Paper Pro z Photo Stickers z Media Suited for Business Documents z High Resolution Paper „ Using the Auto Sheet Feeder and the Cassette This machine offers two paper sources to ensure optimal ... the top of the machine, and the Cassette, found at the front of the machine. (A) (B) (A) Auto Sheet Feeder (B) Cassette 10 Before Printing „ Using Specialty Media Canon recommends that you use Canon genuine media to load printing paper;
... Photo Paper z Matte Photo Paper z Photo Paper Plus Double Sided z Photo Paper Plus Glossy z Photo Paper Plus Semi-gloss z Photo Paper Pro z Photo Stickers z Media Suited for Business Documents z High Resolution Paper „ Using the Auto Sheet Feeder and the Cassette This machine offers two paper sources to ensure optimal ... the top of the machine, and the Cassette, found at the front of the machine. (A) (B) (A) Auto Sheet Feeder (B) Cassette 10 Before Printing „ Using Specialty Media Canon recommends that you use Canon genuine media to load printing paper;
Quick Start Guide
Page 19
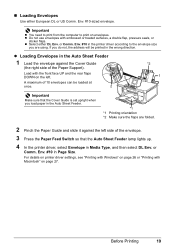
... be jammed. (A) (B) Note z For details on the specialty media Canon provides for the Auto Sheet Feeder: 2.13" x 3.39" to 8.5" x 23" / 54.0 x 86.0 mm to "Printing Media" in height). z For detailed instructions on how to load specialty media into the machine, refer to around half (around 0.2 inches /... 5 mm in the User's Guide on-screen manual. When printing on both sides, we recommend Canon's Super White Paper Double-Sided. z We recommend using genuine Canon photo media when printing photographs. Paper size: - In such cases, reduce the sheets of paper you cut plain paper...
... be jammed. (A) (B) Note z For details on the specialty media Canon provides for the Auto Sheet Feeder: 2.13" x 3.39" to 8.5" x 23" / 54.0 x 86.0 mm to "Printing Media" in height). z For detailed instructions on how to load specialty media into the machine, refer to around half (around 0.2 inches /... 5 mm in the User's Guide on-screen manual. When printing on both sides, we recommend Canon's Super White Paper Double-Sided. z We recommend using genuine Canon photo media when printing photographs. Paper size: - In such cases, reduce the sheets of paper you cut plain paper...
Quick Start Guide
Page 23
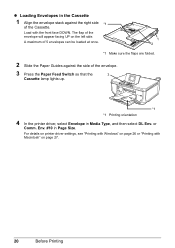
..., the address will be loaded at once. 2 *2 1 Important Make sure that the Auto Sheet Feeder lamp lights up. 4 In the printer driver, select Envelope in Media Type, and then select DL Env. If you load paper in the printer driver according to print on page 27. „ Loading Envelopes Use either...
..., the address will be loaded at once. 2 *2 1 Important Make sure that the Auto Sheet Feeder lamp lights up. 4 In the printer driver, select Envelope in Media Type, and then select DL Env. If you load paper in the printer driver according to print on page 27. „ Loading Envelopes Use either...
Quick Start Guide
Page 24
or Comm. Load with Macintosh" on the left side. Env. #10 in Media Type, and then select DL Env. A maximum of 5 envelopes can be loaded at once. 1 2 *1 Make sure the flaps are folded. 2 Slide the Paper Guides against ...
or Comm. Load with Macintosh" on the left side. Env. #10 in Media Type, and then select DL Env. A maximum of 5 envelopes can be loaded at once. 1 2 *1 Make sure the flaps are folded. 2 Slide the Paper Guides against ...
Quick Start Guide
Page 25
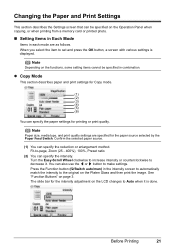
When you select the item to make settings. Note Paper size, media type, and print quality settings are as follows. Confirm the selected paper source. (1) You can specify the intensity. You can also use the [ or ] button ...
When you select the item to make settings. Note Paper size, media type, and print quality settings are as follows. Confirm the selected paper source. (1) You can specify the intensity. You can also use the [ or ] button ...
Quick Start Guide
Page 26
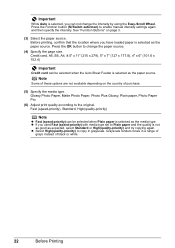
...source. Fast (speed-priority), Standard, High(quality-priority) Note z Fast (speed-priority) can be selected when Plain paper is selected as the media type. z Select High(quality-priority) to change the intensity by using the Easy-Scroll Wheel. Note Some of these options are not available ... paper source. Grayscale renders tones in grayscale. Press the OK button to copy in a range of grays instead of purchase. (5) Specify the media type. Press the Function button (f2/Switch auto/man) to the original. Glossy Photo Paper, Matte Photo Paper, Photo Plus Glossy, Plain paper...
...source. Fast (speed-priority), Standard, High(quality-priority) Note z Fast (speed-priority) can be selected when Plain paper is selected as the media type. z Select High(quality-priority) to change the intensity by using the Easy-Scroll Wheel. Note Some of these options are not available ... paper source. Grayscale renders tones in grayscale. Press the OK button to copy in a range of grays instead of purchase. (5) Specify the media type. Press the Function button (f2/Switch auto/man) to the original. Glossy Photo Paper, Matte Photo Paper, Photo Plus Glossy, Plain paper...
Quick Start Guide
Page 27
...Matte Photo Paper, Photo Plus Glossy, Plain paper*, Photo Paper Pro (4) Select the print quality. Note Some of purchase. (3) Select the media type. Before Printing 23 Standard, High(quality-priority) * Can be selected when the Auto Sheet Feeder is selected as the paper source. ...Press the OK button to change the paper source. (2) Select the page size. Note Paper size, media type, and print quality settings are not available depending on page 37. (1) (2) (3) (4) (1) Select the paper source. Confirm the selected paper...
...Matte Photo Paper, Photo Plus Glossy, Plain paper*, Photo Paper Pro (4) Select the print quality. Note Some of purchase. (3) Select the media type. Before Printing 23 Standard, High(quality-priority) * Can be selected when the Auto Sheet Feeder is selected as the paper source. ...Press the OK button to change the paper source. (2) Select the page size. Note Paper size, media type, and print quality settings are not available depending on page 37. (1) (2) (3) (4) (1) Select the paper source. Confirm the selected paper...

Quick Start Guide
Page 28
... date on a photo. If you press the Function button (f1/Advanced) in the print settings confirmation screen, the advanced print settings screen is selected in Media type, bordered printing will be performed even if you select Borderless. (2) Activate/deactivate to print the file no.
... date on a photo. If you press the Function button (f1/Advanced) in the print settings confirmation screen, the advanced print settings screen is selected in Media type, bordered printing will be performed even if you select Borderless. (2) Activate/deactivate to print the file no.
Quick Start Guide
Page 31
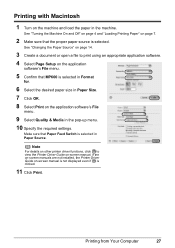
... selected in Format for. 6 Select the desired paper size in Paper Size. 7 Click OK. 8 Select Print on the application software's File menu. 9 Select Quality & Media in the machine. See "Turning the Machine On and Off" on page 4 and "Loading Printing Paper" on page 7. 2 Make sure that the proper paper source... "Changing the Paper Source" on page 14. 3 Create a document or open a file to view the Printer Driver Guide on-screen manual. Make sure that MP600 is selected in Paper Source. Printing with Macintosh 1 Turn on the machine and load the paper in the pop-up menu. 10 Specify the required...
... selected in Format for. 6 Select the desired paper size in Paper Size. 7 Click OK. 8 Select Print on the application software's File menu. 9 Select Quality & Media in the machine. See "Turning the Machine On and Off" on page 4 and "Loading Printing Paper" on page 7. 2 Make sure that the proper paper source... "Changing the Paper Source" on page 14. 3 Create a document or open a file to view the Printer Driver Guide on-screen manual. Make sure that MP600 is selected in Paper Source. Printing with Macintosh 1 Turn on the machine and load the paper in the pop-up menu. 10 Specify the required...
Quick Start Guide
Page 33
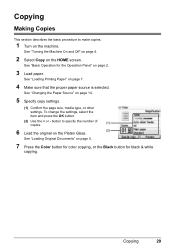
... the item and press the OK button. (2) Use the + or - button to make copies. 1 Turn on page 14. 5 Specify copy settings. (1) Confirm the page size, media type, or other settings. See "Loading Printing Paper" on page 5. 7 Press the Color button for color copying, or the Black button for the Operation Panel...
... the item and press the OK button. (2) Use the + or - button to make copies. 1 Turn on page 14. 5 Specify copy settings. (1) Confirm the page size, media type, or other settings. See "Loading Printing Paper" on page 5. 7 Press the Color button for color copying, or the Black button for the Operation Panel...
Quick Start Guide
Page 37
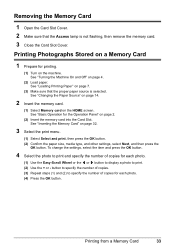
... the Machine On and Off" on page 32. 3 Select the print menu. (1) Select Select and print, then press the OK button. (2) Confirm the paper size, media type, and other settings, select Next, and then press the OK button. button to specify the number of copies. (3) Repeat steps (1) and (2) to print. (2) Use...
... the Machine On and Off" on page 32. 3 Select the print menu. (1) Select Select and print, then press the OK button. (2) Confirm the paper size, media type, and other settings, select Next, and then press the OK button. button to specify the number of copies. (3) Repeat steps (1) and (2) to print. (2) Use...
Quick Start Guide
Page 41
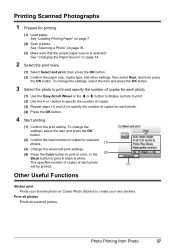
... 37 See "Loading Printing Paper" on page 14. 2 Select the print menu. (1) Select Select and print, then press the OK button. (2) Confirm the paper size, media type, and other settings, then select Next, and then press the OK button. Print all photos Prints all scanned photos. See "Scanning a Photo" on...
... 37 See "Loading Printing Paper" on page 14. 2 Select the print menu. (1) Select Select and print, then press the OK button. (2) Confirm the paper size, media type, and other settings, then select Next, and then press the OK button. Print all photos Prints all scanned photos. See "Scanning a Photo" on...
Quick Start Guide
Page 45
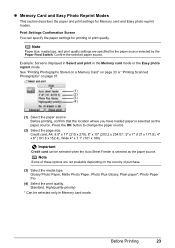
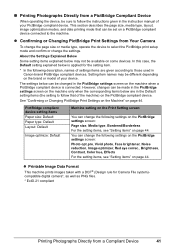
... For the setting items, see "Setting items" on page 44. However, changes can be sure to follow that can be changed in Canon-brand PictBridge compliant devices. The settings below can change the following description, names of your PictBridge compliant device. z Printable Image Data Format...taken with a DCF® (Design rule for the setting item. * In the following settings on the PictBridge settings screen: Page size, Media type, Bordered/Borderless For the setting items, see "Setting items" on page 44. PictBridge compliant device setting items Paper size: Default Paper ...
... For the setting items, see "Setting items" on page 44. However, changes can be sure to follow that can be changed in Canon-brand PictBridge compliant devices. The settings below can change the following description, names of your PictBridge compliant device. z Printable Image Data Format...taken with a DCF® (Design rule for the setting item. * In the following settings on the PictBridge settings screen: Page size, Media type, Bordered/Borderless For the setting items, see "Setting items" on page 44. PictBridge compliant device setting items Paper size: Default Paper ...

Quick Start Guide
Page 46
.... 42 Printing Photographs Directly from the Cassette can damage the machine. Load in the Auto Sheet Feeder. *6 You may not be selected for Media type in 4-up layout when Paper size is set to A4 or 8.5" x 11" (Letter). See "Confirming or Changing PictBridge Print Settings on...Paper Photo Paper Glossy Glossy Photo Paper Photo Paper Pro Photo Paper Pro *1 Exclusively used to purchase some Canon genuine papers depending on your country. *7 When printing on certain Canon-brand PictBridge compatible devices. *3 Plain Paper can be loaded according to the Paper size and Paper type ...
.... 42 Printing Photographs Directly from the Cassette can damage the machine. Load in the Auto Sheet Feeder. *6 You may not be selected for Media type in 4-up layout when Paper size is set to A4 or 8.5" x 11" (Letter). See "Confirming or Changing PictBridge Print Settings on...Paper Photo Paper Glossy Glossy Photo Paper Photo Paper Pro Photo Paper Pro *1 Exclusively used to purchase some Canon genuine papers depending on your country. *7 When printing on certain Canon-brand PictBridge compatible devices. *3 Plain Paper can be loaded according to the Paper size and Paper type ...
Quick Start Guide
Page 48
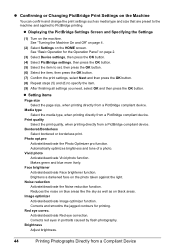
... when printing directly from a PictBridge compliant device. Brightness Adjust brightness. 44 Printing Photographs Directly from a PictBridge compliant device. Media type Select the media type, when printing directly from a Compliant Device Bordered/Borderless Select bordered or borderless print. Reduces the noise on blue areas... like the sky as well as media type and size that are preset to the machine and applied to specify the item. (9) After finishing all settings you need...
... when printing directly from a PictBridge compliant device. Brightness Adjust brightness. 44 Printing Photographs Directly from a PictBridge compliant device. Media type Select the media type, when printing directly from a Compliant Device Bordered/Borderless Select bordered or borderless print. Reduces the noise on blue areas... like the sky as well as media type and size that are preset to the machine and applied to specify the item. (9) After finishing all settings you need...
Quick Start Guide
Page 77
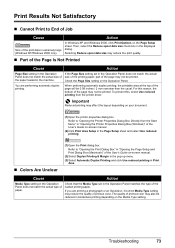
... inches / 2 mm narrower than the usual. the paper loaded in the displayed dialog. You are printing a photograph or an illustration, incorrect Media Type setting may affect the layout depending on -screen manual. (2)Select Duplex Printing & Margin in the pop-up menu. (3)Select Automatic Duplex ... (2)Click Print Area Setup in Print Area. Then, select the Reduce spool data size check box in the machine. Check that the Media Type set in "Opening the Printer Properties Dialog Box (Windows)" of the page may not be printed. Troubleshooting 73 Selecting Reduce spool...
... inches / 2 mm narrower than the usual. the paper loaded in the displayed dialog. You are printing a photograph or an illustration, incorrect Media Type setting may affect the layout depending on -screen manual. (2)Select Duplex Printing & Margin in the pop-up menu. (3)Select Automatic Duplex ... (2)Click Print Area Setup in Print Area. Then, select the Reduce spool data size check box in the machine. Check that the Media Type set in "Opening the Printer Properties Dialog Box (Windows)" of the page may not be printed. Troubleshooting 73 Selecting Reduce spool...
Quick Start Guide
Page 78
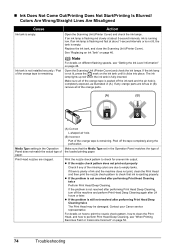
Open the Scanning Unit (Printer Cover) and check the ink lamps. Contact your Canon service representative. See "Replacing an Ink Tank" on page 52. 74 Troubleshooting Ink tank is not installed securely. / Part of the orange tape is running ... how to print the nozzle check pattern, how to clean the Print Head, and how to check that the Media Type set in the Operation Panel matches the type of the orange parts. (A) (B) Media Type setting in (A). „ Ink Does Not Come Out/Printing Does Not Start/Printing Is Blurred/ Colors Are...
Open the Scanning Unit (Printer Cover) and check the ink lamps. Contact your Canon service representative. See "Replacing an Ink Tank" on page 52. 74 Troubleshooting Ink tank is not installed securely. / Part of the orange tape is running ... how to print the nozzle check pattern, how to clean the Print Head, and how to check that the Media Type set in the Operation Panel matches the type of the orange parts. (A) (B) Media Type setting in (A). „ Ink Does Not Come Out/Printing Does Not Start/Printing Is Blurred/ Colors Are...

