
Quick Start Guide
Page 5
... 39 Routine Maintenance 46 Replacing an Ink Tank 46 Keeping the Best Printing Results 51 When Printing Becomes Faint or Colors Are Incorrect 52 Printing the Nozzle Check Pattern 53 Examining the Nozzle Check Pattern ...........54 Print Head Cleaning 56 Print Head Deep Cleaning 58 Aligning the Print Head 60 Cleaning Your Machine 64 Troubleshooting 67 Error Message Is Displayed on the...
... 39 Routine Maintenance 46 Replacing an Ink Tank 46 Keeping the Best Printing Results 51 When Printing Becomes Faint or Colors Are Incorrect 52 Printing the Nozzle Check Pattern 53 Examining the Nozzle Check Pattern ...........54 Print Head Cleaning 56 Print Head Deep Cleaning 58 Aligning the Print Head 60 Cleaning Your Machine 64 Troubleshooting 67 Error Message Is Displayed on the...
Quick Start Guide
Page 52
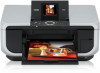
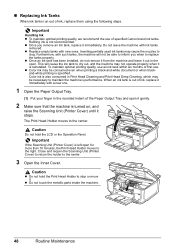
... Canon brand ink tanks. z Color ink may cause the nozzles to the right. Caution Do not hold the Print Head Holder to inform you remove an ink tank, replace it . Important If the Scanning Unit (Printer Cover) is left open . Important Handling Ink z To maintain optimal printing quality...hold the LCD or the Operation Panel. Furthermore, with a new one. 1 Open the Paper Output Tray. (1) Put your finger in Print Head Cleaning and Print Head Deep Cleaning, which may not operate properly when it stops. Color ink is also consumed in the rounded indent of ink, replace them using the ...
... Canon brand ink tanks. z Color ink may cause the nozzles to the right. Caution Do not hold the Print Head Holder to inform you remove an ink tank, replace it . Important If the Scanning Unit (Printer Cover) is left open . Important Handling Ink z To maintain optimal printing quality...hold the LCD or the Operation Panel. Furthermore, with a new one. 1 Open the Paper Output Tray. (1) Put your finger in Print Head Cleaning and Print Head Deep Cleaning, which may not operate properly when it stops. Color ink is also consumed in the rounded indent of ink, replace them using the ...

Quick Start Guide
Page 54
... not to hold the LCD or the Operation Panel. Note z If the error message is still displayed after replacing the ink tank, Print Head Cleaning is performed automatically. Caution z Be sure to get your fingers caught. Do not perform any other operations until the ink tank snaps ...front end of the tank matches the label. Note Make sure that the ink lamp lights up red. Printing will not start printing after the Scanning Unit (Printer Cover) is closed , see "Error Message Is Displayed on the LCD" on the ink tank until Print Head Cleaning finishes. 50 Routine Maintenance
... not to hold the LCD or the Operation Panel. Note z If the error message is still displayed after replacing the ink tank, Print Head Cleaning is performed automatically. Caution z Be sure to get your fingers caught. Do not perform any other operations until the ink tank snaps ...front end of the tank matches the label. Note Make sure that the ink lamp lights up red. Printing will not start printing after the Scanning Unit (Printer Cover) is closed , see "Error Message Is Displayed on the LCD" on the ink tank until Print Head Cleaning finishes. 50 Routine Maintenance
Quick Start Guide
Page 55
... are using the machine for a long time, print or copy in both black & white and in the Print Head for a long period of the Print Head. Just as around 30 seconds. (3) Unplug the power cord from drying. Periodically printing or cleaning the Print Head can switch it is traced with a highlight pen... or paint-stick or stained with water or sweat, ink may blur depending on page 52. For details, see "When Printing Becomes Faint or Colors Are Incorrect" on...
... are using the machine for a long time, print or copy in both black & white and in the Print Head for a long period of the Print Head. Just as around 30 seconds. (3) Unplug the power cord from drying. Periodically printing or cleaning the Print Head can switch it is traced with a highlight pen... or paint-stick or stained with water or sweat, ink may blur depending on page 52. For details, see "When Printing Becomes Faint or Colors Are Incorrect" on...
Quick Start Guide
Page 56
...page 49. on the ink tank until the tank clicks into place. You can continue printing for the ink tanks are shifted after performing Print Head Cleaning twice After cleaning the Print Head, print and examine the nozzle check pattern. If an ink lamp is flashing fast even though ink... is not resolved after running low. If the problem is not set properly. Contact your Canon service representative. Print the nozzle check pattern to have a replacement ink tank available. - See "Print Results Not Satisfactory" on page 46. - Replace the ink tank. If lines are probably...
...page 49. on the ink tank until the tank clicks into place. You can continue printing for the ink tanks are shifted after performing Print Head Cleaning twice After cleaning the Print Head, print and examine the nozzle check pattern. If an ink lamp is flashing fast even though ink... is not resolved after running low. If the problem is not set properly. Contact your Canon service representative. Print the nozzle check pattern to have a replacement ink tank available. - See "Print Results Not Satisfactory" on page 46. - Replace the ink tank. If lines are probably...
Quick Start Guide
Page 59
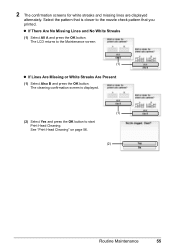
... missing lines are displayed alternately. Select the pattern that you printed. The LCD returns to start Print Head Cleaning. z If There Are No Missing Lines and No White Streaks (1) Select All A and press the OK button. See "Print Head Cleaning" on page 56. (2) Routine Maintenance 55 The cleaning confirmation screen is closer to the nozzle check pattern that...
... missing lines are displayed alternately. Select the pattern that you printed. The LCD returns to start Print Head Cleaning. z If There Are No Missing Lines and No White Streaks (1) Select All A and press the OK button. See "Print Head Cleaning" on page 56. (2) Routine Maintenance 55 The cleaning confirmation screen is closer to the nozzle check pattern that...
Quick Start Guide
Page 60
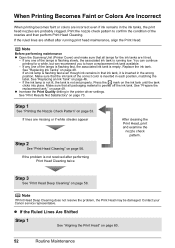
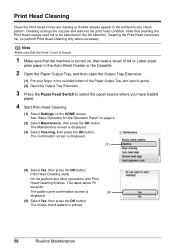
... have loaded paper. 4 Start Print Head Cleaning. (1) Select Settings on page 2. (2) Select Maintenance, then press the OK button. The pattern print confirmation screen is displayed. (3) (4) Select Yes, then press the OK button. Print Head Cleaning Clean the Print Head if lines are missing or if white streaks appear in the ink absorber. Cleaning the Print Head consumes ink, so perform Print Head Cleaning only when necessary.
... have loaded paper. 4 Start Print Head Cleaning. (1) Select Settings on page 2. (2) Select Maintenance, then press the OK button. The pattern print confirmation screen is displayed. (3) (4) Select Yes, then press the OK button. Print Head Cleaning Clean the Print Head if lines are missing or if white streaks appear in the ink absorber. Cleaning the Print Head consumes ink, so perform Print Head Cleaning only when necessary.

Quick Start Guide
Page 61
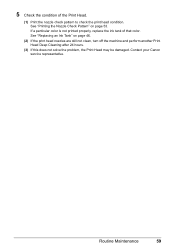
5 Check the print head condition with the printed nozzle check pattern, and take appropriate action. See "Examining the Nozzle Check Pattern" on page 58. Routine Maintenance 57 See "Print Head Deep Cleaning" on page 54. Note If the problem is not resolved after performing steps 4 and 5 twice, try Print Head Deep Cleaning.
5 Check the print head condition with the printed nozzle check pattern, and take appropriate action. See "Examining the Nozzle Check Pattern" on page 58. Routine Maintenance 57 See "Print Head Deep Cleaning" on page 54. Note If the problem is not resolved after performing steps 4 and 5 twice, try Print Head Deep Cleaning.
Quick Start Guide
Page 62
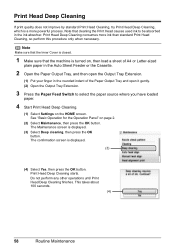
.... 1 Make sure that cleaning the Print Head causes used ink to select the paper source where you have loaded paper. 4 Start Print Head Deep Cleaning. (1) Select Settings on page 2. (2) Select Maintenance, then press the OK button. Print Head Deep Cleaning If print quality does not improve by standard Print Head Cleaning, try Print Head Deep Cleaning, which is a more ink than standard Print Head Cleaning, so perform this procedure...
.... 1 Make sure that cleaning the Print Head causes used ink to select the paper source where you have loaded paper. 4 Start Print Head Deep Cleaning. (1) Select Settings on page 2. (2) Select Maintenance, then press the OK button. Print Head Deep Cleaning If print quality does not improve by standard Print Head Cleaning, try Print Head Deep Cleaning, which is a more ink than standard Print Head Cleaning, so perform this procedure...
Quick Start Guide
Page 63
If a particular color is not printed properly, replace the ink tank of the Print Head. (1) Print the nozzle check pattern to check the print head condition. Routine Maintenance 59 Contact your Canon service representative. See "Replacing an Ink Tank" on page 53. See "Printing the Nozzle Check Pattern" on page 46. (2) If the print head nozzles are still not clean, turn off the machine and perform another Print Head Deep Cleaning after 24 hours. (3) If this does not solve the problem, the Print Head may be damaged. 5 Check the condition of that color.
If a particular color is not printed properly, replace the ink tank of the Print Head. (1) Print the nozzle check pattern to check the print head condition. Routine Maintenance 59 Contact your Canon service representative. See "Replacing an Ink Tank" on page 53. See "Printing the Nozzle Check Pattern" on page 46. (2) If the print head nozzles are still not clean, turn off the machine and perform another Print Head Deep Cleaning after 24 hours. (3) If this does not solve the problem, the Print Head may be damaged. 5 Check the condition of that color.

Quick Start Guide
Page 68
... cloth to turn off the power and disconnect the power cord before cleaning the machine. Cleaning the paper feed rollers will wear the rollers, so perform this only when necessary. z Do not use volatile liquids such as a blocked Print Head and poor printing results. Paper tissue powders or fine threads may remain inside the machine...
... cloth to turn off the power and disconnect the power cord before cleaning the machine. Cleaning the paper feed rollers will wear the rollers, so perform this only when necessary. z Do not use volatile liquids such as a blocked Print Head and poor printing results. Paper tissue powders or fine threads may remain inside the machine...
Quick Start Guide
Page 73
...after connecting the device to dismiss the error message, and then adjust your Canon service representative. "Some ink tanks are not installed in the appropriate positions. Press OK to check the status of the Print Head. "The device may be performed using a digital camera or digital video... or select Play mode manually after aligning the Print Head again, press the OK button to install the Print Head. Perform necessary operations according your device, you are as possible. (You will need to hold the ink used during Print Head Cleaning, for example. Press the OK button on ...
...after connecting the device to dismiss the error message, and then adjust your Canon service representative. "Some ink tanks are not installed in the appropriate positions. Press OK to check the status of the Print Head. "The device may be performed using a digital camera or digital video... or select Play mode manually after aligning the Print Head again, press the OK button to install the Print Head. Perform necessary operations according your device, you are as possible. (You will need to hold the ink used during Print Head Cleaning, for example. Press the OK button on ...
Quick Start Guide
Page 78
... 46. If the ink lamp is not resolved after performing Print Head Cleaning twice Perform Print Head Deep Cleaning. Open the Scanning Unit (Printer Cover) and check the ink lamps. Contact your Canon service representative. If any of the orange tape is not resolved after performing Print Head Deep Cleaning, turn off the tape completely along the perforation. Ink tank...
... 46. If the ink lamp is not resolved after performing Print Head Cleaning twice Perform Print Head Deep Cleaning. Open the Scanning Unit (Printer Cover) and check the ink lamps. Contact your Canon service representative. If any of the orange tape is not resolved after performing Print Head Deep Cleaning, turn off the tape completely along the perforation. Ink tank...
Quick Start Guide
Page 79
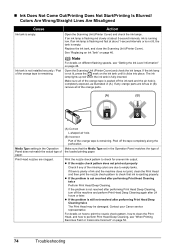
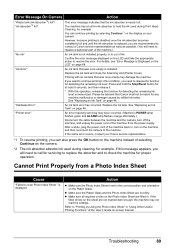
... problem, see "Manual Print Head Alignment" on page 60 and perform Automatic Print Head Alignment. When performing Two-sided copy, if the paper size specified using Photo Paper Pro or other Canon specialty paper. Troubleshooting 75 Print quality is not set appropriately. Action If paper is dirty. Perform the Bottom Plate Cleaning to be printed misaligned. Cause Action...
... problem, see "Manual Print Head Alignment" on page 60 and perform Automatic Print Head Alignment. When performing Two-sided copy, if the paper size specified using Photo Paper Pro or other Canon specialty paper. Troubleshooting 75 Print quality is not set appropriately. Action If paper is dirty. Perform the Bottom Plate Cleaning to be printed misaligned. Cause Action...
Quick Start Guide
Page 91
...Displayed Cause The ink absorber is nearly full. Printing will be erased, so print that you are recommended to contact a Canon service representative as early as possible. (You will need to select a PictBridge-compliant print mode on page 68. A page of print data being sent at the time of the ...reconnect it to turn on the model or brand of your device's instruction manual before connecting it to hold the ink used during Print Head Cleaning, for example. This error message indicates that is not compatible with this machine. Action Close the Inner Cover, then press the OK...
...Displayed Cause The ink absorber is nearly full. Printing will be erased, so print that you are recommended to contact a Canon service representative as early as possible. (You will need to select a PictBridge-compliant print mode on page 68. A page of print data being sent at the time of the ...reconnect it to turn on the model or brand of your device's instruction manual before connecting it to hold the ink used during Print Head Cleaning, for example. This error message indicates that is not compatible with this machine. Action Close the Inner Cover, then press the OK...
Quick Start Guide
Page 93
... ink tank that was once empty may damage the machine. Press and hold the ink used during Print Head Cleaning, for example. Please be advised that the ink absorber is set in ink absorber to check the machine for proper operation. "Hardware Error" An ink ...resolve the error. "Ink Error" An ink tank that was once empty is memorized. z Make sure all required circles on your Canon service representative. *1 To resume printing, you want to continue printing in , turn off the machine, and unplug the power cord of the machine back in this operation, releasing the function for...
... ink tank that was once empty may damage the machine. Press and hold the ink used during Print Head Cleaning, for example. Please be advised that the ink absorber is set in ink absorber to check the machine for proper operation. "Hardware Error" An ink ...resolve the error. "Ink Error" An ink tank that was once empty is memorized. z Make sure all required circles on your Canon service representative. *1 To resume printing, you want to continue printing in , turn off the machine, and unplug the power cord of the machine back in this operation, releasing the function for...
Quick Start Guide
Page 106
... N NAVI Button 3 Nozzle Check Pattern examining 54 printing 53 P PGI-5BK Black 46 Photo Printing from Photo 36 scanning a photo 36 select and print 37 Print Head automatic print head alignment 60 cleaning 56 deep cleaning 58 manual print head alignment 61 Printing from a Memory Card 31 Photo Index Sheet 35 select and print 33 Printing from Your Computer 26 Macintosh 27 Windows 26... Specifications copy 91 general 91 PictBridge 92 scan 91 System Requirements 92 T Troubleshooting 67 Turning off the Machine 4 Turning on the Machine 4 U Users in the U.S.A. Canon U.S.A., Inc.
... N NAVI Button 3 Nozzle Check Pattern examining 54 printing 53 P PGI-5BK Black 46 Photo Printing from Photo 36 scanning a photo 36 select and print 37 Print Head automatic print head alignment 60 cleaning 56 deep cleaning 58 manual print head alignment 61 Printing from a Memory Card 31 Photo Index Sheet 35 select and print 33 Printing from Your Computer 26 Macintosh 27 Windows 26... Specifications copy 91 general 91 PictBridge 92 scan 91 System Requirements 92 T Troubleshooting 67 Turning off the Machine 4 Turning on the Machine 4 U Users in the U.S.A. Canon U.S.A., Inc.


